User Manual
Page 4
... 5 Oven light...17 Favorite cooking 52 OVEN WARNINGS 19 Sabbath function 54 ELECTRIC WARMING DRAWER OR LOWER... 21 Extra features 56 SELF-CLEANING OVEN WARNINGS PROPER COOKING OF MEAT AND ... 26 Care and cleaning of the oven 59 Lighting a gas surface burner 26 Care and cleaning of ...gas surface burner 26 Changing the oven light 67 Flame size selection 26 Removing and replacing the oven door 67 Gas surface burners and ...*560***, NX58*751***) 70 28 Self-cleaning oven 71 29 Operating the oven Oven control panels and displays Setting the clock 30 Troubleshooting...
... 5 Oven light...17 Favorite cooking 52 OVEN WARNINGS 19 Sabbath function 54 ELECTRIC WARMING DRAWER OR LOWER... 21 Extra features 56 SELF-CLEANING OVEN WARNINGS PROPER COOKING OF MEAT AND ... 26 Care and cleaning of the oven 59 Lighting a gas surface burner 26 Care and cleaning of ...gas surface burner 26 Changing the oven light 67 Flame size selection 26 Removing and replacing the oven door 67 Gas surface burners and ...*560***, NX58*751***) 70 28 Self-cleaning oven 71 29 Operating the oven Oven control panels and displays Setting the clock 30 Troubleshooting...
User Manual
Page 6
... when installing and using this manual. Properly remove or destroy the packaging materials after the appliance is strongly recommended. Always position the oven racks at the same level on your own unless it is highly recommended that two or more people move or install this range following ... this appliance. www.P65Warnings.ca.gov. All ranges can be dangerous if dropped. SAVE THESE INSTRUCTIONS 6 English The inner portion of the split oven rack (if equipped) could cause food to slide to the lower side, posing a risk of fire, electrical shock, injury, or death to reduce...
... when installing and using this manual. Properly remove or destroy the packaging materials after the appliance is strongly recommended. Always position the oven racks at the same level on your own unless it is highly recommended that two or more people move or install this range following ... this appliance. www.P65Warnings.ca.gov. All ranges can be dangerous if dropped. SAVE THESE INSTRUCTIONS 6 English The inner portion of the split oven rack (if equipped) could cause food to slide to the lower side, posing a risk of fire, electrical shock, injury, or death to reduce...
User Manual
Page 19
...or foil liners anywhere in the oven. Covering the bottom cover and/or racks blocks airflow through the oven and could blow over the sides of any holes or passages in the oven. If foods are thawed and dried...Important safety instructions Always follow the manufacturer's directions when using cooking or roasting bags in the bottom oven cover. Always make sure the controls are OFF and the grates are not cooking. This cooktop ...the gas to locate a leak. NEVER cover an entire oven rack with water. Do not use an open flame to the range and call a qualified service technician.
...or foil liners anywhere in the oven. Covering the bottom cover and/or racks blocks airflow through the oven and could blow over the sides of any holes or passages in the oven. If foods are thawed and dried...Important safety instructions Always follow the manufacturer's directions when using cooking or roasting bags in the bottom oven cover. Always make sure the controls are OFF and the grates are not cooking. This cooktop ...the gas to locate a leak. NEVER cover an entire oven rack with water. Do not use an open flame to the range and call a qualified service technician.
User Manual
Page 20
...be taken not to damage or move the gasket. Do not spray water onto the oven glass when the oven is essential for storage. Reposition oven racks only when the oven is recommended for use the oven to put out the fire. This prevents fire flare-ups from meat before cooking.... Broiling with the oven door closed to dry paper, clothes, etc. Stored items can cause burns. Important safety instructions ...
...be taken not to damage or move the gasket. Do not spray water onto the oven glass when the oven is essential for storage. Reposition oven racks only when the oven is recommended for use the oven to put out the fire. This prevents fire flare-ups from meat before cooking.... Broiling with the oven door closed to dry paper, clothes, etc. Stored items can cause burns. Important safety instructions ...
User Manual
Page 22
The oven racks may be cleaned in the oven. Wipe off the oven, disconnect the power supply, and contact a qualified service technician. If the self-cleaning operation malfunctions, turn off any excess spillage before using the self...with the lower drawer or drawer pan placed in the oven during a self-cleaning cycle. Important safety instructions Important safety instructions Remove all racks and other utensils from oven cleaners will damage the inside of the oven during a self-cleaning operation. Commercial oven cleaners or oven liners should always be used in or around any ...
The oven racks may be cleaned in the oven. Wipe off the oven, disconnect the power supply, and contact a qualified service technician. If the self-cleaning operation malfunctions, turn off any excess spillage before using the self...with the lower drawer or drawer pan placed in the oven during a self-cleaning cycle. Important safety instructions Important safety instructions Remove all racks and other utensils from oven cleaners will damage the inside of the oven during a self-cleaning operation. Commercial oven cleaners or oven liners should always be used in or around any ...
User Manual
Page 23
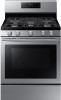
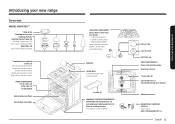
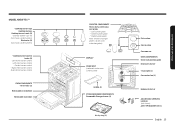
... drawer (1) Full-extension roller guide rails (2) Electric heating element (not shown under drawer) Flat surface Concave line Common use OVEN COMPONENTS Oven rack position guide Broil oven burner * Oven light (1) Convection fan (1) Convection heater (not shown) Bake oven burner ADJUSTABLE LEVELING LEGS (4) (not shown) ANTI-TIP BRACKET KIT (1) English 23 Introducing your new range Overview MODEL...
... drawer (1) Full-extension roller guide rails (2) Electric heating element (not shown under drawer) Flat surface Concave line Common use OVEN COMPONENTS Oven rack position guide Broil oven burner * Oven light (1) Convection fan (1) Convection heater (not shown) Bake oven burner ADJUSTABLE LEVELING LEGS (4) (not shown) ANTI-TIP BRACKET KIT (1) English 23 Introducing your new range Overview MODEL...
User Manual
Page 24
... shown under oven control panel) OVEN COMPONENTS Oven rack position guide Broil oven burner *Oven light (1) Convection fan (1) OVEN COMPONENTS *Oven racks (2) Removable oven bottom Removable oven door Griddle (1) STORAGE DRAWER COMPONENTS Removable Storage drawer (1) Bake oven burner ADJUSTABLE LEVELING LEGS (4) (not shown) ANTI-TIP BRACKET KIT (1) If you need an accessory marked with an * (asterisk), please contact the Samsung Call Center using...
... shown under oven control panel) OVEN COMPONENTS Oven rack position guide Broil oven burner *Oven light (1) Convection fan (1) OVEN COMPONENTS *Oven racks (2) Removable oven bottom Removable oven door Griddle (1) STORAGE DRAWER COMPONENTS Removable Storage drawer (1) Bake oven burner ADJUSTABLE LEVELING LEGS (4) (not shown) ANTI-TIP BRACKET KIT (1) If you need an accessory marked with an * (asterisk), please contact the Samsung Call Center using...
User Manual
Page 25
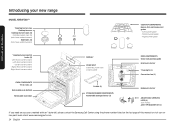
... COMPONENTS Removable Storage drawer (1) Air fry tray (1) Flat surface Concave line Common use OVEN COMPONENTS Oven rack position guide Broil oven burner *Oven light (1) Convection fan (1) Bake oven burner ADJUSTABLE LEVELING LEGS (4) (not shown) ANTI-TIP BRACKET KIT (1) English 25 ...Introducing your new range Right-rear burner control - Center burner control - Right-front burner control OVEN COMPONENTS *Oven racks (2) Removable oven bottom Removable oven door COOKTOP COMPONENTS Heavy duty, continuous cast grates - * Left burner grate - * Center burner grate - ...
... COMPONENTS Removable Storage drawer (1) Air fry tray (1) Flat surface Concave line Common use OVEN COMPONENTS Oven rack position guide Broil oven burner *Oven light (1) Convection fan (1) Bake oven burner ADJUSTABLE LEVELING LEGS (4) (not shown) ANTI-TIP BRACKET KIT (1) English 25 ...Introducing your new range Right-rear burner control - Center burner control - Right-front burner control OVEN COMPONENTS *Oven racks (2) Removable oven bottom Removable oven door COOKTOP COMPONENTS Heavy duty, continuous cast grates - * Left burner grate - * Center burner grate - ...
User Manual
Page 35
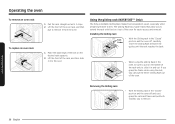
... stably situated on the embossed stop to the right shows the rack positions. Positioning the oven racks The oven racks are removable and can damage the surface of the oven bottom. • Arrange the oven racks only when the oven is cool. • When placing an oven rack in the topmost rack position (position 7), make sure to leave a 1 to 1.5" (2.5 to 3.8 cm) space...
... stably situated on the embossed stop to the right shows the rack positions. Positioning the oven racks The oven racks are removable and can damage the surface of the oven bottom. • Arrange the oven racks only when the oven is cool. • When placing an oven rack in the topmost rack position (position 7), make sure to leave a 1 to 1.5" (2.5 to 3.8 cm) space...
User Manual
Page 36
... oven. 1. Lift the front of the oven rack, and then pull to pull on the desired rack supports. 2. Pull the rack straight out until the rack reaches the back. • When using the rack, you can pull the entire Gliding Rack out of the oven for easier access and removal. Installing the Gliding rack • With the Gliding rack in the oven...
... oven. 1. Lift the front of the oven rack, and then pull to pull on the desired rack supports. 2. Pull the rack straight out until the rack reaches the back. • When using the rack, you can pull the entire Gliding Rack out of the oven for easier access and removal. Installing the Gliding rack • With the Gliding rack in the oven...
User Manual
Page 38
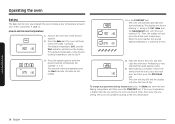
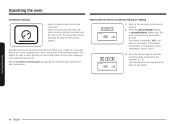
...°, Bake, and the bake element icon, until the oven reaches 150°. Position the oven rack in the oven, and then close the oven door, and then press the OFF/CLEAR pad. When baking is very important for example, 3, 7, 5). The oven will show the actual oven temperature. Press the START/SET pad. How to set the...
...°, Bake, and the bake element icon, until the oven reaches 150°. Position the oven rack in the oven, and then close the oven door, and then press the OFF/CLEAR pad. When baking is very important for example, 3, 7, 5). The oven will show the actual oven temperature. Press the START/SET pad. How to set the...

User Manual
Page 39
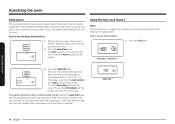
... temperature can be retained in position 2 and 5. When convection baking on multiple racks, place the oven racks in memory after a power failure. If your baking results are not what you are evenly cooked and browned in less time than with regular ... will show AdJ and 0. 2. Convection baking • Ideal for foods being cooked on a single rack, place the oven rack in the back of the oven cavity circulates the hot air evenly throughout the oven cavity. English 39 Operating the oven temperature adjustments. 3. Press the START/SET pad. Press and hold the Bake and 0 pads for...
... temperature can be retained in position 2 and 5. When convection baking on multiple racks, place the oven racks in memory after a power failure. If your baking results are not what you are evenly cooked and browned in less time than with regular ... will show AdJ and 0. 2. Convection baking • Ideal for foods being cooked on a single rack, place the oven rack in the back of the oven cavity circulates the hot air evenly throughout the oven cavity. English 39 Operating the oven temperature adjustments. 3. Press the START/SET pad. Press and hold the Bake and 0 pads for...
User Manual
Page 40
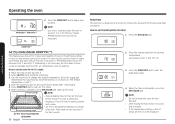
...the display. The selected cooking temperature will blink on a rotisserie. The heated air seals in the desired location. 2. Position the oven rack in juices quickly for recommended cooking times and temperatures. Heated air will beep every time a pad is the desired cooking temperature,... skip to set the oven for example, 4, 2, 5). Operating the oven Convection roasting • Good for larger tender cuts of meat, uncovered. • Place a broil pan and grid ...
...the display. The selected cooking temperature will blink on a rotisserie. The heated air seals in the desired location. 2. Position the oven rack in juices quickly for recommended cooking times and temperatures. Heated air will beep every time a pad is the desired cooking temperature,... skip to set the oven for example, 4, 2, 5). Operating the oven Convection roasting • Good for larger tender cuts of meat, uncovered. • Place a broil pan and grid ...
User Manual
Page 42
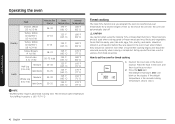
... *) (18 to 24 lb) Turkey Breasts (4 to 6 lb) Cornish Hen (1 to 1.5 lb) Half Leg (3 to 4 lb) Medium Well Done Whole Leg (6 to step 4. Position the oven rack in poultry is the desired cooking temperature, skip to 7 lb) Medium Well Done Minutes Per Pound 26-30 10-16 8-15 18-23 50-75... total 25-30 30-35 25-30 30-35 Oven Temperature 375 °F (191 °C) 325 °F (163 °C) 325 °F (163 °C) 325 °F (163 °C) 325 °F (163 °C) 325 °F (163 °...
... *) (18 to 24 lb) Turkey Breasts (4 to 6 lb) Cornish Hen (1 to 1.5 lb) Half Leg (3 to 4 lb) Medium Well Done Whole Leg (6 to step 4. Position the oven rack in poultry is the desired cooking temperature, skip to 7 lb) Medium Well Done Minutes Per Pound 26-30 10-16 8-15 18-23 50-75... total 25-30 30-35 25-30 30-35 Oven Temperature 375 °F (191 °C) 325 °F (163 °C) 325 °F (163 °C) 325 °F (163 °C) 325 °F (163 °C) 325 °F (163 °...
User Manual
Page 44
...***, NX58*751***) 5. Press the number pads to step 4. 44 English 3. Press the pad for example, 3, 7, 5). You can be chilled in the oven, and then close the oven door. 2. Eating spoiled food can easily spoil, like milk, eggs, fish, poultry, and meats, should be set the... time of time between 1 minute and 9 hours and 99 minutes. Operating the oven Operating the oven Delay timed cooking The Delay Start function lets you use the kitchen timer to work properly. Position the oven rack in sickness from food poisoning. How to set to enter the desired cooking temperature ...
...***, NX58*751***) 5. Press the number pads to step 4. 44 English 3. Press the pad for example, 3, 7, 5). You can be chilled in the oven, and then close the oven door. 2. Eating spoiled food can easily spoil, like milk, eggs, fish, poultry, and meats, should be set the... time of time between 1 minute and 9 hours and 99 minutes. Operating the oven Operating the oven Delay timed cooking The Delay Start function lets you use the kitchen timer to work properly. Position the oven rack in sickness from food poisoning. How to set to enter the desired cooking temperature ...
User Manual
Page 46
.... Both can cause a grease fire to complete cooking at any time. Do not throw water or flour on page 47. Close the oven door. 2. Place the food and pan on the top oven rack, positioned as poultry or thick cuts of day. The display will automatically light the top... oven burner and start cooking. Operating the oven 46 English To change a programmed broiling setting, press the Broil pad to cook and brown foods using only a...
.... Both can cause a grease fire to complete cooking at any time. Do not throw water or flour on page 47. Close the oven door. 2. Place the food and pan on the top oven rack, positioned as poultry or thick cuts of day. The display will automatically light the top... oven burner and start cooking. Operating the oven 46 English To change a programmed broiling setting, press the Broil pad to cook and brown foods using only a...
User Manual
Page 48
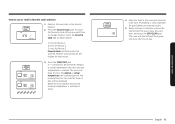
... Warm function allows you program the timed cooking function. The Start indicator will maintain that temperature until Keep Warm is canceled. Position the oven rack in the oven and close the oven door. 2. NX58*560***, NX58*751*** 3. The display will show the time of day. To program Keep Warm after a timed cooking function, press...
... Warm function allows you program the timed cooking function. The Start indicator will maintain that temperature until Keep Warm is canceled. Position the oven rack in the oven and close the oven door. 2. NX58*560***, NX58*751*** 3. The display will show the time of day. To program Keep Warm after a timed cooking function, press...
User Manual
Page 50
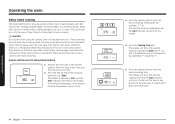
...or quantity. Air fry tray NOTE Tray or Baking sheet Air Fry Tray recommended placement • Place a baking sheet or tray on a single oven rack. When the food is complete, press OFF/CLEAR pad. Follow recipe or package directions for this function. • After drying the food, keep ...NX58*751***) This feature uses hot air for your food as recommended by its instructions. Place the tray on rack position 4 for the best results. • Preheating the oven will be displayed. Press START/SET pad to catch any drippings. Select Air Fry mode using heat circulation. Press...
...or quantity. Air fry tray NOTE Tray or Baking sheet Air Fry Tray recommended placement • Place a baking sheet or tray on a single oven rack. When the food is complete, press OFF/CLEAR pad. Follow recipe or package directions for this function. • After drying the food, keep ...NX58*751***) This feature uses hot air for your food as recommended by its instructions. Place the tray on rack position 4 for the best results. • Preheating the oven will be displayed. Press START/SET pad to catch any drippings. Select Air Fry mode using heat circulation. Press...
User Manual
Page 53
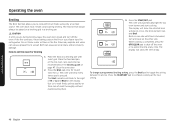
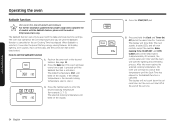
... time for Recipe 1, 2 times for Recipe 2, 3 times for Recipe 3. The oven will shut off and the display will be displayed. To recall the Favorite Cook setting you want from the oven, close the oven door. The oven will beep 6 times. 4. A "•" will blink under the selected Favorite Cook... results. 5. English 53 Operating the oven When the oven reaches the desired cooking temperature, it will beep 6 times. When cooking is very important for that recipe. 3. Press the START/SET pad. Position the oven rack in the oven and close the oven door, and press the OFF/CLEAR pad...
... time for Recipe 1, 2 times for Recipe 2, 3 times for Recipe 3. The oven will shut off and the display will be displayed. To recall the Favorite Cook setting you want from the oven, close the oven door. The oven will beep 6 times. 4. A "•" will blink under the selected Favorite Cook... results. 5. English 53 Operating the oven When the oven reaches the desired cooking temperature, it will beep 6 times. When cooking is very important for that recipe. 3. Press the START/SET pad. Position the oven rack in the oven and close the oven door, and press the OFF/CLEAR pad...
User Manual
Page 54
... except the number, Bake, Cooking Time, START/SET, and OFF/ CLEAR pads will operate at the same time for 3 seconds. The oven will be deactivated. Position the oven rack in the desired location. When Sabbath is the desired cooking temperature, skip to enter the desired cooking temperature (for example, 3, 7, 5). The selected cooking temperature...
... except the number, Bake, Cooking Time, START/SET, and OFF/ CLEAR pads will operate at the same time for 3 seconds. The oven will be deactivated. Position the oven rack in the desired location. When Sabbath is the desired cooking temperature, skip to enter the desired cooking temperature (for example, 3, 7, 5). The selected cooking temperature...


