User Manual
Page 4
...Broiling 46 ELECTRICAL WARNINGS 13 Keep warm 48 GROUNDING INSTRUCTIONS 14 Using the easy cook feature 48 INSTALLATION WARNINGS 14 Air Fry mode (Model NX58*751***) 50 SURFACE BURNER WARNINGS 17 Favorite cooking 52 OVEN WARNINGS 19 Sabbath function 54 ELECTRIC WARMING DRAWER OR LOWER STORAGE ...OVEN WARNINGS PROPER COOKING OF MEAT AND POULTRY Introducing your new range 21 Using the warming drawer 58 22 About the warming drawer (Model NX58*565*** Only) 58 23 Turning the warming drawer on or off 58 Overview Surface cooking 23 Maintaining your appliance 59 26 ...
...Broiling 46 ELECTRICAL WARNINGS 13 Keep warm 48 GROUNDING INSTRUCTIONS 14 Using the easy cook feature 48 INSTALLATION WARNINGS 14 Air Fry mode (Model NX58*751***) 50 SURFACE BURNER WARNINGS 17 Favorite cooking 52 OVEN WARNINGS 19 Sabbath function 54 ELECTRIC WARMING DRAWER OR LOWER STORAGE ...OVEN WARNINGS PROPER COOKING OF MEAT AND POULTRY Introducing your new range 21 Using the warming drawer 58 22 About the warming drawer (Model NX58*565*** Only) 58 23 Turning the warming drawer on or off 58 Overview Surface cooking 23 Maintaining your appliance 59 26 ...
User Manual
Page 23
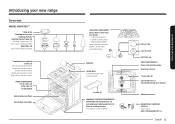
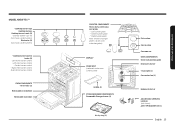
... grates - * Left burner grate - * Center burner grate - * Right burner grate Note: the left and right grates can be used interchangeably. Introducing your new range Overview MODEL NX58*565*** * Wok grate * Cooktop burner caps Cooktop burners Cooktop burner heads (5) Cooktop burner cups (5) (not shown under burners) Electrodes (5) (not shown under drawer) Flat...
... grates - * Left burner grate - * Center burner grate - * Right burner grate Note: the left and right grates can be used interchangeably. Introducing your new range Overview MODEL NX58*565*** * Wok grate * Cooktop burner caps Cooktop burners Cooktop burner heads (5) Cooktop burner cups (5) (not shown under burners) Electrodes (5) (not shown under drawer) Flat...
User Manual
Page 24
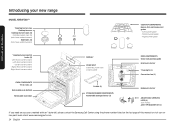
Right-rear burner control - Introducing your new range MODEL NX58*560*** *Cooktop burner caps Cooktop burners Cooktop burner heads (5) Cooktop burner cups (5) (not shown under burners) Electrodes (5) (not shown under oven control panel) OVEN ... drawer (1) Bake oven burner ADJUSTABLE LEVELING LEGS (4) (not shown) ANTI-TIP BRACKET KIT (1) If you need an accessory marked with an * (asterisk), please contact the Samsung Call Center using the phone number listed on the last page of this manual or visit our online parts web site at www.samsungparts.com...
Right-rear burner control - Introducing your new range MODEL NX58*560*** *Cooktop burner caps Cooktop burners Cooktop burner heads (5) Cooktop burner cups (5) (not shown under burners) Electrodes (5) (not shown under oven control panel) OVEN ... drawer (1) Bake oven burner ADJUSTABLE LEVELING LEGS (4) (not shown) ANTI-TIP BRACKET KIT (1) If you need an accessory marked with an * (asterisk), please contact the Samsung Call Center using the phone number listed on the last page of this manual or visit our online parts web site at www.samsungparts.com...
User Manual
Page 25
... burner grate - * Center burner grate - * Right burner grate Note: the left and right grates can be used interchangeably. Center burner control - Left-rear burner control - MODEL NX58*751*** * Cooktop burner caps Cooktop burners Cooktop burner heads (5) Cooktop burner cups (5) (not shown under burners) Electrodes (5) (not shown under oven control panel) Griddle...
... burner grate - * Center burner grate - * Right burner grate Note: the left and right grates can be used interchangeably. Center burner control - Left-rear burner control - MODEL NX58*751*** * Cooktop burner caps Cooktop burners Cooktop burner heads (5) Cooktop burner cups (5) (not shown under burners) Electrodes (5) (not shown under oven control panel) Griddle...
User Manual
Page 30
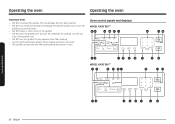
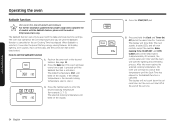
... Operating the oven Important Note: • DO NOT overheat the griddle. Oven control panels and displays MODEL NX58*565*** 01 02 03 04 05 11 09 07 08 12 10 13 15 14 16 MODEL NX58*560*** 01 02 03 04 05 11 17 18 06 09 07 08 Operating the oven...
... Operating the oven Important Note: • DO NOT overheat the griddle. Oven control panels and displays MODEL NX58*565*** 01 02 03 04 05 11 09 07 08 12 10 13 15 14 16 MODEL NX58*560*** 01 02 03 04 05 11 17 18 06 09 07 08 Operating the oven...
User Manual
Page 31
... top oven burner only. 06 START/SET: Touch this function to 93 °C). 11 SELF CLEAN: Activates the self-cleaning oven function. Operating the oven MODEL NX58*751*** 01 02 03 04 05 11 09 07 08 12 10 15 14 16 17 18 06 NOTE All oven operations are controlled...
... top oven burner only. 06 START/SET: Touch this function to 93 °C). 11 SELF CLEAN: Activates the self-cleaning oven function. Operating the oven MODEL NX58*751*** 01 02 03 04 05 11 09 07 08 12 10 15 14 16 17 18 06 NOTE All oven operations are controlled...

User Manual
Page 32
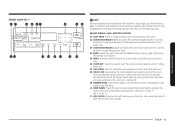
... 550 °F (288 °C) 550 °F (288 °C) 500 °F (260 °C) 3 hours 3 hours 12 hours * Model NX58*565*** Only If you set Conversion On for the desired amount of a button. 13 WARMING DRAWER (MODEL NX58*565***): Touch this pad to turn the oven light on or off when the time has...
... 550 °F (288 °C) 550 °F (288 °C) 500 °F (260 °C) 3 hours 3 hours 12 hours * Model NX58*565*** Only If you set Conversion On for the desired amount of a button. 13 WARMING DRAWER (MODEL NX58*565***): Touch this pad to turn the oven light on or off when the time has...
User Manual
Page 50
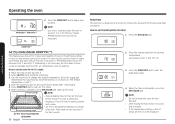
... between 100 ˚F and 175 ˚F) 3. This will not be set between 350 °F and 500 °F. Operating the oven NX58*565*** Air Fry mode (Model NX58*751***) This feature uses hot air for set the Cook Time or Delay Start, if necessary. 5.
... between 100 ˚F and 175 ˚F) 3. This will not be set between 350 °F and 500 °F. Operating the oven NX58*565*** Air Fry mode (Model NX58*751***) This feature uses hot air for set the Cook Time or Delay Start, if necessary. 5.
User Manual
Page 54
... time, but the oven will start the lighting and preheating process. Press and hold the Clock and Timer On/ Off pad at the end of models with the Bake and Cooking Time settings. The oven signals, display LEDs, and all oven controls except the number, Bake, Cooking Time, START/SET, and...
... time, but the oven will start the lighting and preheating process. Press and hold the Clock and Timer On/ Off pad at the end of models with the Bake and Cooking Time settings. The oven signals, display LEDs, and all oven controls except the number, Bake, Cooking Time, START/SET, and...
User Manual
Page 58
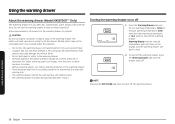
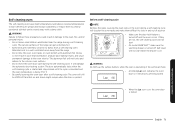
Using the warming drawer About the warming drawer (Model NX58*565*** Only) The Warming Drawer lets you keep hot, cooked foods warm. Melted plastic may not be removable and is an excellent heat insulator ...
Using the warming drawer About the warming drawer (Model NX58*565*** Only) The Warming Drawer lets you keep hot, cooked foods warm. Melted plastic may not be removable and is an excellent heat insulator ...
User Manual
Page 69
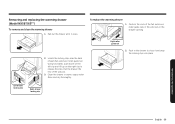
... in warm, soapy water. Clean the drawer in the drawer opening. Push in the drawer to release the clips. Removing and replacing the warming drawer (Model NX58*565***) To remove and clean the warming drawer 1. Right roller guide rail 2. Locate the locking clips near the back of the way out. 3.
... in warm, soapy water. Clean the drawer in the drawer opening. Push in the drawer to release the clips. Removing and replacing the warming drawer (Model NX58*565***) To remove and clean the warming drawer 1. Right roller guide rail 2. Locate the locking clips near the back of the way out. 3.
User Manual
Page 70
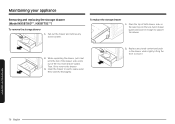
... drawer. 2. Clean the drawer in enough to remove the drawer. 3. While supporting the drawer, pull it . Maintaining your appliance Removing and replacing the storage drawer (Model NX58*560***, NX58*751***) To remove the storage drawer 1. Maintaining your appliance 70 English To replace the storage drawer 1. Rinse and dry thoroughly. 2. Replace any...
... drawer. 2. Clean the drawer in enough to remove the drawer. 3. While supporting the drawer, pull it . Maintaining your appliance Removing and replacing the storage drawer (Model NX58*560***, NX58*751***) To remove the storage drawer 1. Maintaining your appliance 70 English To replace the storage drawer 1. Rinse and dry thoroughly. 2. Replace any...
User Manual
Page 71
... the range can be VERY HOT and hot air and steam might escape when the door is opened. Self-clean will not start . • On model NX58*565***, make them to a finely powdered ash that can get extremely hot. • Some birds are not, the self-cleaning cycle will not start...
... the range can be VERY HOT and hot air and steam might escape when the door is opened. Self-clean will not start . • On model NX58*565***, make them to a finely powdered ash that can get extremely hot. • Some birds are not, the self-cleaning cycle will not start...
User Manual
Page 79
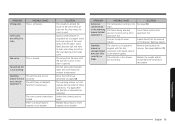
...fan starts automatically when the oven meets the preheat temperature. The foods being used . Liquid should not be warmed in the warming drawer (Model NX58*565***). The drawer is normal. The contents in the drawer are difficult to slide. Apply a small amount of vegetable oil to.... The oven controls have been locked. Reset the controls as described on pages 58. Remove liquids. The warming drawer will not work (Model NX58*565***). Replace blown fuse or reset tripped circuit breaker. You are left in the drawer. Fan noise. There is opened. Warming ...
...fan starts automatically when the oven meets the preheat temperature. The foods being used . Liquid should not be warmed in the warming drawer (Model NX58*565***). The drawer is normal. The contents in the drawer are difficult to slide. Apply a small amount of vegetable oil to.... The oven controls have been locked. Reset the controls as described on pages 58. Remove liquids. The warming drawer will not work (Model NX58*565***). Replace blown fuse or reset tripped circuit breaker. You are left in the drawer. Fan noise. There is opened. Warming ...

User Manual
Page 82
.... Warranty Warranty (CANADA) Registration Please register your receipt (or a copy) to this manual. Model # Serial # Please attach your product online at www.samsung.com/us/support. Warranty 82 English You may elect to provide transportation of SAMSUNG and must contact SAMSUNG for problem determination and service procedures. To receive warranty service, the purchaser must...
.... Warranty Warranty (CANADA) Registration Please register your receipt (or a copy) to this manual. Model # Serial # Please attach your product online at www.samsung.com/us/support. Warranty 82 English You may elect to provide transportation of SAMSUNG and must contact SAMSUNG for problem determination and service procedures. To receive warranty service, the purchaser must...
User Manual
Page 84
You may need it, along with your receipt (or a copy) to this manual. Warranty 84 English Questions For questions about features, operation/performance, parts, accessories, or service, call 1-800-SAMSUNG (726-7864), or visit our Web site at www.samsung.com/register. Warranty Memo Registration Please register your product online at www.samsung.com/ca/support (English), or www.samsung.com/ca_fr/support (French). Model # Serial # Please attach your model and serial number, when calling for assistance.
You may need it, along with your receipt (or a copy) to this manual. Warranty 84 English Questions For questions about features, operation/performance, parts, accessories, or service, call 1-800-SAMSUNG (726-7864), or visit our Web site at www.samsung.com/register. Warranty Memo Registration Please register your product online at www.samsung.com/ca/support (English), or www.samsung.com/ca_fr/support (French). Model # Serial # Please attach your model and serial number, when calling for assistance.
Installation Guide
Page 12
... operation. Commercial oven cleaners or oven liners should be used in or around any part of the oven during a self-cleaning Special gas requirements (Gas models sold in the oven. Tools and materials 21 Do not clean the door gasket. Safety instructions Safety instructions Contents Gas range components 13 Never self...
... operation. Commercial oven cleaners or oven liners should be used in or around any part of the oven during a self-cleaning Special gas requirements (Gas models sold in the oven. Tools and materials 21 Do not clean the door gasket. Safety instructions Safety instructions Contents Gas range components 13 Never self...
Installation Guide
Page 13
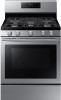
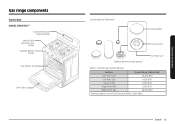
Gas range components Overview MODEL NX58*565*** Control Panel And Digital Display Heavy-Duty continous cast Grates Cooktop Burner Knobs Oven Racks (3) Oven Door Cooktop Burner Placement Flat surface Concave line Cooktop Burners (under grates) Common use Burner Locations and Output Ratings Location Output Rating (Natural Gas) Left-Front (LF) 15,000 BTU Left-Rear (LR) 9,500 BTU Center (CTR) 9,500 BTU Right-Rear (RR) 5,000 BTU Right-Front (RF) 18,000 BTU Warming Drawer (with Full Extension Roller Guide Rails) English 13 Gas range components
Gas range components Overview MODEL NX58*565*** Control Panel And Digital Display Heavy-Duty continous cast Grates Cooktop Burner Knobs Oven Racks (3) Oven Door Cooktop Burner Placement Flat surface Concave line Cooktop Burners (under grates) Common use Burner Locations and Output Ratings Location Output Rating (Natural Gas) Left-Front (LF) 15,000 BTU Left-Rear (LR) 9,500 BTU Center (CTR) 9,500 BTU Right-Rear (RR) 5,000 BTU Right-Front (RF) 18,000 BTU Warming Drawer (with Full Extension Roller Guide Rails) English 13 Gas range components
Installation Guide
Page 14
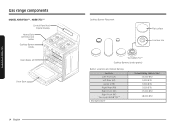
Gas range components Gas range components MODEL NX58*560*** , NX58*751*** Control Panel And Digital Display Heavy-Duty continous cast Grates Cooktop Burner Knobs Oven Racks (2) Oven Door 14 English Cooktop Burner Placement Flat surface Concave line * for NX58*751*** Cooktop Burners (under grates) Burner Locations and Output Ratings Location Left-Front (LF) Left-Rear (LR) Center (CTR) Right-Rear (RR) Right-Front (RF) Right-Front (RF) * For model NX58*751*** Storage Drawer Output Rating (Natural Gas) 15,000 BTU 9,500 BTU 9,500 BTU 5,000 BTU 17,000 BTU 18,000 BTU
Gas range components Gas range components MODEL NX58*560*** , NX58*751*** Control Panel And Digital Display Heavy-Duty continous cast Grates Cooktop Burner Knobs Oven Racks (2) Oven Door 14 English Cooktop Burner Placement Flat surface Concave line * for NX58*751*** Cooktop Burners (under grates) Burner Locations and Output Ratings Location Left-Front (LF) Left-Rear (LR) Center (CTR) Right-Rear (RR) Right-Front (RF) Right-Front (RF) * For model NX58*751*** Storage Drawer Output Rating (Natural Gas) 15,000 BTU 9,500 BTU 9,500 BTU 5,000 BTU 17,000 BTU 18,000 BTU

Installation Guide
Page 15
.../ (RF)-14,500 BTU Broil (Upper)-13,500 BTU / Bake (Lower)-18,000 BTU Broil (Upper)-11,500 BTU / Bake (Lower)-15,000 BTU MODEL NX58*560*** , NX58*751*** DESCRIPTION OVERALL DIMENSIONS NET WEIGHT ELECTRICAL GAS, NG (NATURAL GAS) GAS, LP (LIQUID PROPANE) SURFACE BURNERS (NG) SURFACE BURNERS (...LP) OVEN BURNERS (NG) OVEN BURNERS (LP) * For model NX58*751*** Gas Free-Standing Range 29 15⁄16" (W) x 46 11⁄16" (H) x 28 5⁄16" (D) 761 mm (W) x 1,186.2 mm (H) x 718.7 ...
.../ (RF)-14,500 BTU Broil (Upper)-13,500 BTU / Bake (Lower)-18,000 BTU Broil (Upper)-11,500 BTU / Bake (Lower)-15,000 BTU MODEL NX58*560*** , NX58*751*** DESCRIPTION OVERALL DIMENSIONS NET WEIGHT ELECTRICAL GAS, NG (NATURAL GAS) GAS, LP (LIQUID PROPANE) SURFACE BURNERS (NG) SURFACE BURNERS (...LP) OVEN BURNERS (NG) OVEN BURNERS (LP) * For model NX58*751*** Gas Free-Standing Range 29 15⁄16" (W) x 46 11⁄16" (H) x 28 5⁄16" (D) 761 mm (W) x 1,186.2 mm (H) x 718.7 ...


