
Quick Guide Ver.1.0 (English)
Page 1
...PH4500-5000-ZA]BN68-05661A-00ENG.indb 1 BN68-05661A-00 E-MANUAL Thank you have any questions, please call us Samsung Electronics Canada Inc., Customer Service 55 Standish Court Mississauga, Ontario L5R 4B2 Canada Samsung Electronics America, Inc. 85 Challenger Road Ridgefield Park, NJ ...07660 Plasma TV user manual © 2014 Samsung Electronics Co., Ltd. Country CANADA Customer Care Center 1-800-SAMSUNG (726-7864) U.S.A 1-800-SAMSUNG (726-7864) Web Site Address www.samsung.com/ca (English) www.samsung.com/ca_fr (French) www.samsung.com/us at 1-800-SAMSUNG (1-800-726-7864) for...
...PH4500-5000-ZA]BN68-05661A-00ENG.indb 1 BN68-05661A-00 E-MANUAL Thank you have any questions, please call us Samsung Electronics Canada Inc., Customer Service 55 Standish Court Mississauga, Ontario L5R 4B2 Canada Samsung Electronics America, Inc. 85 Challenger Road Ridgefield Park, NJ ...07660 Plasma TV user manual © 2014 Samsung Electronics Co., Ltd. Country CANADA Customer Care Center 1-800-SAMSUNG (726-7864) U.S.A 1-800-SAMSUNG (726-7864) Web Site Address www.samsung.com/ca (English) www.samsung.com/ca_fr (French) www.samsung.com/us at 1-800-SAMSUNG (1-800-726-7864) for...

Quick Guide Ver.1.0 (English)
Page 4
...of the Plasma TV The top side of its face or back. Damage caused by the above effect is not covered by a fall . Your Samsung Plasma TV is a high quality television that requires careful handling. Panel breakage caused by the warranty. • After-images on the screen. Important..., nonetheless, a fragile piece of use as it can break if you accidently drop the TV. Refrain from actual product appearances. A detailed User's Manual is built into your PDP TV can cause screen image retention. Watching the Plasma TV in 4:3 format for more than a certain period of time may...
...of the Plasma TV The top side of its face or back. Damage caused by the above effect is not covered by a fall . Your Samsung Plasma TV is a high quality television that requires careful handling. Panel breakage caused by the warranty. • After-images on the screen. Important..., nonetheless, a fragile piece of use as it can break if you accidently drop the TV. Refrain from actual product appearances. A detailed User's Manual is built into your PDP TV can cause screen image retention. Watching the Plasma TV in 4:3 format for more than a certain period of time may...

Quick Guide Ver.1.0 (English)
Page 5
...8226; Media Play: Media Play lets you access, view, or play photos, videos, or music located on USB devices and digital cameras. • e-Manual: Provides a detailed, on the model. ✎✎ Check that there are included with your TV. (page 11) Accessories and Cables ✎✎ Please... direction. If any items are missing, contact your dealer. ✎✎ The items' colors and shapes may vary depending on -screen user's manual built into your TV. Cable Plugs Ports/Jacks Do not connect plugs in . HDMI HDMI-DVI Component Composite (AV) Coaxial (RF) ✎✎...
...8226; Media Play: Media Play lets you access, view, or play photos, videos, or music located on USB devices and digital cameras. • e-Manual: Provides a detailed, on the model. ✎✎ Check that there are included with your TV. (page 11) Accessories and Cables ✎✎ Please... direction. If any items are missing, contact your dealer. ✎✎ The items' colors and shapes may vary depending on -screen user's manual built into your TV. Cable Plugs Ports/Jacks Do not connect plugs in . HDMI HDMI-DVI Component Composite (AV) Coaxial (RF) ✎✎...

Quick Guide Ver.1.0 (English)
Page 8
... the main on the menu. B C D Exit the menu. For example, to the previous channel. Return to select channel '54-3', press '54', then press '-' and '3'. E-MANUAL: Displays the e-Manual. Quickly select frequently used by the same station. Return to access channels directly. Use these buttons according to select additional digital channels being broadcasted...
... the main on the menu. B C D Exit the menu. For example, to the previous channel. Return to select channel '54-3', press '54', then press '-' and '3'. E-MANUAL: Displays the e-Manual. Quickly select frequently used by the same station. Return to access channels directly. Use these buttons according to select additional digital channels being broadcasted...

Quick Guide Ver.1.0 (English)
Page 11
... Standard 10 95 45 50 50 G50 R50 Method 1 1. Select Yes, and then press the ENTERE button. How to View the e-Manual You can find instructions for watching movies and games. Basic Features Changing the Preset Picture Mode Adjusting Picture Settings Changing the Picture Options Changing ... for an eye comfortable display. ● Movie: Suitable for watching movies in a dark room. ● Entertain: Suitable for your TV's features in the e-Manual in some menus. The OSD window appears. 2. English a Try Now b Home { Zoom } Index L Page e Exit ✎✎ This function is not...
... Standard 10 95 45 50 50 G50 R50 Method 1 1. Select Yes, and then press the ENTERE button. How to View the e-Manual You can find instructions for watching movies and games. Basic Features Changing the Preset Picture Mode Adjusting Picture Settings Changing the Picture Options Changing ... for an eye comfortable display. ● Movie: Suitable for watching movies in a dark room. ● Entertain: Suitable for your TV's features in the e-Manual in some menus. The OSD window appears. 2. English a Try Now b Home { Zoom } Index L Page e Exit ✎✎ This function is not...

Quick Guide Ver.1.0 (English)
Page 12
...and then press ENTERE. The Index displays a list of topics and keywords that corresponds to magnify the screen. e (Exit): Exit the e-Manual. Using the Zoom mode When you selected. 3. Contents Area: Contains the topic contents if you can scroll through the magnified screen by using ...return to the previous or next page. Press the Blue (Index) button on the index page English 1. L (Page): Moves to the e-Manual screen, press the E-MANUAL button. The Index screen appears. 2. N It is only available when connecting a PC. To search for watching movies and games. N ...
...and then press ENTERE. The Index displays a list of topics and keywords that corresponds to magnify the screen. e (Exit): Exit the e-Manual. Using the Zoom mode When you selected. 3. Contents Area: Contains the topic contents if you can scroll through the magnified screen by using ...return to the previous or next page. Press the Blue (Index) button on the index page English 1. L (Page): Moves to the e-Manual screen, press the E-MANUAL button. The Index screen appears. 2. N It is only available when connecting a PC. To search for watching movies and games. N ...

Quick Guide Ver.1.0 (English)
Page 13
...8226; Cell Light, Contrast, Brightness, Sharpness, Color, Tint (G/R) and so on your devices to disable some of the troubleshooting tips apply, visit www.samsung.com/support or call to the service department. • If you have a problem, first review this list of your power cord, remote control, and.... • Self Diagnosis: User Menu → Support → Self Diagnosis → Picture Test If the problem does not appear in the e-Manual. If the screen displays the guide or info data, the problem is not outputting a signal. To turn these features off because the cable or...
...8226; Cell Light, Contrast, Brightness, Sharpness, Color, Tint (G/R) and so on your devices to disable some of the troubleshooting tips apply, visit www.samsung.com/support or call to the service department. • If you have a problem, first review this list of your power cord, remote control, and.... • Self Diagnosis: User Menu → Support → Self Diagnosis → Picture Test If the problem does not appear in the e-Manual. If the screen displays the guide or info data, the problem is not outputting a signal. To turn these features off because the cable or...

Quick Guide Ver.1.0 (English)
Page 16
...SD (4:3) contents. • Black bars will play, but could experience some playability issues. ✎✎ Some functions and pictures shown in this manual are available on specific models only. ✎✎ To keep your external device or change the settings from your TV. • Adjust the ...picture size option on your TV in optimum condition, upgrade to the latest firmware on the Samsung web site by using an HDMI or Component source. A "Mode Not Supported" message appears. • Check the supported resolution of the picture...
...SD (4:3) contents. • Black bars will play, but could experience some playability issues. ✎✎ Some functions and pictures shown in this manual are available on specific models only. ✎✎ To keep your external device or change the settings from your TV. • Adjust the ...picture size option on your TV in optimum condition, upgrade to the latest firmware on the Samsung web site by using an HDMI or Component source. A "Mode Not Supported" message appears. • Check the supported resolution of the picture...
Quick Guide Ver.1.0 (English)
Page 17
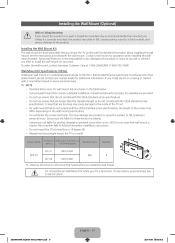
.... ✎✎ NOTE • Standard dimensions for wall mount kits are shown in the table below. • Samsung wall mount kits contain a detailed installation manual and all parts necessary for assembly are provided. • Do not use screws that do not comply with the VESA... 600 X 400 M8 4 ✎✎ Remove the screws in personal injury due to the product. Contact a technician for additional information. Samsung Electronics is correctly mounted, the product may result in the mounting holes before you install the wall mount. For detailed information about installing the...
.... ✎✎ NOTE • Standard dimensions for wall mount kits are shown in the table below. • Samsung wall mount kits contain a detailed installation manual and all parts necessary for assembly are provided. • Do not use screws that do not comply with the VESA... 600 X 400 M8 4 ✎✎ Remove the screws in personal injury due to the product. Contact a technician for additional information. Samsung Electronics is correctly mounted, the product may result in the mounting holes before you install the wall mount. For detailed information about installing the...

Quick Guide Ver.1.0 (English)
Page 19
... to the Kensington slot on the model. Wrap the Kensington lock cable around a large, immobile object and then attach the lock to the manual provided with the lock attached through the looped end of the TV. Slide the end of the TV. Lock the lock. ✎✎... for more information and software tools to prevent scratches. ABOUT DIVX VIDEO-ON-DEMAND: This DivX Certified® device must be purchased separately. Covered by Samsung. ✎✎ Please find a "K" icon on the product. 4. benzene, thinners) or a cleaning agent. [PH4500-5000-ZA]BN68-05661A-00ENG.indb 19 English...
... to the Kensington slot on the model. Wrap the Kensington lock cable around a large, immobile object and then attach the lock to the manual provided with the lock attached through the looped end of the TV. Slide the end of the TV. Lock the lock. ✎✎... for more information and software tools to prevent scratches. ABOUT DIVX VIDEO-ON-DEMAND: This DivX Certified® device must be purchased separately. Covered by Samsung. ✎✎ Please find a "K" icon on the product. 4. benzene, thinners) or a cleaning agent. [PH4500-5000-ZA]BN68-05661A-00ENG.indb 19 English...

User Manual Ver.1.0 (English)
Page 9
NN Date is available only when you select Once in Repeat. ●● Start Time: You can set the start time you want. Then, press the ENTERE button and ◀ select Edit or Delete. ▶ ●● Repeat: Select Once, Manual, Sat~Sun, Mon~Fri or Everyday. If you select Manual, you can set the day you want to edit or cancel a scheduled viewing, select the scheduled viewing on Schedule Manager. NN If you selected. ●● Date: You can set a desired date. NN A check (c) mark indicates a day you want .
NN Date is available only when you select Once in Repeat. ●● Start Time: You can set the start time you want. Then, press the ENTERE button and ◀ select Edit or Delete. ▶ ●● Repeat: Select Once, Manual, Sat~Sun, Mon~Fri or Everyday. If you select Manual, you can set the day you want to edit or cancel a scheduled viewing, select the scheduled viewing on Schedule Manager. NN If you selected. ●● Date: You can set a desired date. NN A check (c) mark indicates a day you want .

User Manual Ver.1.0 (English)
Page 29
❑❑ Other Features ■■ Channel Settings OO MENUm → Broadcasting → Channel Settings → ENTERE ●● Fine Tune (analog channels only) If the reception is done automatically during the search and store operation. This is clear, you do not have an asterisk ( * ) on the right-hand side of the channel number in the channel banner. NN To reset the fine-tuning, select Reset. If the signal is weak or ◀ distorted, fine tune the channel manually. ▶ NN Fine tuned channels that have been saved have to fine tune the channel.
❑❑ Other Features ■■ Channel Settings OO MENUm → Broadcasting → Channel Settings → ENTERE ●● Fine Tune (analog channels only) If the reception is done automatically during the search and store operation. This is clear, you do not have an asterisk ( * ) on the right-hand side of the channel number in the channel banner. NN To reset the fine-tuning, select Reset. If the signal is weak or ◀ distorted, fine tune the channel manually. ▶ NN Fine tuned channels that have been saved have to fine tune the channel.
User Manual Ver.1.0 (English)
Page 69
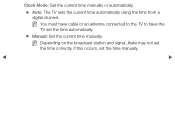
NN Depending on the broadcast station and signal, Auto may not set the time manually. ◀ ▶ Clock Mode: Set the current time manually or automatically. ●● Auto: The TV sets the current time automatically using the time from a digital channel. If this occurs, set the time correctly. NN You must have cable or an antenna connected to the TV to have the TV set the time automatically. ●● Manual: Set the current time manually.
NN Depending on the broadcast station and signal, Auto may not set the time manually. ◀ ▶ Clock Mode: Set the current time manually or automatically. ●● Auto: The TV sets the current time automatically using the time from a digital channel. If this occurs, set the time correctly. NN You must have cable or an antenna connected to the TV to have the TV set the time automatically. ●● Manual: Set the current time manually.
User Manual Ver.1.0 (English)
Page 70
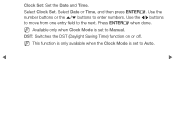
Clock Set: Set the Date and Time. Select Date or Time, and then press ENTERE. Use the l/r buttons to move from one entry field to enter numbers. NN This function is only available when the Clock Mode is set to Manual. Press ENTERE when done. Use the number buttons or the u/d buttons to the next. NN Available only when Clock Mode is set to Auto. ◀ ▶ Select Clock Set. DST: Switches the DST (Daylight Saving Time) function on or off.
Clock Set: Set the Date and Time. Select Date or Time, and then press ENTERE. Use the l/r buttons to move from one entry field to enter numbers. NN This function is only available when the Clock Mode is set to Manual. Press ENTERE when done. Use the number buttons or the u/d buttons to the next. NN Available only when Clock Mode is set to Auto. ◀ ▶ Select Clock Set. DST: Switches the DST (Daylight Saving Time) function on or off.

User Manual Ver.1.0 (English)
Page 73
If you select Manual, you can choose the days you want On Timer ▶ to turn on a day of your TV. Setup: Select Off, Once, Everyday, Mon~Fri, Mon~Sat, Sat~Sun, or ◀ Manual. ❑❑ Setting the On/Off Timer OO MENUm → System → Time → On Timer Off Timer → ENTERE Set On Timer so that your TV turns on automatically at a time and on your choosing. ●● On Timer: You can use On Timer. NN The c mark indicates days you can set the clock before you 've selected. NN You must set up three separate On Timer configurations.
If you select Manual, you can choose the days you want On Timer ▶ to turn on a day of your TV. Setup: Select Off, Once, Everyday, Mon~Fri, Mon~Sat, Sat~Sun, or ◀ Manual. ❑❑ Setting the On/Off Timer OO MENUm → System → Time → On Timer Off Timer → ENTERE Set On Timer so that your TV turns on automatically at a time and on your choosing. ●● On Timer: You can use On Timer. NN The c mark indicates days you can set the clock before you 've selected. NN You must set up three separate On Timer configurations.

User Manual Ver.1.0 (English)
Page 77
Time: Set the hour, minute, and am/pm. If you select Manual, you can choose the days you 've selected. Use the number buttons or the u/d buttons to change entry fields. ◀ ▶ NN The c mark indicates days you want Off Timer to turn off your TV. ●● Off Timer: You can use Off Timer. NN You must set the clock before you can set up three separate Off Timer configurations. Use the l/r buttons to enter numbers. Setup: Select Off, Once, Everyday, Mon~Fri, Mon~Sat, Sat~Sun or Manual.
Time: Set the hour, minute, and am/pm. If you select Manual, you can choose the days you 've selected. Use the number buttons or the u/d buttons to change entry fields. ◀ ▶ NN The c mark indicates days you want Off Timer to turn off your TV. ●● Off Timer: You can use Off Timer. NN You must set the clock before you can set up three separate Off Timer configurations. Use the l/r buttons to enter numbers. Setup: Select Off, Once, Everyday, Mon~Fri, Mon~Sat, Sat~Sun or Manual.
User Manual Ver.1.0 (English)
Page 79
... display brightness may change (become slightly darker in power saving mode. ◀ ●● Auto Power Off: The TV will automatically turn off if you manually adjust the minimum screen brightness.
... display brightness may change (become slightly darker in power saving mode. ◀ ●● Auto Power Off: The TV will automatically turn off if you manually adjust the minimum screen brightness.

User Manual Ver.1.0 (English)
Page 88
❑❑ Using the Source List ■■ Source List OO MENUm → Applications → Source List→ ENTERE NN When you press the SOURCE button, the Source screen is displayed immediately. In the Source list, connected inputs are connected to "Changing the Input Source" in the paper ▶ User Manual. NN You can only choose external devices that are highlighted. ◀ NN For detailed information, refer to the TV.
❑❑ Using the Source List ■■ Source List OO MENUm → Applications → Source List→ ENTERE NN When you press the SOURCE button, the Source screen is displayed immediately. In the Source list, connected inputs are connected to "Changing the Input Source" in the paper ▶ User Manual. NN You can only choose external devices that are highlighted. ◀ NN For detailed information, refer to the TV.

User Manual Ver.1.0 (English)
Page 90
... exit to view or play, and then press the ENTERE button. 7. You can change this by pressing the RETURN button until you selected in the e-Manual. 8. For ▶ example, if you selected Music, you will only display ◀ files of the Content Type (Photos, Videos, or Music) you ... files. NN Even though the player will display folders for all Content Types, it will only be able to "Disconnecting a USB Device" in the e-Manual. Press the RETURN button to exit a current screen and go to the previous screen. For information about controlling playback, go to "Using Media Play"...
... exit to view or play, and then press the ENTERE button. 7. You can change this by pressing the RETURN button until you selected in the e-Manual. 8. For ▶ example, if you selected Music, you will only display ◀ files of the Content Type (Photos, Videos, or Music) you ... files. NN Even though the player will display folders for all Content Types, it will only be able to "Disconnecting a USB Device" in the e-Manual. Press the RETURN button to exit a current screen and go to the previous screen. For information about controlling playback, go to "Using Media Play"...
User Manual Ver.1.0 (English)
Page 97
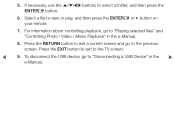
Press the EXIT button to exit to view or play, and then press the ENTERE or ∂ button on your remote. 7. To disconnect the USB device, go to "Disconnecting a USB Device" in the e-Manual. 8. Press the RETURN button to exit a current screen and go to the previous screen. Select a file to the TV screen. ◀ 9. For information about controlling playback, go to select a folder, and then press the ENTERE button. 6. If necessary, use the u/d/l/r buttons to "Playing selected files" and "Controlling Photo / Video / Music Playback" in the ▶ e-Manual. 5.
Press the EXIT button to exit to view or play, and then press the ENTERE or ∂ button on your remote. 7. To disconnect the USB device, go to "Disconnecting a USB Device" in the e-Manual. 8. Press the RETURN button to exit a current screen and go to the previous screen. Select a file to the TV screen. ◀ 9. For information about controlling playback, go to select a folder, and then press the ENTERE button. 6. If necessary, use the u/d/l/r buttons to "Playing selected files" and "Controlling Photo / Video / Music Playback" in the ▶ e-Manual. 5.


