User Manual
Page 3
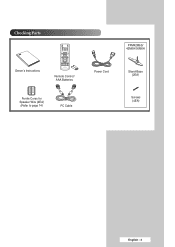
Checking Parts PPM42M6S/ 42M6H/50M6H Owner's Instructions Remote Control/ AAA Batteries Ferrite Cores for Speaker Wire (2EA) (Refer to page 14) PC Cable Power Cord Stand-Base (2EA) Screws (4EA) English - 3
Checking Parts PPM42M6S/ 42M6H/50M6H Owner's Instructions Remote Control/ AAA Batteries Ferrite Cores for Speaker Wire (2EA) (Refer to page 14) PC Cable Power Cord Stand-Base (2EA) Screws (4EA) English - 3

User Manual
Page 4
Contents ◆ FOREWORD ■ User Instructions 2 ◆ CONNECTING AND PREPARING YOUR DISPLAY ■ Control Panel 6 ■ Infrared Remote Control 8 ■ Inserting the Batteries in the Remote Control 9 ■ Assembling the Stand-Base 9 ■ Installing the Display on the Wall Attachment Panel 10 ■ Installing ...Customizing the Sound Settings 23 ■ Setting the TruSurround XT 24 ■ Activating Panel Button Lock 25 ■ Activating Remote Control Button Lock 26 ■ Setting Up Your Personal ID Number 27 Continued... English - 4
Contents ◆ FOREWORD ■ User Instructions 2 ◆ CONNECTING AND PREPARING YOUR DISPLAY ■ Control Panel 6 ■ Infrared Remote Control 8 ■ Inserting the Batteries in the Remote Control 9 ■ Assembling the Stand-Base 9 ■ Installing the Display on the Wall Attachment Panel 10 ■ Installing ...Customizing the Sound Settings 23 ■ Setting the TruSurround XT 24 ■ Activating Panel Button Lock 25 ■ Activating Remote Control Button Lock 26 ■ Setting Up Your Personal ID Number 27 Continued... English - 4
User Manual
Page 6
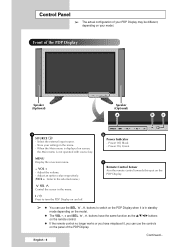
... depending on the model. ◆ The VOL -, + and SEL , buttons have the same function as the buttons on the remote control. ◆ If the remote control no longer works or you have misplaced it, you can use the controls on screen, the Main menu is displayed on the...PDP Display Speaker (Optional) Speaker (Optional) a b c a SOURCE - English - 6 Continued... When the Main menu is not operated with source key. Green c Remote Control Sensor Aim the remote control towards this spot on the PDP Display. ➢ ◆ You can use the SEL , buttons to turn the PDP Display on your...
... depending on the model. ◆ The VOL -, + and SEL , buttons have the same function as the buttons on the remote control. ◆ If the remote control no longer works or you have misplaced it, you can use the controls on screen, the Main menu is displayed on the...PDP Display Speaker (Optional) Speaker (Optional) a b c a SOURCE - English - 6 Continued... When the Main menu is not operated with source key. Green c Remote Control Sensor Aim the remote control towards this spot on the PDP Display. ➢ ◆ You can use the SEL , buttons to turn the PDP Display on your...
User Manual
Page 8
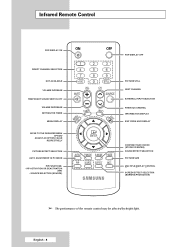
...) SOUND EFFECT SELECTION PICTURE SIZE MULTIPLE DISPLAY CONTROL SCREEN EFFECT SELECTION (BURNING PROTECTION) ➢ The performance of the remote control may be affected by bright light. PIP ACTIVATION OR DEACTIVATION (PIP) - Infrared Remote Control PDP DISPLAY ON DIRECT CHANNEL SELECTION NOT AVAILABLE VOLUME INCREASE TEMPORARY SOUND SWITCH-OFF VOLUME DECREASE SETTING THE...
...) SOUND EFFECT SELECTION PICTURE SIZE MULTIPLE DISPLAY CONTROL SCREEN EFFECT SELECTION (BURNING PROTECTION) ➢ The performance of the remote control may be affected by bright light. PIP ACTIVATION OR DEACTIVATION (PIP) - Infrared Remote Control PDP DISPLAY ON DIRECT CHANNEL SELECTION NOT AVAILABLE VOLUME INCREASE TEMPORARY SOUND SWITCH-OFF VOLUME DECREASE SETTING THE...
User Manual
Page 9
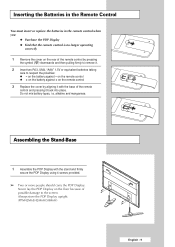
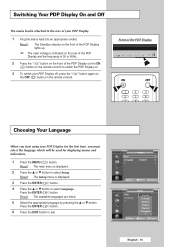
... polarities: ◆ - alkaline and manganese. Do not mix battery types, i.e. on the remote control ◆ + on the battery against - Inserting the Batteries in the Remote Control You must insert or replace the batteries in the remote control when you: ◆ Purchase the PDP Display ◆ Find that the... using 4 screws provided. ➢ Two or more people should carry the PDP Display. Never lay the PDP Display on the battery against + on the remote control 3 Replace the cover by pressing the symbol ( ) downwards and then pulling firmly to remove it. 2 Insert two R03, UM4, "AAA" 1....
... polarities: ◆ - alkaline and manganese. Do not mix battery types, i.e. on the remote control ◆ + on the battery against - Inserting the Batteries in the Remote Control You must insert or replace the batteries in the remote control when you: ◆ Purchase the PDP Display ◆ Find that the... using 4 screws provided. ➢ Two or more people should carry the PDP Display. Never lay the PDP Display on the battery against + on the remote control 3 Replace the cover by pressing the symbol ( ) downwards and then pulling firmly to remove it. 2 Insert two R03, UM4, "AAA" 1....

User Manual
Page 12
...Multiple Display Control)" on the left when viewed from the figure below. ➢ The Fan function for PDP Display adjustment. You can operate the remote control only for 2x2 Video Wall connections Rear of the PDP Display ② ① ➢ ◆ You can install the PDP Display ...Wall function Rear of the PDP Display with menu buttons on page 28. Installing the Display Vertically ❋ Samsung shall not be difficult to create IDs when operating the remote control for Multiple Display Control connections English - 12 And you wish to stop the fan, position the PDP...
...Multiple Display Control)" on the left when viewed from the figure below. ➢ The Fan function for PDP Display adjustment. You can operate the remote control only for 2x2 Video Wall connections Rear of the PDP Display ② ① ➢ ◆ You can install the PDP Display ...Wall function Rear of the PDP Display with menu buttons on page 28. Installing the Display Vertically ❋ Samsung shall not be difficult to create IDs when operating the remote control for Multiple Display Control connections English - 12 And you wish to stop the fan, position the PDP...
User Manual
Page 15
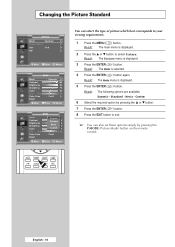
... of the PDP Display Choosing Your Language When you start using your PDP Display off, press the " " button again (or the OFF ( ) button on the remote control) to exit. Result: The main menu is displayed. 3 Press the ENTER ( ) button. 4 Press the ... or † button to select Setup. Result: The Setup menu... and Off The mains lead is 50 or 60Hz. 2 Press the " " button on the front of the PDP Display (or the ON ( ) button on the remote control).
... of the PDP Display Choosing Your Language When you start using your PDP Display off, press the " " button again (or the OFF ( ) button on the remote control) to exit. Result: The main menu is displayed. 3 Press the ENTER ( ) button. 4 Press the ... or † button to select Setup. Result: The Setup menu... and Off The mains lead is 50 or 60Hz. 2 Press the " " button on the front of the PDP Display (or the ON ( ) button on the remote control).
User Manual
Page 16
.... ➢ You can also set these options simply by pressing the ... Custom 6 Select the required option by pressing the P.MODE (Picture Mode) button on the remote control. or † button to select Picture. Movie -
.... ➢ You can also set these options simply by pressing the ... Custom 6 Select the required option by pressing the P.MODE (Picture Mode) button on the remote control. or † button to select Picture. Movie -
User Manual
Page 21
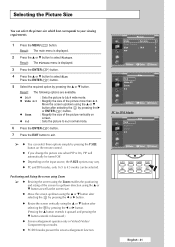
.... 6 Press the ENTER ( ) button. 7 Press the EXIT button to exit. ➢ ◆ You can select these options simply by pressing the P.SIZE button on the remote control. ◆ If you change the picture size when PIP is On, PIP will automatically be selected. or † button after selecting the by pressing...
.... 6 Press the ENTER ( ) button. 7 Press the EXIT button to exit. ➢ ◆ You can select these options simply by pressing the P.SIZE button on the remote control. ◆ If you change the picture size when PIP is On, PIP will automatically be selected. or † button after selecting the by pressing...
User Manual
Page 22
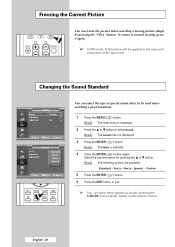
... displayed. 2 Press the ▲ or ▼ button to exit. ➢ You can select these options by simply pressing the S.MODE (Sound Mode) button on the remote control. Select the required option by pressing the "STILL" button. Freezing the Current Picture You can freeze the picture when watching a moving picture simply by...
... displayed. 2 Press the ▲ or ▼ button to exit. ➢ You can select these options by simply pressing the S.MODE (Sound Mode) button on the remote control. Select the required option by pressing the "STILL" button. Freezing the Current Picture You can freeze the picture when watching a moving picture simply by...
User Manual
Page 25
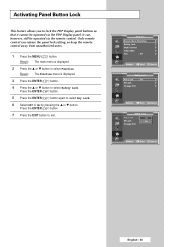
It can release the panel lock setting, so keep the remote control away from unauthorized users. 1 Press the MENU ( ) button. Function Screen Burn Protection Safety Lock Multi Control Video Wall Fan : Off Move Enter Return Safety ... PIN : Off Off On Move Enter Return English - 25 Press the ENTER ( ) button. 5 Press the ENTER ( ) button again to exit. Only remote control can , however, still be operated via the remote control. Result: The main menu is displayed. 3 Press the ENTER ( ) button. 4 Press the ▲ or ▼ button to select Safety Lock...
It can release the panel lock setting, so keep the remote control away from unauthorized users. 1 Press the MENU ( ) button. Function Screen Burn Protection Safety Lock Multi Control Video Wall Fan : Off Move Enter Return Safety ... PIN : Off Off On Move Enter Return English - 25 Press the ENTER ( ) button. 5 Press the ENTER ( ) button again to exit. Only remote control can , however, still be operated via the remote control. Result: The main menu is displayed. 3 Press the ENTER ( ) button. 4 Press the ▲ or ▼ button to select Safety Lock...
User Manual
Page 26
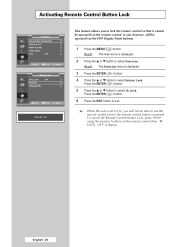
... IR Lock : On This feature allows you will not be able to use the remote control even if the remote control button is pressed. To cancel the Remote Control Button Lock, press "0000" using the numeric buttons on the remote control then, 'IR LOCK : OFF' is displayed. 3 Press the ENTER ( ) button.... 4 Press the ▲ or ▼ button to lock the remote control so that it cannot be operated via the remote control. It can, however, still be operated via the PDP Display Panel buttons. 1 Press the MENU ( ) button. Result: The Function...
... IR Lock : On This feature allows you will not be able to use the remote control even if the remote control button is pressed. To cancel the Remote Control Button Lock, press "0000" using the numeric buttons on the remote control then, 'IR LOCK : OFF' is displayed. 3 Press the ENTER ( ) button.... 4 Press the ▲ or ▼ button to lock the remote control so that it cannot be operated via the remote control. It can, however, still be operated via the PDP Display Panel buttons. 1 Press the MENU ( ) button. Result: The Function...
User Manual
Page 27
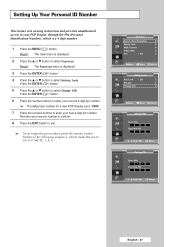
... English - 27 Re-enter your new pin number to confirm. 8 Press the EXIT button to exit. ➢ If you forget the pin number, press the remote control buttons in the following sequence, which is "0000". 7 Press the numeric buttons to select Function. Setting Up Your Personal ID Number This feature sets...
... English - 27 Re-enter your new pin number to confirm. 8 Press the EXIT button to exit. ➢ If you forget the pin number, press the remote control buttons in the following sequence, which is "0000". 7 Press the numeric buttons to select Function. Setting Up Your Personal ID Number This feature sets...
User Manual
Page 28
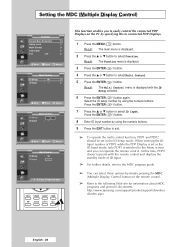
... Display Control) button on the PC by specifying IDs to the following Web site for information about MDC programs and protocol documents: http://www.samsung.com/support/productsupport/downloa d/index.aspx English - 28 Result: The main menu is switched to the Menu screen and you to easily control the... connected PDP Displays on the remote control. ➢ Refer to connected PDP Displays. 1 Press the MENU ( ) button. When entering the ID Input number of ID Input. ➢ For ...
... Display Control) button on the PC by specifying IDs to the following Web site for information about MDC programs and protocol documents: http://www.samsung.com/support/productsupport/downloa d/index.aspx English - 28 Result: The main menu is switched to the Menu screen and you to easily control the... connected PDP Displays on the remote control. ➢ Refer to connected PDP Displays. 1 Press the MENU ( ) button. When entering the ID Input number of ID Input. ➢ For ...
User Manual
Page 29
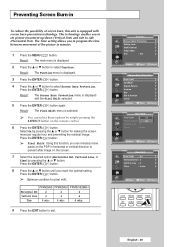
... Enter Return English - 29 The Time setting allows you to set picture movement up/down (Vertical Line) and side to prevent after image on the remote control. 6 Press the ENTER ( ) button. Select On by simply pressing the S.EFFECT button on the screen. 7 Select the required option (Horizontal Dot, Vertical Line, or...
... Enter Return English - 29 The Time setting allows you to set picture movement up/down (Vertical Line) and side to prevent after image on the remote control. 6 Press the ENTER ( ) button. Select On by simply pressing the S.EFFECT button on the screen. 7 Select the required option (Horizontal Dot, Vertical Line, or...
User Manual
Page 33
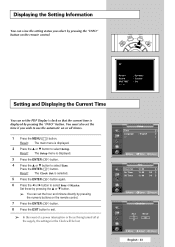
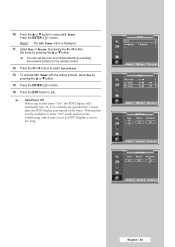
...being turned off timers. 1 Press the MENU ( ) button. Set these by pressing the "INFO" button. or † button to use the automatic on the remote control. 7 Press the ENTER ( ) button. 8 Press the EXIT button to exit. ➢ In the event of a power interruption or the set the time...; button to select Hour or Minute. or † button. ➢ You can set the hour and minute directly by pressing the "INFO" button on the remote control. Result: The Setup menu is displayed. 2 Press the ... Press the ENTER ( ) button. AV Picture Sound SRS TSXT -- : -- : Dynamic : Custom : Off ...
...being turned off timers. 1 Press the MENU ( ) button. Set these by pressing the "INFO" button. or † button to use the automatic on the remote control. 7 Press the ENTER ( ) button. 8 Press the EXIT button to exit. ➢ In the event of a power interruption or the set the time...; button to select Hour or Minute. or † button. ➢ You can set the hour and minute directly by pressing the "INFO" button on the remote control. Result: The Setup menu is displayed. 2 Press the ... Press the ENTER ( ) button. AV Picture Sound SRS TSXT -- : -- : Dynamic : Custom : Off ...
User Manual
Page 34
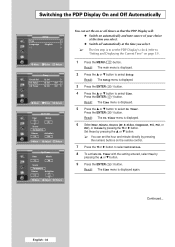
... Component Volume Activation 10 Yes Move Adjust Return You can set the PDP Display's clock (refer to "Setting and Displaying the Current Time" on the remote control. 7 Press the œ or √ button to select Activation. 8 To activate On Timer with the setting entered, select Yes by pressing the ... or †...
... Component Volume Activation 10 Yes Move Adjust Return You can set the PDP Display's clock (refer to "Setting and Displaying the Current Time" on the remote control. 7 Press the œ or √ button to select Activation. 8 To activate On Timer with the setting entered, select Yes by pressing the ... or †...
User Manual
Page 35
... Activation 00 Yes Move Adjust Return English - 35 Set these by pressing the œ or √ button. Result: The Off Timer menu is on the remote control. 12 Press the œ or √ button to select Off Timer. or † button to select Activation. 13 To activate Off Timer with the...
... Activation 00 Yes Move Adjust Return English - 35 Set these by pressing the œ or √ button. Result: The Off Timer menu is on the remote control. 12 Press the œ or √ button to select Off Timer. or † button to select Activation. 13 To activate Off Timer with the...

User Manual
Page 37
or † button to exit. Result: The following options are available. S-Video 7 Select a source of the remote control. Press the ENTER ( ) button. 10 Press the EXIT button to select Source. Easy functions of the sub picture by pressing the ... Viewing the Picture ...
or † button to exit. Result: The following options are available. S-Video 7 Select a source of the remote control. Press the ENTER ( ) button. 10 Press the EXIT button to select Source. Easy functions of the sub picture by pressing the ... Viewing the Picture ...
User Manual
Page 38
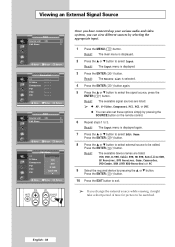
..., AV Receiver, DVD Receiver, Game, Camcorder, DVD Combo, DHR (DVD HDD Recorder),or PC 9 Select the required device by pressing the SOURCE button on the remote control. 6 Repeat steps 1 to be switched. Result: The main menu is displayed again. 7 Press the ... Result: The Input menu is displayed. 2 Press the ... Press the...
..., AV Receiver, DVD Receiver, Game, Camcorder, DVD Combo, DHR (DVD HDD Recorder),or PC 9 Select the required device by pressing the SOURCE button on the remote control. 6 Repeat steps 1 to be switched. Result: The main menu is displayed again. 7 Press the ... Result: The Input menu is displayed. 2 Press the ... Press the...


