

User Manual Ver.1.0 (English)
Page 3
... Connecting and Using a PC Connection Using the D-SUB Cable (Analogue Type) Driver Installation Setting Optimum Resolution Changing the Resolution Using a PC Brightness Configuring Brightness Contrast Configuring Contrast Sharpness Configuring Sharpness SAMSUNG MAGIC Bright Configuring SAMSUNG MAGIC Bright SAMSUNG MAGIC Upscale Configuring SAMSUNG MAGIC Upscale Image Size Changing the Image Size H-Position & V-Position Configuring H-Position & V-Position Coarse...
... Connecting and Using a PC Connection Using the D-SUB Cable (Analogue Type) Driver Installation Setting Optimum Resolution Changing the Resolution Using a PC Brightness Configuring Brightness Contrast Configuring Contrast Sharpness Configuring Sharpness SAMSUNG MAGIC Bright Configuring SAMSUNG MAGIC Bright SAMSUNG MAGIC Upscale Configuring SAMSUNG MAGIC Upscale Image Size Changing the Image Size H-Position & V-Position Configuring H-Position & V-Position Coarse...

User Manual Ver.1.0 (English)
Page 5
Q & A General (S19C150N / S22C150N) General (S19C150F / S20C150FL) PowerSaver Standard Signal Mode Table APPENDIX 83 89 89 89 89 Contact SAMSUNG WORLD WIDE Responsibility for the Pay Service (Cost to Customers) Not a product defect A Product damage caused by customer...Of Contents Installing the Software Removing the Software MultiScreen Installing the Software Removing the Software Requirements Before Contacting Samsung Customer Service Center Testing the Product Checking the Resolution and Frequency Check the following. Table Of Contents INFORMATION MENU AND 64 OTHERS 64 65 INSTALLING THE ...
Q & A General (S19C150N / S22C150N) General (S19C150F / S20C150FL) PowerSaver Standard Signal Mode Table APPENDIX 83 89 89 89 89 Contact SAMSUNG WORLD WIDE Responsibility for the Pay Service (Cost to Customers) Not a product defect A Product damage caused by customer...Of Contents Installing the Software Removing the Software MultiScreen Installing the Software Removing the Software Requirements Before Contacting Samsung Customer Service Center Testing the Product Checking the Resolution and Frequency Check the following. Table Of Contents INFORMATION MENU AND 64 OTHERS 64 65 INSTALLING THE ...

User Manual Ver.1.0 (English)
Page 16
... the DC power adapter before you are not going to use it can deteriorate your eyesight. ! 16 Before Using the Product Looking at the recommended resolution and frequency. Your eyesight may result. Leaving the screen fixed on using the product outdoors where it . Otherwise, a fire may deteriorate. Do not...
... the DC power adapter before you are not going to use it can deteriorate your eyesight. ! 16 Before Using the Product Looking at the recommended resolution and frequency. Your eyesight may result. Leaving the screen fixed on using the product outdoors where it . Otherwise, a fire may deteriorate. Do not...
User Manual Ver.1.0 (English)
Page 22
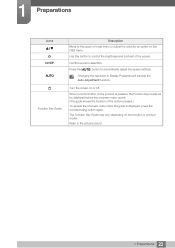
... to the upper or lower menu or adjust the value for an option on the product is displayed, press the corresponding button again. Changing the resolution in Display Properties will be displayed before the onscreen menu opens. (The guide shows the function of the screen. Refer to automatically adjust the screen...
... to the upper or lower menu or adjust the value for an option on the product is displayed, press the corresponding button again. Changing the resolution in Display Properties will be displayed before the onscreen menu opens. (The guide shows the function of the screen. Refer to automatically adjust the screen...

User Manual Ver.1.0 (English)
Page 34
... 2.3.2 Driver Installation You can set the optimum resolution and frequency for this product by installing the corresponding drivers. An installation driver is contained on the CD supplied with the product. If the file provided is faulty, visit the Samsung homepage (http://www.samsung.com/) and download the file. 1 Insert the...
... 2.3.2 Driver Installation You can set the optimum resolution and frequency for this product by installing the corresponding drivers. An installation driver is contained on the CD supplied with the product. If the file provided is faulty, visit the Samsung homepage (http://www.samsung.com/) and download the file. 1 Insert the...

User Manual Ver.1.0 (English)
Page 35
... message will appear up to three times for a specified time even when the product is as follows: **** x **** **Hz Use the above settings to set the resolution on your PC to the language you power on the product for this monitor is turned off and on again. The optimum... resolution can also be selected in Control Panel on your PC. English EXIT AUTO 1 Press [ ] to move to the optimum setting. The optimal resolution for the first time after purchase. Select a language on the product and change the...
... message will appear up to three times for a specified time even when the product is as follows: **** x **** **Hz Use the above settings to set the resolution on your PC to the language you power on the product for this monitor is turned off and on again. The optimum... resolution can also be selected in Control Panel on your PC. English EXIT AUTO 1 Press [ ] to move to the optimum setting. The optimal resolution for the first time after purchase. Select a language on the product and change the...

User Manual Ver.1.0 (English)
Page 36
Changing the Resolution on your PC to Control Panel Display Settings and change the resolution. 1 2 3 ********** **** **** 36 2 Connecting and Using a Source Device 2 Connecting and Using a Source Device 2.3.4 Changing the Resolution Using a PC Adjust the resolution and refresh rate in Control Panel on Windows XP Go to obtain optimum picture quality. The picture quality of TFT-LCDs may degrade if the optimum resolution is not selected.
Changing the Resolution on your PC to Control Panel Display Settings and change the resolution. 1 2 3 ********** **** **** 36 2 Connecting and Using a Source Device 2 Connecting and Using a Source Device 2.3.4 Changing the Resolution Using a PC Adjust the resolution and refresh rate in Control Panel on Windows XP Go to obtain optimum picture quality. The picture quality of TFT-LCDs may degrade if the optimum resolution is not selected.

User Manual Ver.1.0 (English)
Page 37
2 Connecting and Using a Source Device Changing the Resolution on Windows Vista Go to Control Panel Personalization Display Settings and change the resolution. 1 2 3 4 37 2 Connecting and Using a Source Device
2 Connecting and Using a Source Device Changing the Resolution on Windows Vista Go to Control Panel Personalization Display Settings and change the resolution. 1 2 3 4 37 2 Connecting and Using a Source Device

User Manual Ver.1.0 (English)
Page 38
2 Connecting and Using a Source Device Changing the Resolution on Windows 7 Go to Control Panel Display Screen Resolution and change the resolution. 1 2 3 4 38 2 Connecting and Using a Source Device
2 Connecting and Using a Source Device Changing the Resolution on Windows 7 Go to Control Panel Display Screen Resolution and change the resolution. 1 2 3 4 38 2 Connecting and Using a Source Device

User Manual Ver.1.0 (English)
Page 39
2 Connecting and Using a Source Device Changing the Resolution on Windows 8 Go to Settings Control Panel Display Screen Resolution and change the resolution. 1 2 3 4 5 39 2 Connecting and Using a Source Device
2 Connecting and Using a Source Device Changing the Resolution on Windows 8 Go to Settings Control Panel Display Screen Resolution and change the resolution. 1 2 3 4 5 39 2 Connecting and Using a Source Device

User Manual Ver.1.0 (English)
Page 44
.... The function has more obvious effects on low-resolution pictures. This menu is not available when MSAAMSGUINCGBright is in Cinema or Dynamic Contrast mode. 3.5.1 Configuring SAMSUNG MAGIC Upscale 1 Press any button on the product. PICTURE Brightness Contrast Sharpness SAMSUNG MAGIC Bright SAMSUNG MAGIC Upscale Image Size H-Position Custom Off Mode1 MOoffde2 RReettuurrnn...
.... The function has more obvious effects on low-resolution pictures. This menu is not available when MSAAMSGUINCGBright is in Cinema or Dynamic Contrast mode. 3.5.1 Configuring SAMSUNG MAGIC Upscale 1 Press any button on the product. PICTURE Brightness Contrast Sharpness SAMSUNG MAGIC Bright SAMSUNG MAGIC Upscale Image Size H-Position Custom Off Mode1 MOoffde2 RReettuurrnn...

User Manual Ver.1.0 (English)
Page 64
... AUTO AUTO ۴ The displayed menu items may vary depending on the front of the product to INFORMATION. The current input source, frequency and resolution will appear. Next, press [MENU] to display the corresponding menu screen. 2 Press [ ] to move to display the Function Key Guide. 7 INFORMATION Menu and Others 7.1 INFORMATION...
... AUTO AUTO ۴ The displayed menu items may vary depending on the front of the product to INFORMATION. The current input source, frequency and resolution will appear. Next, press [MENU] to display the corresponding menu screen. 2 Press [ ] to move to display the Function Key Guide. 7 INFORMATION Menu and Others 7.1 INFORMATION...
User Manual Ver.1.0 (English)
Page 70
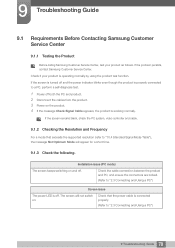
.... (Refer to "10.4 Standard Signal Mode Table"), the message Not Optimum Mode will not switch on. If the problem persists, contact Samsung Customer Service Center. Installation issue (PC mode) The screen keeps switching on the product. 4 If the message Check Signal Cable appears, ... for a short time. 9.1.3 Check the following. If the screen remains blank, check the PC system, video controller and cable. 9.1.2 Checking the Resolution and Frequency For a mode that the power cable is properly connected to "2.3 Connecting and Using a PC") 70 9 Troubleshooting Guide If the screen ...
.... (Refer to "10.4 Standard Signal Mode Table"), the message Not Optimum Mode will not switch on. If the problem persists, contact Samsung Customer Service Center. Installation issue (PC mode) The screen keeps switching on the product. 4 If the message Check Signal Cable appears, ... for a short time. 9.1.3 Check the following. If the screen remains blank, check the PC system, video controller and cable. 9.1.2 Checking the Resolution and Frequency For a mode that the power cable is properly connected to "2.3 Connecting and Using a PC") 70 9 Troubleshooting Guide If the screen ...
User Manual Ver.1.0 (English)
Page 71
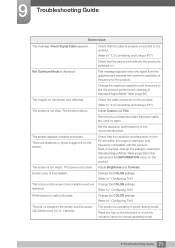
.... Adjust Coarse and Fine. The screen appears unstable and shaky. Screen color is displayed. Not Optimum Mode is inconsistent. Set the resolution and frequency to the product is no image on . This message appears when the signal from the graphics card exceeds the maximum... resolution or frequency for the PC are within the range of resolution and frequency compatible with the product. The screen is properly connected to the product. (Refer to "2.3 Connecting and...
.... Adjust Coarse and Fine. The screen appears unstable and shaky. Screen color is displayed. Not Optimum Mode is inconsistent. Set the resolution and frequency to the product is no image on . This message appears when the signal from the graphics card exceeds the maximum... resolution or frequency for the PC are within the range of resolution and frequency compatible with the product. The screen is properly connected to the product. (Refer to "2.3 Connecting and...

User Manual Ver.1.0 (English)
Page 73
... Personalization Personalization Display Settings Advanced Settings Monitor, and adjust Refresh rate under Monitor settings. Windows 7: Go to Control Panel Appearance and Personalization Display Screen Resolution Advanced settings Monitor, and adjust Refresh rate under Monitor settings. Windows 8: Go to Settings Control Panel Appearance and Personalization Display Screen...
... Personalization Personalization Display Settings Advanced Settings Monitor, and adjust Refresh rate under Monitor settings. Windows 7: Go to Control Panel Appearance and Personalization Display Screen Resolution Advanced settings Monitor, and adjust Refresh rate under Monitor settings. Windows 8: Go to Settings Control Panel Appearance and Personalization Display Screen...

User Manual Ver.1.0 (English)
Page 74
... Panel Appearance and Personalization Personalize Screen Saver Settings or BIOS SETUP on adjustment. 74 9 Troubleshooting Guide How do I change the resolution? 9 Troubleshooting Guide Question How can I set power-saving mode? Answer Windows XP: Go to Control Panel Appearance and... Themes Display Settings, and adjust the resolution. Windows ME/2000: Go to Control Panel Display Settings, and adjust the resolution. Windows Vista: Go to Control Panel Appearance and Personalization Personalize Display Settings, ...
... Panel Appearance and Personalization Personalize Screen Saver Settings or BIOS SETUP on adjustment. 74 9 Troubleshooting Guide How do I change the resolution? 9 Troubleshooting Guide Question How can I set power-saving mode? Answer Windows XP: Go to Control Panel Appearance and... Themes Display Settings, and adjust the resolution. Windows ME/2000: Go to Control Panel Display Settings, and adjust the resolution. Windows Vista: Go to Control Panel Appearance and Personalization Personalize Display Settings, ...

User Manual Ver.1.0 (English)
Page 75
... 75 10 Specifications 10 Specifications 10.1 General (S19C150N / S22C150N) Panel Model Name Size Display area Pixel Pitch Synchronization Horizontal Frequency Vertical Frequency Display Color Resolution Optimum Resolution Maximum Resolution Input Signal, Terminated Maximum Pixel Clock Power Supply Signal connectors Dimensions (W x H x D) / Weight Without Stand With Stand Environmental considerations Operating Storage S19C150N S22C150N 18.5 Inches...
... 75 10 Specifications 10 Specifications 10.1 General (S19C150N / S22C150N) Panel Model Name Size Display area Pixel Pitch Synchronization Horizontal Frequency Vertical Frequency Display Color Resolution Optimum Resolution Maximum Resolution Input Signal, Terminated Maximum Pixel Clock Power Supply Signal connectors Dimensions (W x H x D) / Weight Without Stand With Stand Environmental considerations Operating Storage S19C150N S22C150N 18.5 Inches...
User Manual Ver.1.0 (English)
Page 77
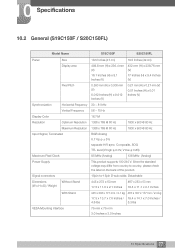
10 Specifications 10.2 General (S19C150F / S20C150FL) Model Name S19C150F S20C150FL Panel Size 18.5 Inches (47 cm) 19.5 Inches (49 cm) Display area 409.8 mm (H) x 230.4 mm (V) 16.1 Inches (H) x 9.1 Inches (V) 432 mm (H)...27 mm (V) 0.01 Inches (H) x 0.01 Inches (V) Synchronization Horizontal Frequency 30 ~ 81 kHz Vertical Frequency 56 ~ 75 Hz Display Color 16.7 M Resolution Optimum Resolution 1366 x 768 @ 60 Hz 1600 x 900 @ 60 Hz Maximum Resolution 1366 x 768 @ 60 Hz 1600 x 900 @ 60 Hz Input Signal, Terminated RGB Analog 0.7 Vp-p ± 5% separate H/V sync, Composite,...
10 Specifications 10.2 General (S19C150F / S20C150FL) Model Name S19C150F S20C150FL Panel Size 18.5 Inches (47 cm) 19.5 Inches (49 cm) Display area 409.8 mm (H) x 230.4 mm (V) 16.1 Inches (H) x 9.1 Inches (V) 432 mm (H)...27 mm (V) 0.01 Inches (H) x 0.01 Inches (V) Synchronization Horizontal Frequency 30 ~ 81 kHz Vertical Frequency 56 ~ 75 Hz Display Color 16.7 M Resolution Optimum Resolution 1366 x 768 @ 60 Hz 1600 x 900 @ 60 Hz Maximum Resolution 1366 x 768 @ 60 Hz 1600 x 900 @ 60 Hz Input Signal, Terminated RGB Analog 0.7 Vp-p ± 5% separate H/V sync, Composite,...

User Manual Ver.1.0 (English)
Page 80
... such a case, change the vertical frequency to 60Hz using the CDT monitor before you exchange a CDT monitor (connected to the nature of the panel. S19C150N / S19C150F Resolution IBM, 720 x 400 VESA, 640 x 480 MAC, 640 x 480 VESA, 640 x 480 VESA, 640 x 480 VESA, 800 x 600 VESA, 800 x 600...belongs to the following table by referring to the standard signal modes, the screen may degrade the picture quality. Therefore, a resolution other than the specified resolution may be blank even though the power LED turns on. If the signal transmitted from your product. Check the ...
... such a case, change the vertical frequency to 60Hz using the CDT monitor before you exchange a CDT monitor (connected to the nature of the panel. S19C150N / S19C150F Resolution IBM, 720 x 400 VESA, 640 x 480 MAC, 640 x 480 VESA, 640 x 480 VESA, 640 x 480 VESA, 800 x 600 VESA, 800 x 600...belongs to the following table by referring to the standard signal modes, the screen may degrade the picture quality. Therefore, a resolution other than the specified resolution may be blank even though the power LED turns on. If the signal transmitted from your product. Check the ...

User Manual Ver.1.0 (English)
Page 82
... second allows you to the right side of a horizontal cycle is called "vertical frequency" or "refresh rate" and is called a horizontal cycle. 10 Specifications S22C150N Resolution IBM, 720 x 400 MAC, 640 x 480 MAC, 832 x 624 MAC, 1152 x 870 VESA, 640 x 480 VESA, 640 x 480 VESA, 640 x 480 VESA, 800 x 600 VESA...
... second allows you to the right side of a horizontal cycle is called "vertical frequency" or "refresh rate" and is called a horizontal cycle. 10 Specifications S22C150N Resolution IBM, 720 x 400 MAC, 640 x 480 MAC, 832 x 624 MAC, 1152 x 870 VESA, 640 x 480 VESA, 640 x 480 VESA, 640 x 480 VESA, 800 x 600 VESA...


