

Instruction Booklet
Page 2
......21 Connecting the Power Source...22 s To use the AC Power Adapter...22 s To use the Battery Pack ...23 Using the Battery Pack...24 s Continuous Recording time table...24 s Battery Level Display...25 Inserting and Ejecting a Cassette ...26 Basic Recording Making Your First Recording...27 Hints for Stable Image Recording ...29 s Recording with...
......21 Connecting the Power Source...22 s To use the AC Power Adapter...22 s To use the Battery Pack ...23 Using the Battery Pack...24 s Continuous Recording time table...24 s Battery Level Display...25 Inserting and Ejecting a Cassette ...26 Basic Recording Making Your First Recording...27 Hints for Stable Image Recording ...29 s Recording with...
Instruction Booklet
Page 5
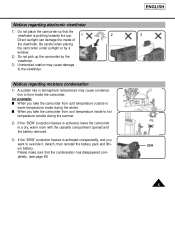
... inside the camcorder. for example: s When you want to override it, detach, then reinstall the battery pack and lithium battery. Notices regarding moisture condensation 1) A sudden rise in a dry, warm room with the cassette compartment opened and the battery removed. 3) If the "DEW" protection feature is pointing towards the sun. 1 2 Direct sunlight can damage...
... inside the camcorder. for example: s When you want to override it, detach, then reinstall the battery pack and lithium battery. Notices regarding moisture condensation 1) A sudden rise in a dry, warm room with the cassette compartment opened and the battery removed. 3) If the "DEW" protection feature is pointing towards the sun. 1 2 Direct sunlight can damage...

Instruction Booklet
Page 6
... the end of the LCD when recording for a long time because the LCD uses more battery power. 1 Make sure that the battery pack is charged before recording outdoors. 1 To preserve battery power, keep your camcorder turned off when you are not operating it. 1 When your camcorder is in CAMERA mode, if ...it is a good idea to CAMERA. even if the battery pack or AC power adapter is removed. 1 The lithium battery for the camcorder lasts about 8~10 months under normal operation from time of installation. 1 When the lithium...
... the end of the LCD when recording for a long time because the LCD uses more battery power. 1 Make sure that the battery pack is charged before recording outdoors. 1 To preserve battery power, keep your camcorder turned off when you are not operating it. 1 When your camcorder is in CAMERA mode, if ...it is a good idea to CAMERA. even if the battery pack or AC power adapter is removed. 1 The lithium battery for the camcorder lasts about 8~10 months under normal operation from time of installation. 1 When the lithium...

Instruction Booklet
Page 9
... other) or a 3-wire grounding type plug, a plug having a third (grounding) pin. Do not defeat the safety purpose of the CAMCORDER and to protect it from battery power, or other similar surface: on the label.
... other) or a 3-wire grounding type plug, a plug having a third (grounding) pin. Do not defeat the safety purpose of the CAMCORDER and to protect it from battery power, or other similar surface: on the label.

Instruction Booklet
Page 14
... Menu dial works in MENU mode. (see page 30) VOLUME works in PLAYER mode. (see page 42, 59) DSE works in CAMERA mode. 26. Lithium Battery (see page 30) MENU ON/OFF works in PLAYER mode. 27. LCD open 25. Speaker 28. TITLE 27. MENU ON/OFF (see page 21) 28...
... Menu dial works in MENU mode. (see page 30) VOLUME works in PLAYER mode. (see page 42, 59) DSE works in CAMERA mode. 26. Lithium Battery (see page 30) MENU ON/OFF works in PLAYER mode. 27. LCD open 25. Speaker 28. TITLE 27. MENU ON/OFF (see page 21) 28...

Instruction Booklet
Page 15
...External MIC 32. Hooks for shoulder strap 36. LENS cap 34. External MIC (see page 21) 32. Battery pack compartment (see page 55) 33. Hooks for shoulder strap (see page 66) 38. Cassette holder 31.... AUDIO/VIDEO out (see page 23) 40. DC jack (see page 23) 15 BATTERY EJECT 41. Recharging Indicator (see page 22) 39. ENGLISH Rear View 40. LOCK/STANDBY 41. LENS cap...42. ZOOM 30. Recharging Indicator 38. SNAP SHOT/D.ZOOM SNAP SHOT works in CAMERA mode (SCL530/L540/L550 only, see page 50) D.ZOOM works in CAMERA mode. 37. LOCK : off - SNAPSHOT/D....
...External MIC 32. Hooks for shoulder strap 36. LENS cap 34. External MIC (see page 21) 32. Battery pack compartment (see page 55) 33. Hooks for shoulder strap (see page 66) 38. Cassette holder 31.... AUDIO/VIDEO out (see page 23) 40. DC jack (see page 23) 15 BATTERY EJECT 41. Recharging Indicator (see page 22) 39. ENGLISH Rear View 40. LOCK/STANDBY 41. LENS cap...42. ZOOM 30. Recharging Indicator 38. SNAP SHOT/D.ZOOM SNAP SHOT works in CAMERA mode (SCL530/L540/L550 only, see page 50) D.ZOOM works in CAMERA mode. 37. LOCK : off - SNAPSHOT/D....

Instruction Booklet
Page 16
Zoom position (see page 44) Indicates the date of the recording. 16 Date (see page 34) Indicates zoom position. DIS (SCL530/L540/L550 only) (see page 40) Indicates Program AE mode is activated. ( , , , ,HSS) c g. Auto Focus is activated. AUG. 2002... i e. ENGLISH OSD (On Screen Display) 1 The OSD on . c. OSD in CAMERA mode b. Program AE (see page 37) Indicates DIS is displayed in the battery. ( ) d. r q Hi8 PLA Y p 0:00:25 o DEW LP u TAPE Z.RTN v l VOLUME w i. a. ba t s r q W TT 440 x Hi8 REC p c XX 0:00:00 o d M.FOCUS DEW...
Zoom position (see page 44) Indicates the date of the recording. 16 Date (see page 34) Indicates zoom position. DIS (SCL530/L540/L550 only) (see page 40) Indicates Program AE mode is activated. ( , , , ,HSS) c g. Auto Focus is activated. AUG. 2002... i e. ENGLISH OSD (On Screen Display) 1 The OSD on . c. OSD in CAMERA mode b. Program AE (see page 37) Indicates DIS is displayed in the battery. ( ) d. r q Hi8 PLA Y p 0:00:25 o DEW LP u TAPE Z.RTN v l VOLUME w i. a. ba t s r q W TT 440 x Hi8 REC p c XX 0:00:00 o d M.FOCUS DEW...

Instruction Booklet
Page 18
...Video Cable. (see page 26) 12. Shoulder strap. (see page 19) (SCL530/L540/L550) 8. Remote Control. (see page 21) 6. AC cord 3. Battery Pack AD44-00035A AD39-00028A 4. Lithium Battery Optional Accessories 10. Note: Optional accessories may be included with your camcorder. S-VIDEO ...cable 11. Two R6 AAbatteries 9. Cassette AD43-10130A 12. AC Power Adapter. (see page 23) 4. Battery Pack. (see page 22) 2. Shoulder Strap AD43-00022A 6. Remote Control AD63-00044B 8. Carrying Case. ENGLISH Accessories Supplied with Camcorder ...
...Video Cable. (see page 26) 12. Shoulder strap. (see page 19) (SCL530/L540/L550) 8. Remote Control. (see page 21) 6. AC cord 3. Battery Pack AD44-00035A AD39-00028A 4. Lithium Battery Optional Accessories 10. Note: Optional accessories may be included with your camcorder. S-VIDEO ...cable 11. Two R6 AAbatteries 9. Cassette AD43-10130A 12. AC Power Adapter. (see page 23) 4. Battery Pack. (see page 22) 2. Shoulder Strap AD43-00022A 6. Remote Control AD63-00044B 8. Carrying Case. ENGLISH Accessories Supplied with Camcorder ...

Instruction Booklet
Page 19
... following the + and - WAIT-10S/SELF-END: wait 10 seconds, followed by 30 seconds of the batteries. Self Timer 3. WIDE (see page 56) Remote Control Battery Installation 1 You must insert or replace these batteries when: - Display (see page 16) 7. (Play) (see page 56) 8. (FF) (see ...page 57) 9. (REW) (see page 57) 10. (Stop) (see page 34) 5. WAIT-10S/SELF-30S: wait 10 seconds, followed by recording until you to reverse the polarity of recording. - Remote Control (SCL530...
... following the + and - WAIT-10S/SELF-END: wait 10 seconds, followed by 30 seconds of the batteries. Self Timer 3. WIDE (see page 56) Remote Control Battery Installation 1 You must insert or replace these batteries when: - Display (see page 16) 7. (Play) (see page 56) 8. (FF) (see ...page 57) 9. (REW) (see page 57) 10. (Stop) (see page 34) 5. WAIT-10S/SELF-30S: wait 10 seconds, followed by recording until you to reverse the polarity of recording. - Remote Control (SCL530...
Instruction Booklet
Page 21
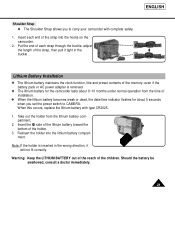
... the holder from the time of the strap, then pull it will not fit correctly. Warning: Keep the LITHIUM BATTERY out of the reach of the memory; even if the battery pack or AC power adapter is inserted in the wrong direction, it tight in the buckle . Reinsert the holder ...hooks on the camcorder. 2. ENGLISH Shoulder Strap 1 The Shoulder Strap allows you set the power switch to carry your camcorder with type CR2025. 1. Lithium Battery Installation 1 The lithium battery maintains the clock function, title and preset contents of the children. When this occurs, replace the lithium...
... the holder from the time of the strap, then pull it will not fit correctly. Warning: Keep the LITHIUM BATTERY out of the reach of the memory; even if the battery pack or AC power adapter is inserted in the wrong direction, it tight in the buckle . Reinsert the holder ...hooks on the camcorder. 2. ENGLISH Shoulder Strap 1 The Shoulder Strap allows you set the power switch to carry your camcorder with type CR2025. 1. Lithium Battery Installation 1 The lithium battery maintains the clock function, title and preset contents of the children. When this occurs, replace the lithium...

Instruction Booklet
Page 22
...- Move the adapter away from the TV, camcorder or the antenna cable. 22 Make sure that the image appears in the LCD monitor. - Using the Battery Pack: used next to CAMERAmode. Set LOCK/STANDBY switch to connect power source. - ENGLISH Connecting the Power Source 1 There are two ways to STANDBY.
...- Move the adapter away from the TV, camcorder or the antenna cable. 22 Make sure that the image appears in the LCD monitor. - Using the Battery Pack: used next to CAMERAmode. Set LOCK/STANDBY switch to connect power source. - ENGLISH Connecting the Power Source 1 There are two ways to STANDBY.

Instruction Booklet
Page 23
... : Indicates 50% ~ 75% has been recharged. - Blinking stops and stays on : Recharging has been completed. - Prepare as many battery packs as possible. Attach the battery pack to a wall socket. 2 3 3. Blinking once a second : Indicates less than OFF 50% has been charged. - If recharging... is used in recording. s Even if the power is turned off, battery will the battery last for a second: Indicates there is an error. Recharging the Battery Pack 1. corder. 4. Blinking three times a second : Indicates 75% ~ 100% has been recharged. - Reset ...
... : Indicates 50% ~ 75% has been recharged. - Blinking stops and stays on : Recharging has been completed. - Prepare as many battery packs as possible. Attach the battery pack to a wall socket. 2 3 3. Blinking once a second : Indicates less than OFF 50% has been charged. - If recharging... is used in recording. s Even if the power is turned off, battery will the battery last for a second: Indicates there is an error. Recharging the Battery Pack 1. corder. 4. Blinking three times a second : Indicates 75% ~ 100% has been recharged. - Reset ...

Instruction Booklet
Page 24
... be recharged in temperatures below 0°C, even when it is between 0°C(32°F) and 40°C(104°F). of the battery pack will be reduced if the battery pack is left in the table are both turned on, then the recording time will be reduced. 1 The continuous recording times given...temperatures above 40°C(104°F) for example). 1 Do not connect +/- Actual recording time depends on model and battery type. Battery Type SB-L160 SCL520 LCD ON, EVF OFF LCD OFF, EVF ON SCL530/SCL540 LCD ON, LCD OFF, EVF/CVF OFF EVF/CVF ON SCL550 LCD ON, EVF OFF LCD OFF, EVF...
... be recharged in temperatures below 0°C, even when it is between 0°C(32°F) and 40°C(104°F). of the battery pack will be reduced if the battery pack is left in the table are both turned on, then the recording time will be reduced. 1 The continuous recording times given...temperatures above 40°C(104°F) for example). 1 Do not connect +/- Actual recording time depends on model and battery type. Battery Type SB-L160 SCL520 LCD ON, EVF OFF LCD OFF, EVF ON SCL530/SCL540 LCD ON, LCD OFF, EVF/CVF OFF EVF/CVF ON SCL550 LCD ON, EVF OFF LCD OFF, EVF...

Instruction Booklet
Page 25
.... The continuous recording time in these instructions. ble) 6 1 Please refer to the table on the battery pack to help you actually use the camcorder, the remaining battery time may choose which indicates discharged. Fully charged 1 2. 20~45% consumed 3. 45~80% consumed... (prepare a charged one indicates charged and which one ) 3 5. 95~98% consumed (change the battery) 4 6. 100% consumed 5 (camcorder will turn off soon, change the battery as soon as the approximate continuous recording times given in the operating instructions is affected by environmental temperature and...
.... The continuous recording time in these instructions. ble) 6 1 Please refer to the table on the battery pack to help you actually use the camcorder, the remaining battery time may choose which indicates discharged. Fully charged 1 2. 20~45% consumed 3. 45~80% consumed... (prepare a charged one indicates charged and which one ) 3 5. 95~98% consumed (change the battery) 4 6. 100% consumed 5 (camcorder will turn off soon, change the battery as soon as the approximate continuous recording times given in the operating instructions is affected by environmental temperature and...
Instruction Booklet
Page 26
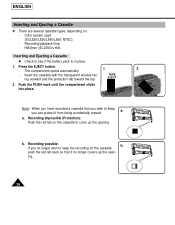
... cassette types, depending on the cassette, push the red tab back so that you wish to keep, you no longer wish to see if the battery pack is Hi8). The compartment opens automatically. - a. Color system used (SCL520/L530/L540/L550: NTSC). - Press the EJECT button. - Recording possible: b. Hi8/8mm (SCL550 is...
... cassette types, depending on the cassette, push the red tab back so that you wish to keep, you no longer wish to see if the battery pack is Hi8). The compartment opens automatically. - a. Color system used (SCL520/L530/L540/L550: NTSC). - Press the EJECT button. - Recording possible: b. Hi8/8mm (SCL550 is...

Instruction Booklet
Page 27
Making Your First Recording Please make sure that there is enough remaining power for recording. (see page 25) a. ENGLISH CAMERA BATTERY s Did you open the LENS CAP? STANDBY s Did you insert a cassette? (see page 26) s Open the LCD monitor and make these preparations before ...the red tab of the cassette is displayed in the LCD monitor. s Did you connect a power source? (Battery Pack or AC Power Adapter) s Did you want to STANDBY mode? s Make sure the battery level indicates that STANDBY is opened, STANDBY will not be displayed on the LCD. REC X:XX:XX 27
Making Your First Recording Please make sure that there is enough remaining power for recording. (see page 25) a. ENGLISH CAMERA BATTERY s Did you open the LENS CAP? STANDBY s Did you insert a cassette? (see page 26) s Open the LCD monitor and make these preparations before ...the red tab of the cassette is displayed in the LCD monitor. s Did you connect a power source? (Battery Pack or AC Power Adapter) s Did you want to STANDBY mode? s Make sure the battery level indicates that STANDBY is opened, STANDBY will not be displayed on the LCD. REC X:XX:XX 27
Instruction Booklet
Page 28
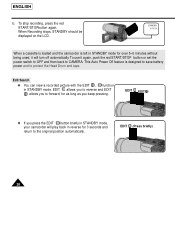
... to protect the Head Drum and tape. EDIT (Press briefly) 28 STANDBY Y:YY:YY When a cassette is loaded and the camcorder is designed to save battery power and to the original position automatically. When Recording stops, STANDBY should be displayed on the LCD. To use it will play back in STANDBY...
... to protect the Head Drum and tape. EDIT (Press briefly) 28 STANDBY Y:YY:YY When a cassette is loaded and the camcorder is designed to save battery power and to the original position automatically. When Recording stops, STANDBY should be displayed on the LCD. To use it will play back in STANDBY...

Instruction Booklet
Page 30
... on the conditions in place. 2. Turn the MENU dial to STANDBY mode. (see page 22) 3. s You can adjust: s Brightness s Color s Tint 1. Make sure that the battery pack is equipped with a 2.5 inch color Liquid Crystal Display (LCD) screen, which you are using the camcorder (indoors or outdoors for example), you desire. BRIGHT...
... on the conditions in place. 2. Turn the MENU dial to STANDBY mode. (see page 22) 3. s You can adjust: s Brightness s Color s Tint 1. Make sure that the battery pack is equipped with a 2.5 inch color Liquid Crystal Display (LCD) screen, which you are using the camcorder (indoors or outdoors for example), you desire. BRIGHT...

Instruction Booklet
Page 32
... (PLAY/STILL) button to the beginning. Open the LCD monitor and make sure that STOP is displayed on the LCD monitor. 1 Make sure that the battery pack is in place. 1. ENGLISH Playing back a tape on the LCD 1 You can monitor the playback picture on the OSD. 3 Adjust the angle of the...
... (PLAY/STILL) button to the beginning. Open the LCD monitor and make sure that STOP is displayed on the LCD monitor. 1 Make sure that the battery pack is in place. 1. ENGLISH Playing back a tape on the LCD 1 You can monitor the playback picture on the OSD. 3 Adjust the angle of the...
Instruction Booklet
Page 34
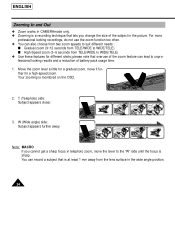
... lets you cannot get a sharp focus in telephoto zoom, move it further for different shots; T (Telephoto) side: Subject appears closer. 3. please note that overuse of battery pack usage time. 1. ENGLISH Zooming In and Out 1 Zoom works in CAMERAmode only. 1 Zooming is a recording technique that is at least 1 mm away from TELE...
... lets you cannot get a sharp focus in telephoto zoom, move it further for different shots; T (Telephoto) side: Subject appears closer. 3. please note that overuse of battery pack usage time. 1. ENGLISH Zooming In and Out 1 Zoom works in CAMERAmode only. 1 Zooming is a recording technique that is at least 1 mm away from TELE...


