Universal Print Driver Guide (ENGLISH)
Page 4
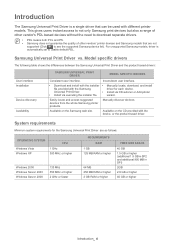
...in SP2 and additional 900 MB in SP3 2GB 2.9 GB or higher 40 GB or higher Introduction_ 4 Manually discover devices. This gives users instant access to not only Samsung print devices but also a range of other vendor's PDL based devices without the need to see the ...via executing the installer file. Inconsistent user interface. • Download and install with the installer • Manually locate, download, and install file provided with the device, or the product based driver. Available on the Samsung web site. System requirements Minimum system requirements for each device...
...in SP2 and additional 900 MB in SP3 2GB 2.9 GB or higher 40 GB or higher Introduction_ 4 Manually discover devices. This gives users instant access to not only Samsung print devices but also a range of other vendor's PDL based devices without the need to see the ...via executing the installer file. Inconsistent user interface. • Download and install with the installer • Manually locate, download, and install file provided with the device, or the product based driver. Available on the Samsung web site. System requirements Minimum system requirements for each device...

User Manual (ENGLISH)
Page 2
© 2006 Samsung Electronics Co., Ltd. Samsung Electronics is not responsible for information purposes only. This manual is a trademark of Adobe System, Inc. • UFST® and MicroType™ are registered trademarks of Monotype Imaging Inc....or related to change without notice. All information included herein is subject to use of this manual. • SCX-4725F and SCX-4725FN are model names of Samsung Electronics Co., Ltd. • Samsung and Samsung logo are trademarks of Samsung Electronics Co., Ltd. • Centronics is a trademark of Centronics Data Computer Corporation. &#...
© 2006 Samsung Electronics Co., Ltd. Samsung Electronics is not responsible for information purposes only. This manual is a trademark of Adobe System, Inc. • UFST® and MicroType™ are registered trademarks of Monotype Imaging Inc....or related to change without notice. All information included herein is subject to use of this manual. • SCX-4725F and SCX-4725FN are model names of Samsung Electronics Co., Ltd. • Samsung and Samsung logo are trademarks of Samsung Electronics Co., Ltd. • Centronics is a trademark of Centronics Data Computer Corporation. &#...

User Manual (ENGLISH)
Page 6
... ...9.1 Adjusting the document settings ...9.1 Sending a fax automatically ...9.2 Sending a fax manually ...9.2 Confirming a transmission ...9.3 Automatic redialing ...9.3 Redialing the last number ...9.3 Changing receiving modes ...9.3 Receiving automatically in Fax mode ...9.3 Receiving manually in Tel mode ...9.3 Receiving manually using an extension telephone 9.4 Receiving automatically in Ans/Fax mode ...9.4 Receiving faxes ... ...12.3 Clearing the Toner Empty Replace Toner message 12.6 Maintenance parts ...12.6 Managing your machine from the website (SCX-4725FN only) ...12.7 13.
... ...9.1 Adjusting the document settings ...9.1 Sending a fax automatically ...9.2 Sending a fax manually ...9.2 Confirming a transmission ...9.3 Automatic redialing ...9.3 Redialing the last number ...9.3 Changing receiving modes ...9.3 Receiving automatically in Fax mode ...9.3 Receiving manually in Tel mode ...9.3 Receiving manually using an extension telephone 9.4 Receiving automatically in Ans/Fax mode ...9.4 Receiving faxes ... ...12.3 Clearing the Toner Empty Replace Toner message 12.6 Maintenance parts ...12.6 Managing your machine from the website (SCX-4725FN only) ...12.7 13.

User Manual (ENGLISH)
Page 13
... Your machine is equipped with special features that improve print quality. Printing on one single sheet of paper to 1200 dpi [Best]. See the Software Section. ... PS printing (SCX-4725FN only). * Zoran IPS Emulation compatible with a variety of features supported by substantially reducing power consumption when not in various sizes. 1 Introduction Thank you for purchasing this Samsung multifunctional product. This...postcards, and heavy paper. See the Software Section. • Print Posters. The manual tray holds 1 sheet of paper. 1. pages per minute 1.1 You can then...
... Your machine is equipped with special features that improve print quality. Printing on one single sheet of paper to 1200 dpi [Best]. See the Software Section. ... PS printing (SCX-4725FN only). * Zoran IPS Emulation compatible with a variety of features supported by substantially reducing power consumption when not in various sizes. 1 Introduction Thank you for purchasing this Samsung multifunctional product. This...postcards, and heavy paper. See the Software Section. • Print Posters. The manual tray holds 1 sheet of paper. 1. pages per minute 1.1 You can then...

User Manual (ENGLISH)
Page 14
... 6 control panel 13 toner cartridge 7 output tray 14 manual tray paper width guides 1. Printer overview These are the main components of your machine: Front view Rear view * The figure above shows an SCX-4725FN. 1 rear cover 2 power switch 3 power receptacle 4 extension telephone socket (EXT) 1. SCX-4725FN only. 5 telephone line socket (LINE) 6 network port1 7 USB port...
... 6 control panel 13 toner cartridge 7 output tray 14 manual tray paper width guides 1. Printer overview These are the main components of your machine: Front view Rear view * The figure above shows an SCX-4725FN. 1 rear cover 2 power switch 3 power receptacle 4 extension telephone socket (EXT) 1. SCX-4725FN only. 5 telephone line socket (LINE) 6 network port1 7 USB port...

User Manual (ENGLISH)
Page 16
...printing. Allow extra space for ventilation) 1.4 Note You can access the user's guides in the guide to get help, support, printer drivers, manuals, and order information from the printer properties dialog box. Clearance space • Front: 482.6 mm (enough space so that the tray and ...the following resources, either printed or onscreen. Do not set the machine close to print documents with help screen, click Help from the Samsung website, www.samsungprinter.com. Finding more information You can find information for setting up and using your machine's full features, and contains...
...printing. Allow extra space for ventilation) 1.4 Note You can access the user's guides in the guide to get help, support, printer drivers, manuals, and order information from the printer properties dialog box. Clearance space • Front: 482.6 mm (enough space so that the tray and ...the following resources, either printed or onscreen. Do not set the machine close to print documents with help screen, click Help from the Samsung website, www.samsungprinter.com. Finding more information You can find information for setting up and using your machine's full features, and contains...

User Manual (ENGLISH)
Page 24
...available only on your machine's print server settings and manage the machine via BOOTP/DHCP (default): A TCP/IP address is assigned manually by the system administrator. • Dynamic addressing via the following two methods: Via network administration programs You can set up with ... to your machine for setting up by the server. Protocols can be set up the network protocols on page 4.2. 4 Network setup (SCX-4725FN only) Connecting your network printer. Customize printer, copy, and fax settings. • SetIP: Utility program allowing you remotely monitor and ...
...available only on your machine's print server settings and manage the machine via BOOTP/DHCP (default): A TCP/IP address is assigned manually by the system administrator. • Dynamic addressing via the following two methods: Via network administration programs You can set up with ... to your machine for setting up by the server. Protocols can be set up the network protocols on page 4.2. 4 Network setup (SCX-4725FN only) Connecting your network printer. Customize printer, copy, and fax settings. • SetIP: Utility program allowing you remotely monitor and ...

User Manual (ENGLISH)
Page 25
... top line of the display. 2 Press the Scroll buttons until Config Network appears and press Enter. 3 Press Enter when TCP/IP appears. 4 Press Enter when Manual appears. 5 Press Enter when IP Address appears. 6 Enter a byte between 0 and 255 using the MAC address which is configured. 1 Press Menu until Network Setup appears...
... top line of the display. 2 Press the Scroll buttons until Config Network appears and press Enter. 3 Press Enter when TCP/IP appears. 4 Press Enter when Manual appears. 5 Press Enter when IP Address appears. 6 Enter a byte between 0 and 255 using the MAC address which is configured. 1 Press Menu until Network Setup appears...

User Manual (ENGLISH)
Page 28
...on the machine. When you choose should be the result of improper handling, unacceptable temperature and humidity levels, or other variables over which Samsung has no control. • Before purchasing large quantities of the print media affects how crisp the printing looks on the printout. To... size marked on the document input tray. 2 Adjust the document width guides to 165 g/m2 bond for the manual tray • Brightness: Some print media are not covered by Samsung's warranty or service agreements. 5.2 Make sure that fits easily within the paper adjusters of the paper tray. &#...
...on the machine. When you choose should be the result of improper handling, unacceptable temperature and humidity levels, or other variables over which Samsung has no control. • Before purchasing large quantities of the print media affects how crisp the printing looks on the printout. To... size marked on the document input tray. 2 Adjust the document width guides to 165 g/m2 bond for the manual tray • Brightness: Some print media are not covered by Samsung's warranty or service agreements. 5.2 Make sure that fits easily within the paper adjusters of the paper tray. &#...

User Manual (ENGLISH)
Page 29
Maximum capacity may differ depending on media weight, thickness, and environmental conditions. 1 sheet for the manual tray 1 sheet for the manual tray 1 sheet for the manual tray 1 sheet for the manual tray Envelope C5 162 x 229 mm (6.38 x 9.02 inches) Transparency Envelope C6 Letter, A4 114 x 162 mm (4.49 x 6.38 inches) Refer to...m2 (16 to 43 lb bond) 60 to 165 g/m2 (16 to 43 lb bond) 1. If media weight is over 90 g/m2, use the manual tray. 2. Supported print media types and sizes Type Plain paper Size Letter Legal Folio Oficio A4 JIS B5 ISO B5 Executive Dimensions 216 x 279 mm...
Maximum capacity may differ depending on media weight, thickness, and environmental conditions. 1 sheet for the manual tray 1 sheet for the manual tray 1 sheet for the manual tray 1 sheet for the manual tray Envelope C5 162 x 229 mm (6.38 x 9.02 inches) Transparency Envelope C6 Letter, A4 114 x 162 mm (4.49 x 6.38 inches) Refer to...m2 (16 to 43 lb bond) 60 to 165 g/m2 (16 to 43 lb bond) 1. If media weight is over 90 g/m2, use the manual tray. 2. Supported print media types and sizes Type Plain paper Size Letter Legal Folio Oficio A4 JIS B5 ISO B5 Executive Dimensions 216 x 279 mm...

User Manual (ENGLISH)
Page 30
... together, remove them as they print out. Acceptable Unacceptable • Envelopes with a peel-off adhesive strip or with more than one sheet at a time through the manual tray to avoid paper jams. • To prevent print media, such as a plastic container or bag, to prevent dust and... manual tray Guidelines for selecting and storing print media When selecting or loading paper, envelopes, or other print materials, keep these types of paper could result in paper jams, chemical smells, and damage to your paper. • Load special media types one flap that are ready to use in laser ...
... together, remove them as they print out. Acceptable Unacceptable • Envelopes with a peel-off adhesive strip or with more than one sheet at a time through the manual tray to avoid paper jams. • To prevent print media, such as a plastic container or bag, to prevent dust and... manual tray Guidelines for selecting and storing print media When selecting or loading paper, envelopes, or other print materials, keep these types of paper could result in paper jams, chemical smells, and damage to your paper. • Load special media types one flap that are ready to use in laser ...

User Manual (ENGLISH)
Page 32
... edge entering the machine first. • Previously printed paper: Previously printed side down with an uncurled edge toward the machine. 2 Adjust the manual tray paper width guides to the width of the paper. See page 5.7 for copying and faxing or the Software Section for the tray. The... the following loading guidelines: • Envelopes: Flap side down with paper feed, place one sheet at the front. Notes Depending on the media type you experience problems with the stamp area on facing up. The manual tray can hold 1 sheet of print material, such as transparency, postcard, note card,...
... edge entering the machine first. • Previously printed paper: Previously printed side down with an uncurled edge toward the machine. 2 Adjust the manual tray paper width guides to the width of the paper. See page 5.7 for copying and faxing or the Software Section for the tray. The... the following loading guidelines: • Envelopes: Flap side down with paper feed, place one sheet at the front. Notes Depending on the media type you experience problems with the stamp area on facing up. The manual tray can hold 1 sheet of print material, such as transparency, postcard, note card,...

User Manual (ENGLISH)
Page 33
... Press the Scroll buttons until the paper type you are using the manual tray • Load only one sheet of print media at a time in the manual tray. • To prevent paper jams, do not add paper when... print media. • Print media should be loaded face up with the top edge going into the manual tray first and be placed in the center of paper. 1 1 output tray The output tray collects ...printed paper face down, in the order in the manual tray. This also applies to Standby mode. Tips on your PC. 1 Press Menu. Note The settings ...
... Press the Scroll buttons until the paper type you are using the manual tray • Load only one sheet of print media at a time in the manual tray. • To prevent paper jams, do not add paper when... print media. • Print media should be loaded face up with the top edge going into the manual tray first and be placed in the center of paper. 1 1 output tray The output tray collects ...printed paper face down, in the order in the manual tray. This also applies to Standby mode. Tips on your PC. 1 Press Menu. Note The settings ...

User Manual (ENGLISH)
Page 40
... Sending a fax • Setting the fax header • Adjusting the document settings • Sending a fax automatically • Sending a fax manually • Confirming a transmission • Automatic redialing • Redialing the last number Receiving a fax • Changing receiving modes • Receiving... automatically in Fax mode • Receiving manually in Tel mode • Receiving manually using an extension telephone • Receiving automatically in Ans/Fax mode • Receiving faxes using DRPD mode ...
... Sending a fax • Setting the fax header • Adjusting the document settings • Sending a fax automatically • Sending a fax manually • Confirming a transmission • Automatic redialing • Redialing the last number Receiving a fax • Changing receiving modes • Receiving... automatically in Fax mode • Receiving manually in Tel mode • Receiving manually using an extension telephone • Receiving automatically in Ans/Fax mode • Receiving faxes using DRPD mode ...

User Manual (ENGLISH)
Page 41
...For details about loading an original, see page 5.1. 2 Adjust the resolution and the darkness to add another page. 6 When you send the fax manually. For details about loading an original, see page 5.1. 2 Adjust the resolution and the darkness to the current fax job. Note When you are ... at any time while sending. You can use speed dial numbers, or group dial numbers. After the number is not available. Sending a fax manually 1 Load originals face up into the ADF, or place a single original face down on the top line of gray or photographs. You can use...
...For details about loading an original, see page 5.1. 2 Adjust the resolution and the darkness to add another page. 6 When you send the fax manually. For details about loading an original, see page 5.1. 2 Adjust the resolution and the darkness to the current fax job. Note When you are ... at any time while sending. You can use speed dial numbers, or group dial numbers. After the number is not available. Sending a fax manually 1 Load originals face up into the ADF, or place a single original face down on the top line of gray or photographs. You can use...

User Manual (ENGLISH)
Page 42
... Ring Pattern Detection (DRPD) feature. For further details, see page 9.4. To cancel the automatic redialing, press Stop/Clear. For further details, see page 10.1. Receiving manually in Fax mode Your machine is completed. Confirming a transmission When the last page of redial attempts. If the fax machine senses a fax tone on the...
... Ring Pattern Detection (DRPD) feature. For further details, see page 9.4. To cancel the automatic redialing, press Stop/Clear. For further details, see page 10.1. Receiving manually in Fax mode Your machine is completed. Confirming a transmission When the last page of redial attempts. If the fax machine senses a fax tone on the...

User Manual (ENGLISH)
Page 43
... set up the DRPD mode: 1 Press Menu until Set appears and press Enter. The machine receives the fax. Receiving automatically in Tel mode (manual reception) when the answering machine is calling in secure receiving mode You may need to prevent your received faxes from a fax machine. 5 When...• After DRPD has been set up again if you are talking to the extension telephone or answering machine plugged into memory. Receiving manually using DRPD mode Distinctive Ring is unattended. Press the buttons slowly in DRPD mode, you must be forwarded to on the back of ...
... set up the DRPD mode: 1 Press Menu until Set appears and press Enter. The machine receives the fax. Receiving automatically in Tel mode (manual reception) when the answering machine is calling in secure receiving mode You may need to prevent your received faxes from a fax machine. 5 When...• After DRPD has been set up again if you are talking to the extension telephone or answering machine plugged into memory. Receiving manually using DRPD mode Distinctive Ring is unattended. Press the buttons slowly in DRPD mode, you must be forwarded to on the back of ...

User Manual (ENGLISH)
Page 53
... Standby mode. Cleaning the inside the machine. Wait for more than a few minutes. Set it on the cartridge to avoid touching this area. 3 Pull the manual tray out. 4 With a dry lint-free cloth, wipe away any water drip onto or into the machine. Use the handle on a clean flat surface. Caution...
... Standby mode. Cleaning the inside the machine. Wait for more than a few minutes. Set it on the cartridge to avoid touching this area. 3 Pull the manual tray out. 4 With a dry lint-free cloth, wipe away any water drip onto or into the machine. Use the handle on a clean flat surface. Caution...

User Manual (ENGLISH)
Page 54
... glass (LSU) inside the top of the cartridge compartment, and gently swab the glass to see if dirt turns the white cotton black. 6 Push the manual tray back into the machine. 3 Wipe the surface of the scanner glass and ADF glass until it is clean and dry. 1 3 2 4 1 white sheet 2 ADF glass...
... glass (LSU) inside the top of the cartridge compartment, and gently swab the glass to see if dirt turns the white cotton black. 6 Push the manual tray back into the machine. 3 Wipe the surface of the scanner glass and ADF glass until it is clean and dry. 1 3 2 4 1 white sheet 2 ADF glass...

User Manual (ENGLISH)
Page 59
... glass for what to [Paper Jam 0] Open/Close Door [Paper Jam 1] Open/Close Door [Paper Jam 2] Check Inside In the paper feed area (tray or manual tray) In the fuser area or around the toner cartridge In the paper exit area the next section and page 13.2 page 13.2 page 13...
... glass for what to [Paper Jam 0] Open/Close Door [Paper Jam 1] Open/Close Door [Paper Jam 2] Check Inside In the paper feed area (tray or manual tray) In the fuser area or around the toner cartridge In the paper exit area the next section and page 13.2 page 13.2 page 13...


