Quick Guide (ENGLISH)
Page 2
Contents Health and safety information 2 1 Camera layout 4 8 Setting up your camera... ...... 5 Unpacking 5 7 Inserting the battery and memory card 6 14 Charging the battery 7 12 Selecting options 7 35 Capturing photos or videos... 8 19 Playing files 9 56 Transferring files to people or animals. Small parts may present physical dangers as the camera or its accessories. Prevent damage to...
Contents Health and safety information 2 1 Camera layout 4 8 Setting up your camera... ...... 5 Unpacking 5 7 Inserting the battery and memory card 6 14 Charging the battery 7 12 Selecting options 7 35 Capturing photos or videos... 8 19 Playing files 9 56 Transferring files to people or animals. Small parts may present physical dangers as the camera or its accessories. Prevent damage to...
Quick Guide (ENGLISH)
Page 3
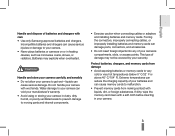
... type of damage may explode when overheated. Do not handle your camera to get wet-liquids can reduce the charging capacity of your camera. • Never place batteries or cameras on or in dusty, dirty, humid, or poorly-ventilated areas... when connecting cables or adapters and installing batteries and memory cards. Batteries may not be covered by your camera in heating devices, such as microwave ovens, stoves, or radiators. Forcing the connectors, improperly connecting cables,... memory cards from making contact with care • Use only Samsung-approved batteries and chargers.
... type of damage may explode when overheated. Do not handle your camera to get wet-liquids can reduce the charging capacity of your camera. • Never place batteries or cameras on or in dusty, dirty, humid, or poorly-ventilated areas... when connecting cables or adapters and installing batteries and memory cards. Batteries may not be covered by your camera in heating devices, such as microwave ovens, stoves, or radiators. Forcing the connectors, improperly connecting cables,... memory cards from making contact with care • Use only Samsung-approved batteries and chargers.

Quick Guide (ENGLISH)
Page 7
EV Indicator light ▪▪ Red: Charging ▪▪ Green: Fully charged Back Move ▪▪ To move left or right, press [ ] or To move up or down, press [ ] or [ ]. 3 Press [ ] to confirm the highlighted option or menu. ▪▪ Press [ ] again to go back to an option or menu. Selecting options 1 In Shooting mode, press [ ]. 2 Use the navigation buttons to scroll to the previous menu. 7 English Charging the battery Before using the camera for the first time, you must charge the battery.
EV Indicator light ▪▪ Red: Charging ▪▪ Green: Fully charged Back Move ▪▪ To move left or right, press [ ] or To move up or down, press [ ] or [ ]. 3 Press [ ] to confirm the highlighted option or menu. ▪▪ Press [ ] again to go back to an option or menu. Selecting options 1 In Shooting mode, press [ ]. 2 Use the navigation buttons to scroll to the previous menu. 7 English Charging the battery Before using the camera for the first time, you must charge the battery.
User Manual (ENGLISH)
Page 12
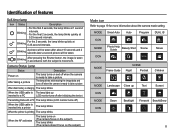
...is inserted into a printer The lamp blinks When the printer is taken in accordance with a PC The lamp blinks (LCD monitor turns off when the camera is ready to page 19 for more information about 10 seconds and 2 seconds later a second picture will be taken. Identification of features ...printing The lamp blinks When the AF activates The lamp turns on (The camera focus on the subject) The lamp blinks (The camera doesn't focus on the subject) Mode icon Refer to take a picture When flash battery is charging The lamp blinks When the USB cable is The lamp lights up Text...
...is inserted into a printer The lamp blinks When the printer is taken in accordance with a PC The lamp blinks (LCD monitor turns off when the camera is ready to page 19 for more information about 10 seconds and 2 seconds later a second picture will be taken. Identification of features ...printing The lamp blinks When the AF activates The lamp turns on (The camera focus on the subject) The lamp blinks (The camera doesn't focus on the subject) Mode icon Refer to take a picture When flash battery is charging The lamp blinks When the USB cable is The lamp lights up Text...
User Manual (ENGLISH)
Page 13
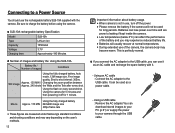
...-10A supplied with it off the power. å Please remove the battery if the camera will usually recover at normal temperatures. å During extended use of images Conditions Using the fully charged battery, Auto mode, 12M image size, Fine image quality, Shot to shot interval: 30Sec...ash on the user's methods. 12 Important information about battery usage. å When camera is not in use, turn off for 1 minute. Batteries can lose power over time and are measured under Samsung's standard conditions and shooting conditions and may experience reduced battery life. å Batteries ...
...-10A supplied with it off the power. å Please remove the battery if the camera will usually recover at normal temperatures. å During extended use of images Conditions Using the fully charged battery, Auto mode, 12M image size, Fine image quality, Shot to shot interval: 30Sec...ash on the user's methods. 12 Important information about battery usage. å When camera is not in use, turn off for 1 minute. Batteries can lose power over time and are measured under Samsung's standard conditions and shooting conditions and may experience reduced battery life. å Batteries ...
User Manual (ENGLISH)
Page 14
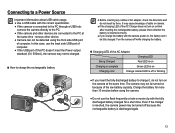
... with the correct specification. å If the camera is connected to the PC through a USB hub : connect the camera directly to the PC. å If the camera and other device. å Camera can not be charged. Ê How to charge the rechargeable battery å Before inserting any cables or AC...by force. Connecting to a Power Source Important information about USB cable usage. å Use a USB cable with the camera power on, the battery won't be fully charged. The camera may not be detected using the front side USB port of the PC doesn't meet the Power output standard (5V, 500mA...
... with the correct specification. å If the camera is connected to the PC through a USB hub : connect the camera directly to the PC. å If the camera and other device. å Camera can not be charged. Ê How to charge the rechargeable battery å Before inserting any cables or AC...by force. Connecting to a Power Source Important information about USB cable usage. å Use a USB cable with the camera power on, the battery won't be fully charged. The camera may not be detected using the front side USB port of the PC doesn't meet the Power output standard (5V, 500mA...

User Manual (ENGLISH)
Page 15
... may damage it. Battery indicator Battery status The battery is fully charged Low battery Low battery capacity capacity (Prepare to (Prepare to a Power Source Ê Insert the battery as shown. - Turn off the camera's power before inserting the memory card. - If the camera does not turn on after you have inserted battery, please...
... may damage it. Battery indicator Battery status The battery is fully charged Low battery Low battery capacity capacity (Prepare to (Prepare to a Power Source Ê Insert the battery as shown. - Turn off the camera's power before inserting the memory card. - If the camera does not turn on after you have inserted battery, please...
User Manual (ENGLISH)
Page 27
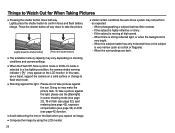
... use the [Backlight] in scene shooting mode (see page 23), fill-in a low lighting condition, the camera shake warning indicator ( Ã ) may vary depending on shooting conditions and camera settings. å When the Flash Off, Slow synchro mode or DUAL IS mode is highly reflective or ...the surroundings are dark. å The available memory capacity may appear on a solid surface or change to confirm focus and flash battery charge. If the subject is selected in flash (see page 32), spot metering (see page 42), exposure compensation (see page 36) or ACB ...
... use the [Backlight] in scene shooting mode (see page 23), fill-in a low lighting condition, the camera shake warning indicator ( Ã ) may vary depending on shooting conditions and camera settings. å When the Flash Off, Slow synchro mode or DUAL IS mode is highly reflective or ...the surroundings are dark. å The available memory capacity may appear on a solid surface or change to confirm focus and flash battery charge. If the subject is selected in flash (see page 32), spot metering (see page 42), exposure compensation (see page 36) or ACB ...
User Manual (ENGLISH)
Page 33
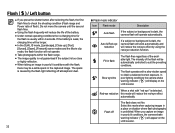
...-eye reduction this mode when capturing images in a place or situation where flash photography is dark, the camera flash will reduce the red-eye effect automatically. If the battery is weak, the charging time will be longer. å In the DUAL IS mode, [Landscape], [Close up], [Text], [Sunset],... of the battery. å Under normal operating conditions the re-charging time for the flash is usually within the flash range. å The image quality is not guaranteed if the subject is dark, the camera flash will work automatically and will display on the LCD ...
...-eye reduction this mode when capturing images in a place or situation where flash photography is dark, the camera flash will reduce the red-eye effect automatically. If the battery is weak, the charging time will be longer. å In the DUAL IS mode, [Landscape], [Close up], [Text], [Sunset],... of the battery. å Under normal operating conditions the re-charging time for the flash is usually within the flash range. å The image quality is not guaranteed if the subject is dark, the camera flash will work automatically and will display on the LCD ...
User Manual (ENGLISH)
Page 35
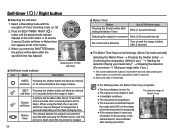
...will be taken after sensing movement The detection range of 2 seconds before the image is recognized. å If the camera doesn`t sense any movement for longer than 2 seconds depending on and the image is taken after 2 seconds Ê...Swing your hands fully)*2 Ã Stopping the detection (Do not move) Ã Taking an image (after 2 sec.) *1: The camera detects the subject's movement 6 seconds after the specified time has elapsed. Ê Self-timer mode indicator Icon Mode [Selecting...Blink (0.25 second interval) No movement is detected Turn on the flash charging time.
...will be taken after sensing movement The detection range of 2 seconds before the image is recognized. å If the camera doesn`t sense any movement for longer than 2 seconds depending on and the image is taken after 2 seconds Ê...Swing your hands fully)*2 Ã Stopping the detection (Do not move) Ã Taking an image (after 2 sec.) *1: The camera detects the subject's movement 6 seconds after the specified time has elapsed. Ê Self-timer mode indicator Icon Mode [Selecting...Blink (0.25 second interval) No movement is detected Turn on the flash charging time.


