
Quick Guide (ENGLISH)
Page 7
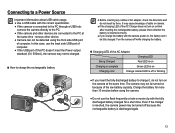
EV Indicator light ▪▪ Red: Charging ▪▪ Green: Fully charged Back Move ▪▪ To move left or right, press [ ] or To move up or down, press [ ] or [ ]. 3 Press [ ] to confirm the highlighted option or menu. ▪▪ Press [ ] again to go back to an option or menu. English Charging the battery Before using the camera for the first time, you must charge the battery. Selecting options 1 In Shooting mode, press [ ]. 2 Use the navigation buttons to scroll to the previous menu. 7
EV Indicator light ▪▪ Red: Charging ▪▪ Green: Fully charged Back Move ▪▪ To move left or right, press [ ] or To move up or down, press [ ] or [ ]. 3 Press [ ] to confirm the highlighted option or menu. ▪▪ Press [ ] again to go back to an option or menu. English Charging the battery Before using the camera for the first time, you must charge the battery. Selecting options 1 In Shooting mode, press [ ]. 2 Use the navigation buttons to scroll to the previous menu. 7
User Manual (ENGLISH)
Page 14
... this case, use the flash frequently or take a movie clip with the fully discharged battery charged for more than 10 minutes before using the camera. å Do not use the back side USB port of computer. å If the USB port of the PC doesn't meet the Power output standard... the charging LED of the AC Charger does not turn on the camera at the same time : remove other device. å Camera can not be detected using the front side USB port of the AC Adapter Charging LED Being Charged Red LED is on Charging is complete Green LED is on Charging error...
... this case, use the flash frequently or take a movie clip with the fully discharged battery charged for more than 10 minutes before using the camera. å Do not use the back side USB port of computer. å If the USB port of the PC doesn't meet the Power output standard... the charging LED of the AC Charger does not turn on the camera at the same time : remove other device. å Camera can not be detected using the front side USB port of the AC Adapter Charging LED Being Charged Red LED is on Charging is complete Green LED is on Charging error...

User Manual (ENGLISH)
Page 21
... an image clearly. å Avoid obstructing the lens or the flash when you press the shutter button down half way, it means that the camera cannot focus on the subject. door place [Backlight] ( ) : When shooting a backlit scenery without a portrait [Backlight Portrait] ( [Portrait] ( [Macro...: When shooting a subject without any movement on the tripod [Action] ( ) : When shooting a subject making frequent movements How to red when you capture an image. 20 Insert the batteries taking with minimal user interaction. 1. Close the battery chamber cover. 4. Insert the ...
... an image clearly. å Avoid obstructing the lens or the flash when you press the shutter button down half way, it means that the camera cannot focus on the subject. door place [Backlight] ( ) : When shooting a backlit scenery without a portrait [Backlight Portrait] ( [Portrait] ( [Macro...: When shooting a subject without any movement on the tripod [Action] ( ) : When shooting a subject making frequent movements How to red when you capture an image. 20 Insert the batteries taking with minimal user interaction. 1. Close the battery chamber cover. 4. Insert the ...
User Manual (ENGLISH)
Page 23
Red frame: subject is out of focus Pressing the OK button To focus on your subject, halfpress the shutter button: - If the subject is out of ... used when adjusting the picture colour Photo Help Guide Photo Help Guide Features to use when the image is out of focus Features to reduce camera shake Features to use in low light conditions Features to use when adjusting brightness Features to use when adjusting colours Change Photo Help Guide Photo...
Red frame: subject is out of focus Pressing the OK button To focus on your subject, halfpress the shutter button: - If the subject is out of ... used when adjusting the picture colour Photo Help Guide Photo Help Guide Features to use when the image is out of focus Features to reduce camera shake Features to use in low light conditions Features to use when adjusting brightness Features to use when adjusting colours Change Photo Help Guide Photo...
User Manual (ENGLISH)
Page 33
...of the battery. å Under normal operating conditions the re-charging time for the flash is dark, the camera flash will work automatically and will reduce the red-eye effect by the flash light reflecting off The flash does not fire. Slow ... flash will display on the LCD monitor. Select this mode will not operate. å Take photographs within 4 seconds. When a shot with "red eye" is dark, the camera flash will appear on the LCD monitor. Flash ( ) / Left button å If you capture an image in a place or situation where...
...of the battery. å Under normal operating conditions the re-charging time for the flash is dark, the camera flash will work automatically and will reduce the red-eye effect by the flash light reflecting off The flash does not fire. Slow ... flash will display on the LCD monitor. Select this mode will not operate. å Take photographs within 4 seconds. When a shot with "red eye" is dark, the camera flash will appear on the LCD monitor. Flash ( ) / Left button å If you capture an image in a place or situation where...
User Manual (ENGLISH)
Page 44
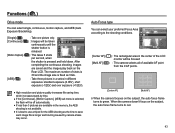
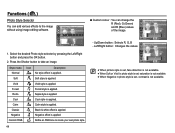
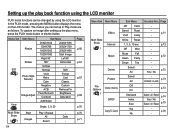
...than 3 pictures are saved and the images play back on the Rear LCD. Functions ( ) Drive mode You can select your preferred Focus Area according to red. 43 Focus Area Back Move [Center AF] ( ) : The rectangular area in different exposures: standard exposure (0.0EV), short exposure (-1/2EV) and over... exposure (+1/2EV). å High resolution and picture quality increases file saving time, which increases stand-by camera shake may occur. When the camera doesn't focus on the subject, the auto focus frame turns to save each image file is pressed and held down....
...than 3 pictures are saved and the images play back on the Rear LCD. Functions ( ) Drive mode You can select your preferred Focus Area according to red. 43 Focus Area Back Move [Center AF] ( ) : The rectangular area in different exposures: standard exposure (0.0EV), short exposure (-1/2EV) and over... exposure (+1/2EV). å High resolution and picture quality increases file saving time, which increases stand-by camera shake may occur. When the camera doesn't focus on the subject, the auto focus frame turns to save each image file is pressed and held down....
User Manual (ENGLISH)
Page 45
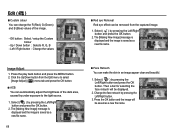
... Style Selector Back Move Back Move - Press the Shutter button to the image without using image editing software. Ê Custom colour : You can change the R (Red), G (Green) and B (Blue) values of the image. Define an RGB tone to create your own photo style. 44 Back Move å When picture...
... Style Selector Back Move Back Move - Press the Shutter button to the image without using image editing software. Ê Custom colour : You can change the R (Red), G (Green) and B (Blue) values of the image. Define an RGB tone to create your own photo style. 44 Back Move å When picture...
User Manual (ENGLISH)
Page 65
... Right 90˚ 180˚ Start Image Left 90˚ Horizontal Vertical - p.71 - - - p.72 - - Normal Soft Vivid Forest Retro Cool Calm Classic Negative Custom ACB Red-eye Fix Face Retouch Brightness Contrast Saturation Add Noise - Select / All / Reset p.74 Yes / No ~ Select / All / Reset p.75 p.76 - The menus you can be...
... Right 90˚ 180˚ Start Image Left 90˚ Horizontal Vertical - p.71 - - - p.72 - - Normal Soft Vivid Forest Retro Cool Calm Classic Negative Custom ACB Red-eye Fix Face Retouch Brightness Contrast Saturation Add Noise - Select / All / Reset p.74 Yes / No ~ Select / All / Reset p.75 p.76 - The menus you can be...
User Manual (ENGLISH)
Page 69
... 2. Change the face retouch by pressing the Left/Right button and press the OK button. 2. Back Move 68 Ê Face Retouch You can change the R (Red), G (Green) and B (Blue) values of the dark area, caused by under exposure to select [Image Adjust] ( ) menu tab and press the OK button. Ê... ACB You can be saved as a new file name. Red-eye Fix Back Move Back Move Image Adjust 1. Press the OK button and the image will be displayed. Select ( ! ) by pressing the Left/Right button...
... 2. Change the face retouch by pressing the Left/Right button and press the OK button. 2. Back Move 68 Ê Face Retouch You can change the R (Red), G (Green) and B (Blue) values of the dark area, caused by under exposure to select [Image Adjust] ( ) menu tab and press the OK button. Ê... ACB You can be saved as a new file name. Red-eye Fix Back Move Back Move Image Adjust 1. Press the OK button and the image will be displayed. Select ( ! ) by pressing the Left/Right button...

User Manual (ENGLISH)
Page 84
...malfunction. A vertical line appears on or a spot appears. åAlthough the LCD screen is manufactured with the camera à Check the connection cables åThere are not occasionally lighted or the red, white and blue spots appear. ĺ This phenomenon does not affect the quality of the recorded image and ...Before contacting a service centre The flash does not fire åFlash off mode has been selected à Dis-engage flash off mode åThe camera mode can't use the flash à Refer to the FLASH instruction (p.31) Incorrect date and time is displayed å The date and time ...
...malfunction. A vertical line appears on or a spot appears. åAlthough the LCD screen is manufactured with the camera à Check the connection cables åThere are not occasionally lighted or the red, white and blue spots appear. ĺ This phenomenon does not affect the quality of the recorded image and ...Before contacting a service centre The flash does not fire åFlash off mode has been selected à Dis-engage flash off mode åThe camera mode can't use the flash à Refer to the FLASH instruction (p.31) Incorrect date and time is displayed å The date and time ...
User Manual (ENGLISH)
Page 85
... - Auto : 1 ~ 1/2,000 sec. (AEB, Continuous 1/4 ~ 1/2,000 sec.), Night : 16 ~ 1/2,000 sec. - Sharpness - Voice Memo in flash, Slow sync, Flash off, Red Eye Fix - Digital Zoom : ·Still Image mode :1.0X ~ 5.0X ·Play mode : 1.0X ~ 10.2X (depends on image size) Shake Reduction - Compensation : ±2EV (1/3EV steps... : Wide : 0.4m ~ 4.0m, Tele : 0.5m ~ 3.0m - Recharging Time : Approx. 4 sec. Auto, Daylight, Cloudy, Fluorescent_H, Fluorescent_L, Tungsten, Custom Voice Recording - Focal Length : SAMSUNG Lens f = 6.3 ~ 31.5mm (35mm film equivalent : 35 ~ 175mm) -
... - Auto : 1 ~ 1/2,000 sec. (AEB, Continuous 1/4 ~ 1/2,000 sec.), Night : 16 ~ 1/2,000 sec. - Sharpness - Voice Memo in flash, Slow sync, Flash off, Red Eye Fix - Digital Zoom : ·Still Image mode :1.0X ~ 5.0X ·Play mode : 1.0X ~ 10.2X (depends on image size) Shake Reduction - Compensation : ±2EV (1/3EV steps... : Wide : 0.4m ~ 4.0m, Tele : 0.5m ~ 3.0m - Recharging Time : Approx. 4 sec. Auto, Daylight, Cloudy, Fluorescent_H, Fluorescent_L, Tungsten, Custom Voice Recording - Focal Length : SAMSUNG Lens f = 6.3 ~ 31.5mm (35mm film equivalent : 35 ~ 175mm) -

User Manual (ENGLISH)
Page 86
...Image Play Interface - Audio : Mono - DC power input connector : 4.2 V 85 Editing : Resize, Rotate, Photo Style Selector, Image Adjust (ACB, Red-eye Fix, Face Retouch, Brightness, Contrast, Saturation, Add Noise) - File Format ·Still Image : JPEG (DCF), EXIF 2.21, DPOF 1.1, ...705 About 759 About 1232 Ä These figures are measured under Samsung standard conditions and may vary depending on shooting conditions and camera settings. Effect : Photo Style Selector, Image Adjust (Sharpness, Contrast, Saturation) - Digital output connector : USB 2.0 - Video output : NTSC, PAL ...
...Image Play Interface - Audio : Mono - DC power input connector : 4.2 V 85 Editing : Resize, Rotate, Photo Style Selector, Image Adjust (ACB, Red-eye Fix, Face Retouch, Brightness, Contrast, Saturation, Add Noise) - File Format ·Still Image : JPEG (DCF), EXIF 2.21, DPOF 1.1, ...705 About 759 About 1232 Ä These figures are measured under Samsung standard conditions and may vary depending on shooting conditions and camera settings. Effect : Photo Style Selector, Image Adjust (Sharpness, Contrast, Saturation) - Digital output connector : USB 2.0 - Video output : NTSC, PAL ...

