User Manual
Page 2
... SIM Card ...5 SD Card ...7 Insert SD Card ...8 Unmount the SD Card...10 Remove SD Card ...12 Format SD Card ...14 Battery Use ...16 Insert the Battery...17 Remove the Battery ...19 Charge the Battery ...21 Turn Your Phone On and Off ...23 Use the Touchscreen ...25 Activation and Service ...28 Complete the Setup Screens...
... SIM Card ...5 SD Card ...7 Insert SD Card ...8 Unmount the SD Card...10 Remove SD Card ...12 Format SD Card ...14 Battery Use ...16 Insert the Battery...17 Remove the Battery ...19 Charge the Battery ...21 Turn Your Phone On and Off ...23 Use the Touchscreen ...25 Activation and Service ...28 Complete the Setup Screens...

User Manual
Page 9
... Add Accounts ...337 Backup and Reset...339 Accessibility Settings...343 Language and Input Settings ...346 Date and Time Settings ...349 Ultra Power Saving Mode ...351 Battery Settings...353 Storage Settings...355 microSD Card ...358 Security Settings ...363 Activate This Device...365 About Device ...366 Copyright Information...368 For Assistance ...369 Troubleshooting...
... Add Accounts ...337 Backup and Reset...339 Accessibility Settings...343 Language and Input Settings ...346 Date and Time Settings ...349 Ultra Power Saving Mode ...351 Battery Settings...353 Storage Settings...355 microSD Card ...358 Security Settings ...363 Activate This Device...365 About Device ...366 Copyright Information...368 For Assistance ...369 Troubleshooting...
User Manual
Page 12
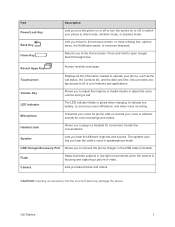
.... Also provides onetap access to announce new notifications, and when voice recording. LED Indicator The LED indicator blinks or glows when charging, to indicate low battery, to all the information needed to connect the phone charger or the USB cable (included). Inserting an accessory into the incorrect jack may damage the...
.... Also provides onetap access to announce new notifications, and when voice recording. LED Indicator The LED indicator blinks or glows when charging, to indicate low battery, to all the information needed to connect the phone charger or the USB cable (included). Inserting an accessory into the incorrect jack may damage the...

User Manual
Page 14
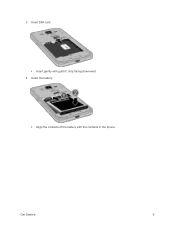
Insert SIM Card Follow these instructions to power off your phone before inserting a SIM card. 1. Remove the battery. Lift upward gently as shown. Remove the battery cover. Lift gently in the direction shown. 2. Get Started 5 Remember to insert a SIM card.
Insert SIM Card Follow these instructions to power off your phone before inserting a SIM card. 1. Remove the battery. Lift upward gently as shown. Remove the battery cover. Lift gently in the direction shown. 2. Get Started 5 Remember to insert a SIM card.
User Manual
Page 15
3. Get Started 6 Insert SIM card. Insert gently with the contacts in the phone. Insert the battery. Align the contacts of the battery with gold IC chip facing downward. 4.
3. Get Started 6 Insert SIM card. Insert gently with the contacts in the phone. Insert the battery. Align the contacts of the battery with gold IC chip facing downward. 4.
User Manual
Page 16
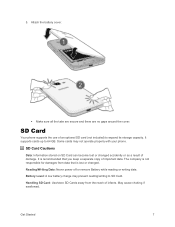
... around the cover. SD Card Cautions Data: Information stored on SD Card can become lost or changed accidently or as a result of infants. Battery Level: A low battery charge may not operate properly with your phone. It supports cards up to SD Card. It is lost or changed . Handling SD Card: ...(not included) to expand its storage capacity. Some cards may prevent reading/writing to 64 GB. Reading/Writing Data: Never power off or remove Battery while reading or writing data. May cause choking if swallowed. Get Started 7 5. SD Card Your phone supports the use of important data.
... around the cover. SD Card Cautions Data: Information stored on SD Card can become lost or changed accidently or as a result of infants. Battery Level: A low battery charge may not operate properly with your phone. It supports cards up to SD Card. It is lost or changed . Handling SD Card: ...(not included) to expand its storage capacity. Some cards may prevent reading/writing to 64 GB. Reading/Writing Data: Never power off or remove Battery while reading or writing data. May cause choking if swallowed. Get Started 7 5. SD Card Your phone supports the use of important data.
User Manual
Page 17
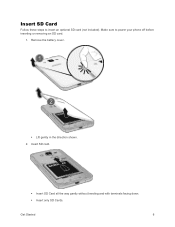
Get Started 8 Remove the battery cover. Lift gently in the direction shown. 2. Insert SD card. Insert SD Card all the way gently without bending and with terminals facing down. Insert only SD Cards. Make sure to insert an optional SD card (not included). Insert SD Card Follow these steps to power your phone off before inserting or removing an SD card. 1.
Get Started 8 Remove the battery cover. Lift gently in the direction shown. 2. Insert SD card. Insert SD Card all the way gently without bending and with terminals facing down. Insert only SD Cards. Make sure to insert an optional SD card (not included). Insert SD Card Follow these steps to power your phone off before inserting or removing an SD card. 1.

User Manual
Page 18
Get Started 9 Attach the battery cover. Make sure all the tabs are secure and there are no gaps around the cover. 3.
Get Started 9 Attach the battery cover. Make sure all the tabs are secure and there are no gaps around the cover. 3.
User Manual
Page 21
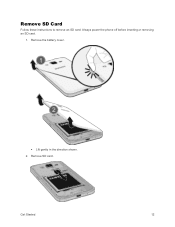
Remove the battery cover. Lift gently in the direction shown. 2. Always power the phone off before inserting or removing an SD card. 1. Get Started 12 Remove SD Card Follow these instructions to remove an SD card. Remove SD card.
Remove the battery cover. Lift gently in the direction shown. 2. Always power the phone off before inserting or removing an SD card. 1. Get Started 12 Remove SD Card Follow these instructions to remove an SD card. Remove SD card.

User Manual
Page 22
Get Started 13 Attach the battery cover. Make sure all the tabs are secure and there are no gaps around the cover. 3.
Get Started 13 Attach the battery cover. Make sure all the tabs are secure and there are no gaps around the cover. 3.
User Manual
Page 25
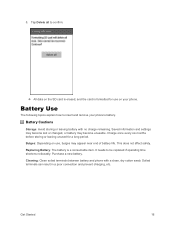
...unused for use , bulges may become lost or changed, or battery may appear near end of battery life. Replacing Battery: The battery is formatted for a long period. Purchase a new battery. Saved information and settings may become unusable. Battery Use The following topics explain how to insert and remove your... and prevent charging, etc. 5. Bulges: Depending on the SD card is erased, and the card is a consumable item. Battery Cautions Storage: Avoid storing or leaving battery with a clean, dry cotton swab. It needs to confirm. All data on use on your phone...
...unused for use , bulges may become lost or changed, or battery may appear near end of battery life. Replacing Battery: The battery is formatted for a long period. Purchase a new battery. Saved information and settings may become unusable. Battery Use The following topics explain how to insert and remove your... and prevent charging, etc. 5. Bulges: Depending on the SD card is erased, and the card is a consumable item. Battery Cautions Storage: Avoid storing or leaving battery with a clean, dry cotton swab. It needs to confirm. All data on use on your phone...
User Manual
Page 26
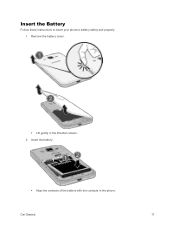
Get Started 17 Insert the battery. Align the contacts of the battery with the contacts in the direction shown. 2. Insert the Battery Follow these instructions to insert your phone's battery safely and properly. 1. Remove the battery cover. Lift gently in the phone.
Get Started 17 Insert the battery. Align the contacts of the battery with the contacts in the direction shown. 2. Insert the Battery Follow these instructions to insert your phone's battery safely and properly. 1. Remove the battery cover. Lift gently in the phone.

User Manual
Page 27
Get Started 18 3. Attach the battery cover. Make sure all the tabs are secure and there are no gaps around the cover.
Get Started 18 3. Attach the battery cover. Make sure all the tabs are secure and there are no gaps around the cover.
User Manual
Page 28
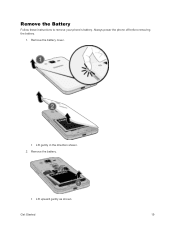
Remove the battery. Lift upward gently as shown. Remove the battery cover. Lift gently in the direction shown. 2. Always power the phone off before removing the battery. 1. Remove the Battery Follow these instructions to remove your phone's battery. Get Started 19
Remove the battery. Lift upward gently as shown. Remove the battery cover. Lift gently in the direction shown. 2. Always power the phone off before removing the battery. 1. Remove the Battery Follow these instructions to remove your phone's battery. Get Started 19

User Manual
Page 29
Attach the battery cover. Make sure all the tabs are secure and there are no gaps around the cover. Get Started 20 3.
Attach the battery cover. Make sure all the tabs are secure and there are no gaps around the cover. Get Started 20 3.
User Manual
Page 30
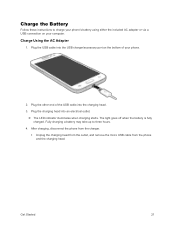
...cable into the USB charger/accessory port on your computer. Fully charging a battery may take up to charge your phone. 2. Plug the charging head into the charging head. 3. Charge Using the AC Adapter 1. Charge the Battery Follow these instructions to three hours. 4. Plug the other end of your ...phone's battery using either the included AC adapter or via a USB connection on the bottom of the USB cable into...
...cable into the USB charger/accessory port on your computer. Fully charging a battery may take up to charge your phone. 2. Plug the charging head into the charging head. 3. Charge Using the AC Adapter 1. Charge the Battery Follow these instructions to three hours. 4. Plug the other end of your ...phone's battery using either the included AC adapter or via a USB connection on the bottom of the USB cable into...
User Manual
Page 31
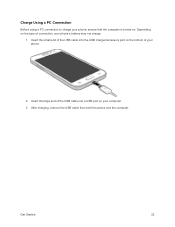
After charging, remove the USB cable from both the phone and the computer. Depending on . Charge Using a PC Connection Before using a PC connection to charge your phone, ensure that the computer is turned on the type of connection, your phone's battery may not charge. 1. Insert the large end of the USB cable into a USB port on the bottom of the USB cable into the USB charger/accessory port on your phone. 2. Get Started 22 Insert the small end of your computer. 3.
After charging, remove the USB cable from both the phone and the computer. Depending on . Charge Using a PC Connection Before using a PC connection to charge your phone, ensure that the computer is turned on the type of connection, your phone's battery may not charge. 1. Insert the large end of the USB cable into a USB port on the bottom of the USB cable into the USB charger/accessory port on your phone. 2. Get Started 22 Insert the small end of your computer. 3.
User Manual
Page 33
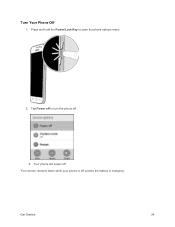
Get Started 24 Tap Power off to open the phone options menu. 2. Press and hold the Power/Lock Key to turn the phone off. Your phone will power off (unless the battery is off . Turn Your Phone Off 1. Your screen remains blank while your phone is charging).
Get Started 24 Tap Power off to open the phone options menu. 2. Press and hold the Power/Lock Key to turn the phone off. Your phone will power off (unless the battery is off . Turn Your Phone Off 1. Your screen remains blank while your phone is charging).
User Manual
Page 77
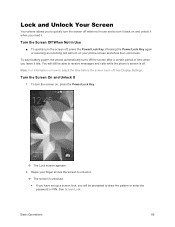
To save battery power, the phone automatically turns off . Pressing the Power/Lock Key again or receiving an incoming call will be able to adjust the time before ...
To save battery power, the phone automatically turns off . Pressing the Power/Lock Key again or receiving an incoming call will be able to adjust the time before ...
User Manual
Page 78
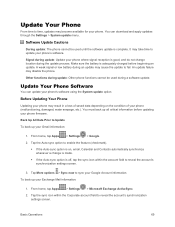
... time to time, updates may take time to update your phone's software. It may become available for your phone. Make sure the battery is complete. Update Your Phone Software You can download and apply updates through the Settings > System update menu. You can update your phone...account's synchronization settings screen. You must back up all critical information before beginning an update. Basic Operations 69 A weak signal or low battery during an update may cause the update to enable the feature (checkmark). If the Auto-sync option is on the condition of...
... time to time, updates may take time to update your phone's software. It may become available for your phone. Make sure the battery is complete. Update Your Phone Software You can download and apply updates through the Settings > System update menu. You can update your phone...account's synchronization settings screen. You must back up all critical information before beginning an update. Basic Operations 69 A weak signal or low battery during an update may cause the update to enable the feature (checkmark). If the Auto-sync option is on the condition of...


