User Manual
Page 79
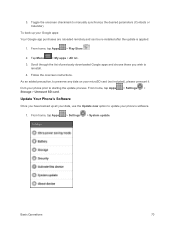
... all your data, use the Update now option to update your phone's software. 1. Follow the onscreen instructions. Update Your Phone's Software Once you wish to manually synchronize the desired parameters (Contacts or Calendar). Basic Operations 70
... all your data, use the Update now option to update your phone's software. 1. Follow the onscreen instructions. Update Your Phone's Software Once you wish to manually synchronize the desired parameters (Contacts or Calendar). Basic Operations 70
User Manual
Page 143
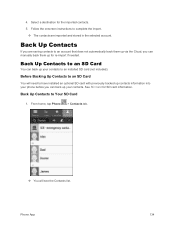
... the Contacts list. Phone App 134 Back Up Contacts If you can back up your contacts. Back Up Contacts to an SD Card You can manually back them up your contacts to complete the import. The contacts are saving contacts to Your SD Card 1. Back Up Contacts to an account...
... the Contacts list. Phone App 134 Back Up Contacts If you can back up your contacts. Back Up Contacts to an SD Card You can manually back them up your contacts to complete the import. The contacts are saving contacts to Your SD Card 1. Back Up Contacts to an account...
User Manual
Page 173
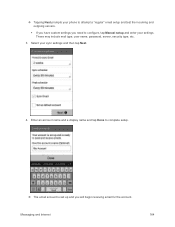
Tapping Next prompts your phone to attempt a "regular" email setup and test the incoming and outgoing servers. If you have custom settings you need to complete setup. The email account is set up and you will begin receiving email for the account. Enter an account name and a display name and tap Done to configure, tap Manual setup and enter your sync settings and then tap Next. 4. These may include mail type, user name, password, server, security type, etc. 3. Select your settings. Messaging and Internet 164
Tapping Next prompts your phone to attempt a "regular" email setup and test the incoming and outgoing servers. If you have custom settings you need to complete setup. The email account is set up and you will begin receiving email for the account. Enter an account name and a display name and tap Done to configure, tap Manual setup and enter your sync settings and then tap Next. 4. These may include mail type, user name, password, server, security type, etc. 3. Select your settings. Messaging and Internet 164
User Manual
Page 175
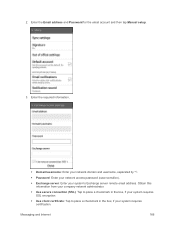
... access password (case-sensitive). Exchange server: Enter your system requires certification. Enter the Email address and Password for the email account and then tap Manual setup. 3. 2.
... access password (case-sensitive). Exchange server: Enter your system requires certification. Enter the Email address and Password for the email account and then tap Manual setup. 3. 2.
User Manual
Page 179
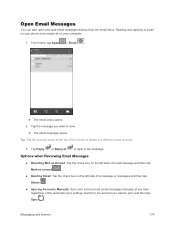
... also open and read message and then tap Mark as on the left side of a message or messages and then tap Delete . ● Syncing Accounts Manually: Sync sent and received email messages manually at the top of the automatic sync settings.
... also open and read message and then tap Mark as on the left side of a message or messages and then tap Delete . ● Syncing Accounts Manually: Sync sent and received email messages manually at the top of the automatic sync settings.
User Manual
Page 183
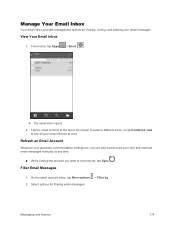
... Email Messages 1. From home, tap Apps > Email . The email inbox opens. 2. Select options for viewing, sorting, and deleting your sent and received email messages manually at once. Manage Your Email Inbox Your email inbox provides management options for filtering email messages. Tap the email account at the top of the...
... Email Messages 1. From home, tap Apps > Email . The email inbox opens. 2. Select options for viewing, sorting, and deleting your sent and received email messages manually at once. Manage Your Email Inbox Your email inbox provides management options for filtering email messages. Tap the email account at the top of the...
User Manual
Page 265
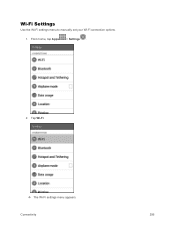
Connectivity 256 Tap Wi-Fi. The Wi-Fi settings menu appears. From home, tap Apps > Settings . 2. Wi-Fi Settings Use the Wi-Fi settings menu to manually set your Wi-Fi connection options. 1.
Connectivity 256 Tap Wi-Fi. The Wi-Fi settings menu appears. From home, tap Apps > Settings . 2. Wi-Fi Settings Use the Wi-Fi settings menu to manually set your Wi-Fi connection options. 1.
User Manual
Page 295
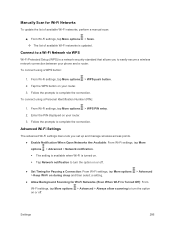
...prompts to complete the connection. From Wi-Fi settings, tap More options > WPS PIN entry. 2. Enter the PIN displayed on your router. 3. Settings 286 Manually Scan for Wi-Fi Networks (Even When Wi-Fi Is Turned Off): From Wi-Fi settings, tap More options > Advanced > Always allow scanning to turn... on during sleep and then select a setting. ● Allow Background Scanning for Wi-Fi Networks To update the list of available Wi-Fi networks, perform a manual scan. ■ From Wi-Fi settings, tap More options > Scan. The list of available Wi-Fi networks is turned on. Tap ...
...prompts to complete the connection. From Wi-Fi settings, tap More options > WPS PIN entry. 2. Enter the PIN displayed on your router. 3. Settings 286 Manually Scan for Wi-Fi Networks (Even When Wi-Fi Is Turned Off): From Wi-Fi settings, tap More options > Advanced > Always allow scanning to turn... on during sleep and then select a setting. ● Allow Background Scanning for Wi-Fi Networks To update the list of available Wi-Fi networks, perform a manual scan. ■ From Wi-Fi settings, tap More options > Scan. The list of available Wi-Fi networks is turned on. Tap ...
User Manual
Page 358
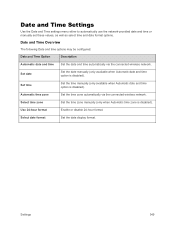
... Date and Time Option Description Automatic date and time Set the date and time automatically via the connected wireless network. Set date Set the date manually (only available when Automatic date and time option is disabled). Date and Time Settings Use the Date and Time settings menu either to automatically use... the network-provided date and time or manually set these values, as well as select time and date format options. Use 24-hour format Enable or disable 24-hour format.
... Date and Time Option Description Automatic date and time Set the date and time automatically via the connected wireless network. Set date Set the date manually (only available when Automatic date and time option is disabled). Date and Time Settings Use the Date and Time settings menu either to automatically use... the network-provided date and time or manually set these values, as well as select time and date format options. Use 24-hour format Enable or disable 24-hour format.


