
User Guide
Page 5
... using multi-display 3.6 Printing enlargements of portions of each part 1.2 SPP-2040 Series Photo Printer 1.2 SPP-2020 Series Photo Printer 1.4 2. Printing via a computer (For SPP-2020 and SPP-2040 Series) Connecting your digital camera (For SPP-2020 and SPP-2040 Series) 5. Installation Installing the Ribbon cartridge 2.2 Loading paper 2.3 Connecting the power cord 2.4 3. Printing from your printer to a computer 3.14 4. CONTENTS Important Safety Information Safety Instructions...
... using multi-display 3.6 Printing enlargements of portions of each part 1.2 SPP-2040 Series Photo Printer 1.2 SPP-2020 Series Photo Printer 1.4 2. Printing via a computer (For SPP-2020 and SPP-2040 Series) Connecting your digital camera (For SPP-2020 and SPP-2040 Series) 5. Installation Installing the Ribbon cartridge 2.2 Loading paper 2.3 Connecting the power cord 2.4 3. Printing from your printer to a computer 3.14 4. CONTENTS Important Safety Information Safety Instructions...

User Guide
Page 8
... adapter included with a display panel. Output tray Printed photos are discharged into this to install the paper cassette. Paper cassette Insert paper for digital camera Use this port to connect the printer to use the photo printer SPP-2040 and SPP-2020 Series. Use this tray. 1.2 SPP-2020 Series printer is not equipped with the printer. For details, see page 3.2-Inserting memory cards...
... adapter included with a display panel. Output tray Printed photos are discharged into this to install the paper cassette. Paper cassette Insert paper for digital camera Use this port to connect the printer to use the photo printer SPP-2040 and SPP-2020 Series. Use this tray. 1.2 SPP-2020 Series printer is not equipped with the printer. For details, see page 3.2-Inserting memory cards...

User Guide
Page 10
Name of the image. SPP-2020 Series Photo Printer On/Off button Turn the printer on or off , press and hold for digital camera Use this to the computer. USB port for more than 2 seconds. Front cover Put down install the paper cassette. Zoom in the menu. Cancel or ... port Use this port to connect the printer to use effects and other functions. Paper cassette Insert paper for more than 2 seconds. Output tray Printed photos are discharged into this port to connect the printer to connect the power adapter included with the printer. Change menu settings. USB port Use ...
Name of the image. SPP-2020 Series Photo Printer On/Off button Turn the printer on or off , press and hold for digital camera Use this to the computer. USB port for more than 2 seconds. Front cover Put down install the paper cassette. Zoom in the menu. Cancel or ... port Use this port to connect the printer to use effects and other functions. Paper cassette Insert paper for more than 2 seconds. Output tray Printed photos are discharged into this port to connect the printer to connect the power adapter included with the printer. Change menu settings. USB port Use ...

User Guide
Page 13
This chapter details the distances that need to be maintained between the printer and surrounding objects, how to turn the printer on and off, and how to load paper. To ensure quick and easy printing, please read this chapter. • Installing the Ribbon cartridge • Loading paper • Connecting the power cord 2.1 2. Installation This photo printer prints images by moving the print paper back and forth through the printer.
This chapter details the distances that need to be maintained between the printer and surrounding objects, how to turn the printer on and off, and how to load paper. To ensure quick and easy printing, please read this chapter. • Installing the Ribbon cartridge • Loading paper • Connecting the power cord 2.1 2. Installation This photo printer prints images by moving the print paper back and forth through the printer.

User Guide
Page 14
If the film is under the lever and then close the side cover. 2.2 Lever Ribbon cartridge/photo paper: IPP-4640G The supplied Ribbon cartridge allows you to print 10 pieces of the ribbon cartridge. Film Roller 4 Make sure that the cartridge is not ... the cartridge from its package, rotate the roller to smooth out wrinkles or uneven areas in the shown illustration. Do not use Samsung-approved ribbon cartridges, designed for your printer. You could be damaged during installation. 3 Insert the cartridge in the direction in the film. Do not touch the ribbon cartridge film...
If the film is under the lever and then close the side cover. 2.2 Lever Ribbon cartridge/photo paper: IPP-4640G The supplied Ribbon cartridge allows you to print 10 pieces of the ribbon cartridge. Film Roller 4 Make sure that the cartridge is not ... the cartridge from its package, rotate the roller to smooth out wrinkles or uneven areas in the shown illustration. Do not use Samsung-approved ribbon cartridges, designed for your printer. You could be damaged during installation. 3 Insert the cartridge in the direction in the film. Do not touch the ribbon cartridge film...

User Guide
Page 15
... if the spare portions of the printer. 3 Push the paper cassette into the printer completely. 2.3 Do not load more than 20 sheets of the paper. Do not touch the surface of paper. Only use only paper designed for Samsung Photo Printer. 1 Open the paper cassette. You should be stored flat. Loading paper Loading paper The supported paper size is turned on. Keep the...
... if the spare portions of the printer. 3 Push the paper cassette into the printer completely. 2.3 Do not load more than 20 sheets of the paper. Do not touch the surface of paper. Only use only paper designed for Samsung Photo Printer. 1 Open the paper cassette. You should be stored flat. Loading paper Loading paper The supported paper size is turned on. Keep the...
User Guide
Page 20
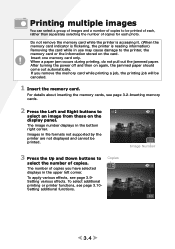
...then on again, the jammed paper should come out automatically. To select additional printing or printer functions, see page 3.2-Inserting memory cards. 2 Press the Left and Right buttons to be printed of each, rather than separately selecting the number of copies for each photo. The image number displays in... file formats not supported by the printer are not displayed and cannot be canceled. 1 Insert the memory card. Do not remove the memory ...
...then on again, the jammed paper should come out automatically. To select additional printing or printer functions, see page 3.2-Inserting memory cards. 2 Press the Left and Right buttons to be printed of each, rather than separately selecting the number of copies for each photo. The image number displays in... file formats not supported by the printer are not displayed and cannot be canceled. 1 Insert the memory card. Do not remove the memory ...

User Guide
Page 26
... the layout. When 'Setting' appears on again, all of your images at one time or select an alternative language with your photos, layout style and paper size. Press the Left and Right buttons to allow an empty border around the image. 3.10 If you press the Menu button...Up and Down buttons to navigate to the desired setting. After printing or turning the printer off .' Setting additional functions You can also print all functions return to their default settings, except for your photo printer. 1 Press the Menu button twice after selecting the image with the Left and Right ...
... the layout. When 'Setting' appears on again, all of your images at one time or select an alternative language with your photos, layout style and paper size. Press the Left and Right buttons to allow an empty border around the image. 3.10 If you press the Menu button...Up and Down buttons to navigate to the desired setting. After printing or turning the printer off .' Setting additional functions You can also print all functions return to their default settings, except for your photo printer. 1 Press the Menu button twice after selecting the image with the Left and Right ...

User Guide
Page 29
... the DPOF file. With DPOF, a user can print them. 1 Insert the memory card with and able to print images via the printer regardless of copies indicated in the memory card's MISC folder. When printing DPOF files, make sure that the AUTPRINT.MRK file is in ...the information of the photos stored on again, the jammed paper should come out automatically. The printer supports only DPOF version 1.0. When a paper jam occurs during printing, do not pull out the jammed paper. Press the Cancel button to store DPOF files, the Samsung Photo Printer can select from a [DPOF] file...
... the DPOF file. With DPOF, a user can print them. 1 Insert the memory card with and able to print images via the printer regardless of copies indicated in the memory card's MISC folder. When printing DPOF files, make sure that the AUTPRINT.MRK file is in ...the information of the photos stored on again, the jammed paper should come out automatically. The printer supports only DPOF version 1.0. When a paper jam occurs during printing, do not pull out the jammed paper. Press the Cancel button to store DPOF files, the Samsung Photo Printer can select from a [DPOF] file...

