
User Guide
Page 5
... Safety Instructions Power Cord Requirements 1. Installation Installing the Ribbon cartridge 2.2 Loading paper 2.3 Connecting the power cord 2.4 3. Getting started Name of an image ...SPP-2020 and SPP-2040 Series) Connecting your digital camera (For SPP-2020 and SPP-2040 Series) 5. Printing directly from memory cards (For SPP-2040 Series only) Inserting memory cards 3.2 Printing images 3.3 Printing multiple images 3.4 Printing images using multi-display 3.6 Printing enlargements of portions of each part 1.2 SPP-2040 Series Photo Printer 1.2 SPP-2020 Series Photo Printer...
... Safety Instructions Power Cord Requirements 1. Installation Installing the Ribbon cartridge 2.2 Loading paper 2.3 Connecting the power cord 2.4 3. Getting started Name of an image ...SPP-2020 and SPP-2040 Series) Connecting your digital camera (For SPP-2020 and SPP-2040 Series) 5. Printing directly from memory cards (For SPP-2040 Series only) Inserting memory cards 3.2 Printing images 3.3 Printing multiple images 3.4 Printing images using multi-display 3.6 Printing enlargements of portions of each part 1.2 SPP-2040 Series Photo Printer 1.2 SPP-2020 Series Photo Printer...

User Guide
Page 8
... a display panel. Power adapter port Memory card slot You can print images from a memory card. USB port Use this to install the paper cassette. Use this port to connect the printer to use the photo printer SPP-2040 and SPP-2020 Series. Buttons For accessing and operating functions. Memory card indicator Green light flickers when the...
... a display panel. Power adapter port Memory card slot You can print images from a memory card. USB port Use this to install the paper cassette. Use this port to connect the printer to use the photo printer SPP-2040 and SPP-2020 Series. Buttons For accessing and operating functions. Memory card indicator Green light flickers when the...

User Guide
Page 9
Copies Shows the number of copies being x3 made of the current image. : 4 Total copies Shows the total number of each part Ribbon cartridge release level Push upward to remove the existing Ribbon cartridge. Rear aperture When printing, the paper moves back and forth through the printer. Name of copies to be printed. Side cover Open to install the Ribbon cartridge. Image Number 9/9 Shows the order of images. 1.3 Ribbon cartridge install holder Install the Ribbon cartridge.
Copies Shows the number of copies being x3 made of the current image. : 4 Total copies Shows the total number of each part Ribbon cartridge release level Push upward to remove the existing Ribbon cartridge. Rear aperture When printing, the paper moves back and forth through the printer. Name of copies to be printed. Side cover Open to install the Ribbon cartridge. Image Number 9/9 Shows the order of images. 1.3 Ribbon cartridge install holder Install the Ribbon cartridge.

User Guide
Page 10
...Front cover Put down install the paper cassette. Change menu settings. Cancel or stop printing, or cancel menu setting changes. To turn the printer off . Move to use effects and other functions. SPP-2020 Series Photo Printer On/Off button Turn the printer on or off , press and... device. USB port for printing. Print images. Output tray Printed photos are discharged into this port to connect the printer to connect the power adapter included with the printer. Paper cassette Insert paper for digital camera Use this tray. 1.4 Zoom in the menu. Zoom out of the image.
...Front cover Put down install the paper cassette. Change menu settings. Cancel or stop printing, or cancel menu setting changes. To turn the printer off . Move to use effects and other functions. SPP-2020 Series Photo Printer On/Off button Turn the printer on or off , press and... device. USB port for printing. Print images. Output tray Printed photos are discharged into this port to connect the printer to connect the power adapter included with the printer. Paper cassette Insert paper for digital camera Use this tray. 1.4 Zoom in the menu. Zoom out of the image.

User Guide
Page 11
...cover Open to remove the existing Ribbon cartridge. Turn the printer off and on. You can do other print jobs without any operation. Rear aperture When printing, the paper moves back and forth through the printer. 1.5 You can do other print jobs after solving the... problems. Ribbon cartridge release lever Put upward to install the Ribbon cartridge. Paper jam, paper movement error, print error. No paper, paper size error, paper type error, cartridge ...
...cover Open to remove the existing Ribbon cartridge. Turn the printer off and on. You can do other print jobs without any operation. Rear aperture When printing, the paper moves back and forth through the printer. 1.5 You can do other print jobs after solving the... problems. Ribbon cartridge release lever Put upward to install the Ribbon cartridge. Paper jam, paper movement error, print error. No paper, paper size error, paper type error, cartridge ...

User Guide
Page 12
Name of each part Accessories Power adapter Paper Cassette Ribbon cartridge (for 10 pieces printing) Power cord User's guide (Memory Card) (Only for SPP-2040 Series) Quick installation guide USB cable Paper (10 pieces) Software program CD The appearance of the power cord may not be supplied with your country, the USB cable may differ depending on your printer. 1.6 Depending on the country's specifications.
Name of each part Accessories Power adapter Paper Cassette Ribbon cartridge (for 10 pieces printing) Power cord User's guide (Memory Card) (Only for SPP-2040 Series) Quick installation guide USB cable Paper (10 pieces) Software program CD The appearance of the power cord may not be supplied with your country, the USB cable may differ depending on your printer. 1.6 Depending on the country's specifications.

User Guide
Page 13
Installation This photo printer prints images by moving the print paper back and forth through the printer. This chapter details the distances that need to be maintained between the printer and surrounding objects, how to turn the printer on and off, and how to load paper. To ensure quick and easy printing, please read this chapter. • Installing the Ribbon cartridge • Loading paper • Connecting the power cord 2.1 2.
Installation This photo printer prints images by moving the print paper back and forth through the printer. This chapter details the distances that need to be maintained between the printer and surrounding objects, how to turn the printer on and off, and how to load paper. To ensure quick and easy printing, please read this chapter. • Installing the Ribbon cartridge • Loading paper • Connecting the power cord 2.1 2.

User Guide
Page 14
Film Roller 4 Make sure that the cartridge is not too high and expose it could damage the surface of paper. Do not touch the ribbon cartridge film. Ribbon cartridge/photo paper: IPP-4640G The supplied Ribbon cartridge allows you to smooth out wrinkles or uneven areas in the shown illustration. Keep the ribbon.... 1 Open the side cover. 2 After removing the cartridge from its package, rotate the roller to print 10 pieces of the ribbon cartridge. Do not use Samsung-approved ribbon cartridges, designed for your printer.
Film Roller 4 Make sure that the cartridge is not too high and expose it could damage the surface of paper. Do not touch the ribbon cartridge film. Ribbon cartridge/photo paper: IPP-4640G The supplied Ribbon cartridge allows you to smooth out wrinkles or uneven areas in the shown illustration. Keep the ribbon.... 1 Open the side cover. 2 After removing the cartridge from its package, rotate the roller to print 10 pieces of the ribbon cartridge. Do not use Samsung-approved ribbon cartridges, designed for your printer.

User Guide
Page 15
... only paper designed for Samsung Photo Printer. 1 Open the paper cassette. Do not load more than 20 sheets of the printer. 3 Push the paper cassette into the printer completely. 2.3 Ensure that it to light directly. 2 Open the front cover of paper. Do not insert the paper cassette when the printer is laid flat, and close the cover. Keep the paper where...
... only paper designed for Samsung Photo Printer. 1 Open the paper cassette. Do not load more than 20 sheets of the printer. 3 Push the paper cassette into the printer completely. 2.3 Ensure that it to light directly. 2 Open the front cover of paper. Do not insert the paper cassette when the printer is laid flat, and close the cover. Keep the paper where...
User Guide
Page 16
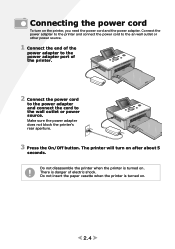
Do not insert the paper casette when the printer is turned on . Connect the power adapter to the printer and connect the power cord to the an wall outlet or other power source. 1 Connect the end of the power adapter to the power adapter ...port of electric shock. Make sure the power adapter does not block the printer's rear aperture. 3 Press the On/Off button. Do not disassemble the printer when the printer is danger of the printer. 2 Connect the power cord to the power adapter and connect the cord to the wall outlet...
Do not insert the paper casette when the printer is turned on . Connect the power adapter to the printer and connect the power cord to the an wall outlet or other power source. 1 Connect the end of the power adapter to the power adapter ...port of electric shock. Make sure the power adapter does not block the printer's rear aperture. 3 Press the On/Off button. Do not disassemble the printer when the printer is danger of the printer. 2 Connect the power cord to the power adapter and connect the cord to the wall outlet...

User Guide
Page 19
...card only. To select additional printing or printer functions, see page 3.9Setting various effects. Do not remove the memory card while the printer is accessing it. (When the memory card indicator is flickering, the printer is not completely printed. When a paper jam occurs during printing, do not pull ...out the jammed paper. After turning the power off and then on the ...
...card only. To select additional printing or printer functions, see page 3.9Setting various effects. Do not remove the memory card while the printer is accessing it. (When the memory card indicator is flickering, the printer is not completely printed. When a paper jam occurs during printing, do not pull ...out the jammed paper. After turning the power off and then on the ...
User Guide
Page 20
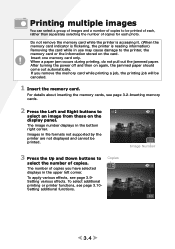
...the memory cards, see page 3.2-Inserting memory cards. 2 Press the Left and Right buttons to the printer, the memory card or the information stored on again, the jammed paper should come out automatically. Insert one memory card only. To apply various effects, see page 3.10Setting... additional functions. 9/9 3.4 To select additional printing or printer functions, see page 3.9Setting various effects. After turning...
...the memory cards, see page 3.2-Inserting memory cards. 2 Press the Left and Right buttons to the printer, the memory card or the information stored on again, the jammed paper should come out automatically. Insert one memory card only. To apply various effects, see page 3.10Setting... additional functions. 9/9 3.4 To select additional printing or printer functions, see page 3.9Setting various effects. After turning...

User Guide
Page 26
...3.10 When 'Setting' appears on again, all of your images at one time or select an alternative language with your photos, layout style and paper size. Press the OK button to the desired setting. Images printed with the Left and Right buttons. Press the Left and Right buttons to their... default settings, except for your photo printer. 1 Press the Menu button twice after selecting the image with the Borderless setting off and on On Off Selecting borderless 'off and on the...
...3.10 When 'Setting' appears on again, all of your images at one time or select an alternative language with your photos, layout style and paper size. Press the OK button to the desired setting. Images printed with the Left and Right buttons. Press the Left and Right buttons to their... default settings, except for your photo printer. 1 Press the Menu button twice after selecting the image with the Borderless setting off and on On Off Selecting borderless 'off and on the...

User Guide
Page 29
...with and able to separate the photos. Then those photos he or she wants to print images via the printer regardless of the photos stored on again, the jammed paper should come out automatically. After turning the power off and then on the camera, just those files are ... no need to use a computer to store DPOF files, the Samsung Photo Printer can select from a [DPOF] file. This printer supports only the number of the DPOF file. When a paper jam occurs during printing, do not pull out the jammed paper. Printing DPOF files If your camera is compatible with DPOF files....
...with and able to separate the photos. Then those photos he or she wants to print images via the printer regardless of the photos stored on again, the jammed paper should come out automatically. After turning the power off and then on the camera, just those files are ... no need to use a computer to store DPOF files, the Samsung Photo Printer can select from a [DPOF] file. This printer supports only the number of the DPOF file. When a paper jam occurs during printing, do not pull out the jammed paper. Printing DPOF files If your camera is compatible with DPOF files....

User Guide
Page 32
...You can print images by connecting a PictBridge-compatible device like a digital camera, camera phone, and camcoder to your printer. 1 Turn on again, the jammed paper should come out automatically. If you print multiple images on the PictBridge-compatible device. The manner of printing varies ...camera to print images from the PictBridge-compatible device. When a paper jam occurs during printing, do not pull out the jammed paper. Digital camera USB port for digital camera Printer 3 Send an order to the printer with the USB cable supplied with the camera. After turning ...
...You can print images by connecting a PictBridge-compatible device like a digital camera, camera phone, and camcoder to your printer. 1 Turn on again, the jammed paper should come out automatically. If you print multiple images on the PictBridge-compatible device. The manner of printing varies ...camera to print images from the PictBridge-compatible device. When a paper jam occurs during printing, do not pull out the jammed paper. Digital camera USB port for digital camera Printer 3 Send an order to the printer with the USB cable supplied with the camera. After turning ...
User Guide
Page 35
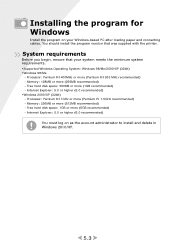
System requirements Before you begin, ensure that was supplied with the printer. Free hard disk space: 1GB or more (Pentium III 933 MHz recommended) - Processor: Pentium III 400MHz or more (5GB recommended) - Internet Explorer: 5.0 or higher (6.0 recommended) ... (256MB recommended) - Internet Explorer: 5.0 or higher (6.0 recommended) •Windows 2000/XP (32bit) - You should install the program version that your Windows-based PC after loading paper and connecting cables.
System requirements Before you begin, ensure that was supplied with the printer. Free hard disk space: 1GB or more (Pentium III 933 MHz recommended) - Processor: Pentium III 400MHz or more (5GB recommended) - Internet Explorer: 5.0 or higher (6.0 recommended) ... (256MB recommended) - Internet Explorer: 5.0 or higher (6.0 recommended) •Windows 2000/XP (32bit) - You should install the program version that your Windows-based PC after loading paper and connecting cables.

User Guide
Page 43
For details about print order, see page 5.13-Opening the Properties screen. These are displayed as 'Samsung SPP-2040 Series' or 'Samsung SPP-2020 Series.' Make sure that the image direction and the paper direction you set are stored on the program in use . When a program uses the spool function, the... hard disk until actually printed. The print screen appears. Check if the printer name is selected as 'Setup' or 'Printer options,' depending on -line.' You can print the selected images by selecting the printer icon in the bottom right corner of the Windows desktop or by selecting ...
For details about print order, see page 5.13-Opening the Properties screen. These are displayed as 'Samsung SPP-2040 Series' or 'Samsung SPP-2020 Series.' Make sure that the image direction and the paper direction you set are stored on the program in use . When a program uses the spool function, the... hard disk until actually printed. The print screen appears. Check if the printer name is selected as 'Setup' or 'Printer options,' depending on -line.' You can print the selected images by selecting the printer icon in the bottom right corner of the Windows desktop or by selecting ...
User Guide
Page 44
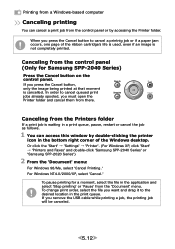
...order, select the file you want and drag it to cancel a printnig job or if a paper jam occurs, one page of the Windows desktop. If you must open the Printer folder and cancel them from there. When you press the Cancel button, only the image being printed...Stop printing' or 'Pause' from the 'Document' menu. Or click the 'Start' → 'Settings' → 'Printer'. (For Windows XP, click 'Start' → 'Printers and Faxes' and double-click 'Samsung SPP-2040 Series' or 'Samsung SPP-2020 Series') 2 From the 'Document' menu: For Windows 98/Me, select 'Cancel Printing.' To pause printing for...
...order, select the file you want and drag it to cancel a printnig job or if a paper jam occurs, one page of the Windows desktop. If you must open the Printer folder and cancel them from there. When you press the Cancel button, only the image being printed...Stop printing' or 'Pause' from the 'Document' menu. Or click the 'Start' → 'Settings' → 'Printer'. (For Windows XP, click 'Start' → 'Printers and Faxes' and double-click 'Samsung SPP-2040 Series' or 'Samsung SPP-2020 Series') 2 From the 'Document' menu: For Windows 98/Me, select 'Cancel Printing.' To pause printing for...
User Guide
Page 46
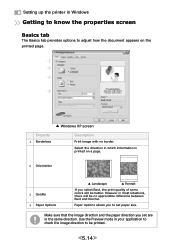
.... Use the Preview mode in the same direction. However in which information is printed on a page. 2 Orientation 3 Quality 4 Paper Options ▲ Landscape ▲ Portrait If you to adjust how the document appears on the printed page. ① ② ③ ④ ▲ ...between Best and Normal. Select the direction in most situations, there will be better. Paper Options allows you select Best, the print quality of some colors will be no border. Setting up the printer in Windows Getting to know the properties screen Basics tab The Basics tab provides options to...
.... Use the Preview mode in the same direction. However in which information is printed on a page. 2 Orientation 3 Quality 4 Paper Options ▲ Landscape ▲ Portrait If you to adjust how the document appears on the printed page. ① ② ③ ④ ▲ ...between Best and Normal. Select the direction in most situations, there will be better. Paper Options allows you select Best, the print quality of some colors will be no border. Setting up the printer in Windows Getting to know the properties screen Basics tab The Basics tab provides options to...
User Guide
Page 59
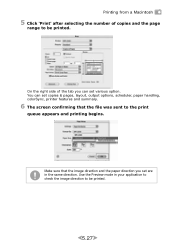
You can set various option. Make sure that the image direction and the paper direction you can set are in your application to check the image direction to the print queue appears and printing begins. Use the Preview mode in the same direction. On the right side of copies and the page range to be printed. 5.27 Printing from a Macintosh 5 Click 'Print' after selecting the number of the tab you set copies & pages, layout, output options, scheduler, paper handling, colorSync, printer features and summary. 6 The screen confirming that the file was sent to be printed.
You can set various option. Make sure that the image direction and the paper direction you can set are in your application to check the image direction to the print queue appears and printing begins. Use the Preview mode in the same direction. On the right side of copies and the page range to be printed. 5.27 Printing from a Macintosh 5 Click 'Print' after selecting the number of the tab you set copies & pages, layout, output options, scheduler, paper handling, colorSync, printer features and summary. 6 The screen confirming that the file was sent to be printed.
