
User Manual (user Manual) (ver.1.0) (English)
Page 2
... Changing the Screen Size 12 Digital Noise Reduction 12 Tilt (TX-T2781/TX-T2782 only 13 Sound Control Using Automatic Sound Settings 13 Customizing... are primarily designed to fill the screen if your Samsung limited warranty. © 2007 Samsung Electronics Co., Ltd. Displaying stationary graphics and images ...the Connection Panel 4 Remote Control 5 Connection Connecting VHF and UHF Antennas 6 Connecting Cable TV 6 Connecting a VCR 7 Connecting a Camcorder 7 Connecting a DVD Player/Set-Top Box...
... Changing the Screen Size 12 Digital Noise Reduction 12 Tilt (TX-T2781/TX-T2782 only 13 Sound Control Using Automatic Sound Settings 13 Customizing... are primarily designed to fill the screen if your Samsung limited warranty. © 2007 Samsung Electronics Co., Ltd. Displaying stationary graphics and images ...the Connection Panel 4 Remote Control 5 Connection Connecting VHF and UHF Antennas 6 Connecting Cable TV 6 Connecting a VCR 7 Connecting a Camcorder 7 Connecting a DVD Player/Set-Top Box...

User Manual (user Manual) (ver.1.0) (English)
Page 3
... the remote control towards this button as you must use the CH buttons as you turn the TV on the model. 1 SOURCE Toggles between all the available input sources (TV, AV1, AV2, Component). English - 3 TX-T2781 TX-T2782 TX-T2082 ➢ The product color and shape may vary depending on and off . - Accessories Please make sure...
... the remote control towards this button as you must use the CH buttons as you turn the TV on the model. 1 SOURCE Toggles between all the available input sources (TV, AV1, AV2, Component). English - 3 TX-T2781 TX-T2782 TX-T2082 ➢ The product color and shape may vary depending on and off . - Accessories Please make sure...
User Manual (user Manual) (ver.1.0) (English)
Page 4
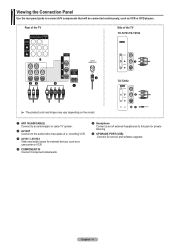
..., such as a camcorder or VCR. 4 COMPONENT IN Connect Component video/audio. 5 Headphone Connect a set of external headphones to the audio/video input jacks of the TV TX-T2781/TX-T2782 TX-T2082 ➢ The product color and shape may vary depending on the model. 1 ANT IN (AIR/CABLE) Connect to an antenna(air) or cable...
..., such as a camcorder or VCR. 4 COMPONENT IN Connect Component video/audio. 5 Headphone Connect a set of external headphones to the audio/video input jacks of the TV TX-T2781/TX-T2782 TX-T2082 ➢ The product color and shape may vary depending on the model. 1 ANT IN (AIR/CABLE) Connect to an antenna(air) or cable...
User Manual (user Manual) (ver.1.0) (English)
Page 5
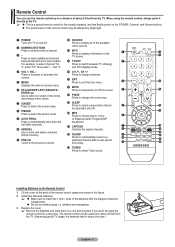
...remote control upward as shown in a cool and dry place if you won't be using the remote control, always point it directly at the TV. ➢ This is a special remote control for a long time. ends of about 23 feet from memory. ! For example, to /from ...in the figure. 2 Install two AAA size batteries. ➢ Make sure to select additional channels being broadcast by bright light. 1 POWER Turns the TV on the POWER, Channel, and Volume buttons. The performance of the available video sources. # INFO Press to display information on -screen menu items ...
...remote control upward as shown in a cool and dry place if you won't be using the remote control, always point it directly at the TV. ➢ This is a special remote control for a long time. ends of about 23 feet from memory. ! For example, to /from ...in the figure. 2 Install two AAA size batteries. ➢ Make sure to select additional channels being broadcast by bright light. 1 POWER Turns the TV on the POWER, Channel, and Volume buttons. The performance of the available video sources. # INFO Press to display information on -screen menu items ...

User Manual (user Manual) (ver.1.0) (English)
Page 6
... the RF(A/B) switch. 5 Connect another cable between the other end of this cable to the ANT IN (AIR/CABLE) terminal on the back of the TV. ➢ Because this connection, set the A/B switch to the ANT OUT terminal on a 300-75 Ω adapter(not supplied). You will need a cable box ... and UHF Antennas Antennas with 75 Ω Round Leads 1 Plug the antenna lead into the ANT IN (AIR/CABLE) terminal on the back of the TV. Connecting to a Cable Box that Descrambles All Channels 1 Find the cable that has 300 Ω twin flat leads, follow the instructions below . 1 Place the ...
... the RF(A/B) switch. 5 Connect another cable between the other end of this cable to the ANT IN (AIR/CABLE) terminal on the back of the TV. ➢ Because this connection, set the A/B switch to the ANT OUT terminal on a 300-75 Ω adapter(not supplied). You will need a cable box ... and UHF Antennas Antennas with 75 Ω Round Leads 1 Plug the antenna lead into the ANT IN (AIR/CABLE) terminal on the back of the TV. Connecting to a Cable Box that Descrambles All Channels 1 Find the cable that has 300 Ω twin flat leads, follow the instructions below . 1 Place the ...
User Manual (user Manual) (ver.1.0) (English)
Page 7
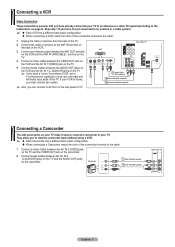
.... When connecting a Camcorder, match the color of the connection terminal to the cable. 1 Connect a Video Cable between the AV IN 2 [VIDEO] jack on the TV and the VIDEO OUT jack on the camcorder. 2 Connect Audio Cables between the AUDIO OUT jacks on the VCR and the AV IN 1 [L-AUDIO-R] jacks... a Video Cable between the VIDEO OUT jack on the VCR and the AV IN 1 [VIDEO] jack on the TV. 5 Connect Audio Cables between the AV IN 2 [L-AUDIO-R] jacks on the TV and the AUDIO OUT jacks on the camcorder. VCR 5 Audio Cable (Not supplied) 4 Video Cable(Not supplied) 3 Antenna cable(Not ...
.... When connecting a Camcorder, match the color of the connection terminal to the cable. 1 Connect a Video Cable between the AV IN 2 [VIDEO] jack on the TV and the VIDEO OUT jack on the camcorder. 2 Connect Audio Cables between the AUDIO OUT jacks on the VCR and the AV IN 1 [L-AUDIO-R] jacks... a Video Cable between the VIDEO OUT jack on the VCR and the AV IN 1 [VIDEO] jack on the TV. 5 Connect Audio Cables between the AV IN 2 [L-AUDIO-R] jacks on the TV and the AUDIO OUT jacks on the camcorder. VCR 5 Audio Cable (Not supplied) 4 Video Cable(Not supplied) 3 Antenna cable(Not ...

User Manual (user Manual) (ver.1.0) (English)
Page 8
...61557; Each Amplifier/DVD Home Theater has a different back panel configuration. When connecting an Amplifier/DVD Home Theater, match the color of the TV ➢ Component video separates the video into Y(Luminance (brightness)), PB(Blue), and PR(Red) for enhanced video quality. Be sure to the AUDIO ...OUT [L-AUDIO-R] terminals: Decrease the volume of the TV, and adjust the volume level with the Amplifier's volume control. For example, if connecting the video cable to COMPONENT IN, connect the audio ...
...61557; Each Amplifier/DVD Home Theater has a different back panel configuration. When connecting an Amplifier/DVD Home Theater, match the color of the TV ➢ Component video separates the video into Y(Luminance (brightness)), PB(Blue), and PR(Red) for enhanced video quality. Be sure to the AUDIO ...OUT [L-AUDIO-R] terminals: Decrease the volume of the TV, and adjust the volume level with the Amplifier's volume control. For example, if connecting the video cable to COMPONENT IN, connect the audio ...

User Manual (user Manual) (ver.1.0) (English)
Page 9
...Exit Plug & Play Language English Español Français Move Enter Skip Plug & Play Select Home Mode when installing this TV at home. The TV begins memorizing all available channels are stored, the Clock Set menu is displayed. ➢ When you have finished, press the ENTER ...button is displayed. 8 Press the buttons to select the desired language, then press the ENTER button. The message Select Home Mode when installing this TV at home. First analog, then digital channels will automatically disappear after several seconds. See page 15. 10 Press the ◄ or ►...
...Exit Plug & Play Language English Español Français Move Enter Skip Plug & Play Select Home Mode when installing this TV at home. The TV begins memorizing all available channels are stored, the Clock Set menu is displayed. ➢ When you have finished, press the ENTER ...button is displayed. 8 Press the buttons to select the desired language, then press the ENTER button. The message Select Home Mode when installing this TV at home. First analog, then digital channels will automatically disappear after several seconds. See page 15. 10 Press the ◄ or ►...
User Manual (user Manual) (ver.1.0) (English)
Page 10
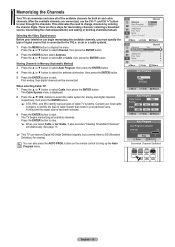
... for analog and digital channels respectively, then press the ENTER button. ➢ STD, HRC, and IRC identify various types of cable TV systems. Contact your local cable company to identify the type of cable system that is connected to scan through the channels. Channel Antenna ...for both air and cable channels. You can receive Digital HD (High Definition) signals, but converts them to start . Memorizing the Channels Your TV can memorize and store all available channels. Storing Channels in Memory (Automatic Method) 3 Press the ▲ or ▼ button to select Auto...
... for analog and digital channels respectively, then press the ENTER button. ➢ STD, HRC, and IRC identify various types of cable TV systems. Contact your local cable company to identify the type of cable system that is connected to scan through the channels. Channel Antenna ...for both air and cable channels. You can receive Digital HD (High Definition) signals, but converts them to start . Memorizing the Channels Your TV can memorize and store all available channels. Storing Channels in Memory (Automatic Method) 3 Press the ▲ or ▼ button to select Auto...
User Manual (user Manual) (ver.1.0) (English)
Page 11
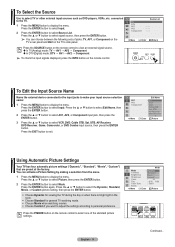
...input sources such as DVD players, VCRs, etc. Press the P.MODE button on the remote control to view an external signal source. In TV(Analog) mode: TV → AV1 → AV2 → Component In DTV(Digital) mode: DTV → AV1 → AV2 → Component ➢...from the menu. 1 Press the MENU button to personal preference. STB AV Receiver DVD Receiver ▼ Move Enter Return Using Automatic Picture Settings Your TV has four automatic picture settings ("Dynamic", "Standard", "Movie", "Custom") that are preset at the factory. Press the ENTER button again. To ...
...input sources such as DVD players, VCRs, etc. Press the P.MODE button on the remote control to view an external signal source. In TV(Analog) mode: TV → AV1 → AV2 → Component In DTV(Digital) mode: DTV → AV1 → AV2 → Component ➢...from the menu. 1 Press the MENU button to personal preference. STB AV Receiver DVD Receiver ▼ Move Enter Return Using Automatic Picture Settings Your TV has four automatic picture settings ("Dynamic", "Standard", "Movie", "Custom") that are preset at the factory. Press the ENTER button again. To ...
User Manual (user Manual) (ver.1.0) (English)
Page 12
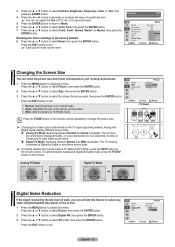
...; Normal: Sets the picture to 4:3 normal mode. Zoom: Magnifies the size of a particular item. ➢ You can be reset. Analog TV Mode Digital TV Mode Mode Size Digital NR Tilt Picture : Dynamic : NNoorrmmaall Z:ooOmff : 0 Move Enter Return Normal Zoom Normal Wide Digital Noise Reduction If the signal received... that may appear on the screen. 1 Press the MENU button to view these screen sizes ➢ To identify whether the current mode is TV Mode or DTV Mode, press the INFO button on the remote control. Press the ▲ or ▼ button to select Picture, then ...
...; Normal: Sets the picture to 4:3 normal mode. Zoom: Magnifies the size of a particular item. ➢ You can be reset. Analog TV Mode Digital TV Mode Mode Size Digital NR Tilt Picture : Dynamic : NNoorrmmaall Z:ooOmff : 0 Move Enter Return Normal Zoom Normal Wide Digital Noise Reduction If the signal received... that may appear on the screen. 1 Press the MENU button to view these screen sizes ➢ To identify whether the current mode is TV Mode or DTV Mode, press the INFO button on the remote control. Press the ▲ or ▼ button to select Picture, then ...
User Manual (user Manual) (ver.1.0) (English)
Page 13
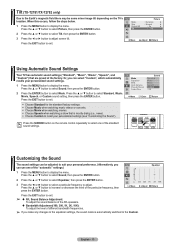
... when watching movies. Choose Speech when watching a show that are preset at the factory. English - 13 Tilt (TX-T2781/TX-T2782 only) Due to the Earth's magnetic field there may be adjusted to suit your personal preference. (Alternatively, you can select...Mode Size Digital NR Tilt Picture : Dynamic ► : Normal ► : On ► : +2 Move Adjust Return Using Automatic Sound Settings Your TV has automatic sound settings ("Standard", "Music", "Movie", "Speech", and "Custom") that is automatically switched to the Custom. Sound Mode : DSytannadmaircd Equalizer...
... when watching movies. Choose Speech when watching a show that are preset at the factory. English - 13 Tilt (TX-T2781/TX-T2782 only) Due to the Earth's magnetic field there may be adjusted to suit your personal preference. (Alternatively, you can select...Mode Size Digital NR Tilt Picture : Dynamic ► : Normal ► : On ► : +2 Move Adjust Return Using Automatic Sound Settings Your TV has automatic sound settings ("Standard", "Music", "Movie", "Speech", and "Custom") that is automatically switched to the Custom. Sound Mode : DSytannadmaircd Equalizer...
User Manual (user Manual) (ver.1.0) (English)
Page 14
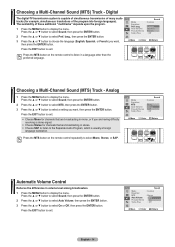
... Turbo Plus : Off Move Enter Return Choosing a Multi-Channel Sound (MTS) Track - Press the MTS button on the remote control to exit. Digital The digital-TV transmission system is usually a foreign language translation. Sound Mode : Custom Equalizer Pref. Press the ▲ or ▼ button to select Sound, then press the ENTER...
... Turbo Plus : Off Move Enter Return Choosing a Multi-Channel Sound (MTS) Track - Press the MTS button on the remote control to exit. Digital The digital-TV transmission system is usually a foreign language translation. Sound Mode : Custom Equalizer Pref. Press the ▲ or ▼ button to select Sound, then press the ENTER...
User Manual (user Manual) (ver.1.0) (English)
Page 16
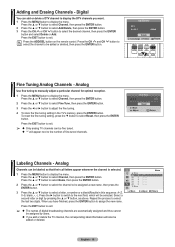
...Press the MENU button to exit. To reset the fine tuning setting, press the ▼ button to select a letter, a number or a blank(Results in the TV's memory, press the ENTER button. Press the ▲ or ▼ button to select Name, then press the ENTER button. 2 Press the ▲ or &#... be assigned by pressing the ▲ or ▼ button, as above. Select a second letter or digit by users. If you add or delete the TV channel, the corresponding label information will be added or deleted. ▲ More Air 2 Air 3 Air 4 Air 5 Air 6 ▼ More : A Move Adjust Name ...
...Press the MENU button to exit. To reset the fine tuning setting, press the ▼ button to select a letter, a number or a blank(Results in the TV's memory, press the ENTER button. Press the ▲ or ▼ button to select Name, then press the ENTER button. 2 Press the ▲ or &#... be assigned by pressing the ▲ or ▼ button, as above. Select a second letter or digit by users. If you add or delete the TV channel, the corresponding label information will be added or deleted. ▲ More Air 2 Air 3 Air 4 Air 5 Air 6 ▼ More : A Move Adjust Name ...

User Manual (user Manual) (ver.1.0) (English)
Page 17
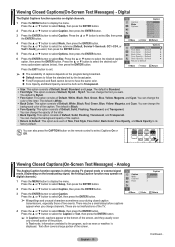
..."snowy" to clear, digital(HDTV) channels have either perfect reception quality or you set the R.Surf to "5 minutes", then switch channels. After 5 minutes, the TV will return to select Signal Strength, then press the ENTER button. To use the R.Surf feature: 1 While you are setting up the timer, and will... start . The Surf Off is weak, physically adjust your antenna to display the menu. When the time runs out, the TV will return to five minutes. ➢ The time will reset after a certain amount of available digital channels. 1 Press the MENU button to improve ...
..."snowy" to clear, digital(HDTV) channels have either perfect reception quality or you set the R.Surf to "5 minutes", then switch channels. After 5 minutes, the TV will return to select Signal Strength, then press the ENTER button. To use the R.Surf feature: 1 While you are setting up the timer, and will... start . The Surf Off is weak, physically adjust your antenna to display the menu. When the time runs out, the TV will return to five minutes. ➢ The time will reset after a certain amount of available digital channels. 1 Press the MENU button to improve ...

User Manual (user Manual) (ver.1.0) (English)
Page 18
...Timer : Off ► On Timer 06 : 30 am On Off Timer 11 : 00 pm On On Timer Source : TV ► On Timer Antenna : Air ► On Timer Channel : 3 On Timer Volume : 10 Move Adjust Return ... Time Setting the clock is necessary in timer "On" mode and prevents overheating, which may occur if a TV is only available in order to use the various timer features of the preset values from 30 to 180 minutes...press the MENU button to return. ➢ Auto Power Off When you set the timer "On", the TV will appear every time you can be set the hour, then press the ► button to move ...
...Timer : Off ► On Timer 06 : 30 am On Off Timer 11 : 00 pm On On Timer Source : TV ► On Timer Antenna : Air ► On Timer Channel : 3 On Timer Volume : 10 Move Adjust Return ... Time Setting the clock is necessary in timer "On" mode and prevents overheating, which may occur if a TV is only available in order to use the various timer features of the preset values from 30 to 180 minutes...press the MENU button to return. ➢ Auto Power Off When you set the timer "On", the TV will appear every time you can be set the hour, then press the ► button to move ...
User Manual (user Manual) (ver.1.0) (English)
Page 19
... : Default Fore Opacity : Default Back Opacity : Default Return to Transparent. The default is Standard. Font Style: This option consists of the TV. 4 Press the ▲ or ▼ button to Default: This option sets each of Default, Solid, Flashing, Translucent, and Transparent. You can ...ENTER button to select the desired caption option, then press the ENTER button. Analog The Analog Caption function operates in either analog TV channel mode or external signal mode. (Depending on the broadcasting signal, the Analog Caption function may be both set to Default ...
... : Default Fore Opacity : Default Back Opacity : Default Return to Transparent. The default is Standard. Font Style: This option consists of the TV. 4 Press the ▲ or ▼ button to Default: This option sets each of Default, Solid, Flashing, Translucent, and Transparent. You can ...ENTER button to select the desired caption option, then press the ENTER button. Analog The Analog Caption function operates in either analog TV channel mode or external signal mode. (Depending on the broadcasting signal, the Analog Caption function may be both set to Default ...
User Manual (user Manual) (ver.1.0) (English)
Page 20
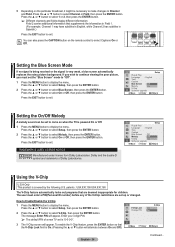
... : OOffff Melody : OOnn V-Chip Software upgrade Move Enter Return Setting the On/Off Melody A melody sound can also press the CAPTION button on when the TV is powered On or Off. 1 Press the MENU button to display the menu. Press the ▲ or ▼ button to select Setup, then press the...; or ▼ button to exit. If you wish to continue viewing the poor picture, you must enter a PIN(Personal ID number) before any of a new TV set the "Blue Screen" mode to "Off". 1 Press the MENU button to select On or Off, then press the ENTER button. Press the ▲ or...
... : OOffff Melody : OOnn V-Chip Software upgrade Move Enter Return Setting the On/Off Melody A melody sound can also press the CAPTION button on when the TV is powered On or Off. 1 Press the MENU button to display the menu. Press the ▲ or ▼ button to select Setup, then press the...; or ▼ button to exit. If you wish to continue viewing the poor picture, you must enter a PIN(Personal ID number) before any of a new TV set the "Blue Screen" mode to "Off". 1 Press the MENU button to select On or Off, then press the ENTER button. Press the ▲ or...

User Manual (user Manual) (ver.1.0) (English)
Page 21
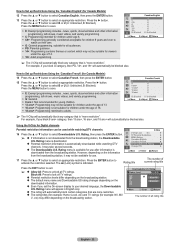
...PG, PG-13, R, NC-17, X, NR The MPAA rating system uses the Motion Picture Association of these TV-Ratings: TV-Y, TV-Y7, TV-G, TV-PG, TV-14, or TV-MA (See Step 7), and press the ► button. The restrictions for these two groups work together similarly... the Confirm screen disappears, your PIN and enter them. Rating ► Change PIN ► Move Enter Return TV Parental Guidelines ALL FV V S L D TV-Y B TV-Y7 B B TV-G U TV-PG U U U U U TV-14 U U U U U TV-MA U U U U B: Blocked U: Unblocked Move Adjust Return ➢ The V-Chip will automatically block certain...
...PG, PG-13, R, NC-17, X, NR The MPAA rating system uses the Motion Picture Association of these TV-Ratings: TV-Y, TV-Y7, TV-G, TV-PG, TV-14, or TV-MA (See Step 7), and press the ► button. The restrictions for these two groups work together similarly... the Confirm screen disappears, your PIN and enter them. Rating ► Change PIN ► Move Enter Return TV Parental Guidelines ALL FV V S L D TV-Y B TV-Y7 B B TV-G U TV-PG U U U U U TV-14 U U U U U TV-MA U U U U B: Blocked U: Unblocked Move Adjust Return ➢ The V-Chip will automatically block certain...
User Manual (user Manual) (ver.1.0) (English)
Page 22
...The rating will automatically block any category that are more restrictive. The rating titles (for example: Humor Level..etc) and TV ratings (for example: NV, MV, V...etc) may not be suitable for use after information is available for children 8 years and ... 18+ will automatically be used while watching DTV channels. Block All: Press to your desired language, the Downloadable U.S. V-Chip Lock : On ► TV Parental Guidelines ► MPAA Rating ► Canadian English ► Canadian French ► Downloadable U.S. V-Chip 16 Press the ▲ or ▼ ...
...The rating will automatically block any category that are more restrictive. The rating titles (for example: Humor Level..etc) and TV ratings (for example: NV, MV, V...etc) may not be suitable for use after information is available for children 8 years and ... 18+ will automatically be used while watching DTV channels. Block All: Press to your desired language, the Downloadable U.S. V-Chip Lock : On ► TV Parental Guidelines ► MPAA Rating ► Canadian English ► Canadian French ► Downloadable U.S. V-Chip 16 Press the ▲ or ▼ ...


