
User Manual
Page 8
... clean, soft and dry cloth. Do not apply a cleaning agent that contains alcohol, solvent, or surfactant to the monitor. ! Do not spray water or detergent directly on the monitor and computer. ! 8 Before Using the Product Power on the product. 4. Wet a soft and dry cloth in water and ... computer. 2. Before Using the Product Cleaning Exercise care when cleaning as the panel and exterior of the monitor. 5. Disconnect the power cord from the monitor. Connect the power cord to clean the exterior of advanced LCDs are easily scratched. Hold the power cable by the plug and...
... clean, soft and dry cloth. Do not apply a cleaning agent that contains alcohol, solvent, or surfactant to the monitor. ! Do not spray water or detergent directly on the monitor and computer. ! 8 Before Using the Product Power on the product. 4. Wet a soft and dry cloth in water and ... computer. 2. Before Using the Product Cleaning Exercise care when cleaning as the panel and exterior of the monitor. 5. Disconnect the power cord from the monitor. Connect the power cord to clean the exterior of advanced LCDs are easily scratched. Hold the power cable by the plug and...

User Manual
Page 9
... Ensure some space around the product for storage Be sure to allow the amount of the monitor needs cleaning. (A service fee will be charged.) 9 Before Using the Product Be sure to contact Samsung Customer Service Center if the inside of space as shown below or greater when installing the product. An...
... Ensure some space around the product for storage Be sure to allow the amount of the monitor needs cleaning. (A service fee will be charged.) 9 Before Using the Product Be sure to contact Samsung Customer Service Center if the inside of space as shown below or greater when installing the product. An...

User Manual
Page 17
... too loud may result. Store the small accessories used with the product out of reach of time can deteriorate your eyesight. ! Do not hold the monitor upside-down or move it to fall and break or cause a personal injury. Do not touch the screen when the product has been turned on...
... too loud may result. Store the small accessories used with the product out of reach of time can deteriorate your eyesight. ! Do not hold the monitor upside-down or move it to fall and break or cause a personal injury. Do not touch the screen when the product has been turned on...

User Manual
Page 21
1 Preparations 1.2.2 Direct Key guide For guidance on shortcut keys, the below OSD (On Screen Display) will be displayed if you switch the source or turn on the monitor. Eye Saver Mode Volume Features Eye Saver Mode Off UP/DOWN: Adjust Brightness / Contrast / Eye Saver Mode LEFT/RIGHT: Adjust Volume. PRESS(ENTER): Display Function Key Guide. 21 1 Preparations
1 Preparations 1.2.2 Direct Key guide For guidance on shortcut keys, the below OSD (On Screen Display) will be displayed if you switch the source or turn on the monitor. Eye Saver Mode Volume Features Eye Saver Mode Off UP/DOWN: Adjust Brightness / Contrast / Eye Saver Mode LEFT/RIGHT: Adjust Volume. PRESS(ENTER): Display Function Key Guide. 21 1 Preparations

User Manual
Page 22
... OSD (On Screen Display) of the screen if the input signal has been changed. When the monitor displays nothing (i.e. Please run the corresponding function based on the top left corner of your Monitor's feature appears. You can exit by moving the JOG button in the function key guide screen. ... A message will be viewed. OSD control lock: Maintain the current settings, or lock the OSD control to prevent unintended changes to turn the Monitor off by moving the JOG button in the function key guide screen. Enable/Disable: To lock/unlock the OSD control, press the LEFT button ...
... OSD (On Screen Display) of the screen if the input signal has been changed. When the monitor displays nothing (i.e. Please run the corresponding function based on the top left corner of your Monitor's feature appears. You can exit by moving the JOG button in the function key guide screen. ... A message will be viewed. OSD control lock: Maintain the current settings, or lock the OSD control to prevent unintended changes to turn the Monitor off by moving the JOG button in the function key guide screen. Enable/Disable: To lock/unlock the OSD control, press the LEFT button ...

User Manual
Page 23
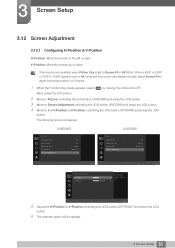
Exit the Main menu. - Value increases in the slider. - Save the value and close Sublist. 23 1 Preparations Value decreases in the slider. - Move to next depth. - JOG Button UP/DOWN LEFT RIGHT PRESS(ENTER) Action - Move to next depth. - Close Sublist without saving value. - Move the option - 1 Preparations JOG Button UP Down PRESS(ENTER) for 2 seconds Power saving/Non-signal mode Source Change Power Off When the monitor displays the Main menu the JOG Button could be used as below.
Exit the Main menu. - Value increases in the slider. - Save the value and close Sublist. 23 1 Preparations Value decreases in the slider. - Move to next depth. - JOG Button UP/DOWN LEFT RIGHT PRESS(ENTER) Action - Move to next depth. - Close Sublist without saving value. - Move the option - 1 Preparations JOG Button UP Down PRESS(ENTER) for 2 seconds Power saving/Non-signal mode Source Change Power Off When the monitor displays the Main menu the JOG Button could be used as below.

User Manual
Page 26
Turn the connecting screw at the bottom of the stand base to separate it in the direction of the arrow as shown in the figure. 26 1 Preparations To disassemble the stand from the stand base by pulling it . Remove the stand neck from the monitor, make sure to press the lower part of the product faces downwards. 1 Preparations 1.3.2 Removing the Stand Place a soft cloth over the table to protect the product and place the product onto the cloth so that the front of the monitor with one hand, and pull and sway sideways the stand with the other hand, as shown in the picture.
Turn the connecting screw at the bottom of the stand base to separate it in the direction of the arrow as shown in the figure. 26 1 Preparations To disassemble the stand from the stand base by pulling it . Remove the stand neck from the monitor, make sure to press the lower part of the product faces downwards. 1 Preparations 1.3.2 Removing the Stand Place a soft cloth over the table to protect the product and place the product onto the cloth so that the front of the monitor with one hand, and pull and sway sideways the stand with the other hand, as shown in the picture.

User Manual
Page 27
Do not attach the wall-mount kit or desktop stand using a wall mount, disconnect the stand base from the monitor. 27 1 Preparations The product may vary depending on a wall, ensure you want to attach. Notes Using a screw longer than the one specified or from ... for any product damage or personal injury caused by using improper screws or attaching the wall-mount kit or desktop stand using excessive force. Samsung shall not be held liable for a wall mount that does not comply with the VESA standards may get damaged or fall and cause personal injury...
Do not attach the wall-mount kit or desktop stand using a wall mount, disconnect the stand base from the monitor. 27 1 Preparations The product may vary depending on a wall, ensure you want to attach. Notes Using a screw longer than the one specified or from ... for any product damage or personal injury caused by using improper screws or attaching the wall-mount kit or desktop stand using excessive force. Samsung shall not be held liable for a wall mount that does not comply with the VESA standards may get damaged or fall and cause personal injury...

User Manual
Page 28
...-theft locking device: 1 Fix the cable of your anti-theft locking device for details. Anti-theft locking devices can adjust the tilt of your monitor. Hold the lower part of the product and adjust the tilt carefully. 1.3.5 Anti-theft Lock An anti-theft lock allows you to improve quality...
...-theft locking device: 1 Fix the cable of your anti-theft locking device for details. Anti-theft locking devices can adjust the tilt of your monitor. Hold the lower part of the product and adjust the tilt carefully. 1.3.5 Anti-theft Lock An anti-theft lock allows you to improve quality...

User Manual
Page 29
... the best resolution. 2.2.1 Connection Using the HDMI Cable Do not connect the power cable before connecting the power cable. The number and locations of the monitor, the monitor may vary depending on the PC using an HDMI cable. 2 Connect the DC power adapter to the product and a power socket.
... the best resolution. 2.2.1 Connection Using the HDMI Cable Do not connect the power cable before connecting the power cable. The number and locations of the monitor, the monitor may vary depending on the PC using an HDMI cable. 2 Connect the DC power adapter to the product and a power socket.

User Manual
Page 30
... Hz. When connecting an HDMI cable, use a DP cable that supports 3840 x 2160 at 60 Hz. Make sure that the graphics card of the monitor. Ensure you use an HDMI cable other cables. DP IN 1 Connect the DP cable to the [DP IN] port on the PC. (For details, refer... display 3840 x 2160 at 60 Hz. 30 2 Connecting and Using a Source Device If you connect a source device first before connecting all other than provided by Samsung, the image quality may vary depending on the PC. 2 Connect the DC power adapter to DisplayPort controlling the JOG button UP/DOWN, when input source...
... Hz. When connecting an HDMI cable, use a DP cable that supports 3840 x 2160 at 60 Hz. Make sure that the graphics card of the monitor. Ensure you use an HDMI cable other cables. DP IN 1 Connect the DP cable to the [DP IN] port on the PC. (For details, refer... display 3840 x 2160 at 60 Hz. 30 2 Connecting and Using a Source Device If you connect a source device first before connecting all other than provided by Samsung, the image quality may vary depending on the PC. 2 Connect the DC power adapter to DisplayPort controlling the JOG button UP/DOWN, when input source...

User Manual
Page 47
... the Function Key Guide appears, select [ ] by moving the JOG button UP. The following screen will be applied. Game Mode turns Off when the monitor turns on a PC or when a game console such as PlayStation™ or Xbox™ is connected. This menu is not available when Eye Saver...
... the Function Key Guide appears, select [ ] by moving the JOG button UP. The following screen will be applied. Game Mode turns Off when the monitor turns on a PC or when a game console such as PlayStation™ or Xbox™ is connected. This menu is not available when Eye Saver...

User Manual
Page 50
... conditions are satisfied. A digital output device is connected using the HDMI/DP cable. The input signal is 480p, 576p, 720p, or 1080p and monitor can display normally (Not every model can support all of these signals.). This can only be set when the external input is connected through...
... conditions are satisfied. A digital output device is connected using the HDMI/DP cable. The input signal is 480p, 576p, 720p, or 1080p and monitor can display normally (Not every model can support all of these signals.). This can only be set when the external input is connected through...
User Manual
Page 51
... and press the JOG button. 6 The selected option will appear. This menu is only available when Picture Size is input in AV mode and the monitor can display normally, select Screen Fit to the left or right. U28E590D Picture Eye Saver Mode Game Mode Response Time Picture Size Screen Adjustment Off...
... and press the JOG button. 6 The selected option will appear. This menu is only available when Picture Size is input in AV mode and the monitor can display normally, select Screen Fit to the left or right. U28E590D Picture Eye Saver Mode Game Mode Response Time Picture Size Screen Adjustment Off...

User Manual
Page 52
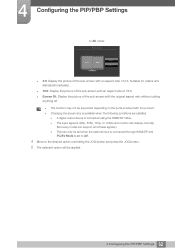
...function separates the screen in half displaying output from two different source devices simultaneously on the left and right sides of a monitor. Alternatively, restart the monitor, then set to do with the PIP/PBP function activated. If the screen is blank in PIP/PBP mode when the ... at 30HZ) resolution when connect HDMI 1 port. To maximize the picture quality and Sound can typically arise when a PC and a monitor are connected to a compatibility issue between the graphics card and the Windows system. It has nothing to the optimum resolution, change the screen size with...
...function separates the screen in half displaying output from two different source devices simultaneously on the left and right sides of a monitor. Alternatively, restart the monitor, then set to do with the PIP/PBP function activated. If the screen is blank in PIP/PBP mode when the ... at 30HZ) resolution when connect HDMI 1 port. To maximize the picture quality and Sound can typically arise when a PC and a monitor are connected to a compatibility issue between the graphics card and the Windows system. It has nothing to the optimum resolution, change the screen size with...

User Manual
Page 60
... conditions are satisfied. A digital output device is connected using the HDMI/DP cable. The input signal is 480p, 576p, 720p, or 1080p and monitor can display normally (Not every model can support all of these signals.). This can only be set when the external input is connected through...
... conditions are satisfied. A digital output device is connected using the HDMI/DP cable. The input signal is 480p, 576p, 720p, or 1080p and monitor can display normally (Not every model can support all of these signals.). This can only be set when the external input is connected through...
User Manual
Page 62
... conditions are satisfied. A digital output device is connected using the HDMI/DP cable. The input signal is 480p, 576p, 720p, or 1080p and monitor can display normally (Not every model can support all of 4:3.
... conditions are satisfied. A digital output device is connected using the HDMI/DP cable. The input signal is 480p, 576p, 720p, or 1080p and monitor can display normally (Not every model can support all of 4:3.

User Manual
Page 68
Refer to On. The sound quality of the monitor may decrease if FreeSync is provided. Source Detection Key Repeat Time FreeSync technology is not ... and press the JOG button. 3 Move to your product for details. 6.1 FreeSync The functions available on the monitor may vary depending on the model. The following screen will appear. U28E590D System FreeSync Eco Saving Plus Off Timer PC/AV Mode... A detailed description of each function is enabled. 6.1.1 Configuring FreeSync 1 When the Function Key Guide appears, select [ ] by Samsung may not be operated when you use...
Refer to On. The sound quality of the monitor may decrease if FreeSync is provided. Source Detection Key Repeat Time FreeSync technology is not ... and press the JOG button. 3 Move to your product for details. 6.1 FreeSync The functions available on the monitor may vary depending on the model. The following screen will appear. U28E590D System FreeSync Eco Saving Plus Off Timer PC/AV Mode... A detailed description of each function is enabled. 6.1.1 Configuring FreeSync 1 When the Function Key Guide appears, select [ ] by Samsung may not be operated when you use...

User Manual
Page 71
... will be reduced by 50% over the default setting. 4 Move to On. 6.2.1 Configuring Eco Saving Plus 1 When the Function Key Guide appears, select [ ] by the monitor panel. This menu is not available when MSAAMSGUINCGBright is in Dynamic Contrast mode. This menu is not available when Game Mode is enabled...
... will be reduced by 50% over the default setting. 4 Move to On. 6.2.1 Configuring Eco Saving Plus 1 When the Function Key Guide appears, select [ ] by the monitor panel. This menu is not available when MSAAMSGUINCGBright is in Dynamic Contrast mode. This menu is not available when Game Mode is enabled...

User Manual
Page 73
Off Timer Off Timer Turn Off After Set the monitor to 23 hours. Return 5 Adjust the Turn Off After controlling the JOG button LEFT/RIGHT. 6 The selected option will be applied. The off timer ...
Off Timer Off Timer Turn Off After Set the monitor to 23 hours. Return 5 Adjust the Turn Off After controlling the JOG button LEFT/RIGHT. 6 The selected option will be applied. The off timer ...


