
User Manual Ver.1.0 (English)
Page 7
... your hand or a metal object under the washer. - If you need to children. - Failing to do so may result in operation. - If a drain error occurs during an operation, check if there is in electric shock, fire, problems with wet hands. - Do not insert your nearest service center. - ... After a water supply failure or when reconnecting the water supply hose, open the faucet slowly. Open the faucet slowly after a long period of a draining problem, it is contaminated by a strong impact. The air pressure in damage to electric leakage. If the washer is used when it is cracked or...
... your hand or a metal object under the washer. - If you need to children. - Failing to do so may result in operation. - If a drain error occurs during an operation, check if there is in electric shock, fire, problems with wet hands. - Do not insert your nearest service center. - ... After a water supply failure or when reconnecting the water supply hose, open the faucet slowly. Open the faucet slowly after a long period of a draining problem, it is contaminated by a strong impact. The air pressure in damage to electric leakage. If the washer is used when it is cracked or...

User Manual Ver.1.0 (English)
Page 8
... in water leakage. Open the faucet and check if the water supply hose connector is firmly tightened and that there is removed. - Since the water drained during a high-temperature wash or drying cycle is not being harmful to do not touch the water. - This may result in the lid. - Do not...
... in water leakage. Open the faucet and check if the water supply hose connector is firmly tightened and that there is removed. - Since the water drained during a high-temperature wash or drying cycle is not being harmful to do not touch the water. - This may result in the lid. - Do not...

User Manual Ver.1.0 (English)
Page 9
..., or spin laundry contaminated by spraying water directly onto it hardens and accumulates inside the washer. Do not wash large laundry items such as no draining.
..., or spin laundry contaminated by spraying water directly onto it hardens and accumulates inside the washer. Do not wash large laundry items such as no draining.

User Manual Ver.1.0 (English)
Page 10
... 28 TROUBLESHOOTING 31 APPENDIX 35 11 Unpacking your washer 11 Overview of your washer 12 Basic location requirements 12 Electrical 12 Grounding 12 Water 13 Drain facility 13 Flooring 13 Location considerations 13 Alcove or closet installation 14 Required dimensions for Installation 14 Important note to installer 18 Loading your washer...
... 28 TROUBLESHOOTING 31 APPENDIX 35 11 Unpacking your washer 11 Overview of your washer 12 Basic location requirements 12 Electrical 12 Grounding 12 Water 13 Drain facility 13 Flooring 13 Location considerations 13 Alcove or closet installation 14 Required dimensions for Installation 14 Important note to installer 18 Loading your washer...

User Manual Ver.1.0 (English)
Page 11
...was damaged during shipping, or you have all of the water supply hoses. Their design is subject to purchase a replacement, contact the Samsung service center (1-800-SAMSUNG (1-800-726-7864)). • The design of childrens' reach. Make sure you do not have received all packing material (plastic bags... YOUR WASHER Unpack your washer and inspect it for product improvement. • Do not reuse old hoses. OVERVIEW OF YOUR WASHER Drain Hose Control panel Lid Power Cord Parts supplied Adjustable legs Hose guide Tools needed User manual book Plastic zip hose tie Water intake ...
...was damaged during shipping, or you have all of the water supply hoses. Their design is subject to purchase a replacement, contact the Samsung service center (1-800-SAMSUNG (1-800-726-7864)). • The design of childrens' reach. Make sure you do not have received all packing material (plastic bags... YOUR WASHER Unpack your washer and inspect it for product improvement. • Do not reuse old hoses. OVERVIEW OF YOUR WASHER Drain Hose Control panel Lid Power Cord Parts supplied Adjustable legs Hose guide Tools needed User manual book Plastic zip hose tie Water intake ...

User Manual Ver.1.0 (English)
Page 13
... attached to minimize vibration and/or unbalanced load situations. If the washer and dryer are contributing factors to accept the outside diameter of the drain hose. Flooring For best performance, you must be reinforced to the washer at least a 72 in² (465 cm²) unobstructed ...) 6 in (15.2 cm) installing your washer will always retain some water in areas where water may need to be routed through the drain hose clip to move slightly during the spin cycle. 01 installing your washer on a platform or weakly supported structure. Never install your washer ...
... attached to minimize vibration and/or unbalanced load situations. If the washer and dryer are contributing factors to accept the outside diameter of the drain hose. Flooring For best performance, you must be reinforced to the washer at least a 72 in² (465 cm²) unobstructed ...) 6 in (15.2 cm) installing your washer will always retain some water in areas where water may need to be routed through the drain hose clip to move slightly during the spin cycle. 01 installing your washer on a platform or weakly supported structure. Never install your washer ...

User Manual Ver.1.0 (English)
Page 15
... supply hoses for the water temperature options are not twisted or bent. installing your property. 01 installing your washer STEP 2 Connecting the water and the drain Connecting the water supply hose The water supply hoses are not supplied with a wrench. Connect the ends of the hoses into the HOT water supply...
... supply hoses for the water temperature options are not twisted or bent. installing your property. 01 installing your washer STEP 2 Connecting the water and the drain Connecting the water supply hose The water supply hoses are not supplied with a wrench. Connect the ends of the hoses into the HOT water supply...

User Manual Ver.1.0 (English)
Page 16
...a wash basin Secure the guide to the side of the basin wall with a hook or to the tap with a piece of string to prevent the drain hose from moving. Open the lid of the washer, and pour the water into position. 2. Pulsator Loosen Lock Adjustable legs 3. Turn the front leveling feet...position of the tub: 1. Slide the washer into the tub to lower the washer. 16_ installing your washer Make sure that the connection between the drain hose and the standpipe is level by turning the front leveling feet clockwise or counterclockwise as shown in (245 cm). If the washer is level...
...a wash basin Secure the guide to the side of the basin wall with a hook or to the tap with a piece of string to prevent the drain hose from moving. Open the lid of the washer, and pour the water into position. 2. Pulsator Loosen Lock Adjustable legs 3. Turn the front leveling feet...position of the tub: 1. Slide the washer into the tub to lower the washer. 16_ installing your washer Make sure that the connection between the drain hose and the standpipe is level by turning the front leveling feet clockwise or counterclockwise as shown in (245 cm). If the washer is level...

User Manual Ver.1.0 (English)
Page 17
...press the Power button. If water leaks while water is supplied or when washing or spinning, and should drain well during the spin cycle. STEP 6 Calibration mode Your Samsung washing machine detects the laundry weight automatically. Select the Rinse+Spin cycle by a 15-amp fuse or ... Press the Start/Pause button to activate "Calibration Mode". 4. The washer should not rock or vibrate excessively when water is being supplied or drained, check the water connections. When "Calibration Mode" is grounded through the third prong of laundry into a three-prong grounded electrical outlet. On...
...press the Power button. If water leaks while water is supplied or when washing or spinning, and should drain well during the spin cycle. STEP 6 Calibration mode Your Samsung washing machine detects the laundry weight automatically. Select the Rinse+Spin cycle by a 15-amp fuse or ... Press the Start/Pause button to activate "Calibration Mode". 4. The washer should not rock or vibrate excessively when water is being supplied or drained, check the water connections. When "Calibration Mode" is grounded through the third prong of laundry into a three-prong grounded electrical outlet. On...

User Manual Ver.1.0 (English)
Page 18
..., the washer may add additional water to redistribute the clothes and correct an imbalance inside the drum. • When washing heavily soiled loads, do a quick drain. • When the cycle is complete, the Door Lock light will go out and "End" (WA456*) / "En" (WA422*,WA400*) will appear in the display. •...
..., the washer may add additional water to redistribute the clothes and correct an imbalance inside the drum. • When washing heavily soiled loads, do a quick drain. • When the cycle is complete, the Door Lock light will go out and "End" (WA456*) / "En" (WA422*,WA400*) will appear in the display. •...

User Manual Ver.1.0 (English)
Page 19
...*/WA400* 23 4 5 6 789 1 Cycle Selector Select the appropriate cycle for the type of laundry, select the Perm Press cycle. To minimize wrinkling of load. Bedding - Drains the water and spins at a high speed. Perm Press - Quick Wash - Heavy Duty - Colors/Darks (WA456*) - Rinse + Spin - Delicates/Hand Wash - Pure CycleTM - washing a load...
...*/WA400* 23 4 5 6 789 1 Cycle Selector Select the appropriate cycle for the type of laundry, select the Perm Press cycle. To minimize wrinkling of load. Bedding - Drains the water and spins at a high speed. Perm Press - Quick Wash - Heavy Duty - Colors/Darks (WA456*) - Rinse + Spin - Delicates/Hand Wash - Pure CycleTM - washing a load...

User Manual Ver.1.0 (English)
Page 20
... items. Cold - For moderately soiled loads. Delay Start - Use this function to 19 hours in one-hour increments. To increase your energy savings on . High - Drains your washer without any cycle for more thoroughly by specifying additional time. Press to pause and restart cycles. 8 My Cycle button Press and hold the...
... items. Cold - For moderately soiled loads. Delay Start - Use this function to 19 hours in one-hour increments. To increase your energy savings on . High - Drains your washer without any cycle for more thoroughly by specifying additional time. Press to pause and restart cycles. 8 My Cycle button Press and hold the...

User Manual Ver.1.0 (English)
Page 21
...and the product enters the "CL" mode. (When the product is turned off and the washing machine drains water by force after you need to the product. WARNING • Once you have activated the Child ...CL" is displayed on the LED display without the alarm sounding and the washing machine starts to drain water by force. • Even if the power of laundry _21 To deactivate the Child Lock ..., "ds" is turned off and then on the LED display and the washing machine starts to drain water. Adding laundry when Child Lock is turned off . • The Child Lock function prevents children...
...and the product enters the "CL" mode. (When the product is turned off and the washing machine drains water by force after you need to the product. WARNING • Once you have activated the Child ...CL" is displayed on the LED display without the alarm sounding and the washing machine starts to drain water by force. • Even if the power of laundry _21 To deactivate the Child Lock ..., "ds" is turned off and then on the LED display and the washing machine starts to drain water. Adding laundry when Child Lock is turned off . • The Child Lock function prevents children...

User Manual Ver.1.0 (English)
Page 23
... of washing performance with water from a nozzle that dissolves the detergent more thoroughly. The Smart Care indicator is complete, the configured wash cycle starts without draining water. If you use this function, the total cycle time is heavily contaminated or stained. This allows the detergent to penetrate more evenly into the...
... of washing performance with water from a nozzle that dissolves the detergent more thoroughly. The Smart Care indicator is complete, the configured wash cycle starts without draining water. If you use this function, the total cycle time is heavily contaminated or stained. This allows the detergent to penetrate more evenly into the...
User Manual Ver.1.0 (English)
Page 31
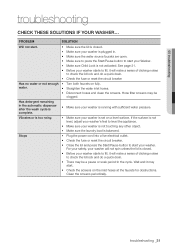
...; Make sure the water source faucets are open. • Make sure to press the Start/Pause button to check the lid lock and do a quick drain. • Check the fuse or reset the circuit breaker Has no water or not enough • Turn both faucets on fully. See page 21. •... is not level, adjust your washer's feet to level the appliance. • Make sure your washer starts to check the lid lock and do a quick drain. • There may start . • Make sure the lid is closed . • Before your washer is not touching any other object. • Make sure the...
...; Make sure the water source faucets are open. • Make sure to press the Start/Pause button to check the lid lock and do a quick drain. • Check the fuse or reset the circuit breaker Has no water or not enough • Turn both faucets on fully. See page 21. •... is not level, adjust your washer's feet to level the appliance. • Make sure your washer starts to check the lid lock and do a quick drain. • There may start . • Make sure the lid is closed . • Before your washer is not touching any other object. • Make sure the...
User Manual Ver.1.0 (English)
Page 32
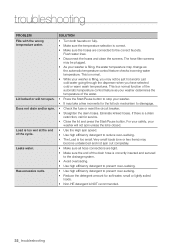
... with the wrong temperature water. If there is correct. • Make sure the hoses are tight. • Make sure the end of the drain hose is correctly inserted and secured to the drainage system. • Avoid overloading. • Use high efficiency detergent to prevent over-sudsing. •...; Use high efficiency detergent to the correct faucets. SOLUTION • Turn both faucets on fully. • Make sure the temperature selection is a drain restriction, call for service. • Close the lid and press the Start/Pause button. Lid locked or will not spin unless the lid is ...
... with the wrong temperature water. If there is correct. • Make sure the hoses are tight. • Make sure the end of the drain hose is correctly inserted and secured to the drainage system. • Avoid overloading. • Use high efficiency detergent to prevent over-sudsing. •...; Use high efficiency detergent to the correct faucets. SOLUTION • Turn both faucets on fully. • Make sure the temperature selection is a drain restriction, call for service. • Close the lid and press the Start/Pause button. Lid locked or will not spin unless the lid is ...

User Manual Ver.1.0 (English)
Page 33
CODE SYMBOL MEANING SOLUTION The Water Level sensor is firmly closed. It can also mean that the unit senses a small clog while draining. If the code reappears, call for service Motor not running . The door will not unlock. Make sure the lid is not working properly. ...You must connect the hot water supply hose because hot water is not draining. Redistribute the load, press the Start/Pause button. Close the lid tightly and restart the cycle. Close the lid tightly and restart the cycle....
CODE SYMBOL MEANING SOLUTION The Water Level sensor is firmly closed. It can also mean that the unit senses a small clog while draining. If the code reappears, call for service Motor not running . The door will not unlock. Make sure the lid is not working properly. ...You must connect the hot water supply hose because hot water is not draining. Redistribute the load, press the Start/Pause button. Close the lid tightly and restart the cycle. Close the lid tightly and restart the cycle....

User Manual Ver.1.0 (English)
Page 38
... materials. SPECIFICATION TYPE DIMENSIONS TOP LOADING WASHER Div Inches (cm) A. Depth 29.3" (74.4) WATER PRESSURE WEIGHT POWER CONSUMPTION SPIN REVOLUTION WA456* WA422* WA400* WASHING SPIN DRAIN WA456* WA422* / WA400* 38_ appendix 20-116 psi (137-800 kPa) 56.0 kg (122.2 lb) 55.0 kg (120.0 lb) 54.0 kg (117.8 lb) 120 V 700...
... materials. SPECIFICATION TYPE DIMENSIONS TOP LOADING WASHER Div Inches (cm) A. Depth 29.3" (74.4) WATER PRESSURE WEIGHT POWER CONSUMPTION SPIN REVOLUTION WA456* WA422* WA400* WASHING SPIN DRAIN WA456* WA422* / WA400* 38_ appendix 20-116 psi (137-800 kPa) 56.0 kg (122.2 lb) 55.0 kg (120.0 lb) 54.0 kg (117.8 lb) 120 V 700...


