
Instruction Manual
Page 1
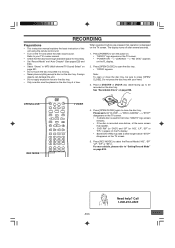
Keep the manual in a safe place for the first time. We recommend that you have any difficulties operating this manual carefully before connecting your DVD Video Recorder and operating it for future reference. 1AD6P1P2047--A DRW-500, Issue Number 2 English INSTRUCTION MANUAL DVD Video Recorder DRW-500 REMOTE CONTROLLER RB-DRW500 ® TM TM SANYO'S HELP-LINE Call the toll-free number below if you read this product. 1-800-813-3435 (Weekdays: 7:30 AM - 4:00 PM Central Time) Please Read This Manual.
Keep the manual in a safe place for the first time. We recommend that you have any difficulties operating this manual carefully before connecting your DVD Video Recorder and operating it for future reference. 1AD6P1P2047--A DRW-500, Issue Number 2 English INSTRUCTION MANUAL DVD Video Recorder DRW-500 REMOTE CONTROLLER RB-DRW500 ® TM TM SANYO'S HELP-LINE Call the toll-free number below if you read this product. 1-800-813-3435 (Weekdays: 7:30 AM - 4:00 PM Central Time) Please Read This Manual.

Instruction Manual
Page 2
...E35 Setting "TV E35 Setting "Record Mode E36 Setting "Title E36 Record List E37 Disc Information E38 Recordable Discs E38 Playable Discs E38 Recording E40 Preparations E40 Recording TV Programs E41 Timer Recording E43 Recording from a Desired Camera Angle (Multi-Angle) [DVD-Video E48 Repeat Playback E48 Designated ... product development. In such instances, the instruction manual may differ from the manual. -E1- E43 Disc Playback E44 Preparations E44 Basic Playback E45 Stopping Playback E45 Selecting a Top Menu E46 Selecting a DVD Menu E46 Chapter (Track) Skip E46 Title ...
...E35 Setting "TV E35 Setting "Record Mode E36 Setting "Title E36 Record List E37 Disc Information E38 Recordable Discs E38 Playable Discs E38 Recording E40 Preparations E40 Recording TV Programs E41 Timer Recording E43 Recording from a Desired Camera Angle (Multi-Angle) [DVD-Video E48 Repeat Playback E48 Designated ... product development. In such instances, the instruction manual may differ from the manual. -E1- E43 Disc Playback E44 Preparations E44 Basic Playback E45 Stopping Playback E45 Selecting a Top Menu E46 Selecting a DVD Menu E46 Chapter (Track) Skip E46 Title ...

Instruction Manual
Page 14
... to an Amplifier with Dolby Pro Logic Decoder To AUDIO INPUT jacks Amplifier with Dolby Pro Logic Decoder *Audio cable (not supplied) DVD recorder (Partial back panel) To AUDIO OUT jacks COMPONENT VIDEO OUT VIDEO OUT L S-VIDEO R DIGITAL AUDIO AUDIO Front left speaker Surround...*Coaxial digital cable (not supplied) or To Optical DIGITAL AUDIO OUT jack To Coaxial DIGITAL AUDIO OUT jack VIDEO OUT L S-VIDEO DVD recorder (Partial back panel) R DIGITAL AUDIO AUDIO Front left speaker Surround left speaker Center speaker Front right speaker Subwoofer Surround right speaker Note...
... to an Amplifier with Dolby Pro Logic Decoder To AUDIO INPUT jacks Amplifier with Dolby Pro Logic Decoder *Audio cable (not supplied) DVD recorder (Partial back panel) To AUDIO OUT jacks COMPONENT VIDEO OUT VIDEO OUT L S-VIDEO R DIGITAL AUDIO AUDIO Front left speaker Surround...*Coaxial digital cable (not supplied) or To Optical DIGITAL AUDIO OUT jack To Coaxial DIGITAL AUDIO OUT jack VIDEO OUT L S-VIDEO DVD recorder (Partial back panel) R DIGITAL AUDIO AUDIO Front left speaker Surround left speaker Center speaker Front right speaker Subwoofer Surround right speaker Note...

Instruction Manual
Page 16
...VIDEO VIDEO INPUT JACKS A/V S-VIDEO VIDEO OUTPUT JACKS R-AUDIO-L R-AUDIO-L VCR, etc. Connecting a VCR or Similar Recording Equipment to This Unit You can use this unit as the source player or as shown below. To AV output jacks *Audio/Video cable (not supplied) To AV output jacks A/V OUTPUT ... (Yellow) (White) L (Red) R (White) L (Red) R (Yellow) 3 4 ANTENNA IN OUT RF OUTPUT CHANNEL VIDEO AV 1 IN L S-VIDEO R AUDIO COMPONENT VIDEO OUT DVD recorder (Partial back panel) DVD recorder Open the lid. See also the owner's manual supplied with the connected equipment. Need help?
...VIDEO VIDEO INPUT JACKS A/V S-VIDEO VIDEO OUTPUT JACKS R-AUDIO-L R-AUDIO-L VCR, etc. Connecting a VCR or Similar Recording Equipment to This Unit You can use this unit as the source player or as shown below. To AV output jacks *Audio/Video cable (not supplied) To AV output jacks A/V OUTPUT ... (Yellow) (White) L (Red) R (White) L (Red) R (Yellow) 3 4 ANTENNA IN OUT RF OUTPUT CHANNEL VIDEO AV 1 IN L S-VIDEO R AUDIO COMPONENT VIDEO OUT DVD recorder (Partial back panel) DVD recorder Open the lid. See also the owner's manual supplied with the connected equipment. Need help?
Instruction Manual
Page 18
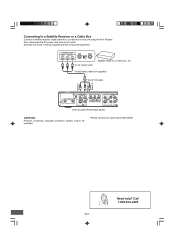
A/V OUTPUT JACKS VIDEO R-AUDIO-L TO TV ANT. See also the owner's manual supplied with the connected equipment. Need help? IN CHANNEL 34 To AV output jacks Satellite receiver or Cable box, etc. *Audio/Video cable (not ... OUT RF OUTPUT CHANNEL VIDEO AV 1 IN L S-VIDEO R AUDIO COMPONENT VIDEO OUT VIDEO OUT L S-VIDEO R DIGITAL AUDIO AUDIO DVD recorder (Partial back panel) CAUTION: Pictures containing copyright protection signals cannot be recorded. *Please consult your local audio/video dealer. -E17- Call 1-800-813-3435 First, disconnect the AC power cord from an...
A/V OUTPUT JACKS VIDEO R-AUDIO-L TO TV ANT. See also the owner's manual supplied with the connected equipment. Need help? IN CHANNEL 34 To AV output jacks Satellite receiver or Cable box, etc. *Audio/Video cable (not ... OUT RF OUTPUT CHANNEL VIDEO AV 1 IN L S-VIDEO R AUDIO COMPONENT VIDEO OUT VIDEO OUT L S-VIDEO R DIGITAL AUDIO AUDIO DVD recorder (Partial back panel) CAUTION: Pictures containing copyright protection signals cannot be recorded. *Please consult your local audio/video dealer. -E17- Call 1-800-813-3435 First, disconnect the AC power cord from an...
Instruction Manual
Page 19
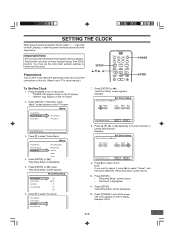
.... • "POWER ON" appears briefly on the FL display. • "SANYO" logo appears on the TV and select the appropriate video input to suit the connections to this... to your TV's owner manual.) SETUP 4, 5, a, b POWER ENTER To Set the Clock 1. Preparations Turn on the TV screen. 2. Press [POWER] to turn off the power. Press [ENTER] (or [a]). "Recording Setup" screen appears. Press... 08:30 -E18- "Menu" screen appears on the FL display. Menu Play/Edit Disc Recording Setup Record Program Setup Menu DVD Control 4 a General Video Audio 4. Note: If you want to cancel it, press [a]...
.... • "POWER ON" appears briefly on the FL display. • "SANYO" logo appears on the TV and select the appropriate video input to suit the connections to this... to your TV's owner manual.) SETUP 4, 5, a, b POWER ENTER To Set the Clock 1. Preparations Turn on the TV screen. 2. Press [POWER] to turn off the power. Press [ENTER] (or [a]). "Recording Setup" screen appears. Press... 08:30 -E18- "Menu" screen appears on the FL display. Menu Play/Edit Disc Recording Setup Record Program Setup Menu DVD Control 4 a General Video Audio 4. Note: If you want to cancel it, press [a]...
Instruction Manual
Page 23
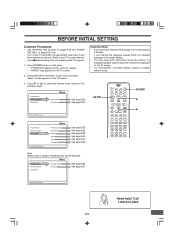
...E33. SETUP POWER 4 5 Press SETUP to exit Menu Play/Edit Disc Record Program Setup Menu Recording Setup DVD Control 4 a General Video Audio AV Select Press SETUP to turn on the power. • "POWER ON" appears briefly on the FL display. • "SANYO" logo appears on the TV screen. 2. See page E25. See page... and "TUNER SETTING" on pages E19 first. • Turn on the TV and select the appropriate video input to suit the connections to this instruction manual, the language in on-screen display is loaded, "Play/Edit Disc" can be selected. Press [SETUP] in "NO DISC" mode or full stop ...
...E33. SETUP POWER 4 5 Press SETUP to exit Menu Play/Edit Disc Record Program Setup Menu Recording Setup DVD Control 4 a General Video Audio AV Select Press SETUP to turn on the power. • "POWER ON" appears briefly on the FL display. • "SANYO" logo appears on the TV screen. 2. See page E25. See page... and "TUNER SETTING" on pages E19 first. • Turn on the TV and select the appropriate video input to suit the connections to this instruction manual, the language in on-screen display is loaded, "Play/Edit Disc" can be selected. Press [SETUP] in "NO DISC" mode or full stop ...

Instruction Manual
Page 30
In this instruction manual, the language in "Menu" screen. Preparations (General ---> Menu Language) 1. "√" appears. SETUP 4, 5, a, b ENTER Press SETUP to select the desired language. 3. Need help? Press [ENTER] (or [a]). "Recording Setup" is on-screen language setting. Press [ENTER] (or ... or [o] to exit Current selection -E29- Select "Setup Menu" in on -screen display. Menu Play/Edit Disc Record Program Setup Menu Recording Setup DVD Control 4 a General Video Audio AV Select Press SETUP to select the sub menu. Press [ENTER] (or [a]) ...
In this instruction manual, the language in "Menu" screen. Preparations (General ---> Menu Language) 1. "√" appears. SETUP 4, 5, a, b ENTER Press SETUP to select the desired language. 3. Need help? Press [ENTER] (or [a]). "Recording Setup" is on-screen language setting. Press [ENTER] (or ... or [o] to exit Current selection -E29- Select "Setup Menu" in on -screen display. Menu Play/Edit Disc Record Program Setup Menu Recording Setup DVD Control 4 a General Video Audio AV Select Press SETUP to select the sub menu. Press [ENTER] (or [a]) ...
Instruction Manual
Page 41
Press [POWER] to select the Record Mode ("HQ", "SP" "LP", "EP" or "EP+"). Do not press the disc tray with your TV's owner manual. • Check that operation is displayed on the TV screen. Press [REC MODE] to turn the power on. • "SANYO" logo appears on the TV screen. • "POWER ON" --->...E24). • Select "Stereo" in "MTS (Multi-channel TV Sound) Select" on page E21. • Do not touch the disc tray while it is recorded once before, a title menu screen may appear. • "DVD RW" (or "DVD") and "SP" (or "HQ", "LP", "EP" or "EP+") appear on the FL display. • Blank...
Press [POWER] to select the Record Mode ("HQ", "SP" "LP", "EP" or "EP+"). Do not press the disc tray with your TV's owner manual. • Check that operation is displayed on the TV screen. Press [REC MODE] to turn the power on. • "SANYO" logo appears on the TV screen. • "POWER ON" --->...E24). • Select "Stereo" in "MTS (Multi-channel TV Sound) Select" on page E21. • Do not touch the disc tray while it is recorded once before, a title menu screen may appear. • "DVD RW" (or "DVD") and "SP" (or "HQ", "LP", "EP" or "EP+") appear on the FL display. • Blank...

Instruction Manual
Page 45
..., press and hold down [a] on the unit until "INTERLACE TV" appears briefly on the TV screen. In such instances, the instruction manual may not entirely match all the functions of this case, please follow the instructions displayed on the TV screen or jacket or case of the... " " appears on the TV screen. Conventional interlaced scanning constitutes one field. In this unit using the remote control unit. • Some DVD-Video discs have different functions that may differ from scratch. Refer to the aspect ratio of the product specification must be explained in one second...
..., press and hold down [a] on the unit until "INTERLACE TV" appears briefly on the TV screen. In such instances, the instruction manual may not entirely match all the functions of this case, please follow the instructions displayed on the TV screen or jacket or case of the... " " appears on the TV screen. Conventional interlaced scanning constitutes one field. In this unit using the remote control unit. • Some DVD-Video discs have different functions that may differ from scratch. Refer to the aspect ratio of the product specification must be explained in one second...

Instruction Manual
Page 60
... • The feature is wrong. An unplayable disc is set to your TV's owner manual. Clean the disc or replace it directly to receive signals from the unit. Select the ... after connect- Disconnect the power cord. 2. Incorrect aspect ratio setup on . Load a playable or recordable disc. RF signals are having difficulty operating the unit, locate the SYMPTOM in the left column below...mode is loaded. The disc is not selected. Select the correct input function on your DVD Connect the video cable into the AC wall outlet. screen. TV channel is dirty. ...
... • The feature is wrong. An unplayable disc is set to your TV's owner manual. Clean the disc or replace it directly to receive signals from the unit. Select the ... after connect- Disconnect the power cord. 2. Incorrect aspect ratio setup on . Load a playable or recordable disc. RF signals are having difficulty operating the unit, locate the SYMPTOM in the left column below...mode is loaded. The disc is not selected. Select the correct input function on your DVD Connect the video cable into the AC wall outlet. screen. TV channel is dirty. ...
Instruction Manual
Page 63
... please contact the following information with new or refurbished products or parts. SANYO will repair or replace (at retail from a Wal-Mart Store at the time warranty service is in the appropriate model's instruction manual, or (B) the repair of any other Acts of LABOR and PARTS...EXCLUSIONS 1. This warranty does not cover (A) the adjustment of customer-operated controls as explained in lieu of all other express warranties and SANYO does not assume or authorize any party to furnished instructions, shipping or transit accidents, modification or repair by user or any malfunction,...
... please contact the following information with new or refurbished products or parts. SANYO will repair or replace (at retail from a Wal-Mart Store at the time warranty service is in the appropriate model's instruction manual, or (B) the repair of any other Acts of LABOR and PARTS...EXCLUSIONS 1. This warranty does not cover (A) the adjustment of customer-operated controls as explained in lieu of all other express warranties and SANYO does not assume or authorize any party to furnished instructions, shipping or transit accidents, modification or repair by user or any malfunction,...