
Instruction Manual
Page 1
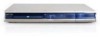
Keep the manual in a safe place for the first time. We recommend that you have any difficulties operating this manual carefully before connecting your DVD Video Recorder and operating it for future reference. 1AD6P1P2047--A DRW-500, Issue Number 2 English INSTRUCTION MANUAL DVD Video Recorder DRW-500 REMOTE CONTROLLER RB-DRW500 ® TM TM SANYO'S HELP-LINE Call the toll-free number below if you read this product. 1-800-813-3435 (Weekdays: 7:30 AM - 4:00 PM Central Time) Please Read This Manual.
Keep the manual in a safe place for the first time. We recommend that you have any difficulties operating this manual carefully before connecting your DVD Video Recorder and operating it for future reference. 1AD6P1P2047--A DRW-500, Issue Number 2 English INSTRUCTION MANUAL DVD Video Recorder DRW-500 REMOTE CONTROLLER RB-DRW500 ® TM TM SANYO'S HELP-LINE Call the toll-free number below if you read this product. 1-800-813-3435 (Weekdays: 7:30 AM - 4:00 PM Central Time) Please Read This Manual.

Instruction Manual
Page 2
... Cable E11 Step 3: Connecting the Audio Cables E12 Step 4: Connecting the Power Cord E14 Connecting a VCR or Similar Recording Equipment to This Unit E15 Connecting to product development. In such instances, the instruction manual may differ from a Desired Camera Angle (Multi-... Setting E19 Setting "Channel Setup E19 Before Initial Setting E22 Common Procedure E22 Initial Settings E23 Recording Setup E23 Preparations E23 Setting "Record Mode E23 Setting "Auto Chapter E24 DVD Control E25 Preparations E25 Setting "Disc Menu E25 Setting "Angle Mark E26 Setting "Audio E26 ...
... Cable E11 Step 3: Connecting the Audio Cables E12 Step 4: Connecting the Power Cord E14 Connecting a VCR or Similar Recording Equipment to This Unit E15 Connecting to product development. In such instances, the instruction manual may differ from a Desired Camera Angle (Multi-... Setting E19 Setting "Channel Setup E19 Before Initial Setting E22 Common Procedure E22 Initial Settings E23 Recording Setup E23 Preparations E23 Setting "Record Mode E23 Setting "Auto Chapter E24 DVD Control E25 Preparations E25 Setting "Disc Menu E25 Setting "Angle Mark E26 Setting "Audio E26 ...

Instruction Manual
Page 6
... OUT VIDEO OUT L S-VIDEO R DIGITAL AUDIO AUDIO 1. Component video output jacks (COMPONENT VIDEO OUT) 6. Disc tray 3. Record mode button (REC MODE) 6. DVD indicator (DVD) 2. Shuffle indicator (SHUFF) 8. Record mode indicators (HQ, SP, LP, EP, +) 12. Pause indicator (k) 17. CD indicator (CD) 18. VHF/UHF... output and Optical digital audio output jacks (DIGITAL AUDIO) Audio output jacks (L/R AUDIO) -E5- Open/Close button (q OPEN/CLOSE) 4. Record button and indicator (m REC) 12. Repeat indicators (REP1, ALL, A-B) 10. Message or number indicators (Title, chapter, track, playing ...
... OUT VIDEO OUT L S-VIDEO R DIGITAL AUDIO AUDIO 1. Component video output jacks (COMPONENT VIDEO OUT) 6. Disc tray 3. Record mode button (REC MODE) 6. DVD indicator (DVD) 2. Shuffle indicator (SHUFF) 8. Record mode indicators (HQ, SP, LP, EP, +) 12. Pause indicator (k) 17. CD indicator (CD) 18. VHF/UHF... output and Optical digital audio output jacks (DIGITAL AUDIO) Audio output jacks (L/R AUDIO) -E5- Open/Close button (q OPEN/CLOSE) 4. Record button and indicator (m REC) 12. Repeat indicators (REP1, ALL, A-B) 10. Message or number indicators (Title, chapter, track, playing ...

Instruction Manual
Page 7
... p, b) 7 11. Play button (a) 11 15. Muting button (MUTE) 15 20. TV button (TV) 16 21. CHANNEL +) 17 22. Record button (m RECORD) 24. Clock button (CLOCK) 20 28. IMPORTANT NOTE: SPENT OR DISCHARGED BATTERIES MUST BE RECYCLED OR DISPOSED OF PROPERLY IN COMPLIANCE WITH ALL APPLICABLE LAWS... approx. 20 feet (6 meters) Note: This is not to be used for a month or more. Record mode button (REC MODE) 23. It cannot operate your TV and VCR. -E6- TV/DVD select button (TV/DVD) 4. Menu button (MENU) 8. Stop button (n) 10 14. Clear button (CLEAR) 25. Number buttons...
... p, b) 7 11. Play button (a) 11 15. Muting button (MUTE) 15 20. TV button (TV) 16 21. CHANNEL +) 17 22. Record button (m RECORD) 24. Clock button (CLOCK) 20 28. IMPORTANT NOTE: SPENT OR DISCHARGED BATTERIES MUST BE RECYCLED OR DISPOSED OF PROPERLY IN COMPLIANCE WITH ALL APPLICABLE LAWS... approx. 20 feet (6 meters) Note: This is not to be used for a month or more. Record mode button (REC MODE) 23. It cannot operate your TV and VCR. -E6- TV/DVD select button (TV/DVD) 4. Menu button (MENU) 8. Stop button (n) 10 14. Clear button (CLEAR) 25. Number buttons...
Instruction Manual
Page 8
... horizontal position only. Please be careful in this condition the unit may be placed in the surrounding temperature can cause damage to your nearest Sanyo Authorized Service Facility. CAUTION: The unit must be unable to form on the optical pickup lens inside and turn the power off. Do not...allow the unit to adjust to the surrounding temperature. • When carrying the unit, be exposed to direct sunlight. • Because of the DVD recorder extremely low noise and wide dynamic range, there is low humidity and little dust. • Do not disassemble or alter the unit in any ...
... horizontal position only. Please be careful in this condition the unit may be placed in the surrounding temperature can cause damage to your nearest Sanyo Authorized Service Facility. CAUTION: The unit must be unable to form on the optical pickup lens inside and turn the power off. Do not...allow the unit to adjust to the surrounding temperature. • When carrying the unit, be exposed to direct sunlight. • Because of the DVD recorder extremely low noise and wide dynamic range, there is low humidity and little dust. • Do not disassemble or alter the unit in any ...

Instruction Manual
Page 9
... the grounding system of cable entry as shown below. Need help you are not sure about the connection, please consult your audio/video dealer. VCR DVD recorder TV DVD recorder VCR TV -E8-
... the grounding system of cable entry as shown below. Need help you are not sure about the connection, please consult your audio/video dealer. VCR DVD recorder TV DVD recorder VCR TV -E8-
Instruction Manual
Page 10
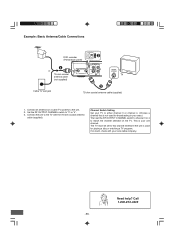
...) to "3" or "4". 3. Call 1-800-813-3435 -E9- This is used for playing a disc or watching a TV program. Example: Basic Antenna/Cable Connections RF OUTPUT CHANNEL DVD recorder 3 4 2 (Partial back panel) 1 or 75-ohm coaxial antenna cable (not supplied) 3 4 ANTENNA IN OUT RF OUTPUT CHANNEL VIDEO AV 1 IN L S-VIDEO R AUDIO VHF/UHF ANTENNA...
...) to "3" or "4". 3. Call 1-800-813-3435 -E9- This is used for playing a disc or watching a TV program. Example: Basic Antenna/Cable Connections RF OUTPUT CHANNEL DVD recorder 3 4 2 (Partial back panel) 1 or 75-ohm coaxial antenna cable (not supplied) 3 4 ANTENNA IN OUT RF OUTPUT CHANNEL VIDEO AV 1 IN L S-VIDEO R AUDIO VHF/UHF ANTENNA...
Instruction Manual
Page 11
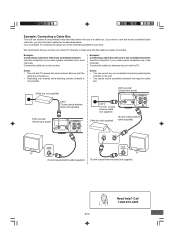
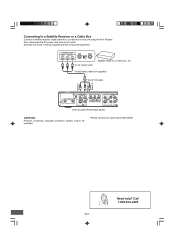
...800-813-3435 Cable box (not supplied) CATV 75-ohm coaxial antenna cable (not supplied) DVD recorder (Partial back panel) 3 4 ANTENNA IN OUT VIDEO AV 1 IN L S-VIDEO R AUDIO RF OUTPUT CHANNEL RF OUTPUT CHANNEL DVD recorder (Partial back panel) CATV 75-ohm coaxial antenna cable (not supplied) 3 4 ANTENNA ...8226; The unit and TV receive the same channel. Be sure that the cable box is turned on the unit. • You cannot record scrambled channels that require a cable box. Example: Connecting a cable box with only a few scrambled channels Use this connection if your cable ...
...800-813-3435 Cable box (not supplied) CATV 75-ohm coaxial antenna cable (not supplied) DVD recorder (Partial back panel) 3 4 ANTENNA IN OUT VIDEO AV 1 IN L S-VIDEO R AUDIO RF OUTPUT CHANNEL RF OUTPUT CHANNEL DVD recorder (Partial back panel) CATV 75-ohm coaxial antenna cable (not supplied) 3 4 ANTENNA ...8226; The unit and TV receive the same channel. Be sure that the cable box is turned on the unit. • You cannot record scrambled channels that require a cable box. Example: Connecting a cable box with only a few scrambled channels Use this connection if your cable ...
Instruction Manual
Page 12
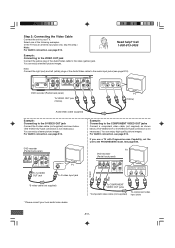
... 3 4 ANTENNA IN OUT RF OUTPUT CHANNEL VIDEO AV 1 IN L S-VIDEO R AUDIO COMPONENT VIDEO OUT VIDEO OUT L S-VIDEO R DIGITAL AUDIO AUDIO DVD recorder (Partial back panel) To VIDEO OUT jack (Yellow) AUDIO VIDEO INPUT 1 R-AUDIO-L VIDEO TV (Yellow) Audio/Video cable (supplied) Example: Connecting to ... (not supplied) as shown below . (The VIDEO OUT or S-VIDEO OUT jack connection is not necessary.) You can enjoy clearer picture images. DVD recorder (Partial back panel) ONENT VIDEO OUT VIDEO OUT L S-VIDEO R DIGITAL AUDIO AUDIO To S-VIDEO OUT jack S-VIDEO IN 1 TV To S-...
... 3 4 ANTENNA IN OUT RF OUTPUT CHANNEL VIDEO AV 1 IN L S-VIDEO R AUDIO COMPONENT VIDEO OUT VIDEO OUT L S-VIDEO R DIGITAL AUDIO AUDIO DVD recorder (Partial back panel) To VIDEO OUT jack (Yellow) AUDIO VIDEO INPUT 1 R-AUDIO-L VIDEO TV (Yellow) Audio/Video cable (supplied) Example: Connecting to ... (not supplied) as shown below . (The VIDEO OUT or S-VIDEO OUT jack connection is not necessary.) You can enjoy clearer picture images. DVD recorder (Partial back panel) ONENT VIDEO OUT VIDEO OUT L S-VIDEO R DIGITAL AUDIO AUDIO To S-VIDEO OUT jack S-VIDEO IN 1 TV To S-...

Instruction Manual
Page 13
...), then connect it to your system. (If the TV has an antenna input jack only, skip this step.) Note: For VIDEO connection, see page E11. DVD recorder (Partial back panel) COMPONENT VIDEO OUT VIDEO OUT L S-VIDEO R DIGITAL AUDIO AUDIO (White) L (Red) R *(Yellow) To AUDIO OUT jacks (Red) R (White) L TV with Audio/Video...
...), then connect it to your system. (If the TV has an antenna input jack only, skip this step.) Note: For VIDEO connection, see page E11. DVD recorder (Partial back panel) COMPONENT VIDEO OUT VIDEO OUT L S-VIDEO R DIGITAL AUDIO AUDIO (White) L (Red) R *(Yellow) To AUDIO OUT jacks (Red) R (White) L TV with Audio/Video...

Instruction Manual
Page 14
...to an Amplifier with Dolby Pro Logic Decoder To AUDIO INPUT jacks Amplifier with Dolby Pro Logic Decoder *Audio cable (not supplied) DVD recorder (Partial back panel) To AUDIO OUT jacks COMPONENT VIDEO OUT VIDEO OUT L S-VIDEO R DIGITAL AUDIO AUDIO Front left speaker Surround ...*Coaxial digital cable (not supplied) or To Optical DIGITAL AUDIO OUT jack To Coaxial DIGITAL AUDIO OUT jack VIDEO OUT L S-VIDEO DVD recorder (Partial back panel) R DIGITAL AUDIO AUDIO Front left speaker Surround left speaker Center speaker Front right speaker Subwoofer Surround right speaker Note...
...to an Amplifier with Dolby Pro Logic Decoder To AUDIO INPUT jacks Amplifier with Dolby Pro Logic Decoder *Audio cable (not supplied) DVD recorder (Partial back panel) To AUDIO OUT jacks COMPONENT VIDEO OUT VIDEO OUT L S-VIDEO R DIGITAL AUDIO AUDIO Front left speaker Surround ...*Coaxial digital cable (not supplied) or To Optical DIGITAL AUDIO OUT jack To Coaxial DIGITAL AUDIO OUT jack VIDEO OUT L S-VIDEO DVD recorder (Partial back panel) R DIGITAL AUDIO AUDIO Front left speaker Surround left speaker Center speaker Front right speaker Subwoofer Surround right speaker Note...

Instruction Manual
Page 16
... R AUDIO COMPONENT VIDEO OUT DVD recorder (Partial back panel) DVD recorder Open the lid. Call 1-800-813-3435 CAUTION: Almost all videos and DVD softwares on page E32. Connecting a VCR or Similar Recording Equipment to This Unit You can use this unit as the source player or as shown below. You cannot record them using an S-video cable...
... R AUDIO COMPONENT VIDEO OUT DVD recorder (Partial back panel) DVD recorder Open the lid. Call 1-800-813-3435 CAUTION: Almost all videos and DVD softwares on page E32. Connecting a VCR or Similar Recording Equipment to This Unit You can use this unit as the source player or as shown below. You cannot record them using an S-video cable...

Instruction Manual
Page 17
...-E16- Need help? Example: Connection for recording to other equipment Connect a VCR or similar recording equipment to the OUT jacks. You cannot record them using an S-video cable (not supplied). • If you pass the DVD recorder signals via the VCR, you may not ...video cable (not supplied) To AUDIO OUT jacks IN L R AUDIO VIDEO OUT L COMPONENT VIDEO OUT S-VIDEO R DIGITAL AUDIO AUDIO DVD recorder (Partial back panel) CAUTION: Almost all videos and DVD softwares on the TV screen. A/V S-VIDEO VIDEO INPUT JACKS A/V S-VIDEO VIDEO OUTPUT JACKS R-AUDIO-L R-AUDIO-L VCR, etc. ...
...-E16- Need help? Example: Connection for recording to other equipment Connect a VCR or similar recording equipment to the OUT jacks. You cannot record them using an S-video cable (not supplied). • If you pass the DVD recorder signals via the VCR, you may not ...video cable (not supplied) To AUDIO OUT jacks IN L R AUDIO VIDEO OUT L COMPONENT VIDEO OUT S-VIDEO R DIGITAL AUDIO AUDIO DVD recorder (Partial back panel) CAUTION: Almost all videos and DVD softwares on the TV screen. A/V S-VIDEO VIDEO INPUT JACKS A/V S-VIDEO VIDEO OUTPUT JACKS R-AUDIO-L R-AUDIO-L VCR, etc. ...
Instruction Manual
Page 18
... IN jacks (White) L (Red) R (Yellow) 3 4 ANTENNA IN OUT RF OUTPUT CHANNEL VIDEO AV 1 IN L S-VIDEO R AUDIO COMPONENT VIDEO OUT VIDEO OUT L S-VIDEO R DIGITAL AUDIO AUDIO DVD recorder (Partial back panel) CAUTION: Pictures containing copyright protection signals cannot be...
... IN jacks (White) L (Red) R (Yellow) 3 4 ANTENNA IN OUT RF OUTPUT CHANNEL VIDEO AV 1 IN L S-VIDEO R AUDIO COMPONENT VIDEO OUT VIDEO OUT L S-VIDEO R DIGITAL AUDIO AUDIO DVD recorder (Partial back panel) CAUTION: Pictures containing copyright protection signals cannot be...
Instruction Manual
Page 19
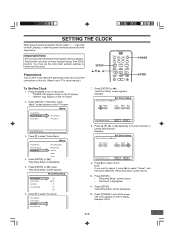
...DST) function. Press [POWER] to turn on the power. • "POWER ON" appears briefly on the FL display. • "SANYO" logo appears on the TV and select the appropriate video input to suit the connections to this unit. (Refer to select "Setup Menu...". Press [p] to your TV's owner manual.) SETUP 4, 5, a, b POWER ENTER To Set the Clock 1. Menu Play/Edit Disc Recording Setup Record Program Setup Menu DVD Control 4 a General Video Audio 4. Press [ENTER] (or [a]) again. Press [p] to exit Done Cancel 8. "Set Clock Setup" screen appears. Hour ...
...DST) function. Press [POWER] to turn on the power. • "POWER ON" appears briefly on the FL display. • "SANYO" logo appears on the TV and select the appropriate video input to suit the connections to this unit. (Refer to select "Setup Menu...". Press [p] to your TV's owner manual.) SETUP 4, 5, a, b POWER ENTER To Set the Clock 1. Menu Play/Edit Disc Recording Setup Record Program Setup Menu DVD Control 4 a General Video Audio 4. Press [ENTER] (or [a]) again. Press [p] to exit Done Cancel 8. "Set Clock Setup" screen appears. Hour ...
Instruction Manual
Page 23
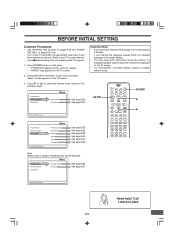
...Note: When a disc is receiving the TV program. 1. See page E37. SETUP POWER 4 5 Press SETUP to exit Menu Play/Edit Disc Record Program Setup Menu Recording Setup DVD Control 4 a General Video Audio AV Select Press SETUP to your TV's owner manual.) • Press [n] before setting if the unit is ... on the TV screen. 2. Press [POWER] to turn on the power. • "POWER ON" appears briefly on the FL display. • "SANYO" logo appears on the TV and select the appropriate video input to suit the connections to this instruction manual, the language in on -screen display...
...Note: When a disc is receiving the TV program. 1. See page E37. SETUP POWER 4 5 Press SETUP to exit Menu Play/Edit Disc Record Program Setup Menu Recording Setup DVD Control 4 a General Video Audio AV Select Press SETUP to your TV's owner manual.) • Press [n] before setting if the unit is ... on the TV screen. 2. Press [POWER] to turn on the power. • "POWER ON" appears briefly on the FL display. • "SANYO" logo appears on the TV and select the appropriate video input to suit the connections to this instruction manual, the language in on -screen display...
Instruction Manual
Page 24
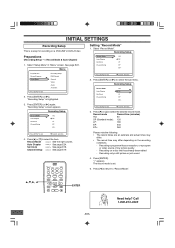
... are an estimate and actual times may differ. • The record time may differ depending on a DVD+RW or DVD+R disc. INITIAL SETTINGS Recording Setup This is a setup for recording on the recording conditions. - Menu Play/Edit Disc Record Program Setup Menu Recording Setup DVD Control 4 a General Video Audio AV Select Press SETUP to exit Current selection 3. Auto Chapter...
... are an estimate and actual times may differ. • The record time may differ depending on a DVD+RW or DVD+R disc. INITIAL SETTINGS Recording Setup This is a setup for recording on the recording conditions. - Menu Play/Edit Disc Record Program Setup Menu Recording Setup DVD Control 4 a General Video Audio AV Select Press SETUP to exit Current selection 3. Auto Chapter...
Instruction Manual
Page 26
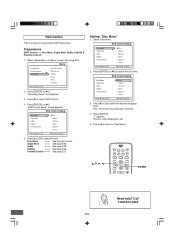
... 4. Call 1-800-813-3435 Press [ENTER] (or [a]). Menu Play/Edit Disc Record Program Setup Menu Recording Setup DVD Control 4 a General Video Audio AV Select Press SETUP to select the item. "DVD Control Setup" screen appears. Press [o] or [p] to exit 2. Subtitle ===> See page E26. DVD Control Setup Disc Menu Angle Mark Audio Subtitle Parental Control a 5 Disc...
... 4. Call 1-800-813-3435 Press [ENTER] (or [a]). Menu Play/Edit Disc Record Program Setup Menu Recording Setup DVD Control 4 a General Video Audio AV Select Press SETUP to select the item. "DVD Control Setup" screen appears. Press [o] or [p] to exit 2. Subtitle ===> See page E26. DVD Control Setup Disc Menu Angle Mark Audio Subtitle Parental Control a 5 Disc...
Instruction Manual
Page 27
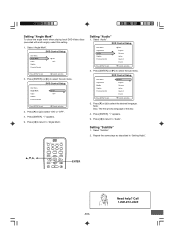
...3435 Setting "Angle Mark" To show the angle mark when playing back DVD-Video discs (recorded with multi-angle), select this setting. 1. Note: Disc: The first priority language of the disc 4. DVD Control Setup Disc Menu Angle Mark Audio Subtitle Parental Control 4 a ...ENTER -E26- "√" appears. 5. Press [b] to return to select the sub menu. Need help? Press [ENTER] (or [a]) to "Audio". DVD Control Setup Disc Menu Angle Mark Audio Subtitle Parental Control 4 a 5 Disc English German Italian Spanish French Press SETUP to exit Current selection 3. Select "...
...3435 Setting "Angle Mark" To show the angle mark when playing back DVD-Video discs (recorded with multi-angle), select this setting. 1. Note: Disc: The first priority language of the disc 4. DVD Control Setup Disc Menu Angle Mark Audio Subtitle Parental Control 4 a ...ENTER -E26- "√" appears. 5. Press [b] to return to select the sub menu. Need help? Press [ENTER] (or [a]) to "Audio". DVD Control Setup Disc Menu Angle Mark Audio Subtitle Parental Control 4 a 5 Disc English German Italian Spanish French Press SETUP to exit Current selection 3. Select "...
Instruction Manual
Page 28
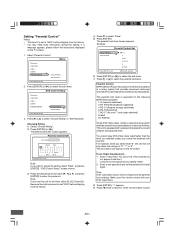
...to prevent children changing the level. Choosing Rating 1) Select "Choose Rating". 2) Press [ENTER] (or [a]). "Parental Control Set" screen appears. "DVD Control Setup" screen returns. 3) Press the directional arrow button (a, b, o, p), and press [ENTER] to the original factory setting "0000". 2. The ... not respond to the parental lock settings. Enter a new password and set the parental lock level again. You cannot play discs with your DVD video discs. 8) Press [ENTER]. For example, when you cancel the parental lock function. "√" appears. 9) Press [b] twice to ...
...to prevent children changing the level. Choosing Rating 1) Select "Choose Rating". 2) Press [ENTER] (or [a]). "Parental Control Set" screen appears. "DVD Control Setup" screen returns. 3) Press the directional arrow button (a, b, o, p), and press [ENTER] to the original factory setting "0000". 2. The ... not respond to the parental lock settings. Enter a new password and set the parental lock level again. You cannot play discs with your DVD video discs. 8) Press [ENTER]. For example, when you cancel the parental lock function. "√" appears. 9) Press [b] twice to ...