
Instruction Manual
Page 1
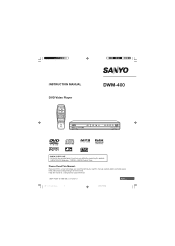
...Issue Number 3 English DWM-400/US (new)English 1 4/26/04, 11:48 AM Keep the manual in a safe place for the first time. INSTRUCTION MANUAL DVD Video Player z /ON AUDIO SUBTITLE OPEN/CLOSE RANDOM ZOOM ANGLE REPEAT A-B REPEAT b RETURN TOP MENU MENU 4 ENT a 5 SETUP ON SCREEN SLOW SEARCH MODE PAUSE/ STEP ...PREV NEXT REV 1 4 7 PLAY FWD PROGRAM 23 560 8 9 +10 REMOTE CONTROLLER RB-SL40 DWM-400 TM ® TM SANYO'S HELP-LINE Call the toll-free number below if you read this product. 1-800-813-3435 (Weekdays: 7:30 AM - 4:00 PM Central Time) Please ...
...Issue Number 3 English DWM-400/US (new)English 1 4/26/04, 11:48 AM Keep the manual in a safe place for the first time. INSTRUCTION MANUAL DVD Video Player z /ON AUDIO SUBTITLE OPEN/CLOSE RANDOM ZOOM ANGLE REPEAT A-B REPEAT b RETURN TOP MENU MENU 4 ENT a 5 SETUP ON SCREEN SLOW SEARCH MODE PAUSE/ STEP ...PREV NEXT REV 1 4 7 PLAY FWD PROGRAM 23 560 8 9 +10 REMOTE CONTROLLER RB-SL40 DWM-400 TM ® TM SANYO'S HELP-LINE Call the toll-free number below if you read this product. 1-800-813-3435 (Weekdays: 7:30 AM - 4:00 PM Central Time) Please ...
Instruction Manual
Page 9
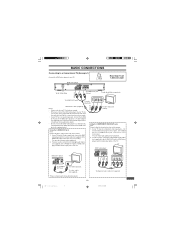
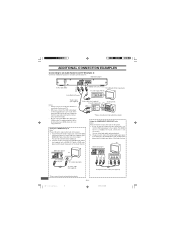
... it to the TV Audio input. TV DVD video player DVD video player TV S-VIDEO IN 1 To S-VIDEO OUT jack To S-video input jack *S-video cable (not supplied) *Please consult your TV has the S-video input jack, connect the DVD video player with Audio/Video input jacks To AUDIO OUT jacks To audio input jacks AUDIO VIDEO INPUT 1 R-AUDIO-L VIDEO Audio/Video cable (supplied) Notes: • Please refer...
... it to the TV Audio input. TV DVD video player DVD video player TV S-VIDEO IN 1 To S-VIDEO OUT jack To S-video input jack *S-video cable (not supplied) *Please consult your TV has the S-video input jack, connect the DVD video player with Audio/Video input jacks To AUDIO OUT jacks To audio input jacks AUDIO VIDEO INPUT 1 R-AUDIO-L VIDEO Audio/Video cable (supplied) Notes: • Please refer...
Instruction Manual
Page 10
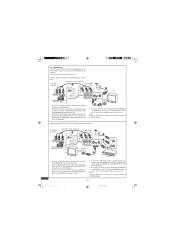
... supplied) between the TO TV OUT terminal of the RF Modulator. 2 4. Connect the Audio/Video cable (supplied) between the AUDIO OUT and VIDEO OUT jacks of the DVD video player and the AUDIO INPUT and VIDEO INPUT jacks of the VCR. 2. Turn on the TV, and set the channel number (CHANNEL3...please purchase the *RF Modulator (not supplied). (*Please consult your area. Connect the Audio/Video cable (supplied) between the AUDIO OUT and VIDEO OUT jacks of the DVD video player and the AUDIO INPUT and VIDEO INPUT jacks of the VCR and the ANT. Note: For more details, please refer to ...
... supplied) between the TO TV OUT terminal of the RF Modulator. 2 4. Connect the Audio/Video cable (supplied) between the AUDIO OUT and VIDEO OUT jacks of the DVD video player and the AUDIO INPUT and VIDEO INPUT jacks of the VCR. 2. Turn on the TV, and set the channel number (CHANNEL3...please purchase the *RF Modulator (not supplied). (*Please consult your area. Connect the Audio/Video cable (supplied) between the AUDIO OUT and VIDEO OUT jacks of the DVD video player and the AUDIO INPUT and VIDEO INPUT jacks of the VCR and the ANT. Note: For more details, please refer to ...
Instruction Manual
Page 11
...scanning *Please consult your TV, be sure to turn off the power and disconnect both units from scratch. Set the DVD video player to the AUDIO OUT jack of DVD video player and the Audio input jacks of the TV. 3. See page E15. Progressive scanning Need help? You also need to... TV must be capable of handing progressive scanning and have been made. • Do not connect the DVD video player to a VCR directly. Connect the DVD video player to the component video input jacks of video in two fields, progressive scanning creates one frame in one second with 30 frames (60 fields), but ...
...scanning *Please consult your TV, be sure to turn off the power and disconnect both units from scratch. Set the DVD video player to the AUDIO OUT jack of DVD video player and the Audio input jacks of the TV. 3. See page E15. Progressive scanning Need help? You also need to... TV must be capable of handing progressive scanning and have been made. • Do not connect the DVD video player to a VCR directly. Connect the DVD video player to the component video input jacks of video in two fields, progressive scanning creates one frame in one second with 30 frames (60 fields), but ...
Instruction Manual
Page 12
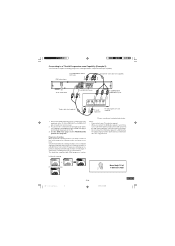
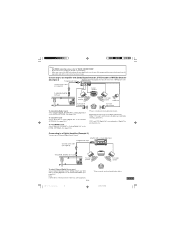
... (not supplied) to these jacks. (The VIDEO OUT or S-VIDEO OUT jack connection is not necessary.) You can enjoy high quality picture playback. 2. DVD video player DVD video player TV To S-VIDEO OUT jack S-VIDEO IN 1 To S-video input jack COMPONENT VIDEO INPUT Y PB PR Green Blue Red Green Blue Red *S-video cable (not supplied) *Component video cable (not supplied) *Please consult your TV...
... (not supplied) to these jacks. (The VIDEO OUT or S-VIDEO OUT jack connection is not necessary.) You can enjoy high quality picture playback. 2. DVD video player DVD video player TV To S-VIDEO OUT jack S-VIDEO IN 1 To S-video input jack COMPONENT VIDEO INPUT Y PB PR Green Blue Red Green Blue Red *S-video cable (not supplied) *Component video cable (not supplied) *Please consult your TV...
Instruction Manual
Page 13
..., please refer to "BASIC CONNECTIONS". • Please refer to the instruction manual of your amplifier. • When you connect the DVD video player to your local audio/video dealer. "Dolby", "Pro Logic" and the double-D symbol are trademarks of Dolby Laboratories. Amplifier with Dolby Digital Decoder, DTS Decoder or...enjoy MPEG2 sound Select "MPEG BITSTREAM" in "Setting Digital Out" on the INITIAL SETTINGS. (See page E33.) *Please consult your local audio/video dealer. DWM-400/US (new)English 13 4/26/04, 11:49 AM Connecting to turn off the power and disconnect both units from Dolby...
..., please refer to "BASIC CONNECTIONS". • Please refer to the instruction manual of your amplifier. • When you connect the DVD video player to your local audio/video dealer. "Dolby", "Pro Logic" and the double-D symbol are trademarks of Dolby Laboratories. Amplifier with Dolby Digital Decoder, DTS Decoder or...enjoy MPEG2 sound Select "MPEG BITSTREAM" in "Setting Digital Out" on the INITIAL SETTINGS. (See page E33.) *Please consult your local audio/video dealer. DWM-400/US (new)English 13 4/26/04, 11:49 AM Connecting to turn off the power and disconnect both units from Dolby...
Instruction Manual
Page 14
...plugging the power cord into an AC outlet, make sure that all the connections have elapsed under the stop mode. • Because of the DVD video player extremely low noise • Do not install this regard. ate properly. Grasp the plug, not the cord, when disconnecting the power cord from... refer to a 120VAC 60Hz outlet. If the unit will not be unable to the standby mode after 10 seconds. CAUTION: When connecting the DVD video player, follow the installation instruction in a confined space, such as and wide dynamic range, there is unplugged from the may be inside and turn it...
...plugging the power cord into an AC outlet, make sure that all the connections have elapsed under the stop mode. • Because of the DVD video player extremely low noise • Do not install this regard. ate properly. Grasp the plug, not the cord, when disconnecting the power cord from... refer to a 120VAC 60Hz outlet. If the unit will not be unable to the standby mode after 10 seconds. CAUTION: When connecting the DVD video player, follow the installation instruction in a confined space, such as and wide dynamic range, there is unplugged from the may be inside and turn it...
Instruction Manual
Page 16
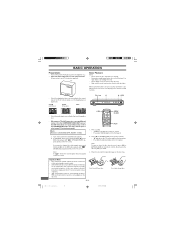
...details, see page E10), you must be placed on the disc tray at a time. In "NO DISC" mode, press and hold down [a] on the DVD video player until " " (INTERLACE) appears briefly on the TV screen. Place the disc with your TV instruction manual.) Note: If you use TV with Progressive-scan... MODE PAUSE/ STEP PREV NEXT REV 1 4 PLAY FWD PROGRAM 23 560 OPEN/ CLOSE PLAY 1. For 5-inch (12cm) disc -E15- Press [z/ON]. • "SANYO" logo appears on the TV screen. • The power indicator lights on the TV screen during operation. When operation buttons are pressed, that operation is...
...details, see page E10), you must be placed on the disc tray at a time. In "NO DISC" mode, press and hold down [a] on the DVD video player until " " (INTERLACE) appears briefly on the TV screen. Place the disc with your TV instruction manual.) Note: If you use TV with Progressive-scan... MODE PAUSE/ STEP PREV NEXT REV 1 4 PLAY FWD PROGRAM 23 560 OPEN/ CLOSE PLAY 1. For 5-inch (12cm) disc -E15- Press [z/ON]. • "SANYO" logo appears on the TV screen. • The power indicator lights on the TV screen during operation. When operation buttons are pressed, that operation is...

Instruction Manual
Page 30
...the next picture or previous picture. Need help? plus you'll get back your film in for processing, and check the box for this DVD video player. Notes: • If the disc is loaded with software that lets you view, enhance, share, and print your pictures from your ...[n]. The thumbnail pic- tures appear. If this occurs, load the disc correctly or replace the disc. • The file system is not available to this DVD video player! The CD with the label facing up to the next or previous thumbnail pictures, press [NEXT e] or [PREV f]. 3. b: Rotate it 90 degrees clockwise...
...the next picture or previous picture. Need help? plus you'll get back your film in for processing, and check the box for this DVD video player. Notes: • If the disc is loaded with software that lets you view, enhance, share, and print your pictures from your ...[n]. The thumbnail pic- tures appear. If this occurs, load the disc correctly or replace the disc. • The file system is not available to this DVD video player! The CD with the label facing up to the next or previous thumbnail pictures, press [NEXT e] or [PREV f]. 3. b: Rotate it 90 degrees clockwise...

Instruction Manual
Page 36
...columns to receive signal from the Select the correct input function on the TV. An unplayable disc is not connected. The video cable is loaded. Connect the video cable into the AC wall outlet. Turn on the TV. this time because: • The feature is not available ...Load a playable disc. No power plug connection at the moment. • The DVD software restricts it . (See page E14.) "PARENTAL" is set . player. Select "INTERLACE" mode. (See page E15.) No sound. Turn on , but the player does not work. The unit does not start playback. An unplayable disc is ...
...columns to receive signal from the Select the correct input function on the TV. An unplayable disc is not connected. The video cable is loaded. Connect the video cable into the AC wall outlet. Turn on the TV. this time because: • The feature is not available ...Load a playable disc. No power plug connection at the moment. • The DVD software restricts it . (See page E14.) "PARENTAL" is set . player. Select "INTERLACE" mode. (See page E15.) No sound. Turn on , but the player does not work. The unit does not start playback. An unplayable disc is ...

Instruction Manual
Page 37
...moistened with plain lukewarm water and wrung dry. Disconnect the power cord. 2. The batteries in the remote control are subject to continuous improvement, SANYO reserves the right to give the model number and explain the problem. window. (See page E6.) SERVICING: Should this product require service, ...without incurring any obligation. SYMPTOM The operation or display is not aimed at the remote sensor mote sensor window. SPECIFICATIONS Type: DVD Video player Signal format: NTSC color Laser: Semiconductor laser, wavelength 650 nm/790 nm Frequency range (digital audio): 4 Hz to 44 kHz...
...moistened with plain lukewarm water and wrung dry. Disconnect the power cord. 2. The batteries in the remote control are subject to continuous improvement, SANYO reserves the right to give the model number and explain the problem. window. (See page E6.) SERVICING: Should this product require service, ...without incurring any obligation. SYMPTOM The operation or display is not aimed at the remote sensor mote sensor window. SPECIFICATIONS Type: DVD Video player Signal format: NTSC color Laser: Semiconductor laser, wavelength 650 nm/790 nm Frequency range (digital audio): 4 Hz to 44 kHz...


