
Owners Manual
Page 5
... SCREEN ADJUSTMENT 33 PICTURE LEVEL AND TILT ADJUSTMENT 10 MOVING PROJECTOR 10 VIDEO MODE 34 CONNECTING PROJECTOR 11 SELECTING INPUT SOURCE 34 TERMINALS OF PROJECTOR 11 SELECTING VIDEO SYSTEM 35 CONNECTING TO COMPUTER 14 PICTURE IMAGE ADJUSTMENT IMAGE LEVEL SELECT 36 36 CONNECTING TO VIDEO EQUIPMENT 15 IMAGE LEVEL ADJUSTMENT 37 PICTURE SCREEN ADJUSTMENT 38 BEFORE...
... SCREEN ADJUSTMENT 33 PICTURE LEVEL AND TILT ADJUSTMENT 10 MOVING PROJECTOR 10 VIDEO MODE 34 CONNECTING PROJECTOR 11 SELECTING INPUT SOURCE 34 TERMINALS OF PROJECTOR 11 SELECTING VIDEO SYSTEM 35 CONNECTING TO COMPUTER 14 PICTURE IMAGE ADJUSTMENT IMAGE LEVEL SELECT 36 36 CONNECTING TO VIDEO EQUIPMENT 15 IMAGE LEVEL ADJUSTMENT 37 PICTURE SCREEN ADJUSTMENT 38 BEFORE...

Owners Manual
Page 6
... and matrix liquid crystal display (LCD) technology. G Computers IBM-compatible or Macintosh computer up and down with this projector has Wireless Mouse function for a connected computer. N Progressive Scan Function This function converts interlace video signals into 1280 x 1024 dots... function operates to diversity of over 5 minutes. This projector is pressed. FEATURES AND DESIGN This Multimedia Projector is no need for troublesome manual adjustment of frequency and other settings. Resolution from a computer between SXGA (1280 x 1024) and UXGA (1600 x 1200)...
... and matrix liquid crystal display (LCD) technology. G Computers IBM-compatible or Macintosh computer up and down with this projector has Wireless Mouse function for a connected computer. N Progressive Scan Function This function converts interlace video signals into 1280 x 1024 dots... function operates to diversity of over 5 minutes. This projector is pressed. FEATURES AND DESIGN This Multimedia Projector is no need for troublesome manual adjustment of frequency and other settings. Resolution from a computer between SXGA (1280 x 1024) and UXGA (1600 x 1200)...

Owners Manual
Page 11
... NOTE; When contacting the sales dealer, tell the Optional Control Number (Op.cont.No.) in Terminal Slots enable you purchased a projector. DVI Terminal is located under Language Select Menu. (See page 39.) Plug Figure shows HDB 15-PIN terminal (Optional parts). ... Optional Interface Board (Terminal Board), contact your sales dealer. CONNECTING PROJECTOR TERMINALS OF PROJECTOR This projector applies various input/output terminals and 3 terminal slots for expansion to tune to diversity of signals from computers and video equipment. 3-built-in the menu that is unavailable for INPUT ...
... NOTE; When contacting the sales dealer, tell the Optional Control Number (Op.cont.No.) in Terminal Slots enable you purchased a projector. DVI Terminal is located under Language Select Menu. (See page 39.) Plug Figure shows HDB 15-PIN terminal (Optional parts). ... Optional Interface Board (Terminal Board), contact your sales dealer. CONNECTING PROJECTOR TERMINALS OF PROJECTOR This projector applies various input/output terminals and 3 terminal slots for expansion to tune to diversity of signals from computers and video equipment. 3-built-in the menu that is unavailable for INPUT ...

Owners Manual
Page 12
... Pr, Y, Pb) from video equipment to this projector, connect mouse port of your personal computer to these connectors. (Refer to P14.) INPUT 3 AV INPUT (VIDEO/Y, C) JACKS Connect composite video output from video equipment to VIDEO/Y jack or connect Separate Y/C video outputs to VIDEO/Y and C jacks. (Refer to P15.) INPUT 3 S-VIDEO INPUT JACK Connect S-VIDEO output from video equipment to P15.) 12...
... Pr, Y, Pb) from video equipment to this projector, connect mouse port of your personal computer to these connectors. (Refer to P14.) INPUT 3 AV INPUT (VIDEO/Y, C) JACKS Connect composite video output from video equipment to VIDEO/Y jack or connect Separate Y/C video outputs to VIDEO/Y and C jacks. (Refer to P15.) INPUT 3 S-VIDEO INPUT JACK Connect S-VIDEO output from video equipment to P15.) 12...

Owners Manual
Page 13
...Occasionally, this port. More than two projectors can be controlled with one computer by pressing RESET button with computer. This can be done by connecting SERIAL PORT IN. AUDIO CONTROL PORT DVI R L R/Pr G/Y B/Pb H/HV V (MONO) AUDIO CONTROL PORT R L VIDEO/Y C S-VIDEO (MONO) AUDIO R L R/C ...as Wired Remote Control, Connect Wired Remote Control Unit to this jack with Remote Control of this projector. (Refer to P40-42.) Connect USB port of another projector to this terminal. AUDIO OUTPUT JACKS Connect an external audio amplifier to these jacks. (Refer to...
...Occasionally, this port. More than two projectors can be controlled with one computer by pressing RESET button with computer. This can be done by connecting SERIAL PORT IN. AUDIO CONTROL PORT DVI R L R/Pr G/Y B/Pb H/HV V (MONO) AUDIO CONTROL PORT R L VIDEO/Y C S-VIDEO (MONO) AUDIO R L R/C ...as Wired Remote Control, Connect Wired Remote Control Unit to this jack with Remote Control of this projector. (Refer to P40-42.) Connect USB port of another projector to this terminal. AUDIO OUTPUT JACKS Connect an external audio amplifier to these jacks. (Refer to...

Owners Manual
Page 14
...SXGA/UXGA) Desktop type Laptop type 14 Monitor Output BNC Cable ✽ Monitor Output Monitor Output Audio Output Serial port PS/2 port ADB port MAC/VGA Adapter Set slide switches following chart below depending on RESOLUTION MODE that you want to use before computer is switched on a projector... DVI Cable DVI/VGA Adapter Terminals of a Projector Switches of MAC/VGA Adapter MAC/VGA ADAPTER ON ON DIP 123456 OFF INPUT 1 INPUT 2 AUDIO CONTROL PORT DVI R L R/Pr G/Y B/Pb H/HV V (MONO) AUDIO R L CONTROL PORT VIDEO/Y C S-VIDEO (MONO) AUDIO R L R/C JACK RESET...
...SXGA/UXGA) Desktop type Laptop type 14 Monitor Output BNC Cable ✽ Monitor Output Monitor Output Audio Output Serial port PS/2 port ADB port MAC/VGA Adapter Set slide switches following chart below depending on RESOLUTION MODE that you want to use before computer is switched on a projector... DVI Cable DVI/VGA Adapter Terminals of a Projector Switches of MAC/VGA Adapter MAC/VGA ADAPTER ON ON DIP 123456 OFF INPUT 1 INPUT 2 AUDIO CONTROL PORT DVI R L R/Pr G/Y B/Pb H/HV V (MONO) AUDIO R L CONTROL PORT VIDEO/Y C S-VIDEO (MONO) AUDIO R L R/C JACK RESET...
Owners Manual
Page 15
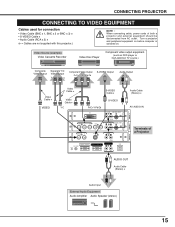
... on before computer is switched on. CONNECTING PROJECTOR CONNECTING TO VIDEO EQUIPMENT Cables used for connection • Video Cable (BNC x 1, BNC x 2 or BNC x 3) ✽ • S-VIDEO Cable ✽ • Audio Cable (RCA x 2) ✽ (✽ = Cables are not supplied with this projector.) NOTE : When connecting cable, power cords of a Projector AUDIO OUT Audio Cable (Stereo) ✽ Audio...
... on before computer is switched on. CONNECTING PROJECTOR CONNECTING TO VIDEO EQUIPMENT Cables used for connection • Video Cable (BNC x 1, BNC x 2 or BNC x 3) ✽ • S-VIDEO Cable ✽ • Audio Cable (RCA x 2) ✽ (✽ = Cables are not supplied with this projector.) NOTE : When connecting cable, power cords of a Projector AUDIO OUT Audio Cable (Stereo) ✽ Audio...

Owners Manual
Page 20
AV SYSTEM MENU Used to select system of projector or reset Lamp Replace Counter. (Refer to P39-41) INPUT MENU Used to P37, 38) Same function as Menu for PC source. 20 Refer to ... P31) SCREEN MENU Used to adjust size of image. [Normal / True / Wide / Digital zoom +/-] (Refer to P33) SETTING MENU Used to change settings of selected video source. (Refer to P35) IMAGE ADJUST MENU Used to adjust picture image. [Contrast/Brightness/Color /Tint/Color Temp. /White balance (R/G/B) /Sharpness/Gamma /Noise Reduction/Progressive...
AV SYSTEM MENU Used to select system of projector or reset Lamp Replace Counter. (Refer to P39-41) INPUT MENU Used to P37, 38) Same function as Menu for PC source. 20 Refer to ... P31) SCREEN MENU Used to adjust size of image. [Normal / True / Wide / Digital zoom +/-] (Refer to P33) SETTING MENU Used to change settings of selected video source. (Refer to P35) IMAGE ADJUST MENU Used to adjust picture image. [Contrast/Brightness/Color /Tint/Color Temp. /White balance (R/G/B) /Sharpness/Gamma /Noise Reduction/Progressive...

Owners Manual
Page 33
...button and ON-SCREEN MENU will appear. True Provides image in other than SXGA (1280 x 1024) is selected, ON-SCREEN MENU disappears and message "D. Digital zoom + When Digital zoom + is used for providing a squeezed video signal at 16 : 9. A projected image can be also expanded by ...any resolution higher than screen size (1280 x 1024), this projector enters "Digital zoom +" mode automatically. NOTE G True and Digital zoom +/- If your computer's screen resolution is higher than screen size. Wide Provides image to fit wide video aspect ratio (16 : 9) by pressing D.ZOOM M button...
...button and ON-SCREEN MENU will appear. True Provides image in other than SXGA (1280 x 1024) is selected, ON-SCREEN MENU disappears and message "D. Digital zoom + When Digital zoom + is used for providing a squeezed video signal at 16 : 9. A projected image can be also expanded by ...any resolution higher than screen size (1280 x 1024), this projector enters "Digital zoom +" mode automatically. NOTE G True and Digital zoom +/- If your computer's screen resolution is higher than screen size. Wide Provides image to fit wide video aspect ratio (16 : 9) by pressing D.ZOOM M button...

Owners Manual
Page 35
...performance. Y, Pb/Cb, Pr/Cr JACKS Auto Projector automatically detects incoming Video signal, and adjusts itself to system and press SELECT button. PAL / SECAM / NTSC / NTSC4.43 / PAL-M / PAL-N If projector cannot reproduce proper video image, it is necessary to system and press ...720p, 1035i , 1080i50 or 1080i60. VIDEO JACK OR S-VIDEO JACK Auto Projector automatically detects incoming Video system, and adjusts itself to select a specific component video signal format among PAL, SECAM, NTSC, NTSC 4.43, PAL-M, and PAL-N. AV SYSTEM MENU (VIDEO OR S-VIDEO) AV SYSTEM Menu icon This box...
...performance. Y, Pb/Cb, Pr/Cr JACKS Auto Projector automatically detects incoming Video signal, and adjusts itself to system and press SELECT button. PAL / SECAM / NTSC / NTSC4.43 / PAL-M / PAL-N If projector cannot reproduce proper video image, it is necessary to system and press ...720p, 1035i , 1080i50 or 1080i60. VIDEO JACK OR S-VIDEO JACK Auto Projector automatically detects incoming Video system, and adjusts itself to select a specific component video signal format among PAL, SECAM, NTSC, NTSC 4.43, PAL-M, and PAL-N. AV SYSTEM MENU (VIDEO OR S-VIDEO) AV SYSTEM Menu icon This box...

Owners Manual
Page 36
... IMAGE SELECT Menu icon. 2 Press POINT DOWN button to move a red frame pointer to level that you want to level and press SELECT button. VIDEO INPUT PICTURE IMAGE ADJUSTMENT IMAGE LEVEL SELECT (DIRECT) Select image level among Standard, Cinema, Image 1, Image 2, Image 3 and Image 4 by pressing... IMAGE button on Top Control or on this projector. Move a red frame pointer to set and then press SELECT button. IMAGE SELECT Menu icon Cinema Picture level adjusted for picture with fine tone. ...
... IMAGE SELECT Menu icon. 2 Press POINT DOWN button to move a red frame pointer to level that you want to level and press SELECT button. VIDEO INPUT PICTURE IMAGE ADJUSTMENT IMAGE LEVEL SELECT (DIRECT) Select image level among Standard, Cinema, Image 1, Image 2, Image 3 and Image 4 by pressing... IMAGE button on Top Control or on this projector. Move a red frame pointer to set and then press SELECT button. IMAGE SELECT Menu icon Cinema Picture level adjusted for picture with fine tone. ...

Owners Manual
Page 38
Quit Closes IMAGE MENU. Normal Provides image at a wide screen ratio of 4 : 3. VIDEO INPUT 3 Store To store adjustment data, move a red frame pointer to function that you to SCREEN Menu icon. SCREEN MENU 2 Press POINT DOWN button and ... desirable image size. 1 Press MENU button and ON-SCREEN MENU will appear. Wide Provides image at a normal video aspect ratio of 16 : 9. Other icons operates as follows. Store icon PICTURE SCREEN ADJUSTMENT This projector has a picture screen resize function, which enables you want to select and then press SELECT button. SCREEN Menu...
Quit Closes IMAGE MENU. Normal Provides image at a wide screen ratio of 4 : 3. VIDEO INPUT 3 Store To store adjustment data, move a red frame pointer to function that you to SCREEN Menu icon. SCREEN MENU 2 Press POINT DOWN button and ... desirable image size. 1 Press MENU button and ON-SCREEN MENU will appear. Wide Provides image at a normal video aspect ratio of 16 : 9. Other icons operates as follows. Store icon PICTURE SCREEN ADJUSTMENT This projector has a picture screen resize function, which enables you want to select and then press SELECT button. SCREEN Menu...

Owners Manual
Page 39
...MENU disappears and Keystone dialog box is distorted vertically, select Keystone. SETTING Menu icon Keystone When image is displayed. Ceiling When this projector will appear. Move a pointer to item Optional Control Number and then press POINT Refer to item and press SELECT button. Setting dialog...On," this function is "On," picture is selectable from a ceiling mounted projector. Refer to display On-Screen Displays. SETTING SETTING MENU 1 Press MENU button and ON-SCREEN MENU will produce a blue image instead of video noise on page 22. Press POINT LEFT/RIGHT button(s) to move a...
...MENU disappears and Keystone dialog box is distorted vertically, select Keystone. SETTING Menu icon Keystone When image is displayed. Ceiling When this projector will appear. Move a pointer to item Optional Control Number and then press POINT Refer to item and press SELECT button. Setting dialog...On," this function is "On," picture is selectable from a ceiling mounted projector. Refer to display On-Screen Displays. SETTING SETTING MENU 1 Press MENU button and ON-SCREEN MENU will produce a blue image instead of video noise on page 22. Press POINT LEFT/RIGHT button(s) to move a...

Owners Manual
Page 40
...Lamps. factory-set from "1 lamp mode" to "Code 2." This switching function prevents remote control operation mixture (jam) when operating several projectors or video equipment together. Press both MENU and IMAGE buttons on Remote Control Unit again. Press SELECT button at this icon to display previous items... mode, Projection Lamp is automatically turned on . Press POINT LEFT/RIGHT buttons to "Lamp mode". Set Remote control in "Code 2," both projector and Remote Control in order to "1 lamp mode" image becomes little darker. Set "2 lamps mode" or "1 lamp mode" by switching ...
...Lamps. factory-set from "1 lamp mode" to "Code 2." This switching function prevents remote control operation mixture (jam) when operating several projectors or video equipment together. Press both MENU and IMAGE buttons on Remote Control Unit again. Press SELECT button at this icon to display previous items... mode, Projection Lamp is automatically turned on . Press POINT LEFT/RIGHT buttons to "Lamp mode". Set Remote control in "Code 2," both projector and Remote Control in order to "1 lamp mode" image becomes little darker. Set "2 lamps mode" or "1 lamp mode" by switching ...

Owners Manual
Page 47
... focus. G Check WARNING TEMP. and READY indicator. If an image still does not appear, unplug a projector from audio input source. Try these Solutions G Plug a projector into your computer or video equipment and a projector. G Wait 90 seconds after a projector is out of : Projector and computer.) 6. NOTE : After pressing Power ON-OFF button to page 45.) G Adjust focus...
... focus. G Check WARNING TEMP. and READY indicator. If an image still does not appear, unplug a projector from audio input source. Try these Solutions G Plug a projector into your computer or video equipment and a projector. G Wait 90 seconds after a projector is out of : Projector and computer.) 6. NOTE : After pressing Power ON-OFF button to page 45.) G Adjust focus...

Owners Manual
Page 49
...730; to the highest possible standards. APPENDIX TECHNICAL SPECIFICATIONS Projector Type Dimensions (W x H x D) Net Weight LCD Panel System Panel Resolution Number of the LCD panels. 49 Output : 1mW / Wave length :... Multi-media Projector 17.3" x 9.1" x 23.8" (439 mm x 230 mm x 605.6 mm) 46.3 lbs (21 kg) Model PLC-EF31/EF31NL, 49.7 lbs (22.5 kg) Model PLC-EF31N 1.8" TFT Active...Type (Audio R and L) and DIN 8-pin (Control port) BNC Type x 2 (VIDEO/Y, C), RCA Type (Audio R and L) and DIN 4-pin (S-Video) Serial port in (DB 9), Serial port out (DB 9), USB port, Audio Monitor ...
...730; to the highest possible standards. APPENDIX TECHNICAL SPECIFICATIONS Projector Type Dimensions (W x H x D) Net Weight LCD Panel System Panel Resolution Number of the LCD panels. 49 Output : 1mW / Wave length :... Multi-media Projector 17.3" x 9.1" x 23.8" (439 mm x 230 mm x 605.6 mm) 46.3 lbs (21 kg) Model PLC-EF31/EF31NL, 49.7 lbs (22.5 kg) Model PLC-EF31N 1.8" TFT Active...Type (Audio R and L) and DIN 8-pin (Control port) BNC Type x 2 (VIDEO/Y, C), RCA Type (Audio R and L) and DIN 4-pin (S-Video) Serial port in (DB 9), Serial port out (DB 9), USB port, Audio Monitor ...


