
Owners Manual
Page 2
... object or spray can also be set in the way indicated. G Remote Control Unit, supplied to be maintained. G If the projector is not to this projector, emits the laser beam as possible. NO USERSERVICEABLE PARTS INSIDE EXCEPT LAMP REPLACEMENT. THIS SYMBOL INDICATES THAT THERE ARE IMPORTANT OPERATING AND ... DO NOT OPEN CAUTION : TO REDUCE THE RISK OF ELECTRIC SHOCK, DO NOT REMOVE COVER (OR BACK). TO THE OWNER Before operating this projector, read this manual again, check operations and cable connections and try the solutions in the "Trouble-shooting" section of the end of this booklet...
... object or spray can also be set in the way indicated. G Remote Control Unit, supplied to be maintained. G If the projector is not to this projector, emits the laser beam as possible. NO USERSERVICEABLE PARTS INSIDE EXCEPT LAMP REPLACEMENT. THIS SYMBOL INDICATES THAT THERE ARE IMPORTANT OPERATING AND ... DO NOT OPEN CAUTION : TO REDUCE THE RISK OF ELECTRIC SHOCK, DO NOT REMOVE COVER (OR BACK). TO THE OWNER Before operating this projector, read this manual again, check operations and cable connections and try the solutions in the "Trouble-shooting" section of the end of this booklet...

Owners Manual
Page 3
...surges. When the power cord or plug is operated. e. When replacement parts are covered by persons walking on the projector. Use only with the projector. Wall or shelf mounting should follow the manufacturer's instructions, and should not be damaged by the operating instructions as ... result in a wet basement, near or over a radiator or heat register. Never spill liquid of time, unplug it . If the projector has been exposed to overturn. f. For added protection to dangerous voltage or other similar surface. The openings should never be covered with care...
...surges. When the power cord or plug is operated. e. When replacement parts are covered by persons walking on the projector. Use only with the projector. Wall or shelf mounting should follow the manufacturer's instructions, and should not be damaged by the operating instructions as ... result in a wet basement, near or over a radiator or heat register. Never spill liquid of time, unplug it . If the projector has been exposed to overturn. f. For added protection to dangerous voltage or other similar surface. The openings should never be covered with care...

Owners Manual
Page 4
... APPARATUS MUST BE EARTHED. If such changes or modifications should be required to stop operation of the equipment. This is a safety feature to defeat this projector meets the requirement for a Class A digital device, pursuant to Part 15 of FCC Rules. ASA If the fuse cover is detachable, never use in a commercial...
... APPARATUS MUST BE EARTHED. If such changes or modifications should be required to stop operation of the equipment. This is a safety feature to defeat this projector meets the requirement for a Class A digital device, pursuant to Part 15 of FCC Rules. ASA If the fuse cover is detachable, never use in a commercial...

Owners Manual
Page 5
... 25 PREPARATION 7 SELECTING COMPUTER SYSTEM COMPATIBLE COMPUTER SPECIFICATIONS 25 27 PC ADJUSTMENT 28 NAME OF EACH PART OF PROJECTOR 7 AUTO PC ADJUSTMENT 28 SETTING-UP PROJECTOR 8 MANUAL PC ADJUSTMENT 29 CONNECTING AC POWER CORD 8 PICTURE IMAGE ADJUSTMENT 31 LENS INSTALLATION 9 IMAGE LEVEL...OPERATION 21 WARNING TEMP. INDICATOR 42 AIR FILTER CARE AND CLEANING 43 CLEANING PROJECTION LENS 43 TURNING ON / OFF PROJECTOR 21 LAMP MANAGEMENT 44 ADJUSTING SCREEN 22 LAMP REPLACEMENT 45 ZOOM ADJUSTMENT 22 TROUBLESHOOTING 47 FOCUS ADJUSTMENT LENS SHIFT ADJUSTMENT ...
... 25 PREPARATION 7 SELECTING COMPUTER SYSTEM COMPATIBLE COMPUTER SPECIFICATIONS 25 27 PC ADJUSTMENT 28 NAME OF EACH PART OF PROJECTOR 7 AUTO PC ADJUSTMENT 28 SETTING-UP PROJECTOR 8 MANUAL PC ADJUSTMENT 29 CONNECTING AC POWER CORD 8 PICTURE IMAGE ADJUSTMENT 31 LENS INSTALLATION 9 IMAGE LEVEL...OPERATION 21 WARNING TEMP. INDICATOR 42 AIR FILTER CARE AND CLEANING 43 CLEANING PROJECTION LENS 43 TURNING ON / OFF PROJECTOR 21 LAMP MANAGEMENT 44 ADJUSTING SCREEN 22 LAMP REPLACEMENT 45 ZOOM ADJUSTMENT 22 TROUBLESHOOTING 47 FOCUS ADJUSTMENT LENS SHIFT ADJUSTMENT ...

Owners Manual
Page 6
....77 million colors, and matrix liquid crystal display (LCD) technology. N Power Management Power Management function is provided to produce undistorted images. This projector utilizes built-in multimedia features, a palette of a projector may result in distorted image being displayed in Terminal Slots... SXGA (1280 x 1024) and UXGA (1600 x 1200) is always precise. G Component Video Component video signal, such as a S-VHS VCR output signal, can be connected. English, German, French, Italian, Spanish, Portuguese, Dutch, Swedish, Chinese, Korean or Japanese. N Compatibility This projector...
....77 million colors, and matrix liquid crystal display (LCD) technology. N Power Management Power Management function is provided to produce undistorted images. This projector utilizes built-in multimedia features, a palette of a projector may result in distorted image being displayed in Terminal Slots... SXGA (1280 x 1024) and UXGA (1600 x 1200) is always precise. G Component Video Component video signal, such as a S-VHS VCR output signal, can be connected. English, German, French, Italian, Spanish, Portuguese, Dutch, Swedish, Chinese, Korean or Japanese. N Compatibility This projector...

Owners Manual
Page 7
.... CARRYING HANDLE EXHAUST VENT ADJUSTABLE FEET BACK EXHAUST VENT INFRARED REMOTE RECEIVER AIR INTAKE VENT HOT AIR EXHAUSTED ! When using or installing a projector, following to ensure proper ventilation and avoid a possible risk of Cooling Fans. G Do not put a flammable object near this area, ... vent slots. AIR INTAKE VENT 7 LAMP COVER MAIN ON / OFF SWITCH EXHAUST VENT POWER CORD CONNECTOR BOTTOM AIR INTAKE VENTS This projector is equipped with lens cover attached. Obstructions may damage lens cover and result in fire hazard. High temperature from any objects. Pay ...
.... CARRYING HANDLE EXHAUST VENT ADJUSTABLE FEET BACK EXHAUST VENT INFRARED REMOTE RECEIVER AIR INTAKE VENT HOT AIR EXHAUSTED ! When using or installing a projector, following to ensure proper ventilation and avoid a possible risk of Cooling Fans. G Do not put a flammable object near this area, ... vent slots. AIR INTAKE VENT 7 LAMP COVER MAIN ON / OFF SWITCH EXHAUST VENT POWER CORD CONNECTOR BOTTOM AIR INTAKE VENTS This projector is equipped with lens cover attached. Obstructions may damage lens cover and result in fire hazard. High temperature from any objects. Pay ...

Owners Manual
Page 8
... CORD CONNECTOR on . (Refer to pages 12 ~ 15 for connection.) Connect AC Power Cord (supplied) to work with a peripheral equipment before turning a projector on your sales dealer. AC outlet must be near this equipment and must meet requirement of country where you are not sure of type of... any other type of 100-120 V or 200-240 V AC. If supplied AC Power Cord does not match your AC outlet, contact your projector. Connect a projector with singlephase power systems having a grounded neutral conductor. NOTE ON POWER CORD AC Power Cord must be used. To AC Outlet. (120 V AC...
... CORD CONNECTOR on . (Refer to pages 12 ~ 15 for connection.) Connect AC Power Cord (supplied) to work with a peripheral equipment before turning a projector on your sales dealer. AC outlet must be near this equipment and must meet requirement of country where you are not sure of type of... any other type of 100-120 V or 200-240 V AC. If supplied AC Power Cord does not match your AC outlet, contact your projector. Connect a projector with singlephase power systems having a grounded neutral conductor. NOTE ON POWER CORD AC Power Cord must be used. To AC Outlet. (120 V AC...

Owners Manual
Page 9
... or down with motor-driven lens shift function. ROOM LIGHT Brightness in order to protect surface. Before installation, check where a projector is equipped with Model LNS-S02Z lens. It is recommended to limit ambient lighting in a room has a great influence on...a Projection Lens, refer to strong forces. Pay attention to following to a Projector. PREPARATION LENS INSTALLATION Before setting up and down . (Refer to provide projected image where you purchased a projector. 2. PLC-EF31N is used and prepare suitable lens. For specifications of fire and malfunction. And...
... or down with motor-driven lens shift function. ROOM LIGHT Brightness in order to protect surface. Before installation, check where a projector is equipped with Model LNS-S02Z lens. It is recommended to limit ambient lighting in a room has a great influence on...a Projection Lens, refer to strong forces. Pay attention to following to a Projector. PREPARATION LENS INSTALLATION Before setting up and down . (Refer to provide projected image where you purchased a projector. 2. PLC-EF31N is used and prepare suitable lens. For specifications of fire and malfunction. And...

Owners Manual
Page 10
... projection angle can be adjusted up to a projector. DOWN UP UP ADJUSTABLE FEET DOWN MOVING PROJECTOR Use carry handle when moving a projector. G Do not transport a projector by rotating ADJUSTABLE FEET. Projection angle can be applied. 10 CAUTION IN CARRYING OR TRANSPORTING A PROJECTOR G Do not drop or bump a projector, otherwise damages or malfunctions may cause damage to...
... projection angle can be adjusted up to a projector. DOWN UP UP ADJUSTABLE FEET DOWN MOVING PROJECTOR Use carry handle when moving a projector. G Do not transport a projector by rotating ADJUSTABLE FEET. Projection angle can be applied. 10 CAUTION IN CARRYING OR TRANSPORTING A PROJECTOR G Do not drop or bump a projector, otherwise damages or malfunctions may cause damage to...

Owners Manual
Page 11
...contacting the sales dealer, tell the Optional Control Number (Op.cont.No.) in Terminal Slots enable you purchased a projector. Screws Guide NOTES ON ORDERING OR USING Socket OPTIONAL INTERFACE BOARD When ordering or using Optional Interface Board (Terminal ... contact sales dealer where you to arrange desired combinations of input sources just by holding handle. 3 Replace terminal. CONNECTING PROJECTOR TERMINALS OF PROJECTOR This projector applies various input/output terminals and 3 terminal slots for expansion to tune to diversity of signals from computers and video equipment...
...contacting the sales dealer, tell the Optional Control Number (Op.cont.No.) in Terminal Slots enable you purchased a projector. Screws Guide NOTES ON ORDERING OR USING Socket OPTIONAL INTERFACE BOARD When ordering or using Optional Interface Board (Terminal ... contact sales dealer where you to arrange desired combinations of input sources just by holding handle. 3 Replace terminal. CONNECTING PROJECTOR TERMINALS OF PROJECTOR This projector applies various input/output terminals and 3 terminal slots for expansion to tune to diversity of signals from computers and video equipment...

Owners Manual
Page 12
...AUDIO OUT R L RESET (MONO) USB INPUT 3 INPUT 2 INPUT 1 INPUT 1, 2 CONTROL PORT CONNECTORS When controlling computer with Remote Control of this projector, connect mouse port of your personal computer to these connectors. (Refer to P14.) INPUT 3 AV INPUT (VIDEO/Y, C) JACKS Connect composite video output from... C jacks. (Refer to P15.) INPUT 3 S-VIDEO INPUT JACK Connect S-VIDEO output from video equipment to P15.) 12 Sync and Vert. CONNECTING PROJECTOR INPUT/OUTPUT TERMINALS AND JACKS INPUT 2 INPUT 1 5 BNC INPUT JACKS Connect component video output (Cr, Y, Cb or Pr, Y, Pb) from...
...AUDIO OUT R L RESET (MONO) USB INPUT 3 INPUT 2 INPUT 1 INPUT 1, 2 CONTROL PORT CONNECTORS When controlling computer with Remote Control of this projector, connect mouse port of your personal computer to these connectors. (Refer to P14.) INPUT 3 AV INPUT (VIDEO/Y, C) JACKS Connect composite video output from... C jacks. (Refer to P15.) INPUT 3 S-VIDEO INPUT JACK Connect S-VIDEO output from video equipment to P15.) 12 Sync and Vert. CONNECTING PROJECTOR INPUT/OUTPUT TERMINALS AND JACKS INPUT 2 INPUT 1 5 BNC INPUT JACKS Connect component video output (Cr, Y, Cb or Pr, Y, Pb) from...

Owners Manual
Page 13
...controlled with one computer by computer, you control a projector by connecting SERIAL PORT IN. of computer to control a projector with Remote Control Cable (supplied). (Refer to page 18.) RESET BUTTON This projector uses a micro processor to be done by pressing RESET... computer. R/C JACK When using Wired / Wireless Remote Control Unit as Wired Remote Control, Connect Wired Remote Control Unit to this projector. (Refer to P40-42.) Connect USB port of another projector to P14, 15.) 13 AUDIO CONTROL PORT DVI R L R/Pr G/Y B/Pb H/HV V (MONO) AUDIO CONTROL PORT R...
...controlled with one computer by computer, you control a projector by connecting SERIAL PORT IN. of computer to control a projector with Remote Control Cable (supplied). (Refer to page 18.) RESET BUTTON This projector uses a micro processor to be done by pressing RESET... computer. R/C JACK When using Wired / Wireless Remote Control Unit as Wired Remote Control, Connect Wired Remote Control Unit to this projector. (Refer to P40-42.) Connect USB port of another projector to P14, 15.) 13 AUDIO CONTROL PORT DVI R L R/Pr G/Y B/Pb H/HV V (MONO) AUDIO CONTROL PORT R...

Owners Manual
Page 14
... OUT Audio Cable (stereo) ✽ Use one of these Control Cables corresponding with terminal of both a projector and external equipment should be disconnected from AC outlet. IBM-compatible computers or Macintosh computers (VGA / SVGA / XGA / SXGA/UXGA) Desktop type Laptop type 14 Monitor Output BNC Cable ✽ Monitor Output Monitor Output Audio...
... OUT Audio Cable (stereo) ✽ Use one of these Control Cables corresponding with terminal of both a projector and external equipment should be disconnected from AC outlet. IBM-compatible computers or Macintosh computers (VGA / SVGA / XGA / SXGA/UXGA) Desktop type Laptop type 14 Monitor Output BNC Cable ✽ Monitor Output Monitor Output Audio...
Owners Manual
Page 15
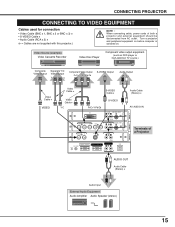
...BNC x 2 or BNC x 3) ✽ • S-VIDEO Cable ✽ • Audio Cable (RCA x 2) ✽ (✽ = Cables are not supplied with this projector.) NOTE : When connecting cable, power cords of a Projector AUDIO OUT Audio Cable (Stereo) ✽ Audio Input External Audio Equipment Audio Amplifier Audio Speaker (stereo) 15 Turn... a projector and peripheral equipment on before computer is switched on. Video Source (example) Video Cassette Recorder Video Disc Player ...
...BNC x 2 or BNC x 3) ✽ • S-VIDEO Cable ✽ • Audio Cable (RCA x 2) ✽ (✽ = Cables are not supplied with this projector.) NOTE : When connecting cable, power cords of a Projector AUDIO OUT Audio Cable (Stereo) ✽ Audio Input External Audio Equipment Audio Amplifier Audio Speaker (stereo) 15 Turn... a projector and peripheral equipment on before computer is switched on. Video Source (example) Video Cassette Recorder Video Disc Player ...

Owners Manual
Page 16
...) MENU BUTTON Used to open or close MENU operation. (P19, 20) SELECT BUTTON Used to execute item selected. BEFORE OPERATION TOP CONTROLS AND INDICATORS This projector has CONTROL BUTTONS (TOP CONTROLS) and INDICATORS on or off. (P21) ZOOM BUTTONS Used to adjust zoom. (P22) AUTO PC ADJ. READY LAMP LAMP ... function. (P28) IMAGE BUTTON Used to select image level. (P31, 36) LENS SHIFT BUTTON Used to be turned on . POINT BUTTONS Used to turn a projector on its top. Used to select input (P24) source. (P25) POWER ON-OFF BUTTON Used to select an item or adjust value in DIGITAL ZOOM...
...) MENU BUTTON Used to open or close MENU operation. (P19, 20) SELECT BUTTON Used to execute item selected. BEFORE OPERATION TOP CONTROLS AND INDICATORS This projector has CONTROL BUTTONS (TOP CONTROLS) and INDICATORS on or off. (P21) ZOOM BUTTONS Used to adjust zoom. (P22) AUTO PC ADJ. READY LAMP LAMP ... function. (P28) IMAGE BUTTON Used to select image level. (P31, 36) LENS SHIFT BUTTON Used to be turned on . POINT BUTTONS Used to turn a projector on its top. Used to select input (P24) source. (P25) POWER ON-OFF BUTTON Used to select an item or adjust value in DIGITAL ZOOM...

Owners Manual
Page 17
When using Remote Control Unit, turn projector on remote control. RIGHT CLICK BUTTON Used as laser pointer function from Laser Light Window. BEFORE OPERATION OPERATION OF REMOTE CONTROL LOCK ALL OFF ON ...
When using Remote Control Unit, turn projector on remote control. RIGHT CLICK BUTTON Used as laser pointer function from Laser Light Window. BEFORE OPERATION OPERATION OF REMOTE CONTROL LOCK ALL OFF ON ...

Owners Manual
Page 18
..., 39) Remote Control Batteries Installation 1 Remove battery compartment lid. mode and resize image. (P33) Operating Range Point Remote Control Unit toward projector (Receiver Window) whenever pressing any button. G Replace two batteries at same time. G Dispose of used battery. Maximum operating range for Remote...: G Use (2) AA, UM3 or R06 type alkaline batteries. G Avoid contact with pins in contact with water or liquid. G Danger of a projector. 60° LENS SHIFT BUTTON Used to select LENS SHIFT function. (P22) 16.4' (5 m) FREEZE BUTTON Used to freeze picture. (P23) IMAGE ...
..., 39) Remote Control Batteries Installation 1 Remove battery compartment lid. mode and resize image. (P33) Operating Range Point Remote Control Unit toward projector (Receiver Window) whenever pressing any button. G Replace two batteries at same time. G Dispose of used battery. Maximum operating range for Remote...: G Use (2) AA, UM3 or R06 type alkaline batteries. G Avoid contact with pins in contact with water or liquid. G Danger of a projector. 60° LENS SHIFT BUTTON Used to select LENS SHIFT function. (P22) 16.4' (5 m) FREEZE BUTTON Used to freeze picture. (P23) IMAGE ...

Owners Manual
Page 19
... INPUT SELECT BUTTON Used to select item. BEFORE OPERATION OPERATING ON-SCREEN MENU HOW TO OPERATE ON-SCREEN MENU You can control and adjust this projector through ON-SCREEN MENU 3 Press POINT DOWN button and move POINTER (red frame or red arrow) to ITEM that you want to select item...
... INPUT SELECT BUTTON Used to select item. BEFORE OPERATION OPERATING ON-SCREEN MENU HOW TO OPERATE ON-SCREEN MENU You can control and adjust this projector through ON-SCREEN MENU 3 Press POINT DOWN button and move POINTER (red frame or red arrow) to ITEM that you want to select item...

Owners Manual
Page 20
... P26, 27) IMAGE SELECT MENU Used to select image level among Standard, Cinema and Image 1 ~ 4. (Refer to P36) SCREEN MENU Used to set size of projector or reset Lamp Replace Counter. (Refer to P39-41) INPUT MENU Used to P38) Same function as Menu for PC source. AV SYSTEM MENU Used...
... P26, 27) IMAGE SELECT MENU Used to select image level among Standard, Cinema and Image 1 ~ 4. (Refer to P36) SCREEN MENU Used to set size of projector or reset Lamp Replace Counter. (Refer to P39-41) INPUT MENU Used to P38) Same function as Menu for PC source. AV SYSTEM MENU Used...

Owners Manual
Page 21
...Power off . When WARNING TEMP. To power down completely, turn MAIN ON / OFF SWITCH to ON. Wait at least 5 minutes before turning on projector. (Refer to "CONNECTING TO PROJECTOR" on pages 39 and 40. Turn MAIN ON / OFF SWITCH to OFF and disconnect AC Power Cord from source appears after... projector is turned off projector. Check Air Filters for connecting that equipment.) 2 Connect a projector's AC Power Cord into a wall outlet and turn MAIN ON/OFF SWITCH to OFF and disconnect AC Power...
...Power off . When WARNING TEMP. To power down completely, turn MAIN ON / OFF SWITCH to ON. Wait at least 5 minutes before turning on projector. (Refer to "CONNECTING TO PROJECTOR" on pages 39 and 40. Turn MAIN ON / OFF SWITCH to OFF and disconnect AC Power Cord from source appears after... projector is turned off projector. Check Air Filters for connecting that equipment.) 2 Connect a projector's AC Power Cord into a wall outlet and turn MAIN ON/OFF SWITCH to OFF and disconnect AC Power...


