
Brochure
Page 2
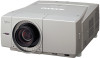
...for instant recall.* * Supports only the standard Iens (LNS-W04) RF Remote Control with only one more flexible setup. Input 4 supports both digital and analog . Keystone Correction The PLC-XF60A/ EF60A provides keystone correction of pixels Configuration Lens Lamp Projection size Throw distance ... 99.99% quality control rating. You get simpler maintenance, with Touch Pad The PLC-XF60A/ EF60A's RF remote control unit features a handy touch pad for easy operation, even in close by : SANYO Electric Co., Ltd. The measurement method and conditions are indicated in -class contrast ...
...for instant recall.* * Supports only the standard Iens (LNS-W04) RF Remote Control with only one more flexible setup. Input 4 supports both digital and analog . Keystone Correction The PLC-XF60A/ EF60A provides keystone correction of pixels Configuration Lens Lamp Projection size Throw distance ... 99.99% quality control rating. You get simpler maintenance, with Touch Pad The PLC-XF60A/ EF60A's RF remote control unit features a handy touch pad for easy operation, even in close by : SANYO Electric Co., Ltd. The measurement method and conditions are indicated in -class contrast ...
User Manual
Page 2
... signals quickly. The projector accepts signals up to UXGA resolution. (☞ p.38 and 70) ◆ Convenient Fingertip Control Pad The fingertip Control Pad on the remote control provides you a remarkable flexibility and simplicity through the OnScreen Menu navigation. (☞ p.14, 33, and 34) ◆ My Menu Selection My Menu function allows...
... signals quickly. The projector accepts signals up to UXGA resolution. (☞ p.38 and 70) ◆ Convenient Fingertip Control Pad The fingertip Control Pad on the remote control provides you a remarkable flexibility and simplicity through the OnScreen Menu navigation. (☞ p.14, 33, and 34) ◆ My Menu Selection My Menu function allows...

User Manual
Page 3
... 6 Moving the Projector 7 Caution in Handling the Projector 7 Compliance 8 Preparation 9 Parts Name 9 Indicators 10 Top Control 11 Terminals 12 Remote Control 14 Remote Control Transmitter 16 Remote Control Channel and ID Setup 16 Remote Control Battery Installation 17 Installation 18 Installation 18 Lens Installation 18 Positioning the Projector 18 Lens Shift Adjustment 19 Level...
... 6 Moving the Projector 7 Caution in Handling the Projector 7 Compliance 8 Preparation 9 Parts Name 9 Indicators 10 Top Control 11 Terminals 12 Remote Control 14 Remote Control Transmitter 16 Remote Control Channel and ID Setup 16 Remote Control Battery Installation 17 Installation 18 Installation 18 Lens Installation 18 Positioning the Projector 18 Lens Shift Adjustment 19 Level...

User Manual
Page 9
... CAUTION Hot air is equipped with cooling fans for protection from the exhaust vent. Preparation Preparation Parts Name Front qw e Back y uy rt io !0 Bottom !1 q Remote Receiver w Projection Lens (Option) e Front Cover (inside ) !0 Lamp Cover !1 Adjustable Feet !1 9
... CAUTION Hot air is equipped with cooling fans for protection from the exhaust vent. Preparation Preparation Parts Name Front qw e Back y uy rt io !0 Bottom !1 q Remote Receiver w Projection Lens (Option) e Front Cover (inside ) !0 Lamp Cover !1 Adjustable Feet !1 9

User Manual
Page 13
...IN When controling the projector from a computer, connect the computer to this terminal with a pen, which controls this slot. Do not use the remote control as wired. (p.25) t USB (Series B) This port is used for Optional Interface Board) Optional interface board can be reset. This can...use the RESET function excessively. 13 This input accepts digital signals only. (p.21, 73) e R/C JACK Connect the remote control to this terminal with the wired remote cable (not supplied) to be done by pressing the RESET button with a serial cross cable (commercially available). When controling...
...IN When controling the projector from a computer, connect the computer to this terminal with a pen, which controls this slot. Do not use the remote control as wired. (p.25) t USB (Series B) This port is used for Optional Interface Board) Optional interface board can be reset. This can...use the RESET function excessively. 13 This input accepts digital signals only. (p.21, 73) e R/C JACK Connect the remote control to this terminal with the wired remote cable (not supplied) to be done by pressing the RESET button with a serial cross cable (commercially available). When controling...
User Manual
Page 14
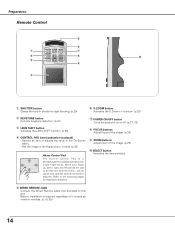
Preparation Remote Control SHUTTER D.ZOOM ON-OFF KEYSTONE LENS SHIFT ZOOM FOCUS t y q SHUTTER D.ZOOM ON-OFF u KEYSTONE w i LENS SHIFT ZOOM FOCUS !0 e o r CANCEL MENU INFO AUTO PC FREEZE ... used as wired or wireless. (p.16, 25) 14 Move your finger up, down, right and left across the pad to this jack. t WIRED REMOTE JACK Connect the Wired Remote Cable (not provided) to select the desired menu, adjust values and operate various convenient features. Battery installation is a semiconductive touchpad operated with a light...
Preparation Remote Control SHUTTER D.ZOOM ON-OFF KEYSTONE LENS SHIFT ZOOM FOCUS t y q SHUTTER D.ZOOM ON-OFF u KEYSTONE w i LENS SHIFT ZOOM FOCUS !0 e o r CANCEL MENU INFO AUTO PC FREEZE ... used as wired or wireless. (p.16, 25) 14 Move your finger up, down, right and left across the pad to this jack. t WIRED REMOTE JACK Connect the Wired Remote Cable (not provided) to select the desired menu, adjust values and operate various convenient features. Battery installation is a semiconductive touchpad operated with a light...
User Manual
Page 15
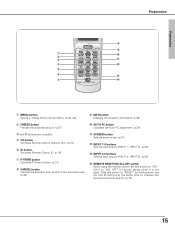
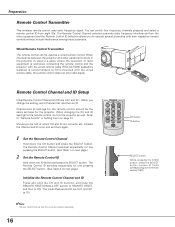
...o MENU INFO AUTO PC q !0 w FREEZE SCREEN e VOL. !1 SOUND P-TIMER INPUT 1 r MUTE !2 INPUT 4 INPUT 2 t CH REMOTE INPUT 5 INPUT 3 y ID !3 u !4 REMOTE RESET ON ALL OFF q MENU button Opens or closes the On-Screen Menu. (p.33, 34) o INFO button Displays the projector information. (p.30...) !2 INPUT 1-3 buttons Selects input source (INPUT 1 - Set it to initialize the Remote Control ID and CH. (p.16) 15 t CH button Switches Remote Control Channel (CH). (p.16) y ID button Switches Remote Control ID. (p.16) u P-TIMER button Operates P-Timer function. (p.31) i CANCEL button...
...o MENU INFO AUTO PC q !0 w FREEZE SCREEN e VOL. !1 SOUND P-TIMER INPUT 1 r MUTE !2 INPUT 4 INPUT 2 t CH REMOTE INPUT 5 INPUT 3 y ID !3 u !4 REMOTE RESET ON ALL OFF q MENU button Opens or closes the On-Screen Menu. (p.33, 34) o INFO button Displays the projector information. (p.30...) !2 INPUT 1-3 buttons Selects input source (INPUT 1 - Set it to initialize the Remote Control ID and CH. (p.16) 15 t CH button Switches Remote Control Channel (CH). (p.16) y ID button Switches Remote Control ID. (p.16) u P-TIMER button Operates P-Timer function. (p.31) i CANCEL button...
User Manual
Page 16
...SELECT button. (See Table 2 on nexCAtNpCEaL ge.) MENU INFO AUTO PC FREEZE SCREEN Initialize the Remote Control ChVOLa. The Remote Control Channel selection prevents radio frequency interference from eight IDs. The Remote Control ID switches sequentially for one pressing the SELECT button. (See Table 1 on page 51.... pressing the CH/ID button, press the SELECT button number of radio equipment is restricted, connecting the remote control and the projector with the wired remote cable, the remote control does not emit radio signal. You can be lost at which CH and ID are currently set...
...SELECT button. (See Table 2 on nexCAtNpCEaL ge.) MENU INFO AUTO PC FREEZE SCREEN Initialize the Remote Control ChVOLa. The Remote Control Channel selection prevents radio frequency interference from eight IDs. The Remote Control ID switches sequentially for one pressing the SELECT button. (See Table 1 on page 51.... pressing the CH/ID button, press the SELECT button number of radio equipment is restricted, connecting the remote control and the projector with the wired remote cable, the remote control does not emit radio signal. You can be lost at which CH and ID are currently set...

User Manual
Page 17
...radio interferences, change the communication frequency channel or move to radio interferences. Caution in Wireless LAN Interference Under wireless LAN environment based on remote control, carefully wipe case clean and install new batteries. ● Risk of explosion if battery is replaced by an incorrect type. ...failure in the area that may not operate properly due to other radio equipment using 2.4 GHz band away from the remote control and the projector. Remote Control ID ID switches sequentially for industrial, scientific, and medical equipment (such as pacemaker), as well as the...
...radio interferences, change the communication frequency channel or move to radio interferences. Caution in Wireless LAN Interference Under wireless LAN environment based on remote control, carefully wipe case clean and install new batteries. ● Risk of explosion if battery is replaced by an incorrect type. ...failure in the area that may not operate properly due to other radio equipment using 2.4 GHz band away from the remote control and the projector. Remote Control ID ID switches sequentially for industrial, scientific, and medical equipment (such as pacemaker), as well as the...

User Manual
Page 25
...provided). Operational range of the wireless remote control is within about 32.8' (10m) from working properly. Wireless Remote Control Operation Wired Remote Control Operation R/C jack Wired Remote Cable (not provided) The wireless remote control does not work when the wired remote cable is used wireless or wired.... are unavailable with the wired remote cable when operating the remote control as wireless. Any obstruction to air signal between the projector and the remote control may prevent the remote control from the projector. Remove the wired remote cable from both of the ...
...provided). Operational range of the wireless remote control is within about 32.8' (10m) from working properly. Wireless Remote Control Operation Wired Remote Control Operation R/C jack Wired Remote Cable (not provided) The wireless remote control does not work when the wired remote cable is used wireless or wired.... are unavailable with the wired remote cable when operating the remote control as wireless. Any obstruction to air signal between the projector and the remote control may prevent the remote control from the projector. Remove the wired remote cable from both of the ...
User Manual
Page 26
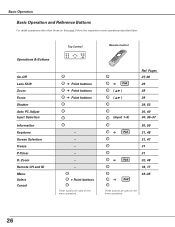
Basic Operation Basic Operation and Reference Buttons For detail operations other than those on the menu operations. 26 Remote Control ➔ Pad ( ed ) ( ed ) (Input 1-5) ➔ Pad ➔ Pad ➔ Pad Ref. INPUT INFORMATION SHUTTER P POWER On-Off Lens Shift Zoom Focus ... 31, 47 31 31 32, 48 16, 17 33~35 These buttons are used on this page, follow the respective menu operations described later. Zoom Remote CH and ID Menu Select Cancel ➔ Point buttons ➔ Point buttons ➔ Point buttons - - - - - - + Point buttons These buttons are used on the ...
Basic Operation Basic Operation and Reference Buttons For detail operations other than those on the menu operations. 26 Remote Control ➔ Pad ( ed ) ( ed ) (Input 1-5) ➔ Pad ➔ Pad ➔ Pad Ref. INPUT INFORMATION SHUTTER P POWER On-Off Lens Shift Zoom Focus ... 31, 47 31 31 32, 48 16, 17 33~35 These buttons are used on this page, follow the respective menu operations described later. Zoom Remote CH and ID Menu Select Cancel ➔ Point buttons ➔ Point buttons ➔ Point buttons - - - - - - + Point buttons These buttons are used on the ...
User Manual
Page 27
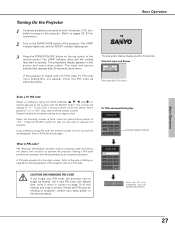
.... Enter the PIN code as instructed below. Set a new PIN code with special care, write it down in Setting on the top control or the remote control. Turning On the Projector 1 Complete peripheral connections (with Computer, VCR, etc.) before turning on the projector. (Refer to pages 22~24 for connection.) 2 Turn...
.... Enter the PIN code as instructed below. Set a new PIN code with special care, write it down in Setting on the top control or the remote control. Turning On the Projector 1 Complete peripheral connections (with Computer, VCR, etc.) before turning on the projector. (Refer to pages 22~24 for connection.) 2 Turn...
User Manual
Page 28
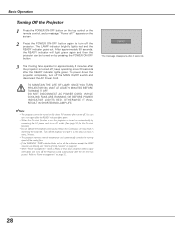
... DISCONNECT AC POWER CORD WHILE COOLING FANS ARE RUNNING OR BEFORE POWER INDICATOR LIGHTS RED. Refer to "Power management" on the top control or the remote control, and a message "Power off?" appears on the screen. 2 Press the POWER ON-OFF button again to an AC outlet. (See page 52 for the...
... DISCONNECT AC POWER CORD WHILE COOLING FANS ARE RUNNING OR BEFORE POWER INDICATOR LIGHTS RED. Refer to "Power management" on the top control or the remote control, and a message "Power off?" appears on the screen. 2 Press the POWER ON-OFF button again to an AC outlet. (See page 52 for the...
User Manual
Page 29
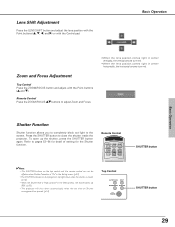
... contrast" in the Setting menu, the shutter opens up the shutter, press the SHUTTER button again. SOUND P P-TIMER MUTE POWER SCREEN CH REMOTE ID SHUTTER button 29 Shutter Function Shutter function allows you to completely block out light to adjust Zoom and Focus. • When the lens ... right in the Setting menu. (p.53) • The SHUTTER indicator on Shutter management has passed. (p.54) Top Control AUTCOA NPCCE LADJ. Remote Control SHUTTER D.ZOOM ON-OFF KEYSTONE LENS SHIFT ZOOM FOCUS SHUTTER button ✔Note: • The SHUTTER buttons on the top control and the...
... contrast" in the Setting menu, the shutter opens up the shutter, press the SHUTTER button again. SOUND P P-TIMER MUTE POWER SCREEN CH REMOTE ID SHUTTER button 29 Shutter Function Shutter function allows you to completely block out light to adjust Zoom and Focus. • When the lens ... right in the Setting menu. (p.53) • The SHUTTER indicator on Shutter management has passed. (p.54) Top Control AUTCOA NPCCE LADJ. Remote Control SHUTTER D.ZOOM ON-OFF KEYSTONE LENS SHIFT ZOOM FOCUS SHUTTER button ✔Note: • The SHUTTER buttons on the top control and the...
User Manual
Page 30
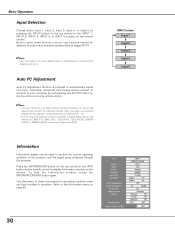
Press the INFORMATION button on the top control or the INFO button on the remote control to confirm the current operating condition of some computers can not be used to display Information ... 1035i (HDTV), 1080i/50 (HDTV), or 1080i/60 (HDTV) is not provided properly with this menu to the Information menu on the remote control. ✔Note: • Fine sync, Total dots, and Picture Position of the projector and the signal being projected through menu operation... hide the Information window, press the INFORMATION/INFO button again. When the image is selected on the remote control.
Press the INFORMATION button on the top control or the INFO button on the remote control to confirm the current operating condition of some computers can not be used to display Information ... 1035i (HDTV), 1080i/50 (HDTV), or 1080i/60 (HDTV) is not provided properly with this menu to the Information menu on the remote control. ✔Note: • Fine sync, Total dots, and Picture Position of the projector and the signal being projected through menu operation... hide the Information window, press the INFORMATION/INFO button again. When the image is selected on the remote control.

User Manual
Page 31
..., press the P-TIMER button. Basic Operation 31 SCREEN button Normal Wide True Full screen Custom P-Timer Function Press the P-TIMER button on the remote control and correct vertical and horizontal distortions with the Point buttons (e, d, 7, and 8) or the Control pad. The Keystone adjustment can be canceled... Selection Select a screen size among Normal, Wide, True, Full screen, and Custom by pressing the SCREEN button on page 47 for PLC-EF60A. Refer to the Screen menu on the remote control. And then, press the P-TIMER button again to correct image distortions.
..., press the P-TIMER button. Basic Operation 31 SCREEN button Normal Wide True Full screen Custom P-Timer Function Press the P-TIMER button on the remote control and correct vertical and horizontal distortions with the Point buttons (e, d, 7, and 8) or the Control pad. The Keystone adjustment can be canceled... Selection Select a screen size among Normal, Wide, True, Full screen, and Custom by pressing the SCREEN button on page 47 for PLC-EF60A. Refer to the Screen menu on the remote control. And then, press the P-TIMER button again to correct image distortions.

User Manual
Page 32
... screen, change Input, or change the screen size. • To exit the panning mode, press any button except the D. ZOOM button on the remote control once and then expand the image size with the SELECT button and pan the image with the SELECT button. ✔Note: To exit the... D. ZOOM button, the SELECT button, and the CH and ID buttons. 32 Zoom +/- ZOOM button on the remote control twice and then compress the image size with the Point buttons (e, d, 7, and 8) or the Control pad. Zoom +/- Function D. D. Zoom + Press the D. Zoom - ...
... screen, change Input, or change the screen size. • To exit the panning mode, press any button except the D. ZOOM button on the remote control once and then expand the image size with the SELECT button and pan the image with the SELECT button. ✔Note: To exit the... D. ZOOM button, the SELECT button, and the CH and ID buttons. 32 Zoom +/- ZOOM button on the remote control twice and then compress the image size with the Point buttons (e, d, 7, and 8) or the Control pad. Zoom +/- Function D. D. Zoom + Press the D. Zoom - ...
User Manual
Page 33
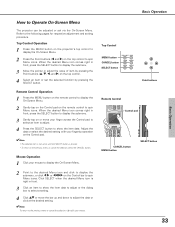
...SELECT button is right in front. 3 Click an item to show the item data. SOUND MUTE FREEZE SCREEN P-TIMER INPUT 1 CH REMOTE ID CANCEL button MENU button SELECT button 33 Basic Operation Basic Operation Top Control MENU button CANCEL button SELECT button LENS SHIFT MENU ZOOM ...CANCEL FOCUS SELECT Point buttons Remote Control SHUTTER D.ZOOM ON-OFF KEYSTONE LENS SHIFT ZOOM FOCUS Control pad CANCEL MENU INFO AUTO PC VOL. Mouse Operation 1 Click your...
...SELECT button is right in front. 3 Click an item to show the item data. SOUND MUTE FREEZE SCREEN P-TIMER INPUT 1 CH REMOTE ID CANCEL button MENU button SELECT button 33 Basic Operation Basic Operation Top Control MENU button CANCEL button SELECT button LENS SHIFT MENU ZOOM ...CANCEL FOCUS SELECT Point buttons Remote Control SHUTTER D.ZOOM ON-OFF KEYSTONE LENS SHIFT ZOOM FOCUS Control pad CANCEL MENU INFO AUTO PC VOL. Mouse Operation 1 Click your...

User Manual
Page 34
... cursor to the projector. (p.25) 34 The selected item box will turns yellow. Mouse cursor When clicking 77 or 88 on the top control or remote control.
... cursor to the projector. (p.25) 34 The selected item box will turns yellow. Mouse cursor When clicking 77 or 88 on the top control or remote control.

User Manual
Page 35
... and Rear), and activates keystone and digital zoom functions. Menu icons INPUT : SYSTEM : What You Can Do with the top 36~37 control or the remote control, correct input source should be adjusted or set via the On-Screen Menu. selects input sources. Before selecting input sources with Each Menu Page...
... and Rear), and activates keystone and digital zoom functions. Menu icons INPUT : SYSTEM : What You Can Do with the top 36~37 control or the remote control, correct input source should be adjusted or set via the On-Screen Menu. selects input sources. Before selecting input sources with Each Menu Page...


