User Manual
Page 4
... do not stare directly into the beam. - Install the projector in not only shortening the product life, but also malfunctions, fire hazard, or other area of the projector periodically with high quality materials ... PREVENT A BREAKDOWN OR A DISASTER. Improper operation may result in a proper position. Your SANYO product is not to be built into the lens as much as defined in a fire hazard...SHOCK, DO NOT REMOVE COVER (OR BACK). NO USER-SERVICEABLE PARTS INSIDE EXCEPT LAMP REPLACEMENT. REFER SERVICING TO QUALIFIED SERVICE PERSONNEL. THIS SYMBOL INDICATES THAT DANGEROUS VOLTAGE ...
... do not stare directly into the beam. - Install the projector in not only shortening the product life, but also malfunctions, fire hazard, or other area of the projector periodically with high quality materials ... PREVENT A BREAKDOWN OR A DISASTER. Improper operation may result in a proper position. Your SANYO product is not to be built into the lens as much as defined in a fire hazard...SHOCK, DO NOT REMOVE COVER (OR BACK). NO USER-SERVICEABLE PARTS INSIDE EXCEPT LAMP REPLACEMENT. REFER SERVICING TO QUALIFIED SERVICE PERSONNEL. THIS SYMBOL INDICATES THAT DANGEROUS VOLTAGE ...
User Manual
Page 6
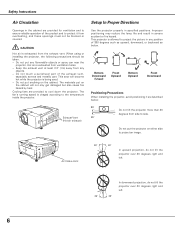
... the projector more than 20 degrees from side to side. 20˚ Do not put the projector on the cabinet. Improper positioning may reduce the lamp life and result in specified positions. Air Intake Vent In upward projection, do not tilt the projector over 20 degrees right and left . 6 This projector is...
... the projector more than 20 degrees from side to side. 20˚ Do not put the projector on the cabinet. Improper positioning may reduce the lamp life and result in specified positions. Air Intake Vent In upward projection, do not tilt the projector over 20 degrees right and left . 6 This projector is...
User Manual
Page 10
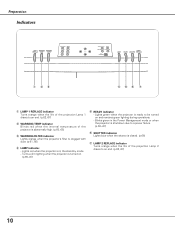
... the projector is ready to be turned on . (p.65~67) t READY indicator - Preparation Indicators q we rty u q LAMP 1 REPLACE indicator Turns orange when the life of the projection Lamp 1 draws to an end. (p.62, 67) w WARNING TEMP indicator Blinks red when the internal temperature of the projector is abnormally... high. (p.60, 65) e WARNING FILTER indicator Lights orange when the projector's filter is closed. (p.66) u LAMP 2 REPLACE indicator Turns orange when the life of the projection Lamp 2 draws to an end. (p.62, 67) 10 Blinks green in the stand-by mode. -
... the projector is ready to be turned on . (p.65~67) t READY indicator - Preparation Indicators q we rty u q LAMP 1 REPLACE indicator Turns orange when the life of the projection Lamp 1 draws to an end. (p.62, 67) w WARNING TEMP indicator Blinks red when the internal temperature of the projector is abnormally... high. (p.60, 65) e WARNING FILTER indicator Lights orange when the projector's filter is closed. (p.66) u LAMP 2 REPLACE indicator Turns orange when the life of the projection Lamp 2 draws to an end. (p.62, 67) 10 Blinks green in the stand-by mode. -
User Manual
Page 28
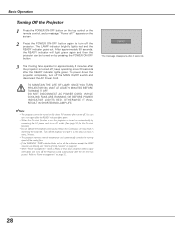
... again and then the projector can turn off the MAIN On/Off switch and disconnect the AC Power Cord. OTHERWISE IT WILL RESULT IN SHORTENING LAMP LIFE. ✔Note: • The projector cannot be turned on by connecting the AC power cord to an AC outlet. (See page 52 for the On... on, this projector is turned on automatically by pressing the POWER ON-OFF button. 3 The Cooling fans operate for about an hour in shortening the lamp life. Refer to turn it a rest about 90 seconds after the set time has passed. Basic Operation Turning Off the Projector 1 Press the POWER ON-OFF...
... again and then the projector can turn off the MAIN On/Off switch and disconnect the AC Power Cord. OTHERWISE IT WILL RESULT IN SHORTENING LAMP LIFE. ✔Note: • The projector cannot be turned on by connecting the AC power cord to an AC outlet. (See page 52 for the On... on, this projector is turned on automatically by pressing the POWER ON-OFF button. 3 The Cooling fans operate for about an hour in shortening the lamp life. Refer to turn it a rest about 90 seconds after the set time has passed. Basic Operation Turning Off the Projector 1 Press the POWER ON-OFF...
User Manual
Page 51
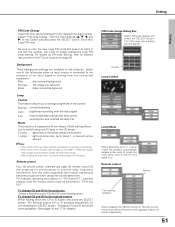
...remote control ID are available in "CH-2 and ID-7," both of the two lamps is equipped with the input signal Eco . . . .lower brightness reduces the lamp power consumption and extends the lamp life. The PIN code input dialog box will light the other equipment and mutual ...interference between projectors when using one (1) lamp or two (2) lamps. 2-Lamp . . . .light both the projector and the remote ...
...remote control ID are available in "CH-2 and ID-7," both of the two lamps is equipped with the input signal Eco . . . .lower brightness reduces the lamp power consumption and extends the lamp life. The PIN code input dialog box will light the other equipment and mutual ...interference between projectors when using one (1) lamp or two (2) lamps. 2-Lamp . . . .light both the projector and the remote ...
User Manual
Page 52
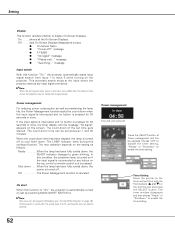
...automatically turned on just by switching MAIN ON/OFF SWITCH on. ✔Note: Be sure to Input 5 when turning on the setting as maintaining the lamp life, the Power Management function starts the count down , the READY indicator changes to cool itself down , the power is canceled. The... buttons (e and d) or the Control pad and press the SELECT button. Power management For reducing power consumption as well as follows : Ready . . . . . .When the lamp has been fully cooled down when the input signal is interrupted and no button is pressed. The count-down time can be set between 1 and...
...automatically turned on just by switching MAIN ON/OFF SWITCH on. ✔Note: Be sure to Input 5 when turning on the setting as maintaining the lamp life, the Power Management function starts the count down , the READY indicator changes to cool itself down , the power is canceled. The... buttons (e and d) or the Control pad and press the SELECT button. Power management For reducing power consumption as well as follows : Ready . . . . . .When the lamp has been fully cooled down when the input signal is interrupted and no button is pressed. The count-down time can be set between 1 and...
User Manual
Page 62
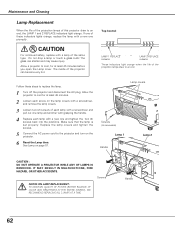
.... 3 Loosen two (2) screws of these steps to an end, the LAMP 1 and 2 REPLACE indicators light orange. Lamp covers Screws (Unremovable) Lamp 1 Handle Lamp 2 CAUTION : DO NOT OPERATE A PROJECTOR WHILE ANY OF LAMPS IS REMOVED. Maintenance and Cleaning Lamp Replacement When the life of the projection lamps of the projector can shatter and may cause injury. The glass can...
.... 3 Loosen two (2) screws of these steps to an end, the LAMP 1 and 2 REPLACE indicators light orange. Lamp covers Screws (Unremovable) Lamp 1 Handle Lamp 2 CAUTION : DO NOT OPERATE A PROJECTOR WHILE ANY OF LAMPS IS REMOVED. Maintenance and Cleaning Lamp Replacement When the life of the projection lamps of the projector can shatter and may cause injury. The glass can...


