
Brochure
Page 2
... cable (x 1), lens attachment (x 1), light shield (x 2), application software CD-ROM, *1 The figures are averages of all products at http: //w w w.sanyo-lcdp.com/english/ * Caution: please consult the instruction manual to ensure safe and proper operation of 1300:1*. Warp & Blending(Option) The PLC-XF60A/ EF60A projects images... during setup, even when there's no external signal source available. Make sure the heat vents are used lens. 360-Degree Tilt Angle The PLC-XF60A/EF60A can be shifted between 10:0 and 0:10* vertically and between 3:2 and 2:3* horizontally. Two Interface...
... cable (x 1), lens attachment (x 1), light shield (x 2), application software CD-ROM, *1 The figures are averages of all products at http: //w w w.sanyo-lcdp.com/english/ * Caution: please consult the instruction manual to ensure safe and proper operation of 1300:1*. Warp & Blending(Option) The PLC-XF60A/ EF60A projects images... during setup, even when there's no external signal source available. Make sure the heat vents are used lens. 360-Degree Tilt Angle The PLC-XF60A/EF60A can be shifted between 10:0 and 0:10* vertically and between 3:2 and 2:3* horizontally. Two Interface...
User Manual
Page 1
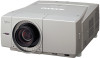
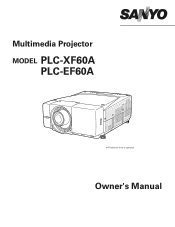
Multimedia Projector MODEL PLC-XF60A PLC-EF60A ✽ Projection lens is optional. Owner's Manual
Multimedia Projector MODEL PLC-XF60A PLC-EF60A ✽ Projection lens is optional. Owner's Manual
User Manual
Page 2
... conform to be used for the projector's menu operation. (☞ p.25, 33, and 34) ◆ Vertical and Horizontal Lens Shift and Memory The projector is equipped with vertical and horizontal Lens Shift and Lens Memory function, which enables you to obtain optimum image easily under various setup environments. (☞ p.29 and 53) ◆...
... conform to be used for the projector's menu operation. (☞ p.25, 33, and 34) ◆ Vertical and Horizontal Lens Shift and Memory The projector is equipped with vertical and horizontal Lens Shift and Lens Memory function, which enables you to obtain optimum image easily under various setup environments. (☞ p.29 and 53) ◆...

User Manual
Page 3
... 25 Operating the Projector 25 Basic Operation and Reference Buttons 26 Turning On the Projector 27 Turning Off the Projector 28 Lens Shift Adjustment 29 Zoom and Focus Adjustment 29 Shutter Function 29 Input Selection 30 Auto PC Adjustment 30 Information 30 Keystone ...Special 57 Information 59 Maintenance and Cleaning 60 Warning Temp Indicator 60 Air Filter Replacement 61 Lamp Replacement 62 Cleaning the Projection Lens 64 Cleaning the Projector Cabinet 64 Attaching the Cord Cover Strap 64 Indicators and Projector Condition 65 Main Indicators 65 Shutter ...
... 25 Operating the Projector 25 Basic Operation and Reference Buttons 26 Turning On the Projector 27 Turning Off the Projector 28 Lens Shift Adjustment 29 Zoom and Focus Adjustment 29 Shutter Function 29 Input Selection 30 Auto PC Adjustment 30 Information 30 Keystone ...Special 57 Information 59 Maintenance and Cleaning 60 Warning Temp Indicator 60 Air Filter Replacement 61 Lamp Replacement 62 Cleaning the Projection Lens 64 Cleaning the Projector Cabinet 64 Attaching the Cord Cover Strap 64 Indicators and Projector Condition 65 Main Indicators 65 Shutter ...
User Manual
Page 4
...NO USER-SERVICEABLE PARTS INSIDE EXCEPT LAMP REPLACEMENT. THIS SYMBOL INDICATES THAT DANGEROUS VOLTAGE CONSTITUTING A RISK OF ELECTRIC SHOCK IS PRESENT WITHIN THIS UNIT. Your SANYO product is designed and manufactured with a vacuum cleaner. Minimum clearances must be recycled and reused. SIDE and TOP REAR 3.3' (1m) 3.3' (1m...UNIT. NOTE: This symbol mark and recycle system are separate collection systems for used for Protection of separately from the projection lens. Do not stare directly into the beam. - If not, it may result in not only shortening the product life,...
...NO USER-SERVICEABLE PARTS INSIDE EXCEPT LAMP REPLACEMENT. THIS SYMBOL INDICATES THAT DANGEROUS VOLTAGE CONSTITUTING A RISK OF ELECTRIC SHOCK IS PRESENT WITHIN THIS UNIT. Your SANYO product is designed and manufactured with a vacuum cleaner. Minimum clearances must be recycled and reused. SIDE and TOP REAR 3.3' (1m) 3.3' (1m...UNIT. NOTE: This symbol mark and recycle system are separate collection systems for used for Protection of separately from the projection lens. Do not stare directly into the beam. - If not, it may result in not only shortening the product life,...
User Manual
Page 7
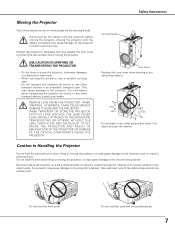
...about transporting the projector by courier or any other transport service in personal injury. WHEN TRANSPORT OR STORE THE PROJECTOR WITHOUT LENS, REPLACE THE LENS COVER PLATE INITIALLY ATTACHED TO THE PROJECTOR. Caution in serious injury. Placing on an uneven surface or any other transport .... USE CAUTION IN CARRYING OR TRANSPORTING THE PROJECTOR - Do not transport the projector by the carrying handle. Carrying Handle Lens Cover Replace the Lens cover when carrying or not using the projector. Moving the projector with the cables connected may cause damage to the projector...
...about transporting the projector by courier or any other transport service in personal injury. WHEN TRANSPORT OR STORE THE PROJECTOR WITHOUT LENS, REPLACE THE LENS COVER PLATE INITIALLY ATTACHED TO THE PROJECTOR. Caution in serious injury. Placing on an uneven surface or any other transport .... USE CAUTION IN CARRYING OR TRANSPORTING THE PROJECTOR - Do not transport the projector by the carrying handle. Carrying Handle Lens Cover Replace the Lens cover when carrying or not using the projector. Moving the projector with the cables connected may cause damage to the projector...

User Manual
Page 9
... objects near this side. CAUTION This projector is exhausted from overheating. Preparation Preparation Parts Name Front qw e Back y uy rt io !0 Bottom !1 q Remote Receiver w Projection Lens (Option) e Front Cover (inside ) !0 Lamp Cover !1 Adjustable Feet !1 9 y Indicators u Top Controls i Air Intake Vent o Air Filter (inside Terminals) r Carrying Handle t Air Exhaust Vent CAUTION Hot...
... objects near this side. CAUTION This projector is exhausted from overheating. Preparation Preparation Parts Name Front qw e Back y uy rt io !0 Bottom !1 q Remote Receiver w Projection Lens (Option) e Front Cover (inside ) !0 Lamp Cover !1 Adjustable Feet !1 9 y Indicators u Top Controls i Air Intake Vent o Air Filter (inside Terminals) r Carrying Handle t Air Exhaust Vent CAUTION Hot...
User Manual
Page 11
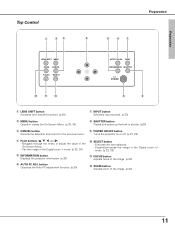
...the image. (p.29) 11 button Operates the Auto PC adjustment function. (p.30) !0 SELECT button - Preparation Top Control q we r t y u Preparation LENS SHIFT MENU ZOOM CANCEL FOCUS SELECT AUTO PC ADJ. Turns the projector on or off. (p.27, 28) r Point buttons (e, d, 7, and 8) - INPUT... INFORMATION SHUTTER P POWER !2 !1 !0 o i q LENS SHIFT button Activates the Lens shift function. (p.29) u INPUT button Switches input sources. (p.30) w MENU button Opens or closes the On-Screen Menu. (p.33, 34) i SHUTTER...
...the image. (p.29) 11 button Operates the Auto PC adjustment function. (p.30) !0 SELECT button - Preparation Top Control q we r t y u Preparation LENS SHIFT MENU ZOOM CANCEL FOCUS SELECT AUTO PC ADJ. Turns the projector on or off. (p.27, 28) r Point buttons (e, d, 7, and 8) - INPUT... INFORMATION SHUTTER P POWER !2 !1 !0 o i q LENS SHIFT button Activates the Lens shift function. (p.29) u INPUT button Switches input sources. (p.30) w MENU button Opens or closes the On-Screen Menu. (p.33, 34) i SHUTTER...
User Manual
Page 14
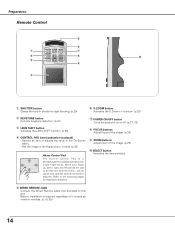
...) w KEYSTONE button Corrects keystone distortion. (p.31) u POWER ON-OFF button Turns the projector on or off. (p.27, 28) e LENS SHIFT button Activates the LENS SHIFT function. (p.29) i FOCUS buttons Adjust focus of the image. (p.29) r CONTROL PAD (semiconductive touchpad) - SOUND REMP-OTTIMEER MUTE...across the pad to the following pages for respective directions. Preparation Remote Control SHUTTER D.ZOOM ON-OFF KEYSTONE LENS SHIFT ZOOM FOCUS t y q SHUTTER D.ZOOM ON-OFF u KEYSTONE w i LENS SHIFT ZOOM FOCUS !0 e o r CANCEL MENU INFO AUTO PC FREEZE VOL. t WIRED REMOTE JACK...
...) w KEYSTONE button Corrects keystone distortion. (p.31) u POWER ON-OFF button Turns the projector on or off. (p.27, 28) e LENS SHIFT button Activates the LENS SHIFT function. (p.29) i FOCUS buttons Adjust focus of the image. (p.29) r CONTROL PAD (semiconductive touchpad) - SOUND REMP-OTTIMEER MUTE...across the pad to the following pages for respective directions. Preparation Remote Control SHUTTER D.ZOOM ON-OFF KEYSTONE LENS SHIFT ZOOM FOCUS t y q SHUTTER D.ZOOM ON-OFF u KEYSTONE w i LENS SHIFT ZOOM FOCUS !0 e o r CANCEL MENU INFO AUTO PC FREEZE VOL. t WIRED REMOTE JACK...
User Manual
Page 15
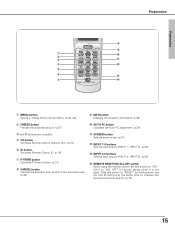
.... (p.31) i CANCEL button Cancels the selection and returns to "ALL OFF" for power saving when it is not used. Preparation SHUTTER D.ZOOM ON-OFF KEYSTONE LENS SHIFT ZOOM FOCUS Preparation i CANCEL o MENU INFO AUTO PC q !0 w FREEZE SCREEN e VOL. !1 SOUND P-TIMER INPUT 1 r MUTE !2 INPUT 4 INPUT 2 t CH REMOTE INPUT 5 INPUT 3 y ID !3 u !4 REMOTE RESET...
.... (p.31) i CANCEL button Cancels the selection and returns to "ALL OFF" for power saving when it is not used. Preparation SHUTTER D.ZOOM ON-OFF KEYSTONE LENS SHIFT ZOOM FOCUS Preparation i CANCEL o MENU INFO AUTO PC q !0 w FREEZE SCREEN e VOL. !1 SOUND P-TIMER INPUT 1 r MUTE !2 INPUT 4 INPUT 2 t CH REMOTE INPUT 5 INPUT 3 y ID !3 u !4 REMOTE RESET...
User Manual
Page 16
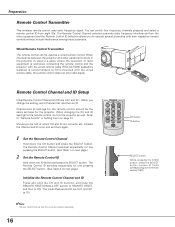
... prevents radio frequency interference from eight IDs. The Remote Control Channel switches sequentially for the projector. When you to ON. SHUTTER D.ZOOM ON-OFF KEYSTONE LENS SHIFT ZOOM FOCUS Remote Control Channel and ID Setup Initial Remote Control Channel and ID are CH1 and ID1. (p.15) ✔Note: Remote Control Channel...
... prevents radio frequency interference from eight IDs. The Remote Control Channel switches sequentially for the projector. When you to ON. SHUTTER D.ZOOM ON-OFF KEYSTONE LENS SHIFT ZOOM FOCUS Remote Control Channel and ID Setup Initial Remote Control Channel and ID are CH1 and ID1. (p.15) ✔Note: Remote Control Channel...
User Manual
Page 18
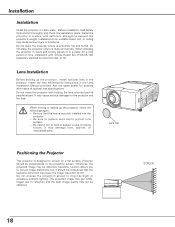
...Before installation, read Safety Instructions thoroughly and check the installation place. When installing the projector in dusty and smoky places or in the projector. Lens cap Positioning the Projector This projector is dusty and smoky. SCREEN 18 Do not place the projector where is securely installed into the projector. ..., or mechanical parts. It may cause serious damages to reflection and the best image quality may not be considered that the lens is extremely hot and humid. Do not place the projector where is designed to project on an unstable stand, cart, or...
...Before installation, read Safety Instructions thoroughly and check the installation place. When installing the projector in dusty and smoky places or in the projector. Lens cap Positioning the Projector This projector is dusty and smoky. SCREEN 18 Do not place the projector where is securely installed into the projector. ..., or mechanical parts. It may cause serious damages to reflection and the best image quality may not be considered that the lens is extremely hot and humid. Do not place the projector where is designed to project on an unstable stand, cart, or...
User Manual
Page 19
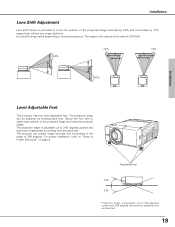
... front and back feet. The projector can be adjusted by 10% respectively without any image distortion. ✽ Lens shift range varies depending on page 6. Installation Lens Shift Adjustment Lens shift feature is provided to move the position of 360 degrees. Adjustable feet 3.65° 3.65° ...3.65 degrees upward and downward respectively by adjusting front and back feet. 19 Adjust the four feet to "Setup In Proper Directions" on lens and projectors. For proper installation, refer to obtain best position of LNS-W04. 50% 10% 10% 50% Installation Level Adjustable Feet ...
... front and back feet. The projector can be adjusted by 10% respectively without any image distortion. ✽ Lens shift range varies depending on page 6. Installation Lens Shift Adjustment Lens shift feature is provided to move the position of 360 degrees. Adjustable feet 3.65° 3.65° ...3.65 degrees upward and downward respectively by adjusting front and back feet. 19 Adjust the four feet to "Setup In Proper Directions" on lens and projectors. For proper installation, refer to obtain best position of LNS-W04. 50% 10% 10% 50% Installation Level Adjustable Feet ...
User Manual
Page 26
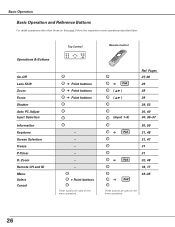
Operations & Buttons Top Control LENS SHIFT MENU ZOOM CANCEL FOCUS SELECT AUTO PC ADJ. Zoom Remote CH and ID Menu Select Cancel ➔ Point buttons ➔ Point buttons ➔ Point ..., 48 16, 17 33~35 These buttons are used on this page, follow the respective menu operations described later. INPUT INFORMATION SHUTTER P POWER On-Off Lens Shift Zoom Focus Shutter Auto PC Adjust Input Selection Information Keystone Screen Selection Freeze P-Timer D.
Operations & Buttons Top Control LENS SHIFT MENU ZOOM CANCEL FOCUS SELECT AUTO PC ADJ. Zoom Remote CH and ID Menu Select Cancel ➔ Point buttons ➔ Point buttons ➔ Point ..., 48 16, 17 33~35 These buttons are used on this page, follow the respective menu operations described later. INPUT INFORMATION SHUTTER P POWER On-Off Lens Shift Zoom Focus Shutter Auto PC Adjust Input Selection Information Keystone Screen Selection Freeze P-Timer D.
User Manual
Page 29
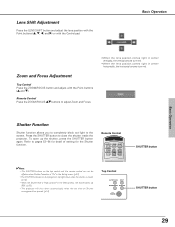
... the Shutter function. SOUND P P-TIMER MUTE POWER SCREEN CH REMOTE ID SHUTTER button 29 Remote Control SHUTTER D.ZOOM ON-OFF KEYSTONE LENS SHIFT ZOOM FOCUS SHUTTER button ✔Note: • The SHUTTER buttons on the top control and the remote control can not be...8226; When the Shutter level is "High contrast" in center horizontally, the horizontal arrows turn red. Refer to the screen. Lens Shift Adjustment Press the LENS SHIFT button and adjust the lens position with the Point buttons (e, d, 7, and 8) or with the Point buttons (e and d). Basic Operation Basic Operation ...
... the Shutter function. SOUND P P-TIMER MUTE POWER SCREEN CH REMOTE ID SHUTTER button 29 Remote Control SHUTTER D.ZOOM ON-OFF KEYSTONE LENS SHIFT ZOOM FOCUS SHUTTER button ✔Note: • The SHUTTER buttons on the top control and the remote control can not be...8226; When the Shutter level is "High contrast" in center horizontally, the horizontal arrows turn red. Refer to the screen. Lens Shift Adjustment Press the LENS SHIFT button and adjust the lens position with the Point buttons (e, d, 7, and 8) or with the Point buttons (e and d). Basic Operation Basic Operation ...
User Manual
Page 33
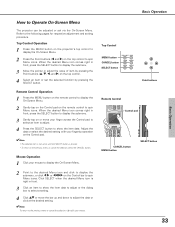
.... • To return to spin Menu icons. Basic Operation Top Control MENU button CANCEL button SELECT button LENS SHIFT MENU ZOOM CANCEL FOCUS SELECT Point buttons Remote Control SHUTTER D.ZOOM ON-OFF KEYSTONE LENS SHIFT ZOOM FOCUS Control pad CANCEL MENU INFO AUTO PC VOL. SOUND MUTE FREEZE SCREEN P-TIMER INPUT 1 CH...
.... • To return to spin Menu icons. Basic Operation Top Control MENU button CANCEL button SELECT button LENS SHIFT MENU ZOOM CANCEL FOCUS SELECT Point buttons Remote Control SHUTTER D.ZOOM ON-OFF KEYSTONE LENS SHIFT ZOOM FOCUS Control pad CANCEL MENU INFO AUTO PC VOL. SOUND MUTE FREEZE SCREEN P-TIMER INPUT 1 CH...
User Manual
Page 49
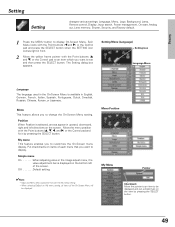
... the SELECT button. Setting Setting Setting changes various settings: Language, Menu, Logo, Background, Lamp, Remote control, Display, Input search, Power management, On start, Analog out, Lens memory, Shutter, Security, and Factory default. 1 Press the MENU button to customize the On-Screen menu display. Spin Menu icons with the Point buttons (7 and...
... the SELECT button. Setting Setting Setting changes various settings: Language, Menu, Logo, Background, Lamp, Remote control, Display, Input search, Power management, On start, Analog out, Lens memory, Shutter, Security, and Factory default. 1 Press the MENU button to customize the On-Screen menu display. Spin Menu icons with the Point buttons (7 and...
User Manual
Page 53
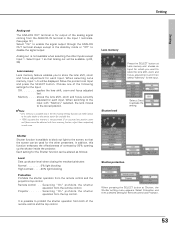
... in the Input 1 terminals. (See page 12.) Select "On" to the sales dealer or the service station for available lens. • 100% accurate lens memory is not available when selecting the other presenters. Contact to enable the signal output through the ANALOG OUT terminal always except...setting for Remote control and Projector. 53 Setting Setting Analog out The ANALOG OUT terminal is for output of the following settings for the Input. Lens memory Shutter level Press the SELECT button at Shutter, the Shutter setting menu appears. Normal 0% light blocking High contrast . . . . .20...
... in the Input 1 terminals. (See page 12.) Select "On" to the sales dealer or the service station for available lens. • 100% accurate lens memory is not available when selecting the other presenters. Contact to enable the signal output through the ANALOG OUT terminal always except...setting for Remote control and Projector. 53 Setting Setting Analog out The ANALOG OUT terminal is for output of the following settings for the Input. Lens memory Shutter level Press the SELECT button at Shutter, the Shutter setting menu appears. Normal 0% light blocking High contrast . . . . .20...
User Manual
Page 61
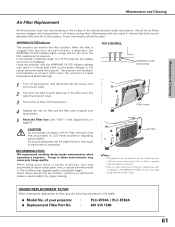
...Do not operate a projector with dust particles, it will reduce cooling fans' effectiveness and may accumulate on liquid crystal panel, lens, or optical elements inside the projector. Do not put small parts into Air Intake Vents. When using under dusty or smoky... avoiding dusty/smoky environments when operating a projector. When above symptoms are noticed, contact your projector : ● Replacement Filter Part No. : PLC-XF60A / PLC-EF60A 610 315 1588 61 Filter cover Air filter ✔Note: • The projector cannot be taken. Proper maintenance should be operated with dust...
...Do not operate a projector with dust particles, it will reduce cooling fans' effectiveness and may accumulate on liquid crystal panel, lens, or optical elements inside the projector. Do not put small parts into Air Intake Vents. When using under dusty or smoky... avoiding dusty/smoky environments when operating a projector. When above symptoms are noticed, contact your projector : ● Replacement Filter Part No. : PLC-XF60A / PLC-EF60A 610 315 1588 61 Filter cover Air filter ✔Note: • The projector cannot be taken. Proper maintenance should be operated with dust...
User Manual
Page 64
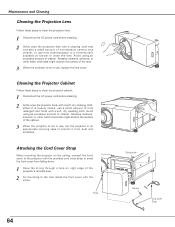
...on right edge of the cabinet. 3 When the projector is heavily soiled, use lens cleaning paper or a commercially available air blower to clean the lens. Cleaning the Projector Cabinet Follow these steps to clean the projection lens. 1 Disconnect the AC power cord before cleaning. 2 Softly wipe the projector body... and finish with a soft, dry cleaning cloth. Avoid using an excessive amount of cleaner. Maintenance and Cleaning Cleaning the Projection Lens Follow these steps to clean the projector cabinet. 1 Disconnect the AC power cord before cleaning. 2 Softly wipe the projection...
...on right edge of the cabinet. 3 When the projector is heavily soiled, use lens cleaning paper or a commercially available air blower to clean the lens. Cleaning the Projector Cabinet Follow these steps to clean the projection lens. 1 Disconnect the AC power cord before cleaning. 2 Softly wipe the projector body... and finish with a soft, dry cleaning cloth. Avoid using an excessive amount of cleaner. Maintenance and Cleaning Cleaning the Projection Lens Follow these steps to clean the projector cabinet. 1 Disconnect the AC power cord before cleaning. 2 Softly wipe the projection...


