
User Manual
Page 2
... AND KEEP THIS OWNER'S MANUAL FOR LATER USE. This projector provides many convenient features and functions. NO USER-SERVICEABLE PARTS INSIDE EXCEPT LAMP REPLACEMENT. In the European Union there are applied only to EU countries and not applied to manage those features and maintain it may result... clearances must be dangerous. If you purchased the projector or the service center. CAUTION Not for allowing air circulation and cooling the projector. Your SANYO product is to be built into the beam. - If not, it in a computer room as possible. Install the projector in a fire...
... AND KEEP THIS OWNER'S MANUAL FOR LATER USE. This projector provides many convenient features and functions. NO USER-SERVICEABLE PARTS INSIDE EXCEPT LAMP REPLACEMENT. In the European Union there are applied only to EU countries and not applied to manage those features and maintain it may result... clearances must be dangerous. If you purchased the projector or the service center. CAUTION Not for allowing air circulation and cooling the projector. Your SANYO product is to be built into the beam. - If not, it in a computer room as possible. Install the projector in a fire...

User Manual
Page 5
... ADJUSTMENT 20 WIRELESS MOUSE MAINTENANCE 45 46 20 WARNING TEMP. INDICATOR AIR FILTERS CARE AND CLEANING 46 47 20 CLEANING PROJECTION LENS 47 21 LAMP REPLACEMENT 48 22 LAMP REPLACE COUNTER 49 22 TROUBLESHOOTING 50 22 22 MENU TREE 52 22 COMPATIBLE COMPUTER SPECIFICATIONS 54 23 INDICATORS AND PROJECTOR CONDITION 55 23 TECHNICAL SPECIFICATIONS...
... ADJUSTMENT 20 WIRELESS MOUSE MAINTENANCE 45 46 20 WARNING TEMP. INDICATOR AIR FILTERS CARE AND CLEANING 46 47 20 CLEANING PROJECTION LENS 47 21 LAMP REPLACEMENT 48 22 LAMP REPLACE COUNTER 49 22 TROUBLESHOOTING 50 22 22 MENU TREE 52 22 COMPATIBLE COMPUTER SPECIFICATIONS 54 23 INDICATORS AND PROJECTOR CONDITION 55 23 TECHNICAL SPECIFICATIONS...
User Manual
Page 17
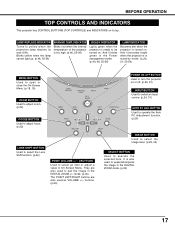
...) POINT (VOLUME + / - ) BUTTONS Used to expand/compress the image in the Power management mode. (p.40, 46, 55-56) LAMP INDICATOR Becomes dim when the projector is ready to yellow when the projection lamp reaches its top. mode. (p.30) The POINT LEFT/RIGHT buttons are also used to pan the image in On... CONTROLS) and INDICATORS on its end of the projector is too high. (p.46, 55-56) READY INDICATOR Lights green when the projector is turned on. LAMP REPLACE INDICATOR Turns to be turned on.
...) POINT (VOLUME + / - ) BUTTONS Used to expand/compress the image in the Power management mode. (p.40, 46, 55-56) LAMP INDICATOR Becomes dim when the projector is ready to yellow when the projection lamp reaches its top. mode. (p.30) The POINT LEFT/RIGHT buttons are also used to pan the image in On... CONTROLS) and INDICATORS on its end of the projector is too high. (p.46, 55-56) READY INDICATOR Lights green when the projector is turned on. LAMP REPLACE INDICATOR Turns to be turned on.
User Manual
Page 19
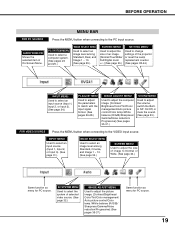
... Wide. (See page 34.) Same function as menu for PC source. AV SYSTEM MENU Used to select the system of the projector or reset the Lamp replacement counter. (See pages 38-44.) INPUT MENU Used to select an input source (Input 1, Input 2, or Input 3). (See page 24.) PC ADJUST MENU Used to...
... Wide. (See page 34.) Same function as menu for PC source. AV SYSTEM MENU Used to select the system of the projector or reset the Lamp replacement counter. (See pages 38-44.) INPUT MENU Used to select an input source (Input 1, Input 2, or Input 3). (See page 24.) PC ADJUST MENU Used to...

User Manual
Page 44
See page 49 for the User logo, Key lock, PIN code lock, Logo PIN code lock, and the Lamp counter to the factory default settings. Quit Exit the SETTING Menu. Select [Yes], and the next box appears. Factory default Select Factory default and this function. When replacing the projection lamp, reset the Lamp replacement counter with this box appears. Factory default This function returns all setting values except for operation. SETTING Lamp counter This function is used to activate it. 44 Select [Yes] to reset the Lamp replacement counter.
See page 49 for the User logo, Key lock, PIN code lock, Logo PIN code lock, and the Lamp counter to the factory default settings. Quit Exit the SETTING Menu. Select [Yes], and the next box appears. Factory default Select Factory default and this function. When replacing the projection lamp, reset the Lamp replacement counter with this box appears. Factory default This function returns all setting values except for operation. SETTING Lamp counter This function is used to activate it. 44 Select [Yes] to reset the Lamp replacement counter.

User Manual
Page 48
... or touch a glass bulb! The glass can be ordered through your projector : ● Replacement Lamp Type No. : PLC-XP57L POA-LMP101 (Service Parts No. 610 328 7362) 48 Make sure that the lamp assembly is not replaced. of the projector can become very hot. CAUTION Allow the projector to cool for at least 45 minutes before...
... or touch a glass bulb! The glass can be ordered through your projector : ● Replacement Lamp Type No. : PLC-XP57L POA-LMP101 (Service Parts No. 610 328 7362) 48 Make sure that the lamp assembly is not replaced. of the projector can become very hot. CAUTION Allow the projector to cool for at least 45 minutes before...

User Manual
Page 49
... buttons to move the red frame pointer to reset the Lamp replacement counter after the projection lamp is reset, the LAMP REPLACE indicator stops lighting. 1 Turn the projector on and press the MENU button to reset the Lamp replacement counter. Move the pointer to [Yes] and then press...select [Yes] to display the On-Screen Menu. When the Lamp replacement counter is replaced. Lamp counter Select Lamp counter and this manual.) Continuous use . NOTE: • Do not reset the Lamp replacement counter until after the lamp assembly is no broken shards or pieces of broken glass. 49...
... buttons to move the red frame pointer to reset the Lamp replacement counter after the projection lamp is reset, the LAMP REPLACE indicator stops lighting. 1 Turn the projector on and press the MENU button to reset the Lamp replacement counter. Move the pointer to [Yes] and then press...select [Yes] to display the On-Screen Menu. When the Lamp replacement counter is replaced. Lamp counter Select Lamp counter and this manual.) Continuous use . NOTE: • Do not reset the Lamp replacement counter until after the lamp assembly is no broken shards or pieces of broken glass. 49...
User Manual
Page 55
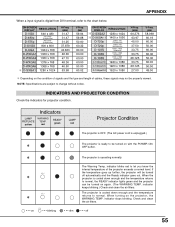
...again. (The WARNING TEMP. When turning on the condition of signals and the type and length of the projector exceeds a normal level. Indicators LAMP WARNING REPLACE TEMP. The projector is digital from DVI terminal, refer to the chart below. Check and clean the air filters. • • ...• dim • • • off automatically and the Ready indicator goes out. yellow red READY green LAMP red Projector Condition The ...
...again. (The WARNING TEMP. When turning on the condition of signals and the type and length of the projector exceeds a normal level. Indicators LAMP WARNING REPLACE TEMP. The projector is digital from DVI terminal, refer to the chart below. Check and clean the air filters. • • ...• dim • • • off automatically and the Ready indicator goes out. yellow red READY green LAMP red Projector Condition The ...

User Manual
Page 56
... • • • off again, disconnect the AC power cord and contact the dealer or the service center for service and checkup. Replace the lamp and then reset the Lamp replacement counter. Unplug the AC power cord and plug it again to be turned on . yellow red READY green ✽...; LAMP Projector Condition red The projector is turned off *When the projection lamp reaches its end of life, the LAMP REPLACE indicator lights yellow. It may cause electric shock or a fire hazard. ✽ The ...
... • • • off again, disconnect the AC power cord and contact the dealer or the service center for service and checkup. Replace the lamp and then reset the Lamp replacement counter. Unplug the AC power cord and plug it again to be turned on . yellow red READY green ✽...; LAMP Projector Condition red The projector is turned off *When the projection lamp reaches its end of life, the LAMP REPLACE indicator lights yellow. It may cause electric shock or a fire hazard. ✽ The ...
User Manual
Page 57
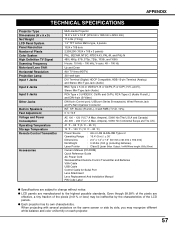
...Guide AC Power Cord Wireless/Wired Remote Control Transmitter and Batteries VGA Cable USB Cable Control Cable for Serial Port Lens Attachment Lens Replacement And Installation Manual PIN Code Label ● Specifications are subject to change without notice. ● LCD panels are effective, a ...projector. 57 Even though 99.99% of Pixels Color System High Definition TV Signal Scanning Frequency Motorized Lens Shift Horizontal Resolution Projection Lamp Input 1 Jacks Input 2 Jacks Input 3 Jacks Other Jacks Built-in Speakers Feet Adjustment Voltage and Power Consumption Operating Temperature ...
...Guide AC Power Cord Wireless/Wired Remote Control Transmitter and Batteries VGA Cable USB Cable Control Cable for Serial Port Lens Attachment Lens Replacement And Installation Manual PIN Code Label ● Specifications are subject to change without notice. ● LCD panels are effective, a ...projector. 57 Even though 99.99% of Pixels Color System High Definition TV Signal Scanning Frequency Motorized Lens Shift Horizontal Resolution Projection Lamp Input 1 Jacks Input 2 Jacks Input 3 Jacks Other Jacks Built-in Speakers Feet Adjustment Voltage and Power Consumption Operating Temperature ...


