
User Manual
Page 1
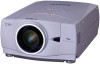
Multimedia Projector MODEL PLC-XP57L Owner's Manual ✽ Projection lens is optional.
Multimedia Projector MODEL PLC-XP57L Owner's Manual ✽ Projection lens is optional.

User Manual
Page 2
... CAUTION RISK OF ELECTRIC SHOCK DO NOT OPEN CAUTION: TO REDUCE THE RISK OF ELECTRIC SHOCK, DO NOT REMOVE COVER (OR BACK). Your SANYO product is not to be built into a compartment or similarly enclosed, the minimum distances must be maintained. In the European Union there are ...the problem still persists, contact the dealer where you leave the projector unclean for a long time, the dust will block the operation of this manual thoroughly and operate the projector properly. Please help us to operate improperly, read this booklet. Do not stare directly into the beam. - Do ...
... CAUTION RISK OF ELECTRIC SHOCK DO NOT OPEN CAUTION: TO REDUCE THE RISK OF ELECTRIC SHOCK, DO NOT REMOVE COVER (OR BACK). Your SANYO product is not to be built into a compartment or similarly enclosed, the minimum distances must be maintained. In the European Union there are ...the problem still persists, contact the dealer where you leave the projector unclean for a long time, the dust will block the operation of this manual thoroughly and operate the projector properly. Please help us to operate improperly, read this booklet. Do not stare directly into the beam. - Do ...

User Manual
Page 5
...COMPUTER INPUT 24 SELECTING INPUT SOURCE 24 PREPARATION 7 SELECTING COMPUTER SYSTEM PC ADJUSTMENT 25 26 AUTO PC ADJUSTMENT 26 NAME OF EACH PART OF PROJECTOR 7 MANUAL PC ADJUSTMENT 27 SETTING-UP PROJECTOR 8 PICTURE IMAGE SELECT 29 CONNECTING AC POWER CORD 8 IMAGE LEVEL SELECT 29 LENS INSTALLATION 9 PICTURE SCREEN ADJUSTMENT 30... Machines, Inc. ● Windows and PowerPoint are registered trademarks of Microsoft Corporation. ● Each name of corporations or products in the owner's manual is a trademark or a registered trademark of its respective corporation. 5
...COMPUTER INPUT 24 SELECTING INPUT SOURCE 24 PREPARATION 7 SELECTING COMPUTER SYSTEM PC ADJUSTMENT 25 26 AUTO PC ADJUSTMENT 26 NAME OF EACH PART OF PROJECTOR 7 MANUAL PC ADJUSTMENT 27 SETTING-UP PROJECTOR 8 PICTURE IMAGE SELECT 29 CONNECTING AC POWER CORD 8 IMAGE LEVEL SELECT 29 LENS INSTALLATION 9 PICTURE SCREEN ADJUSTMENT 30... Machines, Inc. ● Windows and PowerPoint are registered trademarks of Microsoft Corporation. ● Each name of corporations or products in the owner's manual is a trademark or a registered trademark of its respective corporation. 5

User Manual
Page 6
... image of use . This function enables you to turn the projection lamp off when the projector detects a signal interruption or when no need for a troublesome manual adjustment of an original image size, allowing you to operate both projector and computer with this projector has the Wireless Mouse function for a certain period...
... image of use . This function enables you to turn the projection lamp off when the projector detects a signal interruption or when no need for a troublesome manual adjustment of an original image size, allowing you to operate both projector and computer with this projector has the Wireless Mouse function for a certain period...

User Manual
Page 7
... RECEIVER HOT AIR EXHAUSTED ! This projector detects internal temperature and automatically controls operating power of the optional PJ-Net organizer. Pay attention to the owner's manual of the cooling fans. When using or installing the projector, the following matters to the projector, remove the these parts. Obstructions may damage the lens...
... RECEIVER HOT AIR EXHAUSTED ! This projector detects internal temperature and automatically controls operating power of the optional PJ-Net organizer. Pay attention to the owner's manual of the cooling fans. When using or installing the projector, the following matters to the projector, remove the these parts. Obstructions may damage the lens...
User Manual
Page 9
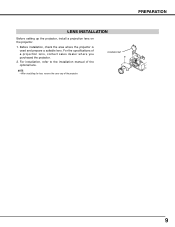
For installation, refer to the installation manual of the projector. NOTE: • When installing the lens, remove the cover cap of the optional lens. COVER CAP 9 Before installation, check the area where the projector is used and prepare a suitable lens. For the specifications of a projection lens, contact sales dealer where you purchased the projector. 2. PREPARATION LENS INSTALLATION Before setting up the projector, install a projection lens on the projector. 1.
For installation, refer to the installation manual of the projector. NOTE: • When installing the lens, remove the cover cap of the optional lens. COVER CAP 9 Before installation, check the area where the projector is used and prepare a suitable lens. For the specifications of a projection lens, contact sales dealer where you purchased the projector. 2. PREPARATION LENS INSTALLATION Before setting up the projector, install a projection lens on the projector. 1.

User Manual
Page 20
... Lamp control status To Enter a PIN code Select a number by pressing the POINT DOWN button, then return to complete entering a four-digit number. Repeat this manual and keep it to the PIN code lock function in SETTING Menu on page 60 of the projector with a PIN code, a PIN code Input Dialog...
... Lamp control status To Enter a PIN code Select a number by pressing the POINT DOWN button, then return to complete entering a four-digit number. Repeat this manual and keep it to the PIN code lock function in SETTING Menu on page 60 of the projector with a PIN code, a PIN code Input Dialog...
User Manual
Page 25
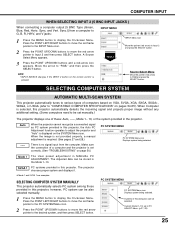
...press the SELECT button. The projector chooses proper system and displays it. ✽ Mode 1 and SVGA 1 are examples. Custom Mode (1~10) set manually.) The projector displays one of computers based on VGA, SVGA, XGA, SXGA, SXGA+, WXGA, or UXGA (refer to "COMPATIBLE COMPUTER SPECIFICATIONS" on page... Horiz. Source Select Menu Move the pointer (red arrow) to "RGB," and then press the SELECT button. SVGA 1 PC systems provided in MANUAL PC ADJUSTMENT. PC SYSTEM MENU PC SYSTEM Menu icon Displays system being selected. INPUT MENU Input 2 INPUT Menu icon Move the pointer (red arrow...
...press the SELECT button. The projector chooses proper system and displays it. ✽ Mode 1 and SVGA 1 are examples. Custom Mode (1~10) set manually.) The projector displays one of computers based on VGA, SVGA, XGA, SXGA, SXGA+, WXGA, or UXGA (refer to "COMPATIBLE COMPUTER SPECIFICATIONS" on page... Horiz. Source Select Menu Move the pointer (red arrow) to "RGB," and then press the SELECT button. SVGA 1 PC systems provided in MANUAL PC ADJUSTMENT. PC SYSTEM MENU PC SYSTEM Menu icon Displays system being selected. INPUT MENU Input 2 INPUT Menu icon Move the pointer (red arrow...
User Manual
Page 26
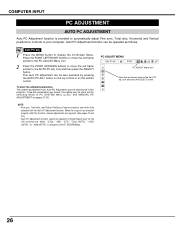
... adj. To store the adjusted parameters. NOTE: • Fine sync, Total dots, and Picture Positions of some computers can be fully adjusted with this function, manual adjustments are stored, the setting can not be done just by pressing the AUTO PC ADJ. icon and press the SELECT button. 26 Once the... to the PC ADJUST Menu icon. 2 Press the POINT UP/DOWN buttons to move the red frame pointer to display the On-Screen Menu. See MANUAL PC ADJUSTMENT on the remote control. Auto PC Adjustment function can be operated as follows. This Auto PC Adjustment can be also executed by selecting...
... adj. To store the adjusted parameters. NOTE: • Fine sync, Total dots, and Picture Positions of some computers can be fully adjusted with this function, manual adjustments are stored, the setting can not be done just by pressing the AUTO PC ADJ. icon and press the SELECT button. 26 Once the... to the PC ADJUST Menu icon. 2 Press the POINT UP/DOWN buttons to move the red frame pointer to display the On-Screen Menu. See MANUAL PC ADJUSTMENT on the remote control. Auto PC Adjustment function can be operated as follows. This Auto PC Adjustment can be also executed by selecting...
User Manual
Page 27
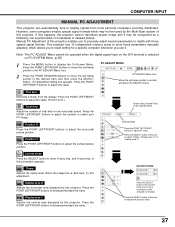
... display. Display area V Adjusts the vertical area displayed by the Multi-Scan system of total dots in one horizontal period. COMPUTER INPUT MANUAL PC ADJUSTMENT This projector can automatically tune to the desired item, and then press the SELECT button. However, some computers employ special signal... signal input on the DVI terminal is selected on PC SYSTEM Menu. (p.25) 1 Press the MENU button to match with those parameters manually adjusted, which allows you to recall setting for a specific computer whenever you to precisely adjust several parameters to display the On-Screen Menu....
... display. Display area V Adjusts the vertical area displayed by the Multi-Scan system of total dots in one horizontal period. COMPUTER INPUT MANUAL PC ADJUSTMENT This projector can automatically tune to the desired item, and then press the SELECT button. However, some computers employ special signal... signal input on the DVI terminal is selected on PC SYSTEM Menu. (p.25) 1 Press the MENU button to match with those parameters manually adjusted, which allows you to recall setting for a specific computer whenever you to precisely adjust several parameters to display the On-Screen Menu....

User Manual
Page 32
... component video signal format from among 480i, 575i, 480p, 575p, 720p, 1035i, and 1080i. When the Video System is 1035i or 1080i, select the system manually. VIDEO JACK OR S-VIDEO JACK Auto The projector automatically detects an incoming video system, and adjusts itself to optimize its performance. Y, Pb/Cb, Pr/Cr...
... component video signal format from among 480i, 575i, 480p, 575p, 720p, 1035i, and 1080i. When the Video System is 1035i or 1080i, select the system manually. VIDEO JACK OR S-VIDEO JACK Auto The projector automatically detects an incoming video system, and adjusts itself to optimize its performance. Y, Pb/Cb, Pr/Cr...

User Manual
Page 37
... reduced. Off . . . . Press the POINT LEFT/RIGHT buttons to set and then press the SELECT button. Noise reduction mode is "Off." Store To store the manually preset image, move the red frame pointer to the original film quality. Press the POINT LEFT/RIGHT buttons to any of the image; For lower...
... reduced. Off . . . . Press the POINT LEFT/RIGHT buttons to set and then press the SELECT button. Noise reduction mode is "Off." Store To store the manually preset image, move the red frame pointer to the original film quality. Press the POINT LEFT/RIGHT buttons to any of the image; For lower...

User Manual
Page 49
... there are no guarantee of explosion may differ according to do so, may explode as a result of use . Lamp counter Select Lamp counter and this manual.) Continuous use of the lamp with the LAMP REPLACE indicator lighted may increase the risk of lamp explosion. ● Lamp may result in which must...
... there are no guarantee of explosion may differ according to do so, may explode as a result of use . Lamp counter Select Lamp counter and this manual.) Continuous use of the lamp with the LAMP REPLACE indicator lighted may increase the risk of lamp explosion. ● Lamp may result in which must...
User Manual
Page 57
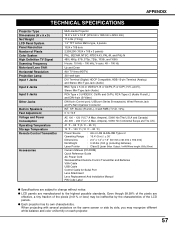
...A Max. Stereo (R and L), 3 watt RMS (T.H.D. 10%) 0˚ to the highest possible standards. Output: 1mW/Wave length: 650±20nm) Owner's Manual (CD-ROM) Quick Reference Guide AC Power Cord Wireless/Wired Remote Control Transmitter and Batteries VGA Cable USB Cable Control Cable for Serial Port Lens... Attachment Lens Replacement And Installation Manual PIN Code Label ● Specifications are subject to change without notice. ● LCD panels are effective, a tiny fraction ...
...A Max. Stereo (R and L), 3 watt RMS (T.H.D. 10%) 0˚ to the highest possible standards. Output: 1mW/Wave length: 650±20nm) Owner's Manual (CD-ROM) Quick Reference Guide AC Power Cord Wireless/Wired Remote Control Transmitter and Batteries VGA Cable USB Cable Control Cable for Serial Port Lens... Attachment Lens Replacement And Installation Manual PIN Code Label ● Specifications are subject to change without notice. ● LCD panels are effective, a tiny fraction ...

User Manual
Page 59
...replacement of JBMIA. Do not attempt to the projector. After installing the lens, attach the lens cap to the attached lens replacement and installation manual, replace or install the lens properly. Do not hold the lens when carrying or lifting the projector. To the sales and service engineers:...the lens by PJLink Class 1 and is verified conformance with PJLink Standard Class 1. When ordering those parts, specify the item name and its Type No. SANYO Projector Input Input1 RGB (PC analog) RGB (Scart) RGB (PC digital) RGB (AV HDCP) Input2 Video Y, Pb/Cb, Pr/Cr Input3 RGB ...
...replacement of JBMIA. Do not attempt to the projector. After installing the lens, attach the lens cap to the attached lens replacement and installation manual, replace or install the lens properly. Do not hold the lens when carrying or lifting the projector. To the sales and service engineers:...the lens by PJLink Class 1 and is verified conformance with PJLink Standard Class 1. When ordering those parts, specify the item name and its Type No. SANYO Projector Input Input1 RGB (PC analog) RGB (Scart) RGB (PC digital) RGB (AV HDCP) Input2 Video Y, Pb/Cb, Pr/Cr Input3 RGB ...
User Manual
Page 60
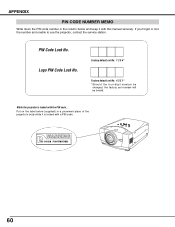
PIN Code Lock No. Factory default set No: 1 2 3 4* Factory default set No: 4 3 2 1* * Should the four-digit number be changed, the factory set number will be invalid. Put on the label below and keep it is locked with the PIN code... APPENDIX PIN CODE NUMBER MEMO Write down the PIN code number in the column below (supplied) in a prominent place of the projector's body while it with this manual securely. If you forgot or lost the number and unable to use the projector, contact the service station. While the projector is locked with a PIN code. 60 Logo PIN Code Lock No.
PIN Code Lock No. Factory default set No: 1 2 3 4* Factory default set No: 4 3 2 1* * Should the four-digit number be changed, the factory set number will be invalid. Put on the label below and keep it is locked with the PIN code... APPENDIX PIN CODE NUMBER MEMO Write down the PIN code number in the column below (supplied) in a prominent place of the projector's body while it with this manual securely. If you forgot or lost the number and unable to use the projector, contact the service station. While the projector is locked with a PIN code. 60 Logo PIN Code Lock No.
Brochure
Page 2
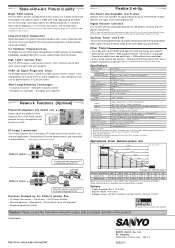
... classrooms, and meeting rooms. *The highest brightness in this projector Caution: Please consult the instruction manual to ensure safe and proper operation of the product. Audio: Stereo mini Input 2 Video: BNC... Y/ Video-Pb/ Cb-Pr/ Cr); Distributed by projector PJ2. AV Company ©2006 SANYO Printed in show windows. *Moving images cannot be interchanged at shipment are shown, in laser pointer... rk capture PC3 PC4 PJ2 PJ1 PC5 A screenshot from film sources. Specifications Model number PLC-XP57L LCD panels 1.3-inch TFT p-Si x 3 Aspect ratio 4:3 Number of ±35 ...
... classrooms, and meeting rooms. *The highest brightness in this projector Caution: Please consult the instruction manual to ensure safe and proper operation of the product. Audio: Stereo mini Input 2 Video: BNC... Y/ Video-Pb/ Cb-Pr/ Cr); Distributed by projector PJ2. AV Company ©2006 SANYO Printed in show windows. *Moving images cannot be interchanged at shipment are shown, in laser pointer... rk capture PC3 PC4 PJ2 PJ1 PC5 A screenshot from film sources. Specifications Model number PLC-XP57L LCD panels 1.3-inch TFT p-Si x 3 Aspect ratio 4:3 Number of ±35 ...


