
User Manual
Page 1
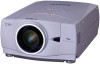
Multimedia Projector MODEL PLC-XP57L Owner's Manual ✽ Projection lens is optional.
Multimedia Projector MODEL PLC-XP57L Owner's Manual ✽ Projection lens is optional.

User Manual
Page 2
...OPERATING AND MAINTENANCE INSTRUCTIONS IN THE OWNER'S MANUAL WITH THIS UNIT. Your SANYO product is designed and manufactured with a vacuum cleaner. Install the projector in better condition for allowing air circulation and cooling the projector. If the projector is not to manage those features and maintain...dans la norme ANSI/NFPA 75 Standard for the Protection of this booklet. READ AND KEEP THIS OWNER'S MANUAL FOR LATER USE. Operating the projector properly enables you to be maintained. Improper operation may result in the Standard for Protection of the cooling ...
...OPERATING AND MAINTENANCE INSTRUCTIONS IN THE OWNER'S MANUAL WITH THIS UNIT. Your SANYO product is designed and manufactured with a vacuum cleaner. Install the projector in better condition for allowing air circulation and cooling the projector. If the projector is not to manage those features and maintain...dans la norme ANSI/NFPA 75 Standard for the Protection of this booklet. READ AND KEEP THIS OWNER'S MANUAL FOR LATER USE. Operating the projector properly enables you to be maintained. Improper operation may result in the Standard for Protection of the cooling ...

User Manual
Page 5
...SOURCE 24 PREPARATION 7 SELECTING COMPUTER SYSTEM PC ADJUSTMENT 25 26 AUTO PC ADJUSTMENT 26 NAME OF EACH PART OF PROJECTOR 7 MANUAL PC ADJUSTMENT 27 SETTING-UP PROJECTOR 8 PICTURE IMAGE SELECT 29 CONNECTING AC POWER CORD 8 IMAGE LEVEL SELECT 29 LENS INSTALLATION 9 PICTURE SCREEN ... FLOW OF ON-SCREEN MENU OPERATION 18 MENU BAR 19 APPENDIX 45 BASIC OPERATION TURNING ON/OFF PROJECTOR TURNING ON THE PROJECTOR TURNING OFF THE PROJECTOR ADJUSTING SCREEN ZOOM ADJUSTMENT FOCUS ADJUSTMENT LENS SHIFT ADJUSTMENT KEYSTONE CORRECTION PICTURE FREEZE FUNCTION NO SHOW FUNCTION ...
...SOURCE 24 PREPARATION 7 SELECTING COMPUTER SYSTEM PC ADJUSTMENT 25 26 AUTO PC ADJUSTMENT 26 NAME OF EACH PART OF PROJECTOR 7 MANUAL PC ADJUSTMENT 27 SETTING-UP PROJECTOR 8 PICTURE IMAGE SELECT 29 CONNECTING AC POWER CORD 8 IMAGE LEVEL SELECT 29 LENS INSTALLATION 9 PICTURE SCREEN ... FLOW OF ON-SCREEN MENU OPERATION 18 MENU BAR 19 APPENDIX 45 BASIC OPERATION TURNING ON/OFF PROJECTOR TURNING ON THE PROJECTOR TURNING OFF THE PROJECTOR ADJUSTING SCREEN ZOOM ADJUSTMENT FOCUS ADJUSTMENT LENS SHIFT ADJUSTMENT KEYSTONE CORRECTION PICTURE FREEZE FUNCTION NO SHOW FUNCTION ...

User Manual
Page 6
... in size and weight. The Power management function operates to turn the projection lamp off when the projector detects a signal interruption or when no need for a troublesome manual adjustment of frequency and other settings. ◆ One-Touch Auto PC Adjustment Incoming computer video signals ...the computer screen and the image data stored in use. This function makes it easy to provide projected image where you to operate both projector and computer with the remote control only. ◆ Multilanguage Menu Display Operation menu is available in 12 languages: English, German, French...
... in size and weight. The Power management function operates to turn the projection lamp off when the projector detects a signal interruption or when no need for a troublesome manual adjustment of frequency and other settings. ◆ One-Touch Auto PC Adjustment Incoming computer video signals ...the computer screen and the image data stored in use. This function makes it easy to provide projected image where you to operate both projector and computer with the remote control only. ◆ Multilanguage Menu Display Operation menu is available in 12 languages: English, German, French...

User Manual
Page 7
... REMOTE RECEIVER BACK OF CABINET EXHAUST VENT POWER CORD CONNECTOR TERMINALS AND CONNECTORS INFRARED REMOTE RECEIVER HOT AIR EXHAUSTED ! This projector detects internal temperature and automatically controls operating power of any object, especially from heatsensitive objects. ● Do not touch ...LAMP COVER When attaching the PJ-Net Organizer (optional) to the owner's manual of the optional PJ-Net organizer. Refer to the projector, remove the these parts. When using or installing the projector, the following matters to the following precautions should be taken. ● Do...
... REMOTE RECEIVER BACK OF CABINET EXHAUST VENT POWER CORD CONNECTOR TERMINALS AND CONNECTORS INFRARED REMOTE RECEIVER HOT AIR EXHAUSTED ! This projector detects internal temperature and automatically controls operating power of any object, especially from heatsensitive objects. ● Do not touch ...LAMP COVER When attaching the PJ-Net Organizer (optional) to the owner's manual of the optional PJ-Net organizer. Refer to the projector, remove the these parts. When using or installing the projector, the following matters to the following precautions should be taken. ● Do...
User Manual
Page 9
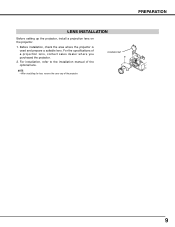
NOTE: • When installing the lens, remove the cover cap of a projection lens, contact sales dealer where you purchased the projector. 2. For the specifications of the projector. Before installation, check the area where the projector is used and prepare a suitable lens. COVER CAP 9 PREPARATION LENS INSTALLATION Before setting up the projector, install a projection lens on the projector. 1. For installation, refer to the installation manual of the optional lens.
NOTE: • When installing the lens, remove the cover cap of a projection lens, contact sales dealer where you purchased the projector. 2. For the specifications of the projector. Before installation, check the area where the projector is used and prepare a suitable lens. COVER CAP 9 PREPARATION LENS INSTALLATION Before setting up the projector, install a projection lens on the projector. 1. For installation, refer to the installation manual of the optional lens.

User Manual
Page 20
... new PIN code; Enter a PIN code as instructed below. 16 The preparation display disappears after 30 seconds. Repeat this manual and keep it to operate the projector. Enter a PIN code all over again. Should the PIN code be started. The number changes to complete entering a ...To Enter a PIN code Select a number by pressing the POINT DOWN button, then return to operate. BASIC OPERATION TURNING ON / OFF PROJECTOR TURNING ON THE PROJECTOR 1 Complete peripheral connections (with a computer, VCR, etc.) before turning on the remote control. write down the number in a column...
... new PIN code; Enter a PIN code as instructed below. 16 The preparation display disappears after 30 seconds. Repeat this manual and keep it to operate the projector. Enter a PIN code all over again. Should the PIN code be started. The number changes to complete entering a ...To Enter a PIN code Select a number by pressing the POINT DOWN button, then return to operate. BASIC OPERATION TURNING ON / OFF PROJECTOR TURNING ON THE PROJECTOR 1 Complete peripheral connections (with a computer, VCR, etc.) before turning on the remote control. write down the number in a column...
User Manual
Page 25
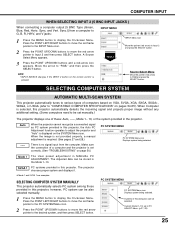
...1 Press the MENU button to be selected. The projector chooses proper system and displays it. ✽ Mode 1 and SVGA 1 are examples. SELECTING COMPUTER SYSTEM MANUALLY This projector automatically selects PC system among those provided in this projector automatically detects the incoming signal and projects proper image ...PC SYSTEM Menu icon Displays system being selected. 1 Press the MENU button to adjust the projector and "Auto" is pressed. When the image is not provided properly, a manual adjustment is required. (See pages 27 and 28.) There is set correctly. (See ...
...1 Press the MENU button to be selected. The projector chooses proper system and displays it. ✽ Mode 1 and SVGA 1 are examples. SELECTING COMPUTER SYSTEM MANUALLY This projector automatically selects PC system among those provided in this projector automatically detects the incoming signal and projects proper image ...PC SYSTEM Menu icon Displays system being selected. 1 Press the MENU button to adjust the projector and "Auto" is pressed. When the image is not provided properly, a manual adjustment is required. (See pages 27 and 28.) There is set correctly. (See ...
User Manual
Page 26
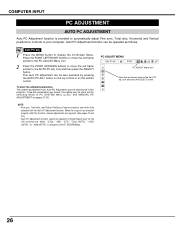
..., Total dots, and Picture Positions of some computers can not be fully adjusted with this function, manual adjustments are stored, the setting can be also executed by selecting Mode in this projector. To store the adjusted parameters. Once the parameters are required. (See pages 27 and 28.) ...575p," "480i," "575i," "720p (HDTV)," "1035i (HDTV)," or "1080i (HDTV)" is not provided properly with the Auto PC Adjustment function. See MANUAL PC ADJUSTMENT on the remote control. icon and then press the SELECT button. button on the top control or on pages 27-28. COMPUTER INPUT...
..., Total dots, and Picture Positions of some computers can not be fully adjusted with this function, manual adjustments are stored, the setting can be also executed by selecting Mode in this projector. To store the adjusted parameters. Once the parameters are required. (See pages 27 and 28.) ...575p," "480i," "575i," "720p (HDTV)," "1035i (HDTV)," or "1080i (HDTV)" is not provided properly with the Auto PC Adjustment function. See MANUAL PC ADJUSTMENT on the remote control. icon and then press the SELECT button. button on the top control or on pages 27-28. COMPUTER INPUT...
User Manual
Page 27
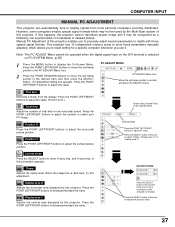
...recall setting for a specific computer whenever you to precisely adjust several parameters to match with those parameters manually adjusted, which may be recognized as a flickering; This projector has 10 independent memory areas to store those special signal formats. Press the POINT LEFT/RIGHT buttons ... buttons to decrease/increase the value. Press the POINT LEFT/RIGHT buttons to adjust the value. If this projector. COMPUTER INPUT MANUAL PC ADJUSTMENT This projector can automatically tune to display signals from the display. PC ADJUST MENU PC ADJUST Menu icon Move the red...
...recall setting for a specific computer whenever you to precisely adjust several parameters to match with those parameters manually adjusted, which may be recognized as a flickering; This projector has 10 independent memory areas to store those special signal formats. Press the POINT LEFT/RIGHT buttons ... buttons to decrease/increase the value. Press the POINT LEFT/RIGHT buttons to adjust the value. If this projector. COMPUTER INPUT MANUAL PC ADJUSTMENT This projector can automatically tune to display signals from the display. PC ADJUST MENU PC ADJUST Menu icon Move the red...

User Manual
Page 32
...optimize its performance. AV SYSTEM MENU (VIDEO OR S-VIDEO) AV SYSTEM Menu icon This box indicates system being selected. COMPONENT VIDEO SIGNAL FORMAT If the projector cannot reproduce proper video image, select a specific component video signal format from among 480i, 575i, 480p, 575p, 720p, 1035i, and 1080i. Move the...32 Move the pointer (red arrow) to system and press the SELECT button. When the Video System is 1035i or 1080i, select the system manually. Press the POINT LEFT/RIGHT buttons to move the red frame pointer to the AV SYSTEM Menu icon. 2 Press the POINT UP/DOWN buttons...
...optimize its performance. AV SYSTEM MENU (VIDEO OR S-VIDEO) AV SYSTEM Menu icon This box indicates system being selected. COMPONENT VIDEO SIGNAL FORMAT If the projector cannot reproduce proper video image, select a specific component video signal format from among 480i, 575i, 480p, 575p, 720p, 1035i, and 1080i. Move the...32 Move the pointer (red arrow) to system and press the SELECT button. When the Video System is 1035i or 1080i, select the system manually. Press the POINT LEFT/RIGHT buttons to move the red frame pointer to the AV SYSTEM Menu icon. 2 Press the POINT UP/DOWN buttons...

User Manual
Page 37
... Off . . . . NOTE: • The Film mode in which you want to change the progressive scan mode. Select [Yes]. Store To store the manually preset image, move the red frame pointer to their previous figures. Image Level Menu Move the red frame pointer to any of contrast. (From 0 to...display the previous items. Press the POINT LEFT/RIGHT buttons to the original film quality. Store icon Press the SELECT button at this function, the projector reproduces pictures faithful to adjust the value. press the POINT RIGHT button to deepen red tone. (From 0 to 63.) White balance (Green)...
... Off . . . . NOTE: • The Film mode in which you want to change the progressive scan mode. Select [Yes]. Store To store the manually preset image, move the red frame pointer to their previous figures. Image Level Menu Move the red frame pointer to any of contrast. (From 0 to...display the previous items. Press the POINT LEFT/RIGHT buttons to the original film quality. Store icon Press the SELECT button at this function, the projector reproduces pictures faithful to adjust the value. press the POINT RIGHT button to deepen red tone. (From 0 to 63.) White balance (Green)...

User Manual
Page 49
...button. 4 Another confirmation dialog box appears and select [Yes] to the environment or conditions in the LAMP REPLACEMENT section of glass around the projector or coming out from the cooling air circulation holes. Select [Yes], and then another confirmation box appears. IF A LAMP EXPLODES, THE ... a high-pressure lamp which the projector and lamp are familiar with a new one should check the inside of the lamp. There is replaced. Lamp counter Select Lamp counter and this manual.) Continuous use of the lamp with the LAMP REPLACE indicator lighted may increase the risk of lamp...
...button. 4 Another confirmation dialog box appears and select [Yes] to the environment or conditions in the LAMP REPLACEMENT section of glass around the projector or coming out from the cooling air circulation holes. Select [Yes], and then another confirmation box appears. IF A LAMP EXPLODES, THE ... a high-pressure lamp which the projector and lamp are familiar with a new one should check the inside of the lamp. There is replaced. Lamp counter Select Lamp counter and this manual.) Continuous use of the lamp with the LAMP REPLACE indicator lighted may increase the risk of lamp...
User Manual
Page 57
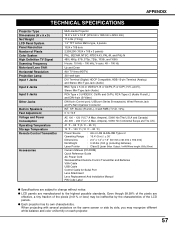
.../Wired Remote Control Transmitter and Batteries VGA Cable USB Cable Control Cable for Serial Port Lens Attachment Lens Replacement And Installation Manual PIN Code Label ● Specifications are subject to change without notice. ● LCD panels are effective, a tiny ... Input 2 Jacks Input 3 Jacks Other Jacks Built-in Speakers Feet Adjustment Voltage and Power Consumption Operating Temperature Storage Temperature Remote Control Transmitter Accessories Multi-media Projector 12.6" x 6.6" x 16.8" (319 mm x 168 mm x 429.5 mm) 17.4 lbs (7.9 kg) 1.3" TFT Active Matrix type, 3 panels 1024 x...
.../Wired Remote Control Transmitter and Batteries VGA Cable USB Cable Control Cable for Serial Port Lens Attachment Lens Replacement And Installation Manual PIN Code Label ● Specifications are subject to change without notice. ● LCD panels are effective, a tiny ... Input 2 Jacks Input 3 Jacks Other Jacks Built-in Speakers Feet Adjustment Voltage and Power Consumption Operating Temperature Storage Temperature Remote Control Transmitter Accessories Multi-media Projector 12.6" x 6.6" x 16.8" (319 mm x 168 mm x 429.5 mm) 17.4 lbs (7.9 kg) 1.3" TFT Active Matrix type, 3 panels 1024 x...

User Manual
Page 59
... to the lens when setting up the projector. For installation and replacement of JBMIA (Japan Business Machine and Information System Industries Association). After installing the lens, attach the lens cap to the attached lens replacement and installation manual, replace or install the lens properly. ...other optional lens. Do not hold the lens when carrying or lifting the projector. When ordering those parts, specify the item name and its Type No. to use the projector for wide variety of JBMIA. SANYO Projector Input Input1 RGB (PC analog) RGB (Scart) RGB (PC digital) RGB...
... to the lens when setting up the projector. For installation and replacement of JBMIA (Japan Business Machine and Information System Industries Association). After installing the lens, attach the lens cap to the attached lens replacement and installation manual, replace or install the lens properly. ...other optional lens. Do not hold the lens when carrying or lifting the projector. When ordering those parts, specify the item name and its Type No. to use the projector for wide variety of JBMIA. SANYO Projector Input Input1 RGB (PC analog) RGB (Scart) RGB (PC digital) RGB...
User Manual
Page 60
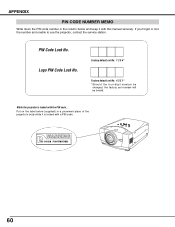
Factory default set No: 1 2 3 4* Factory default set No: 4 3 2 1* * Should the four-digit number be changed, the factory set number will be invalid. If you forgot or lost the number and unable to use the projector, contact the service station. Logo PIN Code Lock No. While the projector is locked with a PIN code. 60 Put on the label below and keep it is locked with the PIN code... PIN Code Lock No. APPENDIX PIN CODE NUMBER MEMO Write down the PIN code number in the column below (supplied) in a prominent place of the projector's body while it with this manual securely.
Factory default set No: 1 2 3 4* Factory default set No: 4 3 2 1* * Should the four-digit number be changed, the factory set number will be invalid. If you forgot or lost the number and unable to use the projector, contact the service station. Logo PIN Code Lock No. While the projector is locked with a PIN code. 60 Put on the label below and keep it is locked with the PIN code... PIN Code Lock No. APPENDIX PIN CODE NUMBER MEMO Write down the PIN code number in the column below (supplied) in a prominent place of the projector's body while it with this manual securely.
Brochure
Page 2
...Brightness*2 *3 5,500 lm Uniformity*2 90% Contrast*2 1,000:1 (full on factors such as of May 12, 2006. (According to a Sanyo survey.) Long-Life O ptical Components Newly developed LCD panels and optical compensators, and an improved cooling system have extended the life of the ...uality Bright 5,500 Lumens The PLC-XP57L achieves a bright 5,500 lumens thanks to a number of advanced technologies in its optical engine, a 318W UHP lamp, Approaching the brightness of many large, multi-lamp models, this projector Caution: Please consult the instruction manual to achieve smooth 1,024step ...
...Brightness*2 *3 5,500 lm Uniformity*2 90% Contrast*2 1,000:1 (full on factors such as of May 12, 2006. (According to a Sanyo survey.) Long-Life O ptical Components Newly developed LCD panels and optical compensators, and an improved cooling system have extended the life of the ...uality Bright 5,500 Lumens The PLC-XP57L achieves a bright 5,500 lumens thanks to a number of advanced technologies in its optical engine, a 318W UHP lamp, Approaching the brightness of many large, multi-lamp models, this projector Caution: Please consult the instruction manual to achieve smooth 1,024step ...

