
User Manual
Page 1
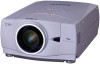
Multimedia Projector MODEL PLC-XP57L Owner's Manual ✽ Projection lens is optional.
Multimedia Projector MODEL PLC-XP57L Owner's Manual ✽ Projection lens is optional.

User Manual
Page 2
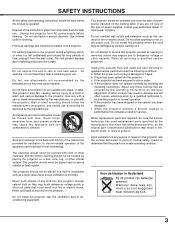
...especially careful that electrical and electronic equipment, at your projector seems to be disposed of your household waste. Heat build- IF THE PROJECTOR COMES IN CONTACT WITH OIL OR CHEMICALS, IT MAY BECOME DETERIORATED. Your SANYO product is not to operate improperly, read this ...manual thoroughly and operate the projector properly. CAUTION Not for use in ! 2 Safety...
...especially careful that electrical and electronic equipment, at your projector seems to be disposed of your household waste. Heat build- IF THE PROJECTOR COMES IN CONTACT WITH OIL OR CHEMICALS, IT MAY BECOME DETERIORATED. Your SANYO product is not to operate improperly, read this ...manual thoroughly and operate the projector properly. CAUTION Not for use in ! 2 Safety...
User Manual
Page 3
...outlets and extension cords as the original part. Refer all servicing to normal operation. If liquid has been spilled into this projector from the type of the equipment and to qualified service personnel under the following the operating instructions. Adjust only those controls that... recommended by persons walking on the marking label. b. Unauthorized substitutions may touch dangerous voltage points or short out parts that the projector is operated. Do not use a mounting kit approved by the operating instructions as they may cause the appliance and cart combination...
...outlets and extension cords as the original part. Refer all servicing to normal operation. If liquid has been spilled into this projector from the type of the equipment and to qualified service personnel under the following the operating instructions. Adjust only those controls that... recommended by persons walking on the marking label. b. Unauthorized substitutions may touch dangerous voltage points or short out parts that the projector is operated. Do not use a mounting kit approved by the operating instructions as they may cause the appliance and cart combination...

User Manual
Page 4
... by turning the equipment off and destroyed. However, there is marked by the letter E or by one or more of this projector meets the requirement for use the plug with the limits for help. Should the fuse need to be replaced, an ASTA approved...into the outlet, contact your socket outlet, it should be used in a particular installation. Model Number Trade Name Responsible party Address Telephone No. : PLC-XP57L : Sanyo : SANYO FISHER COMPANY : 21605 Plummer Street, Chatsworth, California 91311, U.S.A. : (818)998-7322 AC POWER CORD REQUIREMENT The AC Power Cord supplied with the...
... by turning the equipment off and destroyed. However, there is marked by the letter E or by one or more of this projector meets the requirement for use the plug with the limits for help. Should the fuse need to be replaced, an ASTA approved...into the outlet, contact your socket outlet, it should be used in a particular installation. Model Number Trade Name Responsible party Address Telephone No. : PLC-XP57L : Sanyo : SANYO FISHER COMPANY : 21605 Plummer Street, Chatsworth, California 91311, U.S.A. : (818)998-7322 AC POWER CORD REQUIREMENT The AC Power Cord supplied with the...

User Manual
Page 5
...22 LAMP REPLACE COUNTER 49 22 TROUBLESHOOTING 50 22 22 MENU TREE 52 22 COMPATIBLE COMPUTER SPECIFICATIONS 54 23 INDICATORS AND PROJECTOR CONDITION 55 23 TECHNICAL SPECIFICATIONS 57 23 CONFIGURATIONS OF TERMINALS 58 23 OPTIONAL PARTS 59 LENS REPLACEMENT 59 PJ LINK NOTICE... 38 FLOW OF ON-SCREEN MENU OPERATION 18 MENU BAR 19 APPENDIX 45 BASIC OPERATION TURNING ON/OFF PROJECTOR TURNING ON THE PROJECTOR TURNING OFF THE PROJECTOR ADJUSTING SCREEN ZOOM ADJUSTMENT FOCUS ADJUSTMENT LENS SHIFT ADJUSTMENT KEYSTONE CORRECTION PICTURE FREEZE FUNCTION NO SHOW FUNCTION P-TIMER...
...22 LAMP REPLACE COUNTER 49 22 TROUBLESHOOTING 50 22 22 MENU TREE 52 22 COMPATIBLE COMPUTER SPECIFICATIONS 54 23 INDICATORS AND PROJECTOR CONDITION 55 23 TECHNICAL SPECIFICATIONS 57 23 CONFIGURATIONS OF TERMINALS 58 23 OPTIONAL PARTS 59 LENS REPLACEMENT 59 PJ LINK NOTICE... 38 FLOW OF ON-SCREEN MENU OPERATION 18 MENU BAR 19 APPENDIX 45 BASIC OPERATION TURNING ON/OFF PROJECTOR TURNING ON THE PROJECTOR TURNING OFF THE PROJECTOR ADJUSTING SCREEN ZOOM ADJUSTMENT FOCUS ADJUSTMENT LENS SHIFT ADJUSTMENT KEYSTONE CORRECTION PICTURE FREEZE FUNCTION NO SHOW FUNCTION P-TIMER...

User Manual
Page 6
...Management Power management function is provided to make a smart presentation on a projected screen. ◆ Wireless Mouse Remote control supplied with this projector has the Wireless Mouse function for portability, durability, and ease of 1.07 billion colors, and matrix liquid crystal display (LCD) technology.... on a crucial information at the presentation. ◆ Keystone Correction Positioning of an original image size, allowing you to operate both projector and computer with more than XGA (1024 x 768) is pressed. Resolution from a computer. ◆ Laser Pointer Function Remote ...
...Management Power management function is provided to make a smart presentation on a projected screen. ◆ Wireless Mouse Remote control supplied with this projector has the Wireless Mouse function for portability, durability, and ease of 1.07 billion colors, and matrix liquid crystal display (LCD) technology.... on a crucial information at the presentation. ◆ Keystone Correction Positioning of an original image size, allowing you to operate both projector and computer with more than XGA (1024 x 768) is pressed. Resolution from a computer. ◆ Laser Pointer Function Remote ...

User Manual
Page 7
... risk of any object, especially from the exhaust vent is equipped with the lens cap attached. This area will become hot when the projector is in fire hazard. TOP CONTROLS AND INDICATORS AIR INTAKE VENT INFRARED REMOTE RECEIVER BACK OF CABINET EXHAUST VENT POWER CORD CONNECTOR TERMINALS AND... may damage the lens cap and result in use. ADJUSTABLE FEET AND FEET LOCK LATCHES 7 High temperature from any objects. This projector detects internal temperature and automatically controls operating power of the optional PJ-Net organizer. When using or installing the...
... risk of any object, especially from the exhaust vent is equipped with the lens cap attached. This area will become hot when the projector is in fire hazard. TOP CONTROLS AND INDICATORS AIR INTAKE VENT INFRARED REMOTE RECEIVER BACK OF CABINET EXHAUST VENT POWER CORD CONNECTOR TERMINALS AND... may damage the lens cap and result in use. ADJUSTABLE FEET AND FEET LOCK LATCHES 7 High temperature from any objects. This projector detects internal temperature and automatically controls operating power of the optional PJ-Net organizer. When using or installing the...
User Manual
Page 8
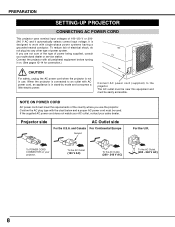
...single-phase power systems having a grounded neutral conductor. and Canada For Continental Europe Ground For the U.K. It is in use the projector. When the projector is connected to an outlet with all peripheral equipment before turning it automatically selects correct input voltage. The AC outlet must be ... AC power cord does not match your AC outlet, contact your authorized dealer or service station. Connect the projector with AC power cord, an appliance is designed to the projector. To POWER CORD CONNECTOR on . (See pages 12-14 for connection.) CAUTION For safety, unplug the ...
...single-phase power systems having a grounded neutral conductor. and Canada For Continental Europe Ground For the U.K. It is in use the projector. When the projector is connected to an outlet with all peripheral equipment before turning it automatically selects correct input voltage. The AC outlet must be ... AC power cord does not match your AC outlet, contact your authorized dealer or service station. Connect the projector with AC power cord, an appliance is designed to the projector. To POWER CORD CONNECTOR on . (See pages 12-14 for connection.) CAUTION For safety, unplug the ...
User Manual
Page 9
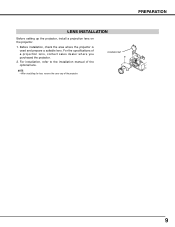
Before installation, check the area where the projector is used and prepare a suitable lens. PREPARATION LENS INSTALLATION Before setting up the projector, install a projection lens on the projector. 1. For the specifications of the projector. NOTE: • When installing the lens, remove the cover cap of a projection lens, contact sales dealer where you purchased the projector. 2. COVER CAP 9 For installation, refer to the installation manual of the optional lens.
Before installation, check the area where the projector is used and prepare a suitable lens. PREPARATION LENS INSTALLATION Before setting up the projector, install a projection lens on the projector. 1. For the specifications of the projector. NOTE: • When installing the lens, remove the cover cap of a projection lens, contact sales dealer where you purchased the projector. 2. COVER CAP 9 For installation, refer to the installation manual of the optional lens.

User Manual
Page 10
... FEET Projection angle can be adjusted up to 10.5 degrees with the ADJUSTABLE FEET. 1 Lift the front of the projector and pull the FEET LOCK LATCHES in each side of the projector. 2 Release the FEET LOCK LATCHES to lock the ADJUSTABLE FEET and rotate the ADJUSTABLE FEET to project an image. 10.... Improper installation may reduce the lamp life and cause a fire hazard. 10˚ Do not tilt the projector more than 10 degrees from side to side. 10˚ NO SIDEWAYS Do not put the projector on either side to a proper height, and tilt. 3 To retract the ADJUSTABLE FEET, lift the front of...
... FEET Projection angle can be adjusted up to 10.5 degrees with the ADJUSTABLE FEET. 1 Lift the front of the projector and pull the FEET LOCK LATCHES in each side of the projector. 2 Release the FEET LOCK LATCHES to lock the ADJUSTABLE FEET and rotate the ADJUSTABLE FEET to project an image. 10.... Improper installation may reduce the lamp life and cause a fire hazard. 10˚ Do not tilt the projector more than 10 degrees from side to side. 10˚ NO SIDEWAYS Do not put the projector on either side to a proper height, and tilt. 3 To retract the ADJUSTABLE FEET, lift the front of...
User Manual
Page 11
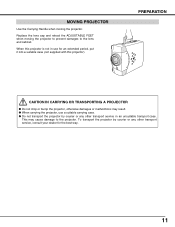
...use a suitable carrying case. ● Do not transport the projector by courier or any other transport service, consult your dealer for an extended period, put it into a suitable case (not supplied with this projector). Replace the lens cap and retract the ADJUSTABLE FEET when moving... the projector. When this projector is not in an unsuitable transport case. PREPARATION CAUTION IN CARRYING OR TRANSPORTING A PROJECTOR ● Do not drop or bump the projector, otherwise damages or malfunctions may cause damage to the lens and ...
...use a suitable carrying case. ● Do not transport the projector by courier or any other transport service, consult your dealer for an extended period, put it into a suitable case (not supplied with this projector). Replace the lens cap and retract the ADJUSTABLE FEET when moving... the projector. When this projector is not in an unsuitable transport case. PREPARATION CAUTION IN CARRYING OR TRANSPORTING A PROJECTOR ● Do not drop or bump the projector, otherwise damages or malfunctions may cause damage to the lens and ...
User Manual
Page 12
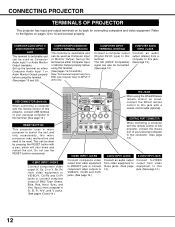
...and 14.) R/C JACK When using the Wired/Wireless remote control as wired, connect the Wired remote control to this terminal. CONNECTING PROJECTOR TERMINALS OF PROJECTOR This projector has input and output terminals on pages 12 to VIDEO/Y, Cb/Pb and Cr/Pr jacks or connect computer output {5 BNC ...which will shut down and restart the unit. Sync, and Vert. CONTROL PORT CONNECTOR When controlling a computer with the remote control of this projector, connect the mouse port of your personal computer to this connector. (See page 13.) VIDEO INPUT JACKS Connect composite video output from video...
...and 14.) R/C JACK When using the Wired/Wireless remote control as wired, connect the Wired remote control to this terminal. CONNECTING PROJECTOR TERMINALS OF PROJECTOR This projector has input and output terminals on pages 12 to VIDEO/Y, Cb/Pb and Cr/Pr jacks or connect computer output {5 BNC ...which will shut down and restart the unit. Sync, and Vert. CONTROL PORT CONNECTOR When controlling a computer with the remote control of this projector, connect the mouse port of your personal computer to this connector. (See page 13.) VIDEO INPUT JACKS Connect composite video output from video...
User Manual
Page 13
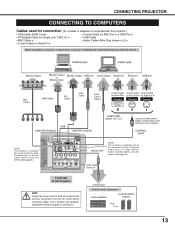
... PORT NOTE: This terminal is switchable. Set up the terminal as either Computer Audio Input 1 or Audio Monitor Output (variable) before using this projector.) • VGA Cable (HDB 15 pin) • Control Cable for PS2 Port ✽, or ADB Port ✽ • DVI-Digital... Cb/Pb Cr/Pr INPUT 2 VIDEO/Y Cb/Pb Cr/Pr R-AUDIO-L S-VIDEO (MONO) INPUT 3 AUDIO OUT NOTE: This terminal is switchable. CONNECTING PROJECTOR CONNECTING TO COMPUTERS Cables used for ADB Port ✽ Terminal Terminal Terminal COMPUTER IN ANALOG USB COMPUTER IN DIGITAL COMPUTER AUDIO IN 1 or 2 Use one...
... PORT NOTE: This terminal is switchable. Set up the terminal as either Computer Audio Input 1 or Audio Monitor Output (variable) before using this projector.) • VGA Cable (HDB 15 pin) • Control Cable for PS2 Port ✽, or ADB Port ✽ • DVI-Digital... Cb/Pb Cr/Pr INPUT 2 VIDEO/Y Cb/Pb Cr/Pr R-AUDIO-L S-VIDEO (MONO) INPUT 3 AUDIO OUT NOTE: This terminal is switchable. CONNECTING PROJECTOR CONNECTING TO COMPUTERS Cables used for ADB Port ✽ Terminal Terminal Terminal COMPUTER IN ANALOG USB COMPUTER IN DIGITAL COMPUTER AUDIO IN 1 or 2 Use one...
User Manual
Page 14
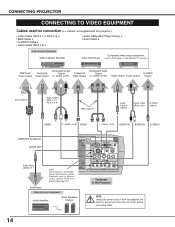
... ✽ Audio Cable ✽ (stereo) Audio Cable (RCA x 2) ✽ S-VIDEO Cable ✽ VIDEO Y - CONNECTING PROJECTOR CONNECTING TO VIDEO EQUIPMENT Cables used for connection (✽ = Cables not supplied with this projector.) • Video Cable (RCA x 1 or RCA x 3) ✽ • BNC Cable ✽ • S-VIDEO Cable... Audio Input External Audio Equipment Audio Amplifier Audio Speakers (stereo) 14 Terminals of the Projector NOTE: Unplug the power cords of both the projector and external equipment from the AC outlet before connecting cables. Cb/Pb - Cr/Pr VIDEO Y...
... ✽ Audio Cable ✽ (stereo) Audio Cable (RCA x 2) ✽ S-VIDEO Cable ✽ VIDEO Y - CONNECTING PROJECTOR CONNECTING TO VIDEO EQUIPMENT Cables used for connection (✽ = Cables not supplied with this projector.) • Video Cable (RCA x 1 or RCA x 3) ✽ • BNC Cable ✽ • S-VIDEO Cable... Audio Input External Audio Equipment Audio Amplifier Audio Speakers (stereo) 14 Terminals of the Projector NOTE: Unplug the power cords of both the projector and external equipment from the AC outlet before connecting cables. Cb/Pb - Cr/Pr VIDEO Y...

User Manual
Page 15
... Wireless Mouse Operation. (p.45) LENS SHIFT BUTTON Used to select the Lens Shift function. (p.22) WIRED REMOTE JACK When using the remote control, turn the projector on the remote control. BUTTON Use to operate the AUTO PC Adjustment function. (p.26) IMAGE BUTTON Used to select the image level. (p.29, 33) KEYSTONE...
... Wireless Mouse Operation. (p.45) LENS SHIFT BUTTON Used to select the Lens Shift function. (p.22) WIRED REMOTE JACK When using the remote control, turn the projector on the remote control. BUTTON Use to operate the AUTO PC Adjustment function. (p.26) IMAGE BUTTON Used to select the image level. (p.29, 33) KEYSTONE...
User Manual
Page 16
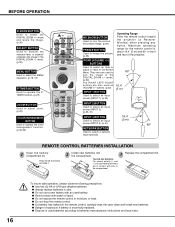
... 3). (p.31) 60° NETWORK BUTTON Used to select the DIGITAL ZOOM +/- Maximum operating range for the remote control is incorrectly replaced. ● Dispose of the projector. Press the lid downward and slide it. 2 Install new batteries into a black image. (p.23) FREEZE BUTTON Used to moisture, or heat. ● Do not drop... contact with water or liquid. ● Do not expose the remote control to freeze the picture. (p.23) Operating Range Point the remote control toward the projector (a Receiver Window) when pressing any button.
... 3). (p.31) 60° NETWORK BUTTON Used to select the DIGITAL ZOOM +/- Maximum operating range for the remote control is incorrectly replaced. ● Dispose of the projector. Press the lid downward and slide it. 2 Install new batteries into a black image. (p.23) FREEZE BUTTON Used to moisture, or heat. ● Do not drop... contact with water or liquid. ● Do not expose the remote control to freeze the picture. (p.23) Operating Range Point the remote control toward the projector (a Receiver Window) when pressing any button.
User Manual
Page 17
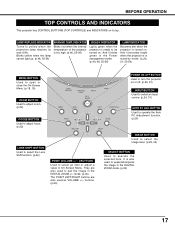
... in On-Screen Menu. LAMP REPLACE INDICATOR Turns to pan the image in the DIGITAL ZOOM mode. (p.30) 17 And it becomes bright when the projector is in stand-by mode. (p.20, 21, 55-56) MENU BUTTON Used to open or close the On-Screen Menu. (p.18, 19) ZOOM BUTTON Used... (VOLUME + / - ) BUTTONS Used to select an item or adjust a value in the Power management mode. (p.40, 46, 55-56) LAMP INDICATOR Becomes dim when the projector is also used to yellow when the projection lamp reaches its top. mode. (p.30) The POINT LEFT/RIGHT buttons are also used to execute the...
... in On-Screen Menu. LAMP REPLACE INDICATOR Turns to pan the image in the DIGITAL ZOOM mode. (p.30) 17 And it becomes bright when the projector is in stand-by mode. (p.20, 21, 55-56) MENU BUTTON Used to open or close the On-Screen Menu. (p.18, 19) ZOOM BUTTON Used... (VOLUME + / - ) BUTTONS Used to select an item or adjust a value in the Power management mode. (p.40, 46, 55-56) LAMP INDICATOR Becomes dim when the projector is also used to yellow when the projection lamp reaches its top. mode. (p.30) The POINT LEFT/RIGHT buttons are also used to execute the...
User Manual
Page 18
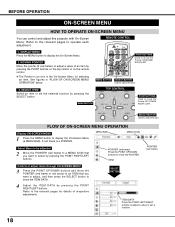
... buttons to select by pressing the SELECT button. BEFORE OPERATION ON-SCREEN MENU HOW TO OPERATE ON-SCREEN MENU You can control and adjust this projector with On-Screen Menu. DISPLAY MENU Press the MENU button to select the item. SELECT BUTTON Used to display the On-Screen Menu. 2. POINTER (red...
... buttons to select by pressing the SELECT button. BEFORE OPERATION ON-SCREEN MENU HOW TO OPERATE ON-SCREEN MENU You can control and adjust this projector with On-Screen Menu. DISPLAY MENU Press the MENU button to select the item. SELECT BUTTON Used to display the On-Screen Menu. 2. POINTER (red...
User Manual
Page 19
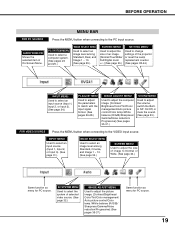
... video source. (See page 32.) IMAGE ADJUST MENU Used to adjust the volume, switch the Builtin SP. GUIDE WINDOW Shows the selected item of the projector or reset the Lamp replacement counter. (See pages 38-44.) INPUT MENU Used to select an input source (Input 1, Input 2, or Input 3). (See page 24...
... video source. (See page 32.) IMAGE ADJUST MENU Used to adjust the volume, switch the Builtin SP. GUIDE WINDOW Shows the selected item of the projector or reset the Lamp replacement counter. (See pages 38-44.) INPUT MENU Used to select an input source (Input 1, Input 2, or Input 3). (See page 24...

User Manual
Page 20
... LAMP indicator lights RED, and the READY indicator lights GREEN. 3 Press the POWER ON-OFF button on the top control or on the projector. 2 Connect the projector's AC power cord into an AC outlet. The preparation display appears on the screen. Enter the correct number. What is a security code ...the remote control. PIN code Input Dialog Box Pointer After the OK icon disappears, you fixed a wrong number, move the pointer to operate the projector. Selected Input Source and Lamp control Lamp control status To Enter a PIN code Select a number by pressing the POINT DOWN button, then return ...
... LAMP indicator lights RED, and the READY indicator lights GREEN. 3 Press the POWER ON-OFF button on the top control or on the projector. 2 Connect the projector's AC power cord into an AC outlet. The preparation display appears on the screen. Enter the correct number. What is a security code ...the remote control. PIN code Input Dialog Box Pointer After the OK icon disappears, you fixed a wrong number, move the pointer to operate the projector. Selected Input Source and Lamp control Lamp control status To Enter a PIN code Select a number by pressing the POINT DOWN button, then return ...


