
User Manual
Page 1
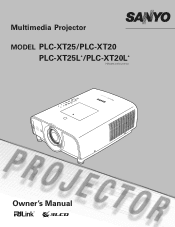
Multimedia Projector MODEL PLC-XT25/PLC-XT20 PLC-XT25L*/PLC-XT20L* (*Models without lens.) Owner's Manual
Multimedia Projector MODEL PLC-XT25/PLC-XT20 PLC-XT25L*/PLC-XT20L* (*Models without lens.) Owner's Manual
User Manual
Page 2
...manual are also available. ◆ Simple Computer System Setting The projector has the Multi-scan system to conform to ensure security of lens options, etc. ◆ Power Management The Power management function reduces power consumption and maintains lamp life (p.58). ◆ Multilanguage ... Lamp and filter maintenance functions provide for the screen logo and use Remote Control Use the remote control as wired and wireless, or as lens shifting, ceiling and rear projection, 360-degree projection, variety of the projector. English, German, French, Italian, Spanish, Portuguese, Dutch, ...
...manual are also available. ◆ Simple Computer System Setting The projector has the Multi-scan system to conform to ensure security of lens options, etc. ◆ Power Management The Power management function reduces power consumption and maintains lamp life (p.58). ◆ Multilanguage ... Lamp and filter maintenance functions provide for the screen logo and use Remote Control Use the remote control as wired and wireless, or as lens shifting, ceiling and rear projection, 360-degree projection, variety of the projector. English, German, French, Italian, Spanish, Portuguese, Dutch, ...

User Manual
Page 3
...Control Battery Installation 18 Remote Control Receivers and Operating Range 18 Adjustable Feet 18 Installation 19 Lens Installation 19 Positioning the Projector 20 Moving the Lens 20 Connecting the AC Power Cord 21 Connecting to a Computer (Digital and Analog RGB) ...Filter 64 Resetting the Filter Counter 64 Lamp Replacement 65 Resetting the Lamp Counter 66 Warning Indicator 67 Cleaning the Projection Lens 68 Cleaning the Projector Cabinet 68 Appendix 69 Troubleshooting 69 Menu Tree 71 Indicators and Projector Condition 73 Compatible Computer Specifications...
...Control Battery Installation 18 Remote Control Receivers and Operating Range 18 Adjustable Feet 18 Installation 19 Lens Installation 19 Positioning the Projector 20 Moving the Lens 20 Connecting the AC Power Cord 21 Connecting to a Computer (Digital and Analog RGB) ...Filter 64 Resetting the Filter Counter 64 Lamp Replacement 65 Resetting the Lamp Counter 66 Warning Indicator 67 Cleaning the Projection Lens 68 Cleaning the Projector Cabinet 68 Appendix 69 Troubleshooting 69 Menu Tree 71 Indicators and Projector Condition 73 Compatible Computer Specifications...
User Manual
Page 4
..., contact the dealer where you to conserve the environment we live in! Your SANYO product is critical for an extended time, unplug the projector from your projector seems to be built into the lens as much as defined in the Standard for the Protection of Electronic Computer/Data... in the "Troubleshooting" section in the back of this booklet. CAUTION ON HANGING FROM THE CEILING When hanging the projector from the projection lens. Heat build-up can reduce the service life of your local community waste collection/recycling centre. Improper operation may result in fire hazard. ...
..., contact the dealer where you to conserve the environment we live in! Your SANYO product is critical for an extended time, unplug the projector from your projector seems to be built into the lens as much as defined in the Standard for the Protection of Electronic Computer/Data... in the "Troubleshooting" section in the back of this booklet. CAUTION ON HANGING FROM THE CEILING When hanging the projector from the projection lens. Heat build-up can reduce the service life of your local community waste collection/recycling centre. Improper operation may result in fire hazard. ...
User Manual
Page 8
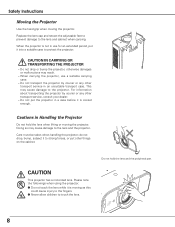
.... For information about transporting the projector by courier or any other transport service, consult your dealer. - Do not put it to the lens and the projector. CAUTION IN CARRYING OR TRANSPORTING THE PROJECTOR - Cautions in a case before it is cooled enough. Please note the followings... when using the projector. ● Do not touch the lens while it is moving the projector. Care must be taken when handling the projector; Do not drop or bump the projector, otherwise damages ...
.... For information about transporting the projector by courier or any other transport service, consult your dealer. - Do not put it to the lens and the projector. CAUTION IN CARRYING OR TRANSPORTING THE PROJECTOR - Cautions in a case before it is cooled enough. Please note the followings... when using the projector. ● Do not touch the lens while it is moving the projector. Care must be taken when handling the projector; Do not drop or bump the projector, otherwise damages ...
User Manual
Page 10
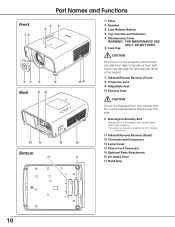
... Intake Vent !7 Hand Grip 10 Part Names and Functions Front qw rt e yu i o Back !1 !2 !0 ✽ !3 !4 !5 !6 Bottom !7 o q Filter w Speaker e Lens Release Button r Top Controls and Indicators t Maintenance Cover WARNING: FOR MAINTENANCE USE ONLY. DO NOT OPEN.... y Lens Cap CAUTION Do not turn on the projector with the lens cap attached. u Infrared Remote Receiver (Front) i Projection Lens o Adjustable Feet !0 Exhaust Vent CAUTION Hot air is a registered trademark of the projector...
... Intake Vent !7 Hand Grip 10 Part Names and Functions Front qw rt e yu i o Back !1 !2 !0 ✽ !3 !4 !5 !6 Bottom !7 o q Filter w Speaker e Lens Release Button r Top Controls and Indicators t Maintenance Cover WARNING: FOR MAINTENANCE USE ONLY. DO NOT OPEN.... y Lens Cap CAUTION Do not turn on the projector with the lens cap attached. u Infrared Remote Receiver (Front) i Projection Lens o Adjustable Feet !0 Exhaust Vent CAUTION Hot air is a registered trademark of the projector...
User Manual
Page 13
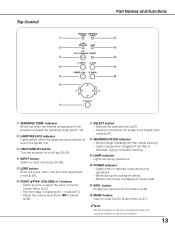
... + mode (p.51). - w LAMP REPLACE indicator Lights yellow when the projection lamp reaches its end of the filter is detected, urging immediate cleaning. t LENS button Enter the focus, zoom, and lens shift adjustment mode (p.29). Expand or compress the image in the OnScreen Menu (p.27). - Lights orange when clogging of life (pp.65...
... + mode (p.51). - w LAMP REPLACE indicator Lights yellow when the projection lamp reaches its end of the filter is detected, urging immediate cleaning. t LENS button Enter the focus, zoom, and lens shift adjustment mode (p.29). Expand or compress the image in the OnScreen Menu (p.27). - Lights orange when clogging of life (pp.65...

User Manual
Page 15
... PIN code numbers (pp. 25, 56-57, 60-61). 15 Display the Pointer on the screen (p.32). @2 KEYSTONE button Correct keystone distortion (p.32). @3 LENS SHIFT button Select the Lens Shift function (p.31). @4 SCREEN button Select the screen size (p.31). @5 R-CLICK button Acts as number buttons. Expand or compress the image in and...
... PIN code numbers (pp. 25, 56-57, 60-61). 15 Display the Pointer on the screen (p.32). @2 KEYSTONE button Correct keystone distortion (p.32). @3 LENS SHIFT button Select the Lens Shift function (p.31). @4 SCREEN button Select the screen size (p.31). @5 R-CLICK button Acts as number buttons. Expand or compress the image in and...

User Manual
Page 19
... following the instructions below. Removing the lens 1 Shift the lens to the projector. CAUTION Be careful when handling the lens. Ask the sales dealer for detailed information of the optional lens specifications. Lens Release button 19 Installation Lens Installation When replacing the lens or using an optional lens, install the lens by using the Lens shift function (see page 29...
... following the instructions below. Removing the lens 1 Shift the lens to the projector. CAUTION Be careful when handling the lens. Ask the sales dealer for detailed information of the optional lens specifications. Lens Release button 19 Installation Lens Installation When replacing the lens or using an optional lens, install the lens by using the Lens shift function (see page 29...

User Manual
Page 20
...(8.7 m) 22.0' (6.7 m) 300" 6096 x 4572 ----- 32.8' (10.0 m) Moving the Lens For details about the Lens shift function, refer to "Lens Shift Adjustment" on the lens. The figures below . The projector should be set perpendicularly to the plane of lens shift range varies depending on page 29. It is recommended to obtain the... best image. •All measurements are for PLC-XT25/XT20) For projector positioning, see the figures below are ...
...(8.7 m) 22.0' (6.7 m) 300" 6096 x 4572 ----- 32.8' (10.0 m) Moving the Lens For details about the Lens shift function, refer to "Lens Shift Adjustment" on the lens. The figures below . The projector should be set perpendicularly to the plane of lens shift range varies depending on page 29. It is recommended to obtain the... best image. •All measurements are for PLC-XT25/XT20) For projector positioning, see the figures below are ...

User Manual
Page 29
...the INFO. To hide the information window, press the INFO. Basic Operation Operating with Projector Control Lens Operation The following lens operation can be made with the Lens button on the screen. ZOOM FOCUS Information Information display can also be different from the menu. Press... and V-sync freq. The information window can be used to display the information window on the screen. Top Control LENS button Lens Shift Adjustment Display "Lens shift" on the screen. Information Menu Information Menu * The H- The selected adjustment display appears on the top control...
...the INFO. To hide the information window, press the INFO. Basic Operation Operating with Projector Control Lens Operation The following lens operation can be made with the Lens button on the screen. ZOOM FOCUS Information Information display can also be different from the menu. Press... and V-sync freq. The information window can be used to display the information window on the screen. Top Control LENS button Lens Shift Adjustment Display "Lens shift" on the screen. Information Menu Information Menu * The H- The selected adjustment display appears on the top control...

User Manual
Page 31
...On-Screen Menu. The selected screen size symbol appears on the remote control to select the desired screen size. button POINT ed buttons SCREEN button LENS SHIFT button ✔Note: •See the next page for details. The computer screen adjustment can be done easily by pressing this button. ...Press the ZOOM buttons on the screen for details. SCREEN button Press the SCREEN buttons on the screen. button See page 29 for details. LENS SHIFT button See page 29 for some frequently used operations is advisable. FOCUS buttons Press the FOCUS buttons on the remote control to freeze ...
...On-Screen Menu. The selected screen size symbol appears on the remote control to select the desired screen size. button POINT ed buttons SCREEN button LENS SHIFT button ✔Note: •See the next page for details. The computer screen adjustment can be done easily by pressing this button. ...Press the ZOOM buttons on the screen for details. SCREEN button Press the SCREEN buttons on the screen. button See page 29 for details. LENS SHIFT button See page 29 for some frequently used operations is advisable. FOCUS buttons Press the FOCUS buttons on the remote control to freeze ...

User Manual
Page 68
.... Avoid using an excessive amount of the cabinet. When the cabinet is not in an appropriate carrying case to clean the lens. Abrasive cleaners, solvents, or other harsh chemicals might scratch the surface of cleaner. When the projector is heavily soiled, use , replace the... lens cap. Gently wipe the projection lens with a soft dry cleaning cloth. Avoid using an excessive amount of the lens. Cleaning the Projector Cabinet Unplug the AC power cord before cleaning. Maintenance and Filter ...
.... Avoid using an excessive amount of the cabinet. When the cabinet is not in an appropriate carrying case to clean the lens. Abrasive cleaners, solvents, or other harsh chemicals might scratch the surface of cleaner. When the projector is heavily soiled, use , replace the... lens cap. Gently wipe the projection lens with a soft dry cleaning cloth. Avoid using an excessive amount of the lens. Cleaning the Projector Cabinet Unplug the AC power cord before cleaning. Maintenance and Filter ...
User Manual
Page 69
...have properly connected the projector to peripheral equipment as described on . Provide proper distance between your computer or video equipment. Check the projection lens to display an image after the POWER indicator stops blinking. Moving the projector from the connected computer, restart the computer. In such cases,...needs cleaning. Make sure the temperature is turned on the projector. - Check the Ceiling function. No image Image is lit. - See on the projection lens. See page 67. - See page 59. - See page 68. - See pages 22-24. - See if the selected system is turned off ...
...have properly connected the projector to peripheral equipment as described on . Provide proper distance between your computer or video equipment. Check the projection lens to display an image after the POWER indicator stops blinking. Moving the projector from the connected computer, restart the computer. In such cases,...needs cleaning. Make sure the temperature is turned on the projector. - Check the Ceiling function. No image Image is lit. - See on the projection lens. See page 67. - See page 59. - See page 68. - See pages 22-24. - See if the selected system is turned off ...
User Manual
Page 77
..., and 1080i H-sync. 15 kHz-100 kHz, V-sync. 50 Hz-100 Hz Optical Information Projection Image Size (Diagonal) Throw Distance Projection Lens Projection Lamp Adjustable from 30" to 300" (PLC-XT25/PLC-XT20) 3.9'-32.8' (1.2 m-10.0 m) F=1.7 to 2.1, f=33 to 43 mm with motor zoom and focus 300 W Interface Input 1 Input 2 Input 3 AUDIO IN Analog...
..., and 1080i H-sync. 15 kHz-100 kHz, V-sync. 50 Hz-100 Hz Optical Information Projection Image Size (Diagonal) Throw Distance Projection Lens Projection Lamp Adjustable from 30" to 300" (PLC-XT25/PLC-XT20) 3.9'-32.8' (1.2 m-10.0 m) F=1.7 to 2.1, f=33 to 43 mm with motor zoom and focus 300 W Interface Input 1 Input 2 Input 3 AUDIO IN Analog...

User Manual
Page 78
... possible standards. Appendix Accessories Owner's Manual (CD-ROM) Quick Reference Guide AC Power Cord Remote Control and Batteries VGA Cable USB Cable Lens Cap (for PLC-XT25/XT20) Lens Mount Cover (for PLC-XT25L/XT20L) PIN Code Label ● The specifications are subject to change without notice. ● LCD panels are manufactured to the...
... possible standards. Appendix Accessories Owner's Manual (CD-ROM) Quick Reference Guide AC Power Cord Remote Control and Batteries VGA Cable USB Cable Lens Cap (for PLC-XT25/XT20) Lens Mount Cover (for PLC-XT25L/XT20L) PIN Code Label ● The specifications are subject to change without notice. ● LCD panels are manufactured to the...


