

User Manual
Page 3
... Cleaning the Projection Lens 68 Cleaning the Projector Cabinet 68 Appendix 69 Troubleshooting 69 Menu Tree 71 Indicators and Projector Condition 73 Compatible Computer Specifications 75 Technical Specifications 77 Optional Parts 78 PJ Link Notice 79 Configurations of Terminals 80 PIN Code Number Memo 81 Dimensions 82 Trademarks Each name of corporations...
... Cleaning the Projection Lens 68 Cleaning the Projector Cabinet 68 Appendix 69 Troubleshooting 69 Menu Tree 71 Indicators and Projector Condition 73 Compatible Computer Specifications 75 Technical Specifications 77 Optional Parts 78 PJ Link Notice 79 Configurations of Terminals 80 PIN Code Number Memo 81 Dimensions 82 Trademarks Each name of corporations...

User Manual
Page 19
... Do not press the lens release button when attaching the lens. Do not drop. Ask the sales dealer for detailed information of the optional lens specifications. Attaching the lens to the projector 1 Remove the lens mount cover. 2 Fit the lens to the projector. CAUTION Be careful when handling the lens. Make...
... Do not press the lens release button when attaching the lens. Do not drop. Ask the sales dealer for detailed information of the optional lens specifications. Attaching the lens to the projector 1 Remove the lens mount cover. 2 Fit the lens to the projector. CAUTION Be careful when handling the lens. Make...

User Manual
Page 36
COMPONENT VIDEO SIGNAL FORMAT If the projector cannot reproduce proper video image, select a specific component video signal format from among 480i, 575i, 480p, 575p, 720p, 1035i, and 1080i. AV System Menu (Component) AV System Menu icon The selected system ... video signal, and adjusts itself to optimize its performance. PAL/SECAM/NTSC/NTSC4.43/PAL-M/PAL-N If the projector cannot reproduce proper video image, select a specific broadcast signal format from among PAL, SECAM, NTSC, NTSC 4.43, PAL-M, and PAL-N. Use the Point 7 8 buttons to move the red frame pointer to the...
COMPONENT VIDEO SIGNAL FORMAT If the projector cannot reproduce proper video image, select a specific component video signal format from among 480i, 575i, 480p, 575p, 720p, 1035i, and 1080i. AV System Menu (Component) AV System Menu icon The selected system ... video signal, and adjusts itself to optimize its performance. PAL/SECAM/NTSC/NTSC4.43/PAL-M/PAL-N If the projector cannot reproduce proper video image, select a specific broadcast signal format from among PAL, SECAM, NTSC, NTSC 4.43, PAL-M, and PAL-N. Use the Point 7 8 buttons to move the red frame pointer to the...

User Manual
Page 40
... the connected computer. Current mode Press the SELECT button to match those parameters manually adjusted. Manual PC Adjustment enables you to recall the setting for a specific computer. 1 Press the MENU button to display the adjustment dialog box. Vertical Use the Point 7 8 buttons to adjust the horizontal picture position. Horizontal Use the...
... the connected computer. Current mode Press the SELECT button to match those parameters manually adjusted. Manual PC Adjustment enables you to recall the setting for a specific computer. 1 Press the MENU button to display the adjustment dialog box. Vertical Use the Point 7 8 buttons to adjust the horizontal picture position. Horizontal Use the...

User Manual
Page 75
PC Adjustment is limited when selecting these modes. Appendix Compatible Computer Specifications Basically this projector can accept the signal from all computers with the V- ON-SCREEN DISPLAY VGA 1 VGA 2 VGA 3 VGA 4 VGA 5 VGA 6 VGA 7 MAC LC13 MAC ...
PC Adjustment is limited when selecting these modes. Appendix Compatible Computer Specifications Basically this projector can accept the signal from all computers with the V- ON-SCREEN DISPLAY VGA 1 VGA 2 VGA 3 VGA 4 VGA 5 VGA 6 VGA 7 MAC LC13 MAC ...

User Manual
Page 76
... not be selected when Input 1 [RGB (PC digital)] is selected in the Input Menu. PC Adjust Menu cannot be displayed properly depending on computers •Specifications are subject to the chart below.
... not be selected when Input 1 [RGB (PC digital)] is selected in the Input Menu. PC Adjust Menu cannot be displayed properly depending on computers •Specifications are subject to the chart below.
User Manual
Page 77
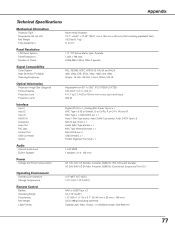
Appendix Technical Specifications Mechanical Information Projector Type Dimensions (W x H x D) Net Weight Feet Adjustment Multi-media Projector 13.7" x 6.46" x.17.48" (348.1 mm x 164 mm x 444 mm) (Not including adjustable ... kHz-100 kHz, V-sync. 50 Hz-100 Hz Optical Information Projection Image Size (Diagonal) Throw Distance Projection Lens Projection Lamp Adjustable from 30" to 300" (PLC-XT25/PLC-XT20) 3.9'-32.8' (1.2 m-10.0 m) F=1.7 to 2.1, f=33 to 43 mm with motor zoom and focus 300 W Interface Input 1 Input 2 Input 3 AUDIO IN Analog Out Audio Out...
Appendix Technical Specifications Mechanical Information Projector Type Dimensions (W x H x D) Net Weight Feet Adjustment Multi-media Projector 13.7" x 6.46" x.17.48" (348.1 mm x 164 mm x 444 mm) (Not including adjustable ... kHz-100 kHz, V-sync. 50 Hz-100 Hz Optical Information Projection Image Size (Diagonal) Throw Distance Projection Lens Projection Lamp Adjustable from 30" to 300" (PLC-XT25/PLC-XT20) 3.9'-32.8' (1.2 m-10.0 m) F=1.7 to 2.1, f=33 to 43 mm with motor zoom and focus 300 W Interface Input 1 Input 2 Input 3 AUDIO IN Analog Out Audio Out...

User Manual
Page 78
... Accessories Owner's Manual (CD-ROM) Quick Reference Guide AC Power Cord Remote Control and Batteries VGA Cable USB Cable Lens Cap (for PLC-XT25/XT20) Lens Mount Cover (for PLC-XT25L/XT20L) PIN Code Label ● The specifications are subject to change without notice. ● LCD panels are manufactured to the sales dealer.
... Accessories Owner's Manual (CD-ROM) Quick Reference Guide AC Power Cord Remote Control and Batteries VGA Cable USB Cable Lens Cap (for PLC-XT25/XT20) Lens Mount Cover (for PLC-XT25L/XT20L) PIN Code Label ● The specifications are subject to change without notice. ● LCD panels are manufactured to the sales dealer.