
Owners Manual
Page 2
...XGA, and PS/2 are trademarks or registered trademarks of Apple Computer,Inc. Table of Contents Table of Contents To the Owner Safety Instructions Installing the Projector in the owner's manual is a trademark or a registered trademark of Microsoft Corporation. G Each name of corporations or products in Proper Position Air Circulation Moving the Projector... 41 13 Cleaning the Air Filters 42 14 Cleaning the Projection Lens 42 14 Cleaning the Projector Cabinet 42 15 Lamp Replacement 43 15 Lamp Replace Counter 44 16 Appendix 45 16 16 17 18 Troubleshooting Indicators and...
...XGA, and PS/2 are trademarks or registered trademarks of Apple Computer,Inc. Table of Contents Table of Contents To the Owner Safety Instructions Installing the Projector in the owner's manual is a trademark or a registered trademark of Microsoft Corporation. G Each name of corporations or products in Proper Position Air Circulation Moving the Projector... 41 13 Cleaning the Air Filters 42 14 Cleaning the Projection Lens 42 14 Cleaning the Projector Cabinet 42 15 Lamp Replacement 43 15 Lamp Replace Counter 44 16 Appendix 45 16 16 17 18 Troubleshooting Indicators and...

Owners Manual
Page 3
... operations and cable connections and try the solutions in the "Troubleshooting" section in better condition for an extended time, unplug the projector from the projection lens. READ AND KEEP THIS OWNER'S MANUAL FOR LATER USE. THIS SYMBOL INDICATES THAT THERE ARE IMPORTANT OPERATING ...AND MAINTENANCE INSTRUCTIONS IN THE OWNER'S MANUAL WITH THIS UNIT. Install the projector in not only shortening the product-life, but also malfunctions, fire hazard, or other people. Do not cover the ventilation slot on...
... operations and cable connections and try the solutions in the "Troubleshooting" section in better condition for an extended time, unplug the projector from the projection lens. READ AND KEEP THIS OWNER'S MANUAL FOR LATER USE. THIS SYMBOL INDICATES THAT THERE ARE IMPORTANT OPERATING ...AND MAINTENANCE INSTRUCTIONS IN THE OWNER'S MANUAL WITH THIS UNIT. Install the projector in not only shortening the product-life, but also malfunctions, fire hazard, or other people. Do not cover the ventilation slot on...
Owners Manual
Page 4
... indicates a need for later use near the ventilation duct of the cabinet are covered by the manufacturers. Do not place this projector yourself as the original part. An appliance and cart combination should be read before cleaning. Quick stops, excessive force, and uneven...an unstable cart, stand, or table. Never spill liquid of power supplied, consult your authorized dealer or local power company. This projector should never be operated only from overheating. If you to qualified service personnel under the following the operating instructions. Do not allow...
... indicates a need for later use near the ventilation duct of the cabinet are covered by the manufacturers. Do not place this projector yourself as the original part. An appliance and cart combination should be read before cleaning. Quick stops, excessive force, and uneven...an unstable cart, stand, or table. Never spill liquid of power supplied, consult your authorized dealer or local power company. This projector should never be operated only from overheating. If you to qualified service personnel under the following the operating instructions. Do not allow...

Owners Manual
Page 5
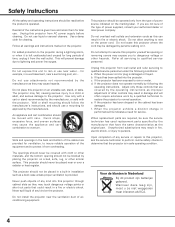
...cooling fans. Cooling fans are provided for an extended period, put on the cabinet. CAUTION IN CARRYING OR TRANSPORTING THE PROJECTOR G Do not drop or bump the projector, otherwise damages or malfunctions may cause damage to project an image. When using a courier or transport service in the... of the product and to protect it to project an image. 20˚ NO SIDEWAYS Do not point the projector down the projector. This may result. When handling the projector, do not drop, bump, subject it from external forces. G Do not put anything on the cabinet will ...
...cooling fans. Cooling fans are provided for an extended period, put on the cabinet. CAUTION IN CARRYING OR TRANSPORTING THE PROJECTOR G Do not drop or bump the projector, otherwise damages or malfunctions may cause damage to project an image. When using a courier or transport service in the... of the product and to protect it to project an image. 20˚ NO SIDEWAYS Do not point the projector down the projector. This may result. When handling the projector, do not drop, bump, subject it from external forces. G Do not put anything on the cabinet will ...
Owners Manual
Page 6
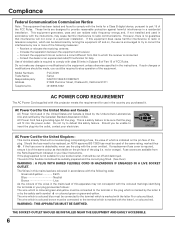
...following code: Green-and-yellow Earth Blue Neutral Brown Live As the colours of the wires in the mains lead of this projector meets the requirement for use the plug with the cover omitted. This equipment generates, uses and can radiate radio frequency energy and...Wires in this mains lead are coloured in accordance with the following measures : - Model Numbers Trade Name Responsible party Address Telephone No. : PLC-XU25 : Sanyo : SANYO FISHER COMPANY : 21605 Plummer Street, Chatsworth, California 91311 : (818)998-7322 AC POWER CORD REQUIREMENT The AC Power Cord supplied with this...
...following code: Green-and-yellow Earth Blue Neutral Brown Live As the colours of the wires in the mains lead of this projector meets the requirement for use the plug with the cover omitted. This equipment generates, uses and can radiate radio frequency energy and...Wires in this mains lead are coloured in accordance with the following measures : - Model Numbers Trade Name Responsible party Address Telephone No. : PLC-XU25 : Sanyo : SANYO FISHER COMPANY : 21605 Plummer Street, Chatsworth, California 91311 : (818)998-7322 AC POWER CORD REQUIREMENT The AC Power Cord supplied with this...
Owners Manual
Page 7
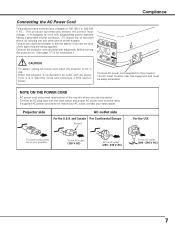
...- 240 V AC) 7 It is designed to work with AC power cord, it is in use a projector. When this equipment and must meet requirement of the country where you are not sure of the type of power... being supplied. Confirm an AC plug type with all peripheral equipment before turning the projector on your projector. To reduce risk of electrical shock, do not plug into any other type of 100...ON THE POWER CORD AC power cord must be easily accessible. The AC outlet must be near this projector is not in Stand-by mode and consumes a little electric power. To power cord connector on ...
...- 240 V AC) 7 It is designed to work with AC power cord, it is in use a projector. When this equipment and must meet requirement of the country where you are not sure of the type of power... being supplied. Confirm an AC plug type with all peripheral equipment before turning the projector on your projector. To reduce risk of electrical shock, do not plug into any other type of 100...ON THE POWER CORD AC power cord must be easily accessible. The AC outlet must be near this projector is not in Stand-by mode and consumes a little electric power. To power cord connector on ...

Owners Manual
Page 8
...Card Imager is also used for the starting display of 16.77 million colors, and matrix liquid crystal display (LCD) technology. Features and Design This Multimedia Projector is designed with the most advanced technology for portability, durability, and ease of use . G S-Video S-..., French, Italian, Spanish, Portuguese, Dutch, Swedish, Russian, Chinese, Korean, or Japanese. (See page 38.) N Switchable Interface Terminal The projector provides a switchable interface terminal. It is equipped with DVI 29-pin terminal for connecting DVI output from a computer or video equipment. G Computers...
...Card Imager is also used for the starting display of 16.77 million colors, and matrix liquid crystal display (LCD) technology. Features and Design This Multimedia Projector is designed with the most advanced technology for portability, durability, and ease of use . G S-Video S-..., French, Italian, Spanish, Portuguese, Dutch, Swedish, Russian, Chinese, Korean, or Japanese. (See page 38.) N Switchable Interface Terminal The projector provides a switchable interface terminal. It is equipped with DVI 29-pin terminal for connecting DVI output from a computer or video equipment. G Computers...
Owners Manual
Page 9
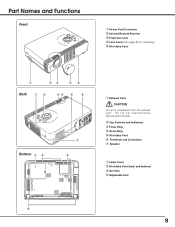
Do not put heat-sensitive objects near this side. w Top Controls and Indicators e Focus Ring r Zoom Ring t Air Intake Vent y Terminals and Connectors u Speaker q Lamp Cover w Air Intake Vent (back and bottom) e Air Filter r Adjustable Feet r 9 Part Names and Functions Front q Power Cord Connector w Infrared Remote Receiver e Projection Lens r Lens Cover (See page 54 for attaching.) t Air Intake Vent q we rt Back q w er t y Bottom q w u e q Exhaust Vent CAUTION Hot air is exhausted from the exhaust vent.
Do not put heat-sensitive objects near this side. w Top Controls and Indicators e Focus Ring r Zoom Ring t Air Intake Vent y Terminals and Connectors u Speaker q Lamp Cover w Air Intake Vent (back and bottom) e Air Filter r Adjustable Feet r 9 Part Names and Functions Front q Power Cord Connector w Infrared Remote Receiver e Projection Lens r Lens Cover (See page 54 for attaching.) t Air Intake Vent q we rt Back q w er t y Bottom q w u e q Exhaust Vent CAUTION Hot air is exhausted from the exhaust vent.
Owners Manual
Page 10
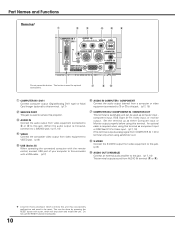
...) t USB (Series B) When operating the connected computer with the remote control, connect USB port of your computer to this connector with a pen, which controls this projector. Do not use the RESET function excessively. 10 This button is switchable and can be used as Monitor out.) i S-VIDEO Connect the S-VIDEO output from...
...) t USB (Series B) When operating the connected computer with the remote control, connect USB port of your computer to this connector with a pen, which controls this projector. Do not use the RESET function excessively. 10 This button is switchable and can be used as Monitor out.) i S-VIDEO Connect the S-VIDEO output from...
Owners Manual
Page 11
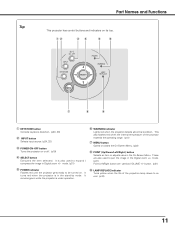
...Menu. (p22) i POINT (Up/Down/Left/Right ) button Selects an item or adjusts value in Digital zoom +/- Top Part Names and Functions This projector has control buttons and indicators on or off. (p19) r SELECT button Executes the item selected. It is also used to an end. (p43)... u i o q KEYSTONE button Corrects keystone distortion. (p20, 38) w INPUT button Selects input source. (p24, 32 ) e POWER ON-OFF button Turns the projector on its top. button. (p21) t POWER indicator Flashes red until the projector gets ready to pan the image in the stand-by mode. It turns red when the...
...Menu. (p22) i POINT (Up/Down/Left/Right ) button Selects an item or adjusts value in Digital zoom +/- Top Part Names and Functions This projector has control buttons and indicators on or off. (p19) r SELECT button Executes the item selected. It is also used to an end. (p43)... u i o q KEYSTONE button Corrects keystone distortion. (p20, 38) w INPUT button Selects input source. (p24, 32 ) e POWER ON-OFF button Turns the projector on its top. button. (p21) t POWER indicator Flashes red until the projector gets ready to pan the image in the stand-by mode. It turns red when the...
Owners Manual
Page 12
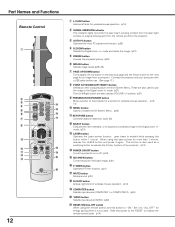
...switch to the "RESET" to expand or compress image in the Digital zoom +/mode. (p31) !3 LASER button Operates the Laser pointer function. Connect the projector and your computer with a USB cable before use. (See page 17.) i POINT (UP/DOWN/LEFT/RIGHT) button Selects an item or adjusts value in... the Digital zoom +/- This button is being emitted from the remote control to the projector. e AUTO PC button Operates the Auto PC adjustment function. (p26) r D.ZOOM button Selects the Digital zoom +/- Laser beam is not used to ...
...switch to the "RESET" to expand or compress image in the Digital zoom +/mode. (p31) !3 LASER button Operates the Laser pointer function. Connect the projector and your computer with a USB cable before use. (See page 17.) i POINT (UP/DOWN/LEFT/RIGHT) button Selects an item or adjusts value in... the Digital zoom +/- This button is being emitted from the remote control to the projector. e AUTO PC button Operates the Auto PC adjustment function. (p26) r D.ZOOM button Selects the Digital zoom +/- Laser beam is not used to ...
Owners Manual
Page 13
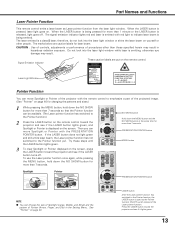
...than those specified herein may result. Do not look into the laser light window while laser is displayed on the remote control toward the projector and see if it lights green. 13 Laser Light Window Pointer Function You can choose the size of Spotlight (Large, Middle, and Small.... Part Names and Functions Laser Pointer Function This remote control emits a laser beam as the Pointer function ON-OFF switch instead of the projector with the PRESENTATION POINTER button. therefore, do not look into the laser light window or shine the laser beam on the remote control. When...
...than those specified herein may result. Do not look into the laser light window while laser is displayed on the remote control toward the projector and see if it lights green. 13 Laser Light Window Pointer Function You can choose the size of Spotlight (Large, Middle, and Small.... Part Names and Functions Laser Pointer Function This remote control emits a laser beam as the Pointer function ON-OFF switch instead of the projector with the PRESENTATION POINTER button. therefore, do not look into the laser light window or shine the laser beam on the remote control. When...
Owners Manual
Page 14
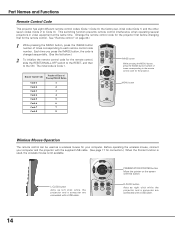
...press the IMAGE button, the code is changed sequentially. (See the list below.) 2 To initialize the remote control code for your computer and the projector with a USB cable. the factory-set, initial code (Code 1) and the other seven codes (Code 2 to each remote control code number. ...1 While pressing the MENU button, press the IMAGE button number of times corresponding to the ON. R-CLICK button Acts as left click while the projector and a computer are connected with this button. See "Remote control" on the screen with a USB cable. 14 MENU button Wireless Mouse Operation...
...press the IMAGE button, the code is changed sequentially. (See the list below.) 2 To initialize the remote control code for your computer and the projector with a USB cable. the factory-set, initial code (Code 1) and the other seven codes (Code 2 to each remote control code number. ...1 While pressing the MENU button, press the IMAGE button number of times corresponding to the ON. R-CLICK button Acts as left click while the projector and a computer are connected with this button. See "Remote control" on the screen with a USB cable. 14 MENU button Wireless Mouse Operation...
Owners Manual
Page 15
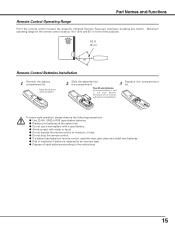
... on remote control, carefully wipe case clean and install new batteries. Part Names and Functions Remote Control Operating Range Point the remote control toward the projector (Infrared Remote Receiver) whenever pressing any button. Maximum operating range for the remote control is replaced by an incorrect type. To insure safe operation, ... expose the remote control to the instructions. 15 G Replace two batteries at the same time. G Do not drop the remote control. G Risk of the projector. 16.4' (5 m) 60° Remote Control Batteries Installation 1 Remove the battery compartment lid.
... on remote control, carefully wipe case clean and install new batteries. Part Names and Functions Remote Control Operating Range Point the remote control toward the projector (Infrared Remote Receiver) whenever pressing any button. Maximum operating range for the remote control is replaced by an incorrect type. To insure safe operation, ... expose the remote control to the instructions. 15 G Replace two batteries at the same time. G Do not drop the remote control. G Risk of the projector. 16.4' (5 m) 60° Remote Control Batteries Installation 1 Remove the battery compartment lid.
Owners Manual
Page 16
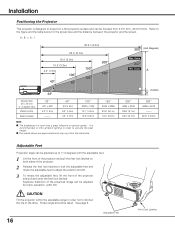
... lock the adjustable feet and rotate the adjustable feet to adjust the position and tilt. 3 To retract the adjustable feet, lift the front of the projector and pull and undo the feet lock latches. A:B = 9:1 32.8' (10.0m) 22.0' (6.7m) 16.4' (5.0m) 10.8' (3.3m) 4.3' (1.3m) 100" 40" 82" 150" 124" ... Lock Latches It is designed to project on a flat projection surface and can be adjusted by menu operation. (p20, 38) CAUTION Tilt the projector within the adjustable range in order not to shorten the life of the lamp. Keystone distortion of the projected image can be focused from the...
... lock the adjustable feet and rotate the adjustable feet to adjust the position and tilt. 3 To retract the adjustable feet, lift the front of the projector and pull and undo the feet lock latches. A:B = 9:1 32.8' (10.0m) 22.0' (6.7m) 16.4' (5.0m) 10.8' (3.3m) 4.3' (1.3m) 100" 40" 82" 150" 124" ... Lock Latches It is designed to project on a flat projection surface and can be adjusted by menu operation. (p20, 38) CAUTION Tilt the projector within the adjustable range in order not to shorten the life of the lamp. Keystone distortion of the projected image can be focused from the...
Owners Manual
Page 17
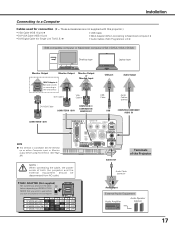
...Audio Amplifier Audio Speaker (stereo) 17 Installation Connecting to a Computer Cables used for connection (✽ = These accessories are not supplied with this projector.) • VGA Cable (HDB 15 pin) ✽ • DVI-VGA Cable (HDB 15 pin) • DVI-Digital Cable (...) x 2) ✽ IBM-compatible computer or Macintosh computer (VGA / SVGA / XGA / SXGA) Desktop type Laptop type Monitor Output Monitor Output MAC Adapter ✽ Set slide switches according to the chart below depending on projector and computer. I COMPUTER IN 1 DVI - Audio Cable (stereo) ✽ N...
...Audio Amplifier Audio Speaker (stereo) 17 Installation Connecting to a Computer Cables used for connection (✽ = These accessories are not supplied with this projector.) • VGA Cable (HDB 15 pin) ✽ • DVI-VGA Cable (HDB 15 pin) • DVI-Digital Cable (...) x 2) ✽ IBM-compatible computer or Macintosh computer (VGA / SVGA / XGA / SXGA) Desktop type Laptop type Monitor Output Monitor Output MAC Adapter ✽ Set slide switches according to the chart below depending on projector and computer. I COMPUTER IN 1 DVI - Audio Cable (stereo) ✽ N...
Owners Manual
Page 18
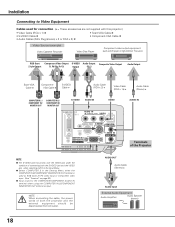
... COMPUTER / COMPONENT RESET MCI COMPUTER IN 2 / COMPONENT IN / MONITOR OUT AUDIO IN AUDIO OUT (VARIABLE) AUDIO IN Terminals of the Projector NOTE G The S-VIDEO jack has priority over the VIDEO jack under the condition of both the S-VIDEO jack and the VIDEO jack when ... in the Setting Menu when the COMPUTER IN 2/COMPONENT IN/MONITOR OUT terminal is used for connection (✽ = These accessories are not supplied with this projector.) • Video Cable (RCA x 1) ✽ • S-VIDEO Cable ✽ • Audio Cables (Mini Plug (stereo) x 2 or RCA x 2) ✽ • Scart...
... COMPUTER / COMPONENT RESET MCI COMPUTER IN 2 / COMPONENT IN / MONITOR OUT AUDIO IN AUDIO OUT (VARIABLE) AUDIO IN Terminals of the Projector NOTE G The S-VIDEO jack has priority over the VIDEO jack under the condition of both the S-VIDEO jack and the VIDEO jack when ... in the Setting Menu when the COMPUTER IN 2/COMPONENT IN/MONITOR OUT terminal is used for connection (✽ = These accessories are not supplied with this projector.) • Video Cable (RCA x 1) ✽ • S-VIDEO Cable ✽ • Audio Cables (Mini Plug (stereo) x 2 or RCA x 2) ✽ • Scart...
Owners Manual
Page 19
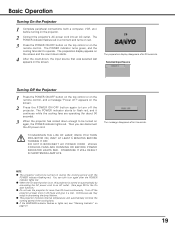
...the top control or on the screen. 26 The preparation display disappears after 30 seconds. TO MAINTAIN THE LIFE OF LAMP, ONCE YOU TURN PROJECTOR ON, WAIT AT LEAST 5 MINUTES BEFORE TURNING IT OFF. The message disappears after the POWER indicator lights red. The preparation display appears ...on the screen and the count down starts. 4 After the count-down enough to turn it a rest. NOTE G The projector cannot be turned on during the cooling period with a computer, VCR, etc.) before turning on the remote control. The POWER indicator starts to operate...
...the top control or on the screen. 26 The preparation display disappears after 30 seconds. TO MAINTAIN THE LIFE OF LAMP, ONCE YOU TURN PROJECTOR ON, WAIT AT LEAST 5 MINUTES BEFORE TURNING IT OFF. The message disappears after the POWER indicator lights red. The preparation display appears ...on the screen and the count down starts. 4 After the count-down enough to turn it a rest. NOTE G The projector cannot be turned on during the cooling period with a computer, VCR, etc.) before turning on the remote control. The POWER indicator starts to operate...

Owners Manual
Page 20
Press the Point Up button to reduce the upper part of the arrow being corrected turns red. • If you press the KEYSTONE button on the top control or on the screen. Keystone adjustment can be memorized. (p38) • The arrows are white when there is no correction. • The arrows disappear at the maximum correction. • The direction of the image, and press the Point Down button to reduce the left part with Point Down button. Reduce the right part with Point Up button. Press the Point Left button to reduce the lower part. Picture Freeze Function Press the ...
Press the Point Up button to reduce the upper part of the arrow being corrected turns red. • If you press the KEYSTONE button on the top control or on the screen. Keystone adjustment can be memorized. (p38) • The arrows are white when there is no correction. • The arrows disappear at the maximum correction. • The direction of the image, and press the Point Down button to reduce the left part with Point Down button. Reduce the right part with Point Up button. Press the Point Left button to reduce the lower part. Picture Freeze Function Press the ...

Owners Manual
Page 21
To stop the P-Timer, press the P-TIMER button. The volume dialog box appears on the remote control to black out the image. indicates approximate level of volume. Volume Press the Point Right button to turn up the volume and (-) button to turn down the volume. Dialog box display is changed to "On" and sound is captured and set the Mute function On or Off. To restore to cancel the P-Timer function. black out ➜ the captured image ➜ normal The message disappears after 4 seconds. The display disappears after 4 seconds. Sound Adjustment Direct Operation ...
To stop the P-Timer, press the P-TIMER button. The volume dialog box appears on the remote control to black out the image. indicates approximate level of volume. Volume Press the Point Right button to turn up the volume and (-) button to turn down the volume. Dialog box display is changed to "On" and sound is captured and set the Mute function On or Off. To restore to cancel the P-Timer function. black out ➜ the captured image ➜ normal The message disappears after 4 seconds. The display disappears after 4 seconds. Sound Adjustment Direct Operation ...
