
Owners Manual
Page 2
..., and PowerBook are trademarks or registered trademarks of International Business Machines, Inc. Table of Contents Table of Contents To the Owner Safety Instructions Installing the Projector in the owner's manual is a trademark or a registered trademark of Microsoft Corporation. G IBM, VGA, XGA, and PS/2 are trademarks or registered trademarks of Apple Computer,Inc.
..., and PowerBook are trademarks or registered trademarks of International Business Machines, Inc. Table of Contents Table of Contents To the Owner Safety Instructions Installing the Projector in the owner's manual is a trademark or a registered trademark of Microsoft Corporation. G IBM, VGA, XGA, and PS/2 are trademarks or registered trademarks of Apple Computer,Inc.

Owners Manual
Page 3
... ANSI/NFPA 75 Standard for Protection of the projector cabinet for use in a computer room as possible. This projector provides many convenient features and functions. To the Owner Before operating this projector, read this manual again, check operations and cable connections and try... the solutions in the "Troubleshooting" section in the end of this manual thoroughly and operate the projector properly. This projector produces intense light from the ventilation holes. - Eye damage may result in a proper position. CAUTION RISK...
... ANSI/NFPA 75 Standard for Protection of the projector cabinet for use in a computer room as possible. This projector provides many convenient features and functions. To the Owner Before operating this projector, read this manual again, check operations and cable connections and try... the solutions in the "Troubleshooting" section in the end of this manual thoroughly and operate the projector properly. This projector produces intense light from the ventilation holes. - Eye damage may result in a proper position. CAUTION RISK...

Owners Manual
Page 25
... of the following four displays appears on page 27 and 28. Adjustment data can also be selected manually if some PC systems appear PC System Menu on this projector, the Auto PC Adjustment function operates to set, and then press the SELECT button. PC System Menu The Auto PC ...2 Press the Point Down button to move the red arrow pointer to the system that you wish to adjust the projector. The projector chooses a proper system and displays it manually, perform manual adjustment as PC system provided in the PC System Menu icon. The PC System Menu icon displays the system being ...
... of the following four displays appears on page 27 and 28. Adjustment data can also be selected manually if some PC systems appear PC System Menu on this projector, the Auto PC Adjustment function operates to set, and then press the SELECT button. PC System Menu The Auto PC ...2 Press the Point Down button to move the red arrow pointer to the system that you wish to adjust the projector. The projector chooses a proper system and displays it manually, perform manual adjustment as PC system provided in the PC System Menu icon. The PC System Menu icon displays the system being ...

Owners Manual
Page 27
...Stored / Free) of total dots in one horizontal period. Horizontal Adjusts horizontal picture position. When the image has dark bars, try this projector. An adjustment dialog box will appear. Press the Point Left/Right button to adjust the position. Total dots Adjusts the number of the ... whenever you use it. 1 Press the MENU button and the On-Screen Menu will appear. This projector has Manual PC Adjustment to enable you want to memorize those signal formats. The projector has 5 independent memory areas to adjust and then press the SELECT button. Press the SELECT button at...
...Stored / Free) of total dots in one horizontal period. Horizontal Adjusts horizontal picture position. When the image has dark bars, try this projector. An adjustment dialog box will appear. Press the Point Left/Right button to adjust the position. Total dots Adjusts the number of the ... whenever you use it. 1 Press the MENU button and the On-Screen Menu will appear. This projector has Manual PC Adjustment to enable you want to memorize those signal formats. The projector has 5 independent memory areas to adjust and then press the SELECT button. Press the SELECT button at...
Owners Manual
Page 30
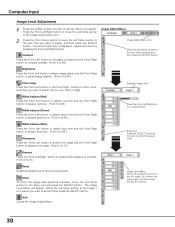
... Closes the Image Adjust Menu. level that you want to set and then press the SELECT button. 30 Store To store the image data adjusted manually, move the red frame pointer to the item that you want to select. (XLow, Low, Mid, or High) White balance (Red) Press the Point Left...
... Closes the Image Adjust Menu. level that you want to set and then press the SELECT button. 30 Store To store the image data adjusted manually, move the red frame pointer to the item that you want to select. (XLow, Low, Mid, or High) White balance (Red) Press the Point Left...

Owners Manual
Page 34
... SELECT button. PAL / SECAM / NTSC / NTSC4.43 / PAL-M / PAL-N If the projector cannot reproduce proper video image, it is necessary to select a specific broadcast signal format among 480i,...COMPONENT VIDEO SIGNAL FORMAT If the projector cannot reproduce proper video image, it is necessary to optimize its performance. Video or S-Video Auto The projector automatically detects incoming video system,...System Menu cannot be selected when selecting RGB(Scart). 34 Component Auto The projector automatically detects incoming video signal, and adjusts itself to a system and press ...
... SELECT button. PAL / SECAM / NTSC / NTSC4.43 / PAL-M / PAL-N If the projector cannot reproduce proper video image, it is necessary to select a specific broadcast signal format among 480i,...COMPONENT VIDEO SIGNAL FORMAT If the projector cannot reproduce proper video image, it is necessary to optimize its performance. Video or S-Video Auto The projector automatically detects incoming video system,...System Menu cannot be selected when selecting RGB(Scart). 34 Component Auto The projector automatically detects incoming video signal, and adjusts itself to a system and press ...
Owners Manual
Page 44
...the lamp should be handled carefully and properly. When the lamp replace counter is displayed. There is displayed. If a lamp explodes, disconnect the projector's AC plug from lamp to lamp and according to the environment or conditions in a shorter period of lamp explosion. NOTE G Do not ...reset the Lamp replace counter without implementation of this manual. ) Continuous use . Additionally, check carefully to do so, may increase the risk of time than other similar lamps. Move the pointer to...
...the lamp should be handled carefully and properly. When the lamp replace counter is displayed. There is displayed. If a lamp explodes, disconnect the projector's AC plug from lamp to lamp and according to the environment or conditions in a shorter period of lamp explosion. NOTE G Do not ...reset the Lamp replace counter without implementation of this manual. ) Continuous use . Additionally, check carefully to do so, may increase the risk of time than other similar lamps. Move the pointer to...

Owners Manual
Page 45
... again. - Adjust focus of the projector into the AC outlet. - Provide proper distance between your computer's owner's manual for monitor output when you operate the projector with your computer. In such an event, leave the projector OFF and wait until condensation disappears. ...No image - Check the connection between the projector and the projection screen. (See ...
... again. - Adjust focus of the projector into the AC outlet. - Provide proper distance between your computer's owner's manual for monitor output when you operate the projector with your computer. In such an event, leave the projector OFF and wait until condensation disappears. ...No image - Check the connection between the projector and the projection screen. (See ...

Owners Manual
Page 51
... 27mm x 181mm) : 0.34 lbs (154 g) (including batteries) : Class II Laser (Max. G LCD panels are subject to change without notice. Output : 1mW / Wave length : 640~660nm) Owner's Manual AC Power Cord Remote Control and Batteries DVI-VGA Cable USB Cable Air Filters Lens Cover String for... A Max. G The On-Screen Menu and figures in Speaker Feet Adjustment Voltage and Power Consumption Operating Temperature Storage Temperature Remote Control Accessories Multi-media Projector 11.73" x 2.8" x 8.43" (298mm x 71mm x 214mm) (not including adjustable feet) 6.0 lbs (2.7 kg) 0.8" TFT Active Matrix...
... 27mm x 181mm) : 0.34 lbs (154 g) (including batteries) : Class II Laser (Max. G LCD panels are subject to change without notice. Output : 1mW / Wave length : 640~660nm) Owner's Manual AC Power Cord Remote Control and Batteries DVI-VGA Cable USB Cable Air Filters Lens Cover String for... A Max. G The On-Screen Menu and figures in Speaker Feet Adjustment Voltage and Power Consumption Operating Temperature Storage Temperature Remote Control Accessories Multi-media Projector 11.73" x 2.8" x 8.43" (298mm x 71mm x 214mm) (not including adjustable feet) 6.0 lbs (2.7 kg) 0.8" TFT Active Matrix...


