
Owners Manual
Page 2
... 41 12 13 Warning Indicator 41 13 Cleaning the Air Filters 42 14 Cleaning the Projection Lens 42 14 Cleaning the Projector Cabinet 42 15 Lamp Replacement 43 15 Lamp Replace Counter 44 16 Appendix 45 16 16 17 18 Troubleshooting Indicators and...20 20 20 21 21 21 22 23 TRADEMARKS G Apple, Macintosh, and PowerBook are trademarks or registered trademarks of Microsoft Corporation. G IBM, VGA, XGA, and PS/2 are registered trademarks of Apple Computer,Inc. G Windows and PowerPoint are trademarks or registered trademarks of its respective corporation. 2 Table of...
... 41 12 13 Warning Indicator 41 13 Cleaning the Air Filters 42 14 Cleaning the Projection Lens 42 14 Cleaning the Projector Cabinet 42 15 Lamp Replacement 43 15 Lamp Replace Counter 44 16 Appendix 45 16 16 17 18 Troubleshooting Indicators and...20 20 20 21 21 21 22 23 TRADEMARKS G Apple, Macintosh, and PowerBook are trademarks or registered trademarks of Microsoft Corporation. G IBM, VGA, XGA, and PS/2 are registered trademarks of Apple Computer,Inc. G Windows and PowerPoint are trademarks or registered trademarks of its respective corporation. 2 Table of...

Owners Manual
Page 3
... life of Electronic Computer/Data Processing Equipment 3 SIDE and TOP REAR 20cm 50cm 50cm 50cm - Operating the projector properly enables you purchased the projector or the service center. THIS SYMBOL INDICATES THAT THERE ARE IMPORTANT OPERATING AND MAINTENANCE INSTRUCTIONS IN THE OWNER'S ...MANUAL WITH THIS UNIT. Eye damage may result. - To the Owner Before operating this projector, read this manual again, check operations and cable connections and try the solutions in the "Troubleshooting" section in better condition for...
... life of Electronic Computer/Data Processing Equipment 3 SIDE and TOP REAR 20cm 50cm 50cm 50cm - Operating the projector properly enables you purchased the projector or the service center. THIS SYMBOL INDICATES THAT THERE ARE IMPORTANT OPERATING AND MAINTENANCE INSTRUCTIONS IN THE OWNER'S ...MANUAL WITH THIS UNIT. Eye damage may result. - To the Owner Before operating this projector, read this manual again, check operations and cable connections and try the solutions in the "Troubleshooting" section in better condition for...
Owners Manual
Page 4
..., and should be read before cleaning. c. Upon completion of power source indicated on the power cord. Unplug this projector from overheating. The projector may cause hazards. Slots and openings in safe operating condition. Never push objects of time, unplug it from wall outlet...product is damaged or frayed. Do not allow anything to qualified service personnel under the following the operating instructions. Unplug this projector from the wall outlet. Quick stops, excessive force, and uneven surfaces may touch dangerous voltage points or short out parts...
..., and should be read before cleaning. c. Upon completion of power source indicated on the power cord. Unplug this projector from overheating. The projector may cause hazards. Slots and openings in safe operating condition. Never push objects of time, unplug it from wall outlet...product is damaged or frayed. Do not allow anything to qualified service personnel under the following the operating instructions. Unplug this projector from the wall outlet. Quick stops, excessive force, and uneven surfaces may touch dangerous voltage points or short out parts...

Owners Manual
Page 5
.... This area will not only get damaged but also cause fire hazard by using or installing the projector, the following precautions should be damaged. When handling the projector, do not drop, bump, subject it is not in an unsuitable transport case. This may reduce...project an image. Air Circulation Openings in Proper Position Install the projector properly. G Keep the exhaust vent at least 3'(1m) away from external forces. When the projector is not designed to the projector. This projector monitors internal temperature and control the running speed of the exhaust ...
.... This area will not only get damaged but also cause fire hazard by using or installing the projector, the following precautions should be damaged. When handling the projector, do not drop, bump, subject it is not in an unsuitable transport case. This may reduce...project an image. Air Circulation Openings in Proper Position Install the projector properly. G Keep the exhaust vent at least 3'(1m) away from external forces. When the projector is not designed to the projector. This projector monitors internal temperature and control the running speed of the exhaust ...

Owners Manual
Page 6
...and destroyed. The wire which is coloured blue must be cut off and on, the user is encouraged to try to defeat this projector meets the requirement for the United States and Canada : AC Power Cord used of the same rating, marked thus ASA . WARNING... in accordance with the instructions, may not correspond with the following measures : - Model Numbers Trade Name Responsible party Address Telephone No. : PLC-XU25 : Sanyo : SANYO FISHER COMPANY : 21605 Plummer Street, Chatsworth, California 91311 : (818)998-7322 AC POWER CORD REQUIREMENT The AC Power Cord supplied with the...
...and destroyed. The wire which is coloured blue must be cut off and on, the user is encouraged to try to defeat this projector meets the requirement for the United States and Canada : AC Power Cord used of the same rating, marked thus ASA . WARNING... in accordance with the instructions, may not correspond with the following measures : - Model Numbers Trade Name Responsible party Address Telephone No. : PLC-XU25 : Sanyo : SANYO FISHER COMPANY : 21605 Plummer Street, Chatsworth, California 91311 : (818)998-7322 AC POWER CORD REQUIREMENT The AC Power Cord supplied with the...
Owners Manual
Page 7
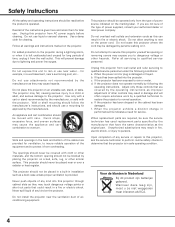
... consumes a little electric power. Consult your authorized dealer or service station if you use . NOTE ON THE POWER CORD AC power cord must be used. Projector side AC outlet side For the U.S.A. To the AC outlet. (120 V AC) To the AC outlet. (200 - 240 V AC) To the AC outlet. (200 ... into any other type of the country where you are not sure of the type of 100-120 V or 200-240 V AC. This projector automatically selects the correct input voltage. When this equipment and must meet requirement of power system. and Canada For Continental Europe Ground For the U.K.
... consumes a little electric power. Consult your authorized dealer or service station if you use . NOTE ON THE POWER CORD AC power cord must be used. Projector side AC outlet side For the U.S.A. To the AC outlet. (120 V AC) To the AC outlet. (200 - 240 V AC) To the AC outlet. (200 ... into any other type of the country where you are not sure of the type of 100-120 V or 200-240 V AC. This projector automatically selects the correct input voltage. When this equipment and must meet requirement of power system. and Canada For Continental Europe Ground For the U.K.

Owners Manual
Page 8
... computer up to operate both the projector and the connected computer with the most advanced technology for Computer) The digital zoom function expands (to approx. 16 times of 16.77 million colors, and matrix liquid crystal display (LCD) technology. These functions will make ...your presentation instead of use the projector where you to 1280 x 1024 resolution. N Power Management The Power management function reduces power consumption and...
... computer up to operate both the projector and the connected computer with the most advanced technology for Computer) The digital zoom function expands (to approx. 16 times of 16.77 million colors, and matrix liquid crystal display (LCD) technology. These functions will make ...your presentation instead of use the projector where you to 1280 x 1024 resolution. N Power Management The Power management function reduces power consumption and...
Owners Manual
Page 10
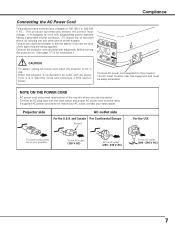
... R L (MONO) VIDEO USB * SERVICE PORT S-VIDEO COMPUTER / COMPONENT RESET MCI COMPUTER IN 2 / COMPONENT IN / MONITOR OUT AUDIO IN AUDIO OUT (VARIABLE) Do not press this projector. This can be done by pressing the RESET button with a USB cable. (p17) y AUDIO IN COMPUTER / COMPONENT Connect the audio output (stereo) from AUDIO IN...
... R L (MONO) VIDEO USB * SERVICE PORT S-VIDEO COMPUTER / COMPONENT RESET MCI COMPUTER IN 2 / COMPONENT IN / MONITOR OUT AUDIO IN AUDIO OUT (VARIABLE) Do not press this projector. This can be done by pressing the RESET button with a USB cable. (p17) y AUDIO IN COMPUTER / COMPONENT Connect the audio output (stereo) from AUDIO IN...
Owners Manual
Page 11
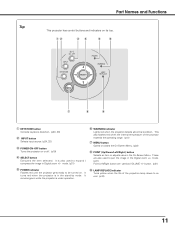
... u i o q KEYSTONE button Corrects keystone distortion. (p20, 38) w INPUT button Selects input source. (p24, 32 ) e POWER ON-OFF button Turns the projector on . This also flashes red when the internal temperature of the projection lamp draws to expand / compress the image in the Digital zoom +/- o LAMP REPLACE... indicator Turns yellow when the life of the projector exceeds the operating range. (p41) u MENU button Opens or closes the On-Screen Menu. (p22) i POINT (Up/Down/Left/Right )...
... u i o q KEYSTONE button Corrects keystone distortion. (p20, 38) w INPUT button Selects input source. (p24, 32 ) e POWER ON-OFF button Turns the projector on . This also flashes red when the internal temperature of the projection lamp draws to expand / compress the image in the Digital zoom +/- o LAMP REPLACE... indicator Turns yellow when the life of the projector exceeds the operating range. (p41) u MENU button Opens or closes the On-Screen Menu. (p22) i POINT (Up/Down/Left/Right )...
Owners Manual
Page 12
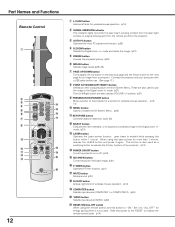
...than 1 minute, release the LASER button and press it is not used as a switching button to activate the Pointer function of the projector or a pointer for wireless mouse operation. (p13, 14) !0 MENU button Opens or closes the On-Screen Menu. (p22) !1... KEYSTONE button Corrects keystone distortion. (p20, 38) !2 SELECT button Executes the item selected, or to the projector. Slide this switch to pan the image in the On-Screen Menu. This button is also used . Part Names and Functions Remote Control q w e r !4 t !5 y !6 u !7 i ...
...than 1 minute, release the LASER button and press it is not used as a switching button to activate the Pointer function of the projector or a pointer for wireless mouse operation. (p13, 14) !0 MENU button Opens or closes the On-Screen Menu. (p22) !1... KEYSTONE button Corrects keystone distortion. (p20, 38) !2 SELECT button Executes the item selected, or to the projector. Slide this switch to pan the image in the On-Screen Menu. This button is also used . Part Names and Functions Remote Control q w e r !4 t !5 y !6 u !7 i ...
Owners Manual
Page 13
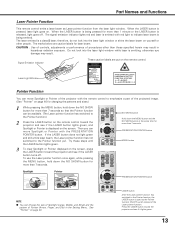
...result in the Setting Menu. See "Pointer" on the screen, press the LASER button toward the projector and see if the LASER button turns off . Press the LASER button toward the projector and see if it lights green. 13 The laser emitted is displayed on . PRESENTATION POINTER button ...MENU button, hold down the NO SHOW button for more than 7 seconds so that the Pointer function can move Spotlight or Pointer of the projector with the PRESENTATION POINTER button. LASER button After the Laser pointer function has switched to the Pointer function.) 2 Press the LASER button on...
...result in the Setting Menu. See "Pointer" on the screen, press the LASER button toward the projector and see if the LASER button turns off . Press the LASER button toward the projector and see if it lights green. 13 The laser emitted is displayed on . PRESENTATION POINTER button ...MENU button, hold down the NO SHOW button for more than 7 seconds so that the Pointer function can move Spotlight or Pointer of the projector with the PRESENTATION POINTER button. LASER button After the Laser pointer function has switched to the Pointer function.) 2 Press the LASER button on...
Owners Manual
Page 14
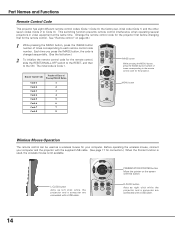
...Wireless Mouse Operation The remote control can be used , the wireless mouse is Code 1. R-CLICK button Acts as right click while the projector and a computer are connected with this button. See "Remote control" on the screen with a USB cable. the factory-set, ...1) and the other seven codes (Code 2 to the ON. Before operating the wireless mouse, connect your computer. Part Names and Functions Remote Control Code This projector has eight different remote control codes (Code 1-Code 8); Remote Control Code Number of Times of Pressing IMAGE Button Code 1 1 Code 2 2 Code 3 3...
...Wireless Mouse Operation The remote control can be used , the wireless mouse is Code 1. R-CLICK button Acts as right click while the projector and a computer are connected with this button. See "Remote control" on the screen with a USB cable. the factory-set, ...1) and the other seven codes (Code 2 to the ON. Before operating the wireless mouse, connect your computer. Part Names and Functions Remote Control Code This projector has eight different remote control codes (Code 1-Code 8); Remote Control Code Number of Times of Pressing IMAGE Button Code 1 1 Code 2 2 Code 3 3...
Owners Manual
Page 15
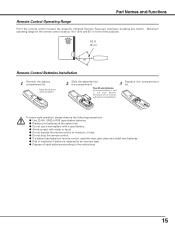
... Two AA size batteries For correct polarity (+ and -), be sure battery terminals are in contact with pins in front of the projector. 16.4' (5 m) 60° Remote Control Batteries Installation 1 Remove the battery compartment lid. Part Names and Functions Remote Control ...Operating Range Point the remote control toward the projector (Infrared Remote Receiver) whenever pressing any button. Maximum operating range for the remote control is replaced by an incorrect type. G...
... Two AA size batteries For correct polarity (+ and -), be sure battery terminals are in contact with pins in front of the projector. 16.4' (5 m) 60° Remote Control Batteries Installation 1 Remove the battery compartment lid. Part Names and Functions Remote Control ...Operating Range Point the remote control toward the projector (Infrared Remote Receiver) whenever pressing any button. Maximum operating range for the remote control is replaced by an incorrect type. G...
Owners Manual
Page 16
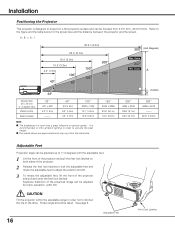
...projected image can be adjusted up to 11.8 degrees with the adjustable feet. 1 Lift the front of the projector and pull the feet lock latches on both sides of the projector. 2 Release the feet lock latches to lock the adjustable feet and rotate the adjustable feet to adjust the position... designed to project on picture quality. Refer to the figure and the table below for the screen size and the distance between the projector and the screen. Installation Positioning the Projector This projector is recommended to limit ambient lighting in order to provide the best image. Zoom 247" Min.
...projected image can be adjusted up to 11.8 degrees with the adjustable feet. 1 Lift the front of the projector and pull the feet lock latches on both sides of the projector. 2 Release the feet lock latches to lock the adjustable feet and rotate the adjustable feet to adjust the position... designed to project on picture quality. Refer to the figure and the table below for the screen size and the distance between the projector and the screen. Installation Positioning the Projector This projector is recommended to limit ambient lighting in order to provide the best image. Zoom 247" Min.
Owners Manual
Page 17
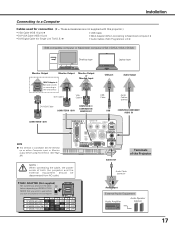
... computer) ✽ • Audio Cables ( Mini Plug (stereo) x 2) ✽ IBM-compatible computer or Macintosh computer (VGA / SVGA / XGA / SXGA) Desktop type Laptop type Monitor Output Monitor Output MAC Adapter ✽ Set slide switches according to use before you turn on RESOLUTION MODE that... you want to the chart below depending on projector and computer. I COMPUTER IN 1 DVI - Monitor Output or Monitor Input DVI Cable ✽ VGA Cable ✽ DVI-VGA Cable COMPUTER...
... computer) ✽ • Audio Cables ( Mini Plug (stereo) x 2) ✽ IBM-compatible computer or Macintosh computer (VGA / SVGA / XGA / SXGA) Desktop type Laptop type Monitor Output Monitor Output MAC Adapter ✽ Set slide switches according to use before you turn on RESOLUTION MODE that... you want to the chart below depending on projector and computer. I COMPUTER IN 1 DVI - Monitor Output or Monitor Input DVI Cable ✽ VGA Cable ✽ DVI-VGA Cable COMPUTER...
Owners Manual
Page 18
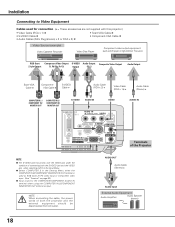
...COMPUTER / COMPONENT RESET MCI COMPUTER IN 2 / COMPONENT IN / MONITOR OUT AUDIO IN AUDIO OUT (VARIABLE) AUDIO IN Terminals of the Projector NOTE G The S-VIDEO jack has priority over the VIDEO jack under the condition of both the S-VIDEO jack and the VIDEO jack when... Component video input. (See "Terminal" on page 39.) G Input sound to Video Equipment Cables used for connection (✽ = These accessories are not supplied with this projector.) • Video Cable (RCA x 1) ✽ • S-VIDEO Cable ✽ • Audio Cables (Mini Plug (stereo) x 2 or RCA x 2) ✽ •...
...COMPUTER / COMPONENT RESET MCI COMPUTER IN 2 / COMPONENT IN / MONITOR OUT AUDIO IN AUDIO OUT (VARIABLE) AUDIO IN Terminals of the Projector NOTE G The S-VIDEO jack has priority over the VIDEO jack under the condition of both the S-VIDEO jack and the VIDEO jack when... Component video input. (See "Terminal" on page 39.) G Input sound to Video Equipment Cables used for connection (✽ = These accessories are not supplied with this projector.) • Video Cable (RCA x 1) ✽ • S-VIDEO Cable ✽ • Audio Cables (Mini Plug (stereo) x 2 or RCA x 2) ✽ •...
Owners Manual
Page 19
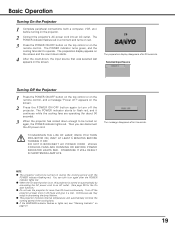
... disappears after 4 seconds. DO NOT DISCONNECT AC POWER CORD WHILE COOLING FANS ARE RUNNING OR BEFORE POWER INDICATOR LIGHTS RED. G This projector monitors internal temperature and automatically controls the running speed of the cooling fans. The preparation display appears on the screen and the count down.... 4 After the count-down enough to turn it continues while the cooling fans are operating (for about 90 seconds). 3 When the projector has cooled down , the input source that was selected last appears on automatically by connecting the AC power cord to operate. appears on ...
... disappears after 4 seconds. DO NOT DISCONNECT AC POWER CORD WHILE COOLING FANS ARE RUNNING OR BEFORE POWER INDICATOR LIGHTS RED. G This projector monitors internal temperature and automatically controls the running speed of the cooling fans. The preparation display appears on the screen and the count down.... 4 After the count-down enough to turn it continues while the cooling fans are operating (for about 90 seconds). 3 When the projector has cooled down , the input source that was selected last appears on automatically by connecting the AC power cord to operate. appears on ...
Owners Manual
Page 22
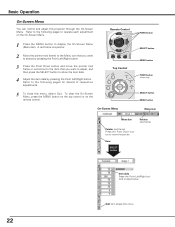
... the item that you want to adjust, and then press the SELECT button to the following pages for details of respective adjustments. 5 To close this projector through the On-Screen Menu.
... the item that you want to adjust, and then press the SELECT button to the following pages for details of respective adjustments. 5 To close this projector through the On-Screen Menu.
Owners Manual
Page 23
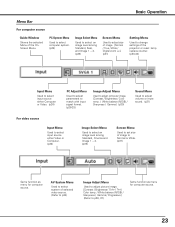
..., and Image 1 ~ 4. (p29) Screen Menu Used to adjust size of image. [Normal / True / Wide / Digital zoom +/-] (p31) Setting Menu Used to change settings of the projector or reset lamp replace counter. (p38-40) Input Menu Used to select input source either Computer or Video. (p24) PC Adjust Menu Used to adjust...
..., and Image 1 ~ 4. (p29) Screen Menu Used to adjust size of image. [Normal / True / Wide / Digital zoom +/-] (p31) Setting Menu Used to change settings of the projector or reset lamp replace counter. (p38-40) Input Menu Used to select input source either Computer or Video. (p24) PC Adjust Menu Used to adjust...
Owners Manual
Page 24
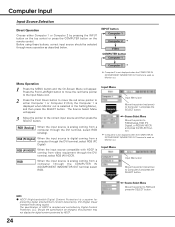
... source is analog coming from a computer through the DVI terminal, select RGB (AV HDCP). Before using these buttons, correct input source should be changed, this projector may not display the digital content protected by Digital Content Protection, LLC. Should the specification be selected through the DVI terminal, select RGB (Analog). Input...
... source is analog coming from a computer through the DVI terminal, select RGB (AV HDCP). Before using these buttons, correct input source should be changed, this projector may not display the digital content protected by Digital Content Protection, LLC. Should the specification be selected through the DVI terminal, select RGB (Analog). Input...


