Owners Manual
Page 2
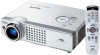
...Film function reproduces pictures faithful to the original film quality from 3:2 pull-down video contents. (See page 40.) ◆ Simple Computer System Setting The projector has the Multi-scan system to conform to almost all computer output signals quickly. (See page 24, 28, and 42.) ◆ PIN Code ...Lock Function The PIN code lock function prevents others except users from using the projector. (See page 20 and 47.) ◆ Digital Zoom (for portability, durability, and ease of screen size) or compress the image size, allowing you...
...Film function reproduces pictures faithful to the original film quality from 3:2 pull-down video contents. (See page 40.) ◆ Simple Computer System Setting The projector has the Multi-scan system to conform to almost all computer output signals quickly. (See page 24, 28, and 42.) ◆ PIN Code ...Lock Function The PIN code lock function prevents others except users from using the projector. (See page 20 and 47.) ◆ Digital Zoom (for portability, durability, and ease of screen size) or compress the image size, allowing you...
Owners Manual
Page 3
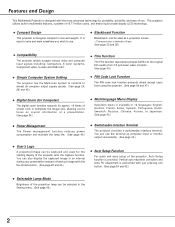
... Function 12 Wireless Mouse Operation 13 Operating Range 13 Remote Control Code 14 Remote Control Battery Installation 14 Installation 15 Positioning the Projector 15 Adjustable Feet 15 Connecting the AC Power Cord 16 Connecting to a Computer 17 Connecting to Video Equipment 18 Connecting to ...Component Video Equipment 19 Basic Operation 20 Turning On the Projector 20 Turning Off the Projector 21 How to Operate the On-Screen Menu 22 Menu Bar 23 Zoom and Focus Adjustment 24 Auto Setup Function ...
... Function 12 Wireless Mouse Operation 13 Operating Range 13 Remote Control Code 14 Remote Control Battery Installation 14 Installation 15 Positioning the Projector 15 Adjustable Feet 15 Connecting the AC Power Cord 16 Connecting to a Computer 17 Connecting to Video Equipment 18 Connecting to ...Component Video Equipment 19 Basic Operation 20 Turning On the Projector 20 Turning Off the Projector 21 How to Operate the On-Screen Menu 22 Menu Bar 23 Zoom and Focus Adjustment 24 Auto Setup Function ...
Owners Manual
Page 4
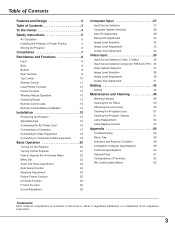
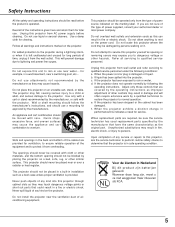
.... Do not put any flammable object or spray can also be built into the beam. - Provide appropriate space on the projector. This projector provides many convenient features and functions. NO USER-SERVICEABLE PARTS INSIDE EXCEPT LAMP REPLACEMENT. THIS SYMBOL INDICATES THAT DANGEROUS VOLTAGE CONSTITUTING ... WARNING : TO REDUCE THE RISK OF FIRE OR ELECTRIC SHOCK, DO NOT EXPOSE THIS APPLIANCE TO RAIN OR MOISTURE. - This projector produces intense light from the ventilation holes. - Do not stare directly into the lens as defined in better condition for allowing air...
.... Do not put any flammable object or spray can also be built into the beam. - Provide appropriate space on the projector. This projector provides many convenient features and functions. NO USER-SERVICEABLE PARTS INSIDE EXCEPT LAMP REPLACEMENT. THIS SYMBOL INDICATES THAT DANGEROUS VOLTAGE CONSTITUTING ... WARNING : TO REDUCE THE RISK OF FIRE OR ELECTRIC SHOCK, DO NOT EXPOSE THIS APPLIANCE TO RAIN OR MOISTURE. - This projector produces intense light from the ventilation holes. - Do not stare directly into the lens as defined in better condition for allowing air...
Owners Manual
Page 5
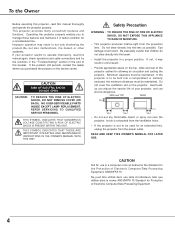
...damp cloth for service. Slots and openings in a fire or electric shock. If liquid has been spilled into this projector on the projector. If the projector has been dropped or the cabinet has been damaged. Read all servicing to dangerous voltage or other controls may expose ...they may cause hazards. Use only with a cart or stand recommended by following conditions: a. Never spill liquid of the equipment and to the projector during a lightning storm, or when it is operated. b. c. Wall or shelf mounting should follow the manufacturer's instructions, and should use near...
...damp cloth for service. Slots and openings in a fire or electric shock. If liquid has been spilled into this projector on the projector. If the projector has been dropped or the cabinet has been damaged. Read all servicing to dangerous voltage or other controls may expose ...they may cause hazards. Use only with a cart or stand recommended by following conditions: a. Never spill liquid of the equipment and to the projector during a lightning storm, or when it is operated. b. c. Wall or shelf mounting should follow the manufacturer's instructions, and should use near...
Owners Manual
Page 6
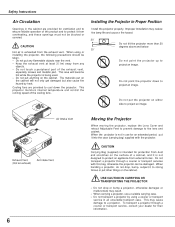
...dust and scratches on the surface of the product and to protect it into the case (carrying bag) supplied with this bag, otherwise the projector can be taken. - When using a courier or transport service in an unsuitable transport case. Do not touch a peripheral part of the cooling... of the exhaust vent, especially screws and metallic part. Do not point the projector down the projector. Air Intake Vent Exhaust Vent (Hot air exhaust) Air Intake Vent 6 Moving the Projector When moving the projector, replace the Lens Cover and retract Adjustable Feet to prevent damage to project an...
...dust and scratches on the surface of the product and to protect it into the case (carrying bag) supplied with this bag, otherwise the projector can be taken. - When using a courier or transport service in an unsuitable transport case. Do not touch a peripheral part of the cooling... of the exhaust vent, especially screws and metallic part. Do not point the projector down the projector. Air Intake Vent Exhaust Vent (Hot air exhaust) Air Intake Vent 6 Moving the Projector When moving the projector, replace the Lens Cover and retract Adjustable Feet to prevent damage to project an...
Owners Manual
Page 7
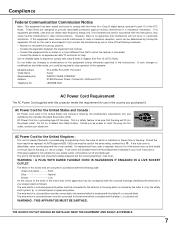
... operation of the equipme Model Numbers Trade Name Responsible party Address Telephone No. : PLC-XU56, PLC-XU51, PLC-SU51 : Sanyo : SANYO FISHER COMPANY : 21605 Plummer Street, Chatsworth, California 91311 : (818)998-7322 AC Power Cord Requirement The AC Power Cord supplied with this projector meets the requirement for the United Kingdom : This cord is already fitted with...
... operation of the equipme Model Numbers Trade Name Responsible party Address Telephone No. : PLC-XU56, PLC-XU51, PLC-SU51 : Sanyo : SANYO FISHER COMPANY : 21605 Plummer Street, Chatsworth, California 91311 : (818)998-7322 AC Power Cord Requirement The AC Power Cord supplied with this projector meets the requirement for the United Kingdom : This cord is already fitted with...
Owners Manual
Page 9
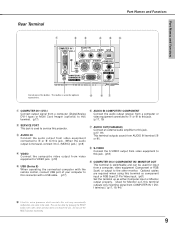
...) VIDEO USB ✽ SERVICE PORT S-VIDEO COMPUTER / COMPONENT RESET MCI COMPUTER IN 2 / COMPONENT IN / MONITOR OUT AUDIO IN AUDIO OUT (VARIABLE) Do not press this projector. This can be used to this jack. (p18) o COMPUTER IN 2/ COMPONENT IN/ MONITOR OUT This terminal is used for input from AUDIO IN terminal (e or...
...) VIDEO USB ✽ SERVICE PORT S-VIDEO COMPUTER / COMPONENT RESET MCI COMPUTER IN 2 / COMPONENT IN / MONITOR OUT AUDIO IN AUDIO OUT (VARIABLE) Do not press this projector. This can be used to this jack. (p18) o COMPUTER IN 2/ COMPONENT IN/ MONITOR OUT This terminal is used for input from AUDIO IN terminal (e or...
Owners Manual
Page 10
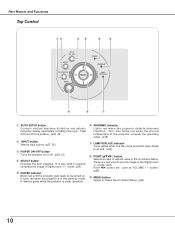
... (p52) i POINT (ed7 8 ) button Selects an item or adjusts value in Digital zoom +/- This also blinks red when the internal temperature of the projector exceeds the operating range. (p49) u LAMP REPLACE indicator Turns yellow when the life of the projection lamp draws to expand/ compress the image in the... On-Screen Menu. button. (p26) o MENU button Opens or closes the On-Screen Menu. (p22) 10 It remains green while the projector is in the Digital zoom +/- These are used to be turned on or off. (p20, 21) r SELECT button Executes the item selected. OFF INPUT...
... (p52) i POINT (ed7 8 ) button Selects an item or adjusts value in Digital zoom +/- This also blinks red when the internal temperature of the projector exceeds the operating range. (p49) u LAMP REPLACE indicator Turns yellow when the life of the projection lamp draws to expand/ compress the image in the... On-Screen Menu. button. (p26) o MENU button Opens or closes the On-Screen Menu. (p22) 10 It remains green while the projector is in the Digital zoom +/- These are used to be turned on or off. (p20, 21) r SELECT button Executes the item selected. OFF INPUT...
Owners Manual
Page 11
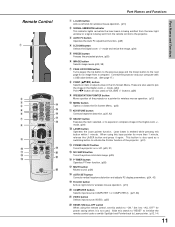
...u PAGE UP/DOWN button Turns pages; mode. (p34) Point 7 8 button are also used as a switching button to activate the Pointer function of the projector or a pointer for wireless mouse operation. (p12) !0 MENU button Opens or closes the On-Screen Menu. (p22) !1 KEYSTONE button Corrects keystone distortion. ...saving when it is emitted while pressing this switch to "RESET" to initialize the remote control code or switch Spotlight and Pointer back to the projector. e AUTO PC button Operates the Auto PC adjustment function. (p29) r D.ZOOM button Selects the Digital zoom +/- buttons. (p26) o...
...u PAGE UP/DOWN button Turns pages; mode. (p34) Point 7 8 button are also used as a switching button to activate the Pointer function of the projector or a pointer for wireless mouse operation. (p12) !0 MENU button Opens or closes the On-Screen Menu. (p22) !1 KEYSTONE button Corrects keystone distortion. ...saving when it is emitted while pressing this switch to "RESET" to initialize the remote control code or switch Spotlight and Pointer back to the projector. e AUTO PC button Operates the Auto PC adjustment function. (p29) r D.ZOOM button Selects the Digital zoom +/- buttons. (p26) o...

Owners Manual
Page 12
...PRESENTATION POINTER button ✔Note: You can move the Spotlight or Pointer with the LASER button lighting green. Press the LASER button toward the projector and see if it lights green. With the LASER button pressed for more than 7 seconds so that the Pointer function will be available.... Emission Indicator These caution labels are the caution labels for more than those specified herein may result. Then move Spotlight or Pointer of the projector with the remote control to emphasize a part of the projected image. 1 With pressing the MENU button, hold down the NO SHOW button...
...PRESENTATION POINTER button ✔Note: You can move the Spotlight or Pointer with the LASER button lighting green. Press the LASER button toward the projector and see if it lights green. With the LASER button pressed for more than 7 seconds so that the Pointer function will be available.... Emission Indicator These caution labels are the caution labels for more than those specified herein may result. Then move Spotlight or Pointer of the projector with the remote control to emphasize a part of the projected image. 1 With pressing the MENU button, hold down the NO SHOW button...
Owners Manual
Page 13
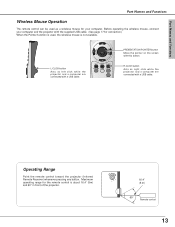
R-CLICK button Acts as a wireless mouse for the remote control is about 16.4' (5m) and 60° in front of the projector. 16.4' (5 m) 60° Remote control 13 Before operating the wireless mouse, connect your computer. PRESENTATION POINTER button Move the pointer on the screen ... computer are connected with the supplied USB cable. (See page 17 for connection.) When the Pointer function is used as right click while the projector and a computer are connected with this button. Part Names and Functions Part Names and Functions Wireless Mouse Operation The remote control can be used ,...
R-CLICK button Acts as a wireless mouse for the remote control is about 16.4' (5m) and 60° in front of the projector. 16.4' (5 m) 60° Remote control 13 Before operating the wireless mouse, connect your computer. PRESENTATION POINTER button Move the pointer on the screen ... computer are connected with the supplied USB cable. (See page 17 for connection.) When the Pointer function is used as right click while the projector and a computer are connected with this button. Part Names and Functions Part Names and Functions Wireless Mouse Operation The remote control can be used ,...
Owners Manual
Page 14
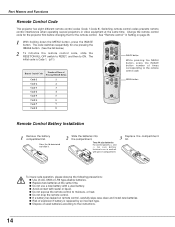
...downward and slide it. 2 Slide the batteries into the compartment. 3 Replace the compartment lid. Part Names and Functions Remote Control Code This projector has eight different remote control codes (Code 1-Code 8). The initial code is replaced by an incorrect type. ● Dispose of times corresponding... 46. 1 With holding down the MENU button, press the IMAGE button. Switching remote control codes prevents remote control interference when operating several projectors or video equipment at the same time. ● Do not use a new battery with a used battery. ● Avoid contact with...
...downward and slide it. 2 Slide the batteries into the compartment. 3 Replace the compartment lid. Part Names and Functions Remote Control Code This projector has eight different remote control codes (Code 1-Code 8). The initial code is replaced by an incorrect type. ● Dispose of times corresponding... 46. 1 With holding down the MENU button, press the IMAGE button. Switching remote control codes prevents remote control interference when operating several projectors or video equipment at the same time. ● Do not use a new battery with a used battery. ● Avoid contact with...
Owners Manual
Page 15
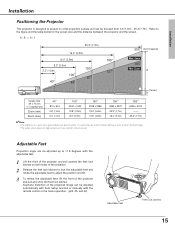
... Keystone distortion of the projected image can be adjusted automatically with Auto Setup function or manually with the adjustable feet. 1 Lift the front of the projector and pull upward the feet lock latches on picture quality. Zoom A (Center) B Screen Size (W x H) mm 4 : 3 aspect ratio Zoom (min) Zoom (max)..." 300" (Inch Diagonal) Max. It is designed to limit ambient lighting in a room has a great influence on both sides of the projector and pull and undo the feet lock latches. Refer to adjust the position and tilt. 3 To retract the adjustable feet, lift the front ...
... Keystone distortion of the projected image can be adjusted automatically with Auto Setup function or manually with the adjustable feet. 1 Lift the front of the projector and pull upward the feet lock latches on picture quality. Zoom A (Center) B Screen Size (W x H) mm 4 : 3 aspect ratio Zoom (min) Zoom (max)..." 300" (Inch Diagonal) Max. It is designed to limit ambient lighting in a room has a great influence on both sides of the projector and pull and undo the feet lock latches. Refer to adjust the position and tilt. 3 To retract the adjustable feet, lift the front ...
Owners Manual
Page 16
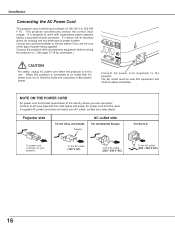
...16 The AC outlet must be used. and Canada Ground AC outlet side For Continental Europe For the U.K. Consult your sales dealer. Connect the projector with single-phase power systems having a grounded neutral conductor. It is not in Stand-by mode and consumes a little electric power. Confirm an ...AC plug type with AC power cord, it is in use a projector. If supplied AC power cord does not match your AC outlet, contact your authorized dealer or service station if you use . When this ...
...16 The AC outlet must be used. and Canada Ground AC outlet side For Continental Europe For the U.K. Consult your sales dealer. Connect the projector with single-phase power systems having a grounded neutral conductor. It is not in Stand-by mode and consumes a little electric power. Confirm an ...AC plug type with AC power cord, it is in use a projector. If supplied AC power cord does not match your AC outlet, contact your authorized dealer or service station if you use . When this ...
Owners Manual
Page 17
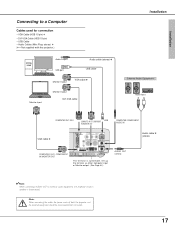
ON ON Note: When connecting the cable, the power cords of both the projector and the external equipment should be disconnected from AC outlet. 17 I USB COMPUTER IN 2/ COMPONENT IN/ MONITOR OUT COMPUTER/ COMPONENT AUDIO IN VGA cable ✽ ... Cable (HDB 15 pin) ✽ • DVI-VGA Cable (HDB 15 pin) • USB Cable • Audio Cables (Mini Plug: stereo Not supplied with this projector.) Monitor Input Audio Output Audio cable (stereo) ✽ USB port USB cable Monitor Output VGA cable ✽ Monitor Output DVI-VGA cable Installation External Audio...
ON ON Note: When connecting the cable, the power cords of both the projector and the external equipment should be disconnected from AC outlet. 17 I USB COMPUTER IN 2/ COMPONENT IN/ MONITOR OUT COMPUTER/ COMPONENT AUDIO IN VGA cable ✽ ... Cable (HDB 15 pin) ✽ • DVI-VGA Cable (HDB 15 pin) • USB Cable • Audio Cables (Mini Plug: stereo Not supplied with this projector.) Monitor Input Audio Output Audio cable (stereo) ✽ USB port USB cable Monitor Output VGA cable ✽ Monitor Output DVI-VGA cable Installation External Audio...
Owners Manual
Page 18
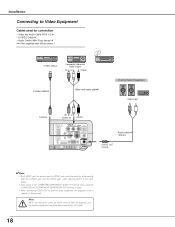
...-in speaker is disconnected. Note: When connecting the cable, the power cords of connecting both the projector and the external equipment should be disconnected from AC outlet. 18 I AUDIO IN R L (MONO) VIDEO USB SERVICE PORT S-VIDEO COMPUTER / / ...connection • Video and Audio Cable (RCA x 3) ✽ • S-VIDEO Cable ✽ • Audio Cables (Mini Plug: stereo Not supplied with this projector.) S-Video Output Composite Video and Audio Output (R) (L) (Video) S-Video cable ✽ Video and audio cable✽ External Audio Equipment Audio Input S-VIDEO (R) (L)...
...-in speaker is disconnected. Note: When connecting the cable, the power cords of connecting both the projector and the external equipment should be disconnected from AC outlet. 18 I AUDIO IN R L (MONO) VIDEO USB SERVICE PORT S-VIDEO COMPUTER / / ...connection • Video and Audio Cable (RCA x 3) ✽ • S-VIDEO Cable ✽ • Audio Cables (Mini Plug: stereo Not supplied with this projector.) S-Video Output Composite Video and Audio Output (R) (L) (Video) S-Video cable ✽ Video and audio cable✽ External Audio Equipment Audio Input S-VIDEO (R) (L)...
Owners Manual
Page 19
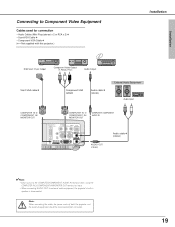
Note: When connecting the cable, the power cords of both the projector and the external equipment should be disconnected from AC outlet. 19 Installation Connecting to Component Video Equipment Cables used for connection • Audio Cables (...Mini Plug (stereo) x 2 or RCA x 2) ✽ • Scart-VGA Cable ✽ • Component-VGA Cable ✽ (✽ = Not supplied with this projector.) Installation RGB Scart 21-pin Output Component Video Output (Y, Pb/Cb, Pr/Cr) Audio Output Scart-VGA cable ✽ Component-VGA cable✽ Audio cable...
Note: When connecting the cable, the power cords of both the projector and the external equipment should be disconnected from AC outlet. 19 Installation Connecting to Component Video Equipment Cables used for connection • Audio Cables (...Mini Plug (stereo) x 2 or RCA x 2) ✽ • Scart-VGA Cable ✽ • Component-VGA Cable ✽ (✽ = Not supplied with this projector.) Installation RGB Scart 21-pin Output Component Video Output (Y, Pb/Cb, Pr/Cr) Audio Output Scart-VGA cable ✽ Component-VGA cable✽ Audio cable...
Owners Manual
Page 20
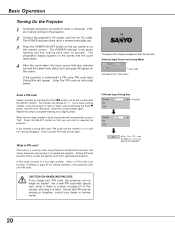
...after 20 seconds. A PIN code consists of this step to "✳". Enter a correct PIN code all over again. Basic Operation Turning On the Projector 1 Complete peripheral connections (with special care, write it at hand. Enter the correct number again. Press the SELECT button so that was selected last...down starts. 4 After the count-down in a moment and lights red. 3 Press the POWER ON-OFF button on the top control or on the projector. 2 Connect the projector's AC power cord into an AC outlet. If you fixed a wrong number, move to "Set" or "Clear" once by pressing the Point 7 ...
...after 20 seconds. A PIN code consists of this step to "✳". Enter a correct PIN code all over again. Basic Operation Turning On the Projector 1 Complete peripheral connections (with special care, write it at hand. Enter the correct number again. Press the SELECT button so that was selected last...down starts. 4 After the count-down in a moment and lights red. 3 Press the POWER ON-OFF button on the top control or on the projector. 2 Connect the projector's AC power cord into an AC outlet. If you fixed a wrong number, move to "Set" or "Clear" once by pressing the Point 7 ...
Owners Manual
Page 21
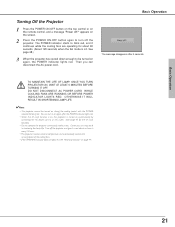
... ON-OFF button again to blink red, and it continues while the cooling fans are operating for the On start function is on, this projector is L2. DO NOT DISCONNECT AC POWER CORD WHILE COOLING FANS ARE RUNNING OR BEFORE POWER INDICATOR LIGHTS RED. You can disconnect the AC ... disappears after the POWER indicator lights red. • When the On start function.) • Do not operate the projector continuously without rest. TO MAINTAIN THE LIFE OF LAMP, ONCE YOU TURN PROJECTOR ON, WAIT AT LEAST 5 MINUTES BEFORE TURNING IT OFF. The POWER indicator starts to turn it a rest about ...
... ON-OFF button again to blink red, and it continues while the cooling fans are operating for the On start function is on, this projector is L2. DO NOT DISCONNECT AC POWER CORD WHILE COOLING FANS ARE RUNNING OR BEFORE POWER INDICATOR LIGHTS RED. You can disconnect the AC ... disappears after the POWER indicator lights red. • When the On start function.) • Do not operate the projector continuously without rest. TO MAINTAIN THE LIFE OF LAMP, ONCE YOU TURN PROJECTOR ON, WAIT AT LEAST 5 MINUTES BEFORE TURNING IT OFF. The POWER indicator starts to turn it a rest about ...

Owners Manual
Page 22
... data. VOLUME + AUTO SET UP MENU SELECT LAMP REPLACE POINT button (outer ring) SELECT button MENU button Refer to Operate the On-Screen Menu The projector can be adjusted or set via the On-Screen Menu. On-Screen Menu Menu icon Menu bar Pointer (red frame) Pointer (red frame) Press the...
... data. VOLUME + AUTO SET UP MENU SELECT LAMP REPLACE POINT button (outer ring) SELECT button MENU button Refer to Operate the On-Screen Menu The projector can be adjusted or set via the On-Screen Menu. On-Screen Menu Menu icon Menu bar Pointer (red frame) Pointer (red frame) Press the...


