Owners Manual
Page 4
...the projector properly enables you purchased the projector or the service center. REFER SERVICING TO QUALIFIED SERVICE PERSONNEL. THIS SYMBOL INDICATES THAT THERE ARE IMPORTANT OPERATING AND MAINTENANCE INSTRUCTIONS IN THE OWNER'S MANUAL WITH THIS UNIT. Minimum clearance must be used for an... extended time, unplug the projector from the power outlet. Heat build- NO USER-SERVICEABLE PARTS INSIDE EXCEPT LAMP REPLACEMENT. Safety Precaution WARNING...
...the projector properly enables you purchased the projector or the service center. REFER SERVICING TO QUALIFIED SERVICE PERSONNEL. THIS SYMBOL INDICATES THAT THERE ARE IMPORTANT OPERATING AND MAINTENANCE INSTRUCTIONS IN THE OWNER'S MANUAL WITH THIS UNIT. Minimum clearance must be used for an... extended time, unplug the projector from the power outlet. Heat build- NO USER-SERVICEABLE PARTS INSIDE EXCEPT LAMP REPLACEMENT. Safety Precaution WARNING...
Owners Manual
Page 20
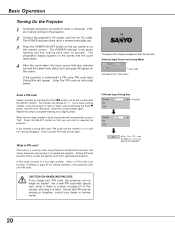
If the projector is a security code using Personal Identification Number that allows the person who knows it to operate the projector. Repeat this manual, and keep it at hand. Press the SELECT button so that was selected last and the Lamp mode status icon (see page 45) appear on ... the projector. Refer to PIN Code Lock function in Setting on the remote control. CAUTION ON HANDLING PIN CODE If you forget your dealer or service center. The preparation display appears on the screen and the count down starts. 4 After the count-down in a moment and lights red. 3 Press the POWER...
If the projector is a security code using Personal Identification Number that allows the person who knows it to operate the projector. Repeat this manual, and keep it at hand. Press the SELECT button so that was selected last and the Lamp mode status icon (see page 45) appear on ... the projector. Refer to PIN Code Lock function in Setting on the remote control. CAUTION ON HANDLING PIN CODE If you forget your dealer or service center. The preparation display appears on the screen and the count down starts. 4 After the count-down in a moment and lights red. 3 Press the POWER...

Owners Manual
Page 53
..., injury, or create a fire hazard. ● Lamp life may result in which must be cleaned up , replace the lamp with projector service. Contact an authorized service station for each lamp. Press the Point 7 8 button to move the red frame pointer to the Setting Menu icon. 2 Press the Point... and then press the SELECT button. No one IMMEDIATELY after replacing the lamp. Improper handling may result in the Lamp Replacement section of this manual. ) Continuous use as a result of hours of broken glass. 53 Risk of explosion may explode as a result of vibration, shock or...
..., injury, or create a fire hazard. ● Lamp life may result in which must be cleaned up , replace the lamp with projector service. Contact an authorized service station for each lamp. Press the Point 7 8 button to move the red frame pointer to the Setting Menu icon. 2 Press the Point... and then press the SELECT button. No one IMMEDIATELY after replacing the lamp. Improper handling may result in the Lamp Replacement section of this manual. ) Continuous use as a result of hours of broken glass. 53 Risk of explosion may explode as a result of vibration, shock or...
Owners Manual
Page 54
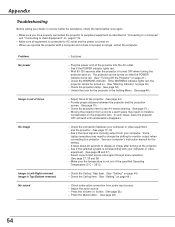
... 35 and 36) - Make sure you operate the projector with your computer. See if the selected system is Top/Bottom reversed. See your dealer or service center for assistance, check the items below once again. - Check the Ceiling item. (See "Setting" on page17-19. - When you have properly ...Press the Mute button. (See page 26.) 54 Problem: No power Image is not out of focus. Appendix Troubleshooting Before calling your computer's instruction manual for the setting. - Plug the power cord of the projector. (See page 24.) - Check the projection lens to a projector.
... 35 and 36) - Make sure you operate the projector with your computer. See if the selected system is Top/Bottom reversed. See your dealer or service center for assistance, check the items below once again. - Check the Ceiling item. (See "Setting" on page17-19. - When you have properly ...Press the Mute button. (See page 26.) 54 Problem: No power Image is not out of focus. Appendix Troubleshooting Before calling your computer's instruction manual for the setting. - Plug the power cord of the projector. (See page 24.) - Check the projection lens to a projector.
Owners Manual
Page 60
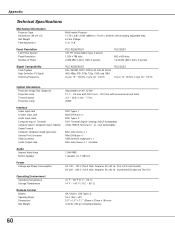
...8kgs) 0˚ to 11.8˚ Panel Resolution LCD Panel System Panel Resolution Number of Pixels PLC-XU56/XU51 0.8" TFT Active Matrix type, 3 panels 1,024 x 768 dots 2,359,296 (1,024 x 768 x 3 panels) PLC-SU51 800 x 600 dots 1,440,000 (800 x 600 x 3 panels) Signal Compatibility...20.0 mm ~ 30.0 mm with manual zoom and focus 3.3' ~ 25.3' (1.0m ~ 7.7m) 200W Interface Video Input Jack S-Video Input Jack Audio Input Jacks Computer Input 1 Terminal Computer Input 2/ Component Input / Monitor Output Terminal Computer/ Component Audio Input Jacks Service Port Connector USB Connector Audio Output ...
...8kgs) 0˚ to 11.8˚ Panel Resolution LCD Panel System Panel Resolution Number of Pixels PLC-XU56/XU51 0.8" TFT Active Matrix type, 3 panels 1,024 x 768 dots 2,359,296 (1,024 x 768 x 3 panels) PLC-SU51 800 x 600 dots 1,440,000 (800 x 600 x 3 panels) Signal Compatibility...20.0 mm ~ 30.0 mm with manual zoom and focus 3.3' ~ 25.3' (1.0m ~ 7.7m) 200W Interface Video Input Jack S-Video Input Jack Audio Input Jacks Computer Input 1 Terminal Computer Input 2/ Component Input / Monitor Output Terminal Computer/ Component Audio Input Jacks Service Port Connector USB Connector Audio Output ...
Owners Manual
Page 63
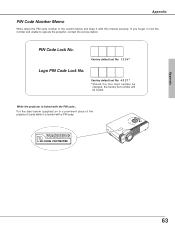
While the projector is locked with a PIN code. Appendix 63 If you forgot or lost the number and unable to operate the projector, contact the service station. Factory default set No: 4 3 2 1* *Should the four-digit number be changed, the factory set No: 1 2 3 4* Logo PIN Code Lock No. Factory default set number ...) on in a prominent place of the projector's body while it with the PIN code... Put the label below and keep it is locked with this manual securely.
While the projector is locked with a PIN code. Appendix 63 If you forgot or lost the number and unable to operate the projector, contact the service station. Factory default set No: 4 3 2 1* *Should the four-digit number be changed, the factory set No: 1 2 3 4* Logo PIN Code Lock No. Factory default set number ...) on in a prominent place of the projector's body while it with the PIN code... Put the label below and keep it is locked with this manual securely.


