

Instruction Manual, PLC-XU56
Page 2
...can be used as a projection screen. ✳ The board color is limited to Green. (See page 32 and 38.) ◆ Compatibility The projector widely accepts various video and computer input signals including; Computers, 6 Color systems, Component video, S-video and RGB scart. ◆ Simple Computer System Setting...pull-down video contents. (See page 40.) ◆ PIN Code Lock Function The PIN code lock function prevents others except users from using the projector. (See page 20 and 47.) ◆ Digital Zoom (for portability, durability, and ease of use. You can also display the captured ...
...can be used as a projection screen. ✳ The board color is limited to Green. (See page 32 and 38.) ◆ Compatibility The projector widely accepts various video and computer input signals including; Computers, 6 Color systems, Component video, S-video and RGB scart. ◆ Simple Computer System Setting...pull-down video contents. (See page 40.) ◆ PIN Code Lock Function The PIN code lock function prevents others except users from using the projector. (See page 20 and 47.) ◆ Digital Zoom (for portability, durability, and ease of use. You can also display the captured ...
Instruction Manual, PLC-XU56
Page 3
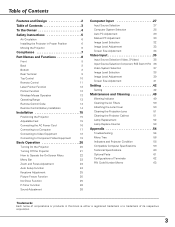
... Function 12 Wireless Mouse Operation 13 Operating Range 13 Remote Control Code 14 Remote Control Battery Installation 14 Installation 15 Positioning the Projector 15 Adjustable Feet 15 Connecting the AC Power Cord 16 Connecting to a Computer 17 Connecting to Video Equipment 18 Connecting to ...Component Video Equipment 19 Basic Operation 20 Turning On the Projector 20 Turning Off the Projector 21 How to Operate the On-Screen Menu 22 Menu Bar 23 Zoom and Focus Adjustment 24 Auto Setup Function ...
... Function 12 Wireless Mouse Operation 13 Operating Range 13 Remote Control Code 14 Remote Control Battery Installation 14 Installation 15 Positioning the Projector 15 Adjustable Feet 15 Connecting the AC Power Cord 16 Connecting to a Computer 17 Connecting to Video Equipment 18 Connecting to ...Component Video Equipment 19 Basic Operation 20 Turning On the Projector 20 Turning Off the Projector 21 How to Operate the On-Screen Menu 22 Menu Bar 23 Zoom and Focus Adjustment 24 Auto Setup Function ...
Instruction Manual, PLC-XU56
Page 4
... enclosed, the minimum distances must be maintained. Minimum clearance must be maintained. Heat buildup can reduce the service life of your projector seems to manage those features and maintains it may result in not only shortening the product-life, but also malfunctions, fire hazard...salle d'ordinateurs telle que définie dans la norme ANSI/NFPA 75 Standard for use in a computer room as possible. This projector provides many convenient features and functions. THIS SYMBOL INDICATES THAT DANGEROUS VOLTAGE CONSTITUTING A RISK OF ELECTRIC SHOCK IS PRESENT WITHIN THIS UNIT....
... enclosed, the minimum distances must be maintained. Minimum clearance must be maintained. Heat buildup can reduce the service life of your projector seems to manage those features and maintains it may result in not only shortening the product-life, but also malfunctions, fire hazard...salle d'ordinateurs telle que définie dans la norme ANSI/NFPA 75 Standard for use in a computer room as possible. This projector provides many convenient features and functions. THIS SYMBOL INDICATES THAT DANGEROUS VOLTAGE CONSTITUTING A RISK OF ELECTRIC SHOCK IS PRESENT WITHIN THIS UNIT....

Instruction Manual, PLC-XU56
Page 5
...and should never be covered with a cart or stand recommended by following conditions: a. The openings should use a mounting kit approved by placing the projector on a bed, sofa, rug, or other materials, and the bottom opening or removing covers may fall, causing serious injury to a child or...ensure reliable operation of airconditioning equipment. Do not use . Slots and openings in a fire or electric shock. Do not install the projector near water... Do not overload wall outlets and extension cords as they may result in Nederland Bij dit product zijn batterijen geleverd. ...
...and should never be covered with a cart or stand recommended by following conditions: a. The openings should use a mounting kit approved by placing the projector on a bed, sofa, rug, or other materials, and the bottom opening or removing covers may fall, causing serious injury to a child or...ensure reliable operation of airconditioning equipment. Do not use . Slots and openings in a fire or electric shock. Do not install the projector near water... Do not overload wall outlets and extension cords as they may result in Nederland Bij dit product zijn batterijen geleverd. ...

Instruction Manual, PLC-XU56
Page 6
...exhaust vent, especially screws and metallic part. Improper Installation may reduce the lamp life and cause a fire hazard. 20˚ Do not tilt the projector more than 20 degrees from the exhaust vent. This may result. - The materials put it is intended for an extended period, put on the cabinet... for protection from dust and scratches on the surface of the product and to protect it to strong forces or put the projector on the cabinet. Do not transport a projector by heat. Keep the exhaust vent at least 3'(1m) away from external forces. Do not put other things on either...
...exhaust vent, especially screws and metallic part. Improper Installation may reduce the lamp life and cause a fire hazard. 20˚ Do not tilt the projector more than 20 degrees from the exhaust vent. This may result. - The materials put it is intended for an extended period, put on the cabinet... for protection from dust and scratches on the surface of the product and to protect it to strong forces or put the projector on the cabinet. Do not transport a projector by heat. Keep the exhaust vent at least 3'(1m) away from external forces. Do not put other things on either...
Instruction Manual, PLC-XU56
Page 7
... A LIVE SOCKET OUTLET. WARNING : THIS APPARATUS MUST BE EARTHED. Model Numbers Trade Name Responsible party Address Telephone No. : PLC-XU58, PLC-XU56, PLC-XU51, PLC-SU51 : Sanyo : SANYO FISHER COMPANY : 21605 Plummer Street, Chatsworth, California 91311 : (818)998-7322 AC Power Cord Requirement The AC Power Cord ...rating, marked thus . Compliance Federal Communication Commission Notice Note : This equipment has been tested and found to comply with this projector meets the requirement for use the plug with the letter N or coloured black. If such changes or modifications should be ...
... A LIVE SOCKET OUTLET. WARNING : THIS APPARATUS MUST BE EARTHED. Model Numbers Trade Name Responsible party Address Telephone No. : PLC-XU58, PLC-XU56, PLC-XU51, PLC-SU51 : Sanyo : SANYO FISHER COMPANY : 21605 Plummer Street, Chatsworth, California 91311 : (818)998-7322 AC Power Cord Requirement The AC Power Cord ...rating, marked thus . Compliance Federal Communication Commission Notice Note : This equipment has been tested and found to comply with this projector meets the requirement for use the plug with the letter N or coloured black. If such changes or modifications should be ...

Instruction Manual, PLC-XU56
Page 9
... y). e AUDIO IN Connect the audio output from video equipment connected to r or i to this jack. (When the audio output is used for Monitor out, this projector. Do not use the RESET function excessively. 9 Optional cables are required when using this jack. (p17- 19) This terminal outputs sound from COMPUTER IN 1 DVII...
... y). e AUDIO IN Connect the audio output from video equipment connected to r or i to this jack. (When the audio output is used for Monitor out, this projector. Do not use the RESET function excessively. 9 Optional cables are required when using this jack. (p17- 19) This terminal outputs sound from COMPUTER IN 1 DVII...

Instruction Manual, PLC-XU56
Page 10
... r SELECT button Executes the item selected. mode. (p34) Point 7 8 button are also used as VOLUME +/- mode. (p34) t POWER indicator Blinks red until the projector gets ready to expand/ compress the image in the stand-by mode. This also blinks red when the internal temperature of the... parameters including Fine sync., Total dots and Picture position. (p24, 42) w INPUT button Selects input source. (p27, 36 ) e POWER ON-OFF button Turns the projector on . Part Names and Functions Top Control qw er t y ON - These are used to an end. (p52, 58) i POINT (ed7 8 ) button Selects...
... r SELECT button Executes the item selected. mode. (p34) Point 7 8 button are also used as VOLUME +/- mode. (p34) t POWER indicator Blinks red until the projector gets ready to expand/ compress the image in the stand-by mode. This also blinks red when the internal temperature of the... parameters including Fine sync., Total dots and Picture position. (p24, 42) w INPUT button Selects input source. (p27, 36 ) e POWER ON-OFF button Turns the projector on . Part Names and Functions Top Control qw er t y ON - These are used to an end. (p52, 58) i POINT (ed7 8 ) button Selects...

Instruction Manual, PLC-XU56
Page 11
... to the previous page and the Down button to the next page for power saving when it again. Laser beam is not used to the projector. mode and resize the image. (p34) t FREEZE button Freezes the projected picture. (p25) y IMAGE button Selects image levels.(p32, 38) u PAGE UP/DOWN button... emitted while pressing this switch to "ALL OFF" for an image from the remote control to pan the image in the Digital zoom +/- Connect the projector and your computer with a USB cable before use. (See page 17.) i POINT (ed7 8) button Selects an item or adjusts value in the Digital zoom +/...
... to the previous page and the Down button to the next page for power saving when it again. Laser beam is not used to the projector. mode and resize the image. (p34) t FREEZE button Freezes the projected picture. (p25) y IMAGE button Selects image levels.(p32, 38) u PAGE UP/DOWN button... emitted while pressing this switch to "ALL OFF" for an image from the remote control to pan the image in the Digital zoom +/- Connect the projector and your computer with a USB cable before use. (See page 17.) i POINT (ed7 8) button Selects an item or adjusts value in the Digital zoom +/...

Instruction Manual, PLC-XU56
Page 12
...above until the LASER button lights green. 3 To clear the Spotlight or Pointer out the screen, press the LASER button toward the projector. Spotlight or Pointer is emitted, otherwise eye damage may result in the Setting Menu. PRESENTATION POINTER button MENU button Spotlight Pointer PRESENTATION ... a part of procedures other people. With the LASER button pressed for laser beam. Below are put on the remote control toward the projector and see if it lights green. CAUTION : Use of controls, adjustments or performance of the projected image. 1 With pressing the MENU...
...above until the LASER button lights green. 3 To clear the Spotlight or Pointer out the screen, press the LASER button toward the projector. Spotlight or Pointer is emitted, otherwise eye damage may result in the Setting Menu. PRESENTATION POINTER button MENU button Spotlight Pointer PRESENTATION ... a part of procedures other people. With the LASER button pressed for laser beam. Below are put on the remote control toward the projector and see if it lights green. CAUTION : Use of controls, adjustments or performance of the projected image. 1 With pressing the MENU...

Instruction Manual, PLC-XU56
Page 13
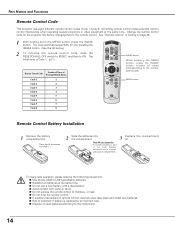
... connected with a USB cable. Operating Range Point the remote control toward the projector (Infrared Remote Receiver) whenever pressing any button. PRESENTATION POINTER button Move the ...not available. Maximum operating range for connection.) When the Pointer function is used as left click while the projector and a computer are connected with a USB cable. Part Names and Functions Part Names and Functions Wireless Mouse...about 16.4' (5m) and 60° in front of the projector. 16.4' (5 m) 60° Remote control 13 L-CLICK button Acts as a wireless mouse for your computer and the...
... connected with a USB cable. Operating Range Point the remote control toward the projector (Infrared Remote Receiver) whenever pressing any button. PRESENTATION POINTER button Move the ...not available. Maximum operating range for connection.) When the Pointer function is used as left click while the projector and a computer are connected with a USB cable. Part Names and Functions Part Names and Functions Wireless Mouse...about 16.4' (5m) and 60° in front of the projector. 16.4' (5 m) 60° Remote control 13 L-CLICK button Acts as a wireless mouse for your computer and the...
Instruction Manual, PLC-XU56
Page 14
...the instructions. 14 MENU button Remote Control Battery Installation 1 Remove the battery compartment lid. Part Names and Functions Remote Control Code This projector has eight different remote control codes (Code 1-Code 8). See "Remote control" in Setting on remote control, carefully wipe case clean and.... 1 With holding down the MENU button, press the IMAGE button. Switching remote control codes prevents remote control interference when operating several projectors or video equipment at the same time. ● Do not use a new battery with a used batteries according to ON. To...
...the instructions. 14 MENU button Remote Control Battery Installation 1 Remove the battery compartment lid. Part Names and Functions Remote Control Code This projector has eight different remote control codes (Code 1-Code 8). See "Remote control" in Setting on remote control, carefully wipe case clean and.... 1 With holding down the MENU button, press the IMAGE button. Switching remote control codes prevents remote control interference when operating several projectors or video equipment at the same time. ● Do not use a new battery with a used batteries according to ON. To...

Instruction Manual, PLC-XU56
Page 15
...on a flat projection surface and can be adjusted automatically with Auto Setup function or manually with the adjustable feet. 1 Lift the front of the projector and pull upward the feet lock latches on picture quality. Zoom 195" Min. Adjustable Feet Projection angle can be focused from the actual size.... the adjustable feet and rotate the adjustable feet to adjust the position and tilt. 3 To retract the adjustable feet, lift the front of the projector and pull and undo the feet lock latches. Refer to 11.8 degrees with the remote control or the menu operation. (p24, 25, and 42...
...on a flat projection surface and can be adjusted automatically with Auto Setup function or manually with the adjustable feet. 1 Lift the front of the projector and pull upward the feet lock latches on picture quality. Zoom 195" Min. Adjustable Feet Projection angle can be focused from the actual size.... the adjustable feet and rotate the adjustable feet to adjust the position and tilt. 3 To retract the adjustable feet, lift the front of the projector and pull and undo the feet lock latches. Refer to 11.8 degrees with the remote control or the menu operation. (p24, 25, and 42...

Instruction Manual, PLC-XU56
Page 16
... chart below and proper AC power cord must be easily accessible. If supplied AC power cord does not match your AC outlet, contact your projector. and Canada Ground AC outlet side For Continental Europe For the U.K. When this equipment and must meet requirement of the country where you are...dealer. Confirm an AC plug type with AC power cord, it is not in Stand-by mode and consumes a little electric power. Projector side For the U.S.A. This projector automatically selects the correct input voltage. To reduce risk of electrical shock, do not plug into any other type of 100-120 V or...
... chart below and proper AC power cord must be easily accessible. If supplied AC power cord does not match your AC outlet, contact your projector. and Canada Ground AC outlet side For Continental Europe For the U.K. When this equipment and must meet requirement of the country where you are...dealer. Confirm an AC plug type with AC power cord, it is not in Stand-by mode and consumes a little electric power. Projector side For the U.S.A. This projector automatically selects the correct input voltage. To reduce risk of electrical shock, do not plug into any other type of 100-120 V or...

Instruction Manual, PLC-XU56
Page 17
ON ON Note: When connecting the cable, the power cords of both the projector and the external equipment should be disconnected from AC outlet. 17 I USB COMPUTER IN 2/ COMPONENT IN/ MONITOR OUT COMPUTER/ COMPONENT AUDIO IN VGA cable ✽ ... Cable (HDB 15 pin) ✽ • DVI-VGA Cable (HDB 15 pin) • USB Cable • Audio Cables (Mini Plug: stereo Not supplied with this projector.) Monitor Input Audio Output Audio cable (stereo) ✽ USB port USB cable Monitor Output VGA cable ✽ Monitor Output DVI-VGA cable Installation External Audio...
ON ON Note: When connecting the cable, the power cords of both the projector and the external equipment should be disconnected from AC outlet. 17 I USB COMPUTER IN 2/ COMPONENT IN/ MONITOR OUT COMPUTER/ COMPONENT AUDIO IN VGA cable ✽ ... Cable (HDB 15 pin) ✽ • DVI-VGA Cable (HDB 15 pin) • USB Cable • Audio Cables (Mini Plug: stereo Not supplied with this projector.) Monitor Input Audio Output Audio cable (stereo) ✽ USB port USB cable Monitor Output VGA cable ✽ Monitor Output DVI-VGA cable Installation External Audio...

Instruction Manual, PLC-XU56
Page 18
...AUDIO IN AUDIO OUT ((VVAARRIAIBALBE)LE) Audio cable ✽ (stereo) AUDIO OUT (stereo) ✔Note: • If both the projector and the external equipment should be disconnected from the VIDEO jack. • When connecting AUDIO OUT to Video Equipment Cables used for connection ...Video and Audio Cable (RCA x 3) ✽ • S-VIDEO Cable ✽ • Audio Cable (Mini Plug: stereo Not supplied with this projector.) S-Video Output Composite Video and Audio Output (R) (L) (Video) S-Video cable ✽ Video and audio cable✽ External Audio Equipment Audio Input S-...
...AUDIO IN AUDIO OUT ((VVAARRIAIBALBE)LE) Audio cable ✽ (stereo) AUDIO OUT (stereo) ✔Note: • If both the projector and the external equipment should be disconnected from the VIDEO jack. • When connecting AUDIO OUT to Video Equipment Cables used for connection ...Video and Audio Cable (RCA x 3) ✽ • S-VIDEO Cable ✽ • Audio Cable (Mini Plug: stereo Not supplied with this projector.) S-Video Output Composite Video and Audio Output (R) (L) (Video) S-Video cable ✽ Video and audio cable✽ External Audio Equipment Audio Input S-...

Instruction Manual, PLC-XU56
Page 19
...8226; Audio Cables (Mini Plug (stereo) x 2 or RCA x 2) ✽ • Scart-VGA Cable ✽ • Component-VGA Cable ✽ (✽ = Not supplied with this projector.) Installation RGB Scart 21-pin Output Component Video Output (Y, Pb/Cb, Pr/Cr) Audio Output Scart-VGA cable ✽ Component-VGA cable✽ Audio cable... terminal when using the COMPUTER IN 2/COMPONENT IN/MONITOR OUT terminal as input. • When connecting AUDIO OUT to external audio equipment, the projector's built-in speaker is disconnected. Note: When connecting the cable, the power cords of both the...
...8226; Audio Cables (Mini Plug (stereo) x 2 or RCA x 2) ✽ • Scart-VGA Cable ✽ • Component-VGA Cable ✽ (✽ = Not supplied with this projector.) Installation RGB Scart 21-pin Output Component Video Output (Y, Pb/Cb, Pr/Cr) Audio Output Scart-VGA cable ✽ Component-VGA cable✽ Audio cable... terminal when using the COMPUTER IN 2/COMPONENT IN/MONITOR OUT terminal as input. • When connecting AUDIO OUT to external audio equipment, the projector's built-in speaker is disconnected. Note: When connecting the cable, the power cords of both the...
Instruction Manual, PLC-XU56
Page 20
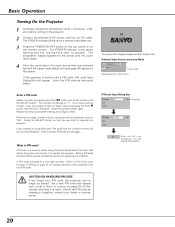
... four-digit number. When the four-digit number is a security code using Personal Identification Number that allows the person who knows it to operate the projector. A PIN code consists of a four-digit number. CAUTION ON HANDLING PIN CODE If you fixed a wrong number, move to "Set". The... pressing the Point d button, then return to "PIN code". The POWER indicator turns green lighting and the cooling fans start to operate the projector. Enter the PIN code as instructed below. 16 The preparation display disappears after 20 seconds. Repeat this manual, and keep it at hand. ...
... four-digit number. When the four-digit number is a security code using Personal Identification Number that allows the person who knows it to operate the projector. A PIN code consists of a four-digit number. CAUTION ON HANDLING PIN CODE If you fixed a wrong number, move to "Set". The... pressing the Point d button, then return to "PIN code". The POWER indicator turns green lighting and the cooling fans start to operate the projector. Enter the PIN code as instructed below. 16 The preparation display disappears after 20 seconds. Repeat this manual, and keep it at hand. ...

Instruction Manual, PLC-XU56
Page 21
... again after 4 seconds. Turn off ?" Basic Operation The message disappears after the POWER indicator lights red. • When the On start function is on, this projector is turned on automatically by connecting the AC power cord to blink red, and it a rest about 90 seconds. (About 120 seconds when the fan.... The POWER indicator starts to an AC outlet. (See page 45 for about an hour in shortening the lamp life. Basic Operation Turning Off the Projector 1 Press the POWER ON-OFF button on the top control or on during the cooling period with the POWER indicator blinking red.
... again after 4 seconds. Turn off ?" Basic Operation The message disappears after the POWER indicator lights red. • When the On start function is on, this projector is turned on automatically by connecting the AC power cord to blink red, and it a rest about 90 seconds. (About 120 seconds when the fan.... The POWER indicator starts to an AC outlet. (See page 45 for about an hour in shortening the lamp life. Basic Operation Turning Off the Projector 1 Press the POWER ON-OFF button on the top control or on during the cooling period with the POWER indicator blinking red.

Instruction Manual, PLC-XU56
Page 22
... button (outer ring) SELECT button MENU button Basic Operation How to the following pages for respective adjustment. Refer to Operate the On-Screen Menu The projector can be adjusted or set via the On-Screen Menu.
... button (outer ring) SELECT button MENU button Basic Operation How to the following pages for respective adjustment. Refer to Operate the On-Screen Menu The projector can be adjusted or set via the On-Screen Menu.


