Owners Manual
Page 3
...Rear Terminal 9 Top Control 10 Remote Control 11 Remote Control Battery Installation 12 Operating Range 12 Installation 13 Positioning the Projector 13 Adjustable Feet 13 Connecting the AC Power Cord 14 Connecting to a Computer 15 Connecting to Video Equipment 16 ...the Projection Lens 54 Cleaning the Projector Cabinet 54 Lamp Replacement 55 Lamp Replacement Counter 56 Appendix 57 Troubleshooting 57 Menu Tree 59 Indicators and Projector Condition 61 Compatible Computer Specifications 62 Technical Specifications 63 Optional Parts 64 Configurations of...
...Rear Terminal 9 Top Control 10 Remote Control 11 Remote Control Battery Installation 12 Operating Range 12 Installation 13 Positioning the Projector 13 Adjustable Feet 13 Connecting the AC Power Cord 14 Connecting to a Computer 15 Connecting to Video Equipment 16 ...the Projection Lens 54 Cleaning the Projector Cabinet 54 Lamp Replacement 55 Lamp Replacement Counter 56 Appendix 57 Troubleshooting 57 Menu Tree 59 Indicators and Projector Condition 61 Compatible Computer Specifications 62 Technical Specifications 63 Optional Parts 64 Configurations of...

Owners Manual
Page 28
...memorize those signal formats. Press the Point 7 8 buttons to move the red framed pointer to the item that you to recall the setting for a specific computer. 1 Press the MENU button to an item and press the SELECT button. Move the red framed pointer to display the On-Screen Menu. of... this projector. Fine sync Eliminate flicker from the image displayed. Press the SELECT button at the Current mode item to display the adjustment dialog box. It allows...
...memorize those signal formats. Press the Point 7 8 buttons to move the red framed pointer to the item that you to recall the setting for a specific computer. 1 Press the MENU button to an item and press the SELECT button. Move the red framed pointer to display the On-Screen Menu. of... this projector. Fine sync Eliminate flicker from the image displayed. Press the SELECT button at the Current mode item to display the adjustment dialog box. It allows...

Owners Manual
Page 37
Video System Selection 1 Press the MENU button to select a specific broadcast signal format among 480i, 575i, 480p, 575p, 720p, 1035i, and 1080i. PAL/SECAM/NTSC/NTSC4.43/PAL-M/PAL-N If the projector cannot reproduce proper video image, it is necessary to select and then press the SELECT button. Move the pointer to...the AV System Menu icon. 2 Press the Point ed buttons to move the red arrow pointer to the system that you want to select a specific component video signal format among PAL, SECAM, NTSC, NTSC 4.43, PAL-M, and PAL-N. When Video System is necessary to display the On-Screen ...
Video System Selection 1 Press the MENU button to select a specific broadcast signal format among 480i, 575i, 480p, 575p, 720p, 1035i, and 1080i. PAL/SECAM/NTSC/NTSC4.43/PAL-M/PAL-N If the projector cannot reproduce proper video image, it is necessary to select and then press the SELECT button. Move the pointer to...the AV System Menu icon. 2 Press the Point ed buttons to move the red arrow pointer to the system that you want to select a specific component video signal format among PAL, SECAM, NTSC, NTSC 4.43, PAL-M, and PAL-N. When Video System is necessary to display the On-Screen ...

Owners Manual
Page 62
...adjustment can accept the signal from all computers with the V, H-Frequency below mentioned and less than 140 MHz of Dot Clock. Appendix Compatible Computer Specifications Basically this projector can be limited. ON-SCREEN DISPLAY RESOLUTION VGA 1 VGA 2 640 x 480 720 x 400 VGA 3 VGA 4 VGA 5 640 x... MAC 16 XGA 1 XGA 2 XGA 3 XGA 4 XGA 5 800 x 600 800 x 600 800 x 600 800 x 600 800 x 600 832 x 624 1024 x 768 1024 x 768 1024 x 768 1024 x 768 1024 x 768 XGA 6 XGA 7 XGA 8 1024 x 768 1024 x 768 1024 x 768 XGA 9 XGA 10 XGA 11 1024 x 768 1024 x 768 1024 x 768 XGA 12 XGA 13 XGA 14 1024 ...
...adjustment can accept the signal from all computers with the V, H-Frequency below mentioned and less than 140 MHz of Dot Clock. Appendix Compatible Computer Specifications Basically this projector can be limited. ON-SCREEN DISPLAY RESOLUTION VGA 1 VGA 2 640 x 480 720 x 400 VGA 3 VGA 4 VGA 5 640 x... MAC 16 XGA 1 XGA 2 XGA 3 XGA 4 XGA 5 800 x 600 800 x 600 800 x 600 800 x 600 800 x 600 832 x 624 1024 x 768 1024 x 768 1024 x 768 1024 x 768 1024 x 768 XGA 6 XGA 7 XGA 8 1024 x 768 1024 x 768 1024 x 768 XGA 9 XGA 10 XGA 11 1024 x 768 1024 x 768 1024 x 768 XGA 12 XGA 13 XGA 14 1024 ...
Owners Manual
Page 63
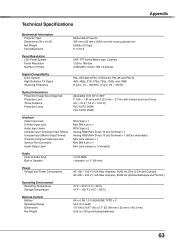
... x 145.3 mm) 3.53 oz (100 g) (including batteries) 63 Appendix Technical Specifications Mechanical Information Projector Type Dimensions (W x H x D) Net Weight Feet Adjustment Multi-media Projector 335 mm x 83 mm x 238.4 mm (Not including adjustable feet) 6.63lbs ...(3.0 kgs) 0˚ to 10.0˚ Panel Resolution LCD Panel System 0.63"...with manual zoom and focus 4.6' ~ 41.3' (1.4 m ~ 12.6 m) PLC-XU75: 200W PLC-XU78: 220W Interface Video Input Jack S-Video Input Jack Audio Input Jacks ...
... x 145.3 mm) 3.53 oz (100 g) (including batteries) 63 Appendix Technical Specifications Mechanical Information Projector Type Dimensions (W x H x D) Net Weight Feet Adjustment Multi-media Projector 335 mm x 83 mm x 238.4 mm (Not including adjustable feet) 6.63lbs ...(3.0 kgs) 0˚ to 10.0˚ Panel Resolution LCD Panel System 0.63"...with manual zoom and focus 4.6' ~ 41.3' (1.4 m ~ 12.6 m) PLC-XU75: 200W PLC-XU78: 220W Interface Video Input Jack S-Video Input Jack Audio Input Jacks ...


