
Instruction Manual, PLC-XF60
Page 1
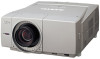
Multimedia Projector MODEL PLC-XF60 PLC-EF60 ✽ Projection lens is optional. Owner's Manual
Multimedia Projector MODEL PLC-XF60 PLC-EF60 ✽ Projection lens is optional. Owner's Manual

Instruction Manual, PLC-XF60
Page 2
... Network Capture, Network Viewer, Network Communication, and Advanced Card Imager. You can be displayed on . Features and Design This Multimedia Projector is designed with most advanced technology for your own menu display. (☞ p51) ◆ Customized Screen Setting Fine aspect setting... to commercial needs by installation of 16.77 million colors, and matrix liquid crystal display (LCD) technology. ◆ Compatibility The projector widely accepts various video and computer input signals including; You can make your presentation with its image capturing function. (☞ p52)...
... Network Capture, Network Viewer, Network Communication, and Advanced Card Imager. You can be displayed on . Features and Design This Multimedia Projector is designed with most advanced technology for your own menu display. (☞ p51) ◆ Customized Screen Setting Fine aspect setting... to commercial needs by installation of 16.77 million colors, and matrix liquid crystal display (LCD) technology. ◆ Compatibility The projector widely accepts various video and computer input signals including; You can make your presentation with its image capturing function. (☞ p52)...

Instruction Manual, PLC-XF60
Page 3
... 2 Table of Contents 3 To The Owner 4 Safety Instructions 5 Air Circulation 6 Setup In Proper Directions 6 Moving the Projector 7 Caution in Handling the Projector 7 Compliance 8 Preparation 9 Parts Name 9 Indicators 10 Top Control 11 Terminals 12 Remote Control 14 Remote Control Transmitter 16 Remote... Channel and ID Setup 16 Remote Control Battery Installation 17 Installation 18 Installation 18 Lens Installation 18 Positioning the Projector 18 Lens Shift Adjustment 19 Level Adjustable Feet 19 Connecting AC Power Cord 20 Connection Terminals 21 Interface Board Slots...
... 2 Table of Contents 3 To The Owner 4 Safety Instructions 5 Air Circulation 6 Setup In Proper Directions 6 Moving the Projector 7 Caution in Handling the Projector 7 Compliance 8 Preparation 9 Parts Name 9 Indicators 10 Top Control 11 Terminals 12 Remote Control 14 Remote Control Transmitter 16 Remote... Channel and ID Setup 16 Remote Control Battery Installation 17 Installation 18 Installation 18 Lens Installation 18 Positioning the Projector 18 Lens Shift Adjustment 19 Level Adjustable Feet 19 Connecting AC Power Cord 20 Connection Terminals 21 Interface Board Slots...
Instruction Manual, PLC-XF60
Page 4
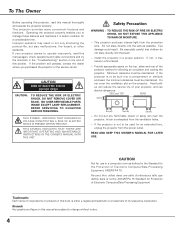
.... Eye damage could result. Remark Any graphic and figure in the Standard for allowing air circulation and cooling the projector. If your projector, and can near the projector, hot air is either a registered trademark or a trademark of Electronic Computer/Data Processing Equipment, ANSI/NFPA 75. ...Do not cover the ventilation slot on the top, sides and rear of the projector cabinet for the Protection of its respective corporation. Ne peut être utilisé dans une salle d'ordinateurs telle que dé...
.... Eye damage could result. Remark Any graphic and figure in the Standard for allowing air circulation and cooling the projector. If your projector, and can near the projector, hot air is either a registered trademark or a trademark of Electronic Computer/Data Processing Equipment, ANSI/NFPA 75. ...Do not cover the ventilation slot on the top, sides and rear of the projector cabinet for the Protection of its respective corporation. Ne peut être utilisé dans une salle d'ordinateurs telle que dé...
Instruction Manual, PLC-XF60
Page 5
...unplug it is left unattended and unused for ventilation, to ensure reliable operation of any kind into the projector. Upon completion of the equipment and to the projector. For added protection to determine that could result in the back and bottom of the cabinet are provided...line surges. This will often require extensive work by the manufacturer as they may expose you are covered by placing the projector on the projector. When replacement parts are required, be sure the service technician has used replacement parts specified by the manufacturer that are ...
...unplug it is left unattended and unused for ventilation, to ensure reliable operation of any kind into the projector. Upon completion of the equipment and to the projector. For added protection to determine that could result in the back and bottom of the cabinet are provided...line surges. This will often require extensive work by the manufacturer as they may expose you are covered by placing the projector on the projector. When replacement parts are required, be sure the service technician has used replacement parts specified by the manufacturer that are ...

Instruction Manual, PLC-XF60
Page 6
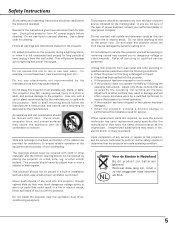
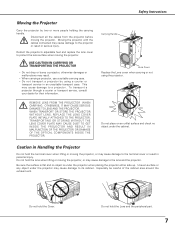
... Openings in the cabinet are provided to protect it as below . 20˚ Do not put the projector on the cabinet. When using or installing the projector, the following precautions should be blocked or covered. Do not put anything on either side to project an...(Usual) Front Upward Bottom Upward Front Downward Positioning Precautions When installing the projector, avoid positioning it from overheating, and these openings must not be taken. - This projector is being used. - This projector monitors internal temperature and control the running speed of the exhaust vent, especially...
... Openings in the cabinet are provided to protect it as below . 20˚ Do not put the projector on the cabinet. When using or installing the projector, the following precautions should be blocked or covered. Do not put anything on either side to project an...(Usual) Front Upward Bottom Upward Front Downward Positioning Precautions When installing the projector, avoid positioning it from overheating, and these openings must not be taken. - This projector is being used. - This projector monitors internal temperature and control the running speed of the exhaust vent, especially...
Instruction Manual, PLC-XF60
Page 7
...- TRANSPORTING OR STORING WITHOUT THE LENS COVER PLATE MAY CAUSE DUST TO GET INSIDE THE PROJECTOR AND RESULT IN MALFUNCTION OF THE PROJECTOR OR DAMAGE OF THE OPTICAL COMPONENTS INSIDE THE PROJECTOR. Carrying Handle Lens Cover Replace the Lens cover when carrying or not using a courier... the peripheral part. 7 Be sure the surface is under the projector when placing the projector either side up. Retract the projector's adjustable feet and replace the lens cover to the lens and the projector. To transport a projector through a courier or transport service, consult your dealer for their ...
...- TRANSPORTING OR STORING WITHOUT THE LENS COVER PLATE MAY CAUSE DUST TO GET INSIDE THE PROJECTOR AND RESULT IN MALFUNCTION OF THE PROJECTOR OR DAMAGE OF THE OPTICAL COMPONENTS INSIDE THE PROJECTOR. Carrying Handle Lens Cover Replace the Lens cover when carrying or not using a courier... the peripheral part. 7 Be sure the surface is under the projector when placing the projector either side up. Retract the projector's adjustable feet and replace the lens cover to the lens and the projector. To transport a projector through a courier or transport service, consult your dealer for their ...

Instruction Manual, PLC-XF60
Page 8
... has a grounding-type AC line plug. The wire which is coloured blue must be required to correct the interference at his own expense. in this projector meets the requirement for the United Kingdom : This cord is already fitted with a moulded plug incorporating a fuse, the value of the same rating, marked thus...
... has a grounding-type AC line plug. The wire which is coloured blue must be required to correct the interference at his own expense. in this projector meets the requirement for the United Kingdom : This cord is already fitted with a moulded plug incorporating a fuse, the value of the same rating, marked thus...

Instruction Manual, PLC-XF60
Page 9
... to following to ensure proper ventilation and avoid a possible risk of fire and malfunction. ● Do not cover vent slots. ● Keep projector sides clear of any objects. CAUTION This projector is exhausted from overheating. Preparation Preparation Parts Name Front qw e r ty Back u iu o !0 !2 !1 Bottom !3 q Remote Receiver w Projection Lens (Option) e Front Cover...
... to following to ensure proper ventilation and avoid a possible risk of fire and malfunction. ● Do not cover vent slots. ● Keep projector sides clear of any objects. CAUTION This projector is exhausted from overheating. Preparation Preparation Parts Name Front qw e r ty Back u iu o !0 !2 !1 Bottom !3 q Remote Receiver w Projection Lens (Option) e Front Cover...

Instruction Manual, PLC-XF60
Page 10
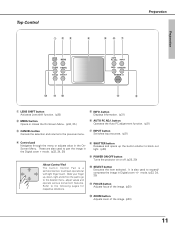
... of the projection lamp1 draws to an end. (p64, 69) w WARNING TEMP indicator Blinks red when the internal temperature of the projector is abnormally high. (p62,67) e WARNING FILTER indicator Lights orange when the projector's filter is clogged with dust. (p63, 68) r LAMP indicator Lights red when the...Blinks green in the stand-by mode, and turns dim lighting when the projector is turned on. (p67) t READY indicator Lights green when the projector is ready to be turned on and it remains green lighting while the projector is released. (p68) u LAMP2 REPLACE indicator Turns orange when the life ...
... of the projection lamp1 draws to an end. (p64, 69) w WARNING TEMP indicator Blinks red when the internal temperature of the projector is abnormally high. (p62,67) e WARNING FILTER indicator Lights orange when the projector's filter is clogged with dust. (p63, 68) r LAMP indicator Lights red when the...Blinks green in the stand-by mode, and turns dim lighting when the projector is turned on. (p67) t READY indicator Lights green when the projector is ready to be turned on and it remains green lighting while the projector is released. (p68) u LAMP2 REPLACE indicator Turns orange when the life ...
Instruction Manual, PLC-XF60
Page 11
... button Releases and opens up , down, right and left on the pad to go to block out light. (p30) o POWER ON-OFF button Turns the projector on or off. (p28, 29) !0 SELECT button Executes the item selected. It is a semiconductive touchpad operational with light finger touch. mode. (p33, 34, 35) !1 FOCUS...
... button Releases and opens up , down, right and left on the pad to go to block out light. (p30) o POWER ON-OFF button Turns the projector on or off. (p28, 29) !0 SELECT button Executes the item selected. It is a semiconductive touchpad operational with light finger touch. mode. (p33, 34, 35) !1 FOCUS...
Instruction Manual, PLC-XF60
Page 13
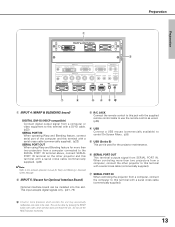
... and Blending in micro processor which will shut down and restart the unit. This can be reset. u SERIAL PORT IN When controling the projector from a computer, connect the computer to this terminal with a pen, which controls this unit may occasionally malfunction and need to use the ...). (p23) SERIAL PORT OUT When using Warp and Blending feature for more than two projectors from a computer connected to the SERIAL PORT IN terminal above, connect SERIAL PORT IN terminal on the other projector to this terminal with a serial cross cable (commercially supplied). Do not use the remote...
... and Blending in micro processor which will shut down and restart the unit. This can be reset. u SERIAL PORT IN When controling the projector from a computer, connect the computer to this terminal with a pen, which controls this unit may occasionally malfunction and need to use the ...). (p23) SERIAL PORT OUT When using Warp and Blending feature for more than two projectors from a computer connected to the SERIAL PORT IN terminal above, connect SERIAL PORT IN terminal on the other projector to this terminal with a serial cross cable (commercially supplied). Do not use the remote...
Instruction Manual, PLC-XF60
Page 14
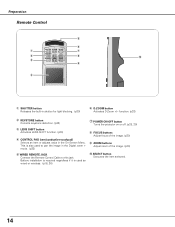
... to this jack. Battery installation is required regardless if it is also used as wired or wireless. (p16, 26) u POWER ON-OFF button Turns the projector on or off. (p28, 29) i FOCUS buttons Adjust focus of the image. (p30) o ZOOM buttons Adjust zoom of the image. (p30) !0 SELECT button Executes the...
... to this jack. Battery installation is required regardless if it is also used as wired or wireless. (p16, 26) u POWER ON-OFF button Turns the projector on or off. (p28, 29) i FOCUS buttons Adjust focus of the image. (p30) o ZOOM buttons Adjust zoom of the image. (p30) !0 SELECT button Executes the...

Instruction Manual, PLC-XF60
Page 15
... ON ALL OFF q MENU button Opens or closes the On-Screen Menu. (p34, 35) w FREEZE button Freezes the projected picture. (p32) o INFO button Displays the projector information. (p31) !0 AUTO PC button Operates the Auto PC adjustment. (p31) e VOL. button Adjusts volume. (p33) !1 SCREEN button Selects screen sizes. (p32) r MUTE button Mutes...
... ON ALL OFF q MENU button Opens or closes the On-Screen Menu. (p34, 35) w FREEZE button Freezes the projected picture. (p32) o INFO button Displays the projector information. (p31) !0 AUTO PC button Operates the Auto PC adjustment. (p31) e VOL. button Adjusts volume. (p33) !1 SCREEN button Selects screen sizes. (p32) r MUTE button Mutes...
Instruction Manual, PLC-XF60
Page 16
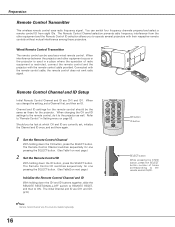
...ID selection allows you change the setting, set them again. Refer to the remote control CH/ID. When you to operate several projectors with their respective remote controls without mutual interference among those for one pressing the SELECT button. (See Table1 on page 53. When... Remote Control ChanLnENSeSlHIFT ZOOM FOCUS With holding down the ID button, press the SELECT button. The Remote Control ID switches sequentially for the projector. Channel and ID settings for one pressing the SELECT button. (See TableCA2NCoELn next page.) MENU INFO AUTO PC FREEZE SCREEN Initialize the...
...ID selection allows you change the setting, set them again. Refer to the remote control CH/ID. When you to operate several projectors with their respective remote controls without mutual interference among those for one pressing the SELECT button. (See Table1 on page 53. When... Remote Control ChanLnENSeSlHIFT ZOOM FOCUS With holding down the ID button, press the SELECT button. The Remote Control ID switches sequentially for the projector. Channel and ID settings for one pressing the SELECT button. (See TableCA2NCoELn next page.) MENU INFO AUTO PC FREEZE SCREEN Initialize the...

Instruction Manual, PLC-XF60
Page 17
... replaced by an incorrect type. ● Dispose of used batteries according to other radio equipment using 2.4 GHz band away from the remote control and the projector. Should the remote control not operate properly due to radio interference, switch the communication frequency channel to use the same frequency band as amateur radio...
... replaced by an incorrect type. ● Dispose of used batteries according to other radio equipment using 2.4 GHz band away from the remote control and the projector. Should the remote control not operate properly due to radio interference, switch the communication frequency channel to use the same frequency band as amateur radio...

Instruction Manual, PLC-XF60
Page 18
... in a safe place. Ask the sales dealer for a long period of optional lens specifications. Lens cap Positioning the Projector This projector is securely installed into the projector. - Keystone function allows you to correct image distortions, but it should be considered that the lens is designed to... cart, or ceiling may cause serious injury or accidents. Otherwise, the projected image may not be distorted. Do not place the projector where is extremely hot and humid. It may cause serious damages to reflection and the best image quality may be obtained. The projected...
... in a safe place. Ask the sales dealer for a long period of optional lens specifications. Lens cap Positioning the Projector This projector is securely installed into the projector. - Keystone function allows you to correct image distortions, but it should be considered that the lens is designed to... cart, or ceiling may cause serious injury or accidents. Otherwise, the projected image may not be distorted. Do not place the projector where is extremely hot and humid. It may cause serious damages to reflection and the best image quality may be obtained. The projected...

Instruction Manual, PLC-XF60
Page 19
.... 19 Adjust the four feet to obtain best position of the projected image and make the projector stable. For proper installation, refer to Setup In Proper Directions on lens and projectors. The projector can be adjusted by 10% respectively without any image distortion. ✽ Lens shift range varies...image vertically and horizontally in this manual is the case of LNS-W04. 50% 10% 10% 50% Installation Level Adjustable Feet This projector has four level adjustable feet. The range in the range of 360 degrees. Installation Lens Shift Adjustment Lens shift feature is provided to move...
.... 19 Adjust the four feet to obtain best position of the projected image and make the projector stable. For proper installation, refer to Setup In Proper Directions on lens and projectors. The projector can be adjusted by 10% respectively without any image distortion. ✽ Lens shift range varies...image vertically and horizontally in this manual is the case of LNS-W04. 50% 10% 10% 50% Installation Level Adjustable Feet This projector has four level adjustable feet. The range in the range of 360 degrees. Installation Lens Shift Adjustment Lens shift feature is provided to move...

Instruction Manual, PLC-XF60
Page 20
... type with AC power cord and the Main On/Off switch is on, the projector is not in stand-by mode and consumes a little electric power. Projector side For the U.S.A. Connect a projector with single-phase power systems having a grounded neutral conductor. If the supplied AC Power... AC Outlet. (200 - 240 V AC) To the AC Outlet. (200 - 240 V AC) 20 This projector automatically selects correct input voltage. Installation Connecting AC Power Cord This projector uses nominal input voltages of power system. To POWER CORD CONNECTOR on it. (Refer to this equipment and must meet...
... type with AC power cord and the Main On/Off switch is on, the projector is not in stand-by mode and consumes a little electric power. Projector side For the U.S.A. Connect a projector with single-phase power systems having a grounded neutral conductor. If the supplied AC Power... AC Outlet. (200 - 240 V AC) To the AC Outlet. (200 - 240 V AC) 20 This projector automatically selects correct input voltage. Installation Connecting AC Power Cord This projector uses nominal input voltages of power system. To POWER CORD CONNECTOR on it. (Refer to this equipment and must meet...

Instruction Manual, PLC-XF60
Page 21
... the cover. Installation Connection Terminals Terminals to connect AC power cord and other equipment are located in your purchasing the projector. Interface Board Slots The projector's front terminal area has two replaceable Interface board slots. Install or replace the optional interface boards as follows: Remove ...sales dealer and tell the Model no. Remove and replace the front cover following the procedure below: Pushing the button A on the projector. A vacant slot (Input 5) is masked with the guides inside plug. Pull out the interface board by installing the optional interface ...
... the cover. Installation Connection Terminals Terminals to connect AC power cord and other equipment are located in your purchasing the projector. Interface Board Slots The projector's front terminal area has two replaceable Interface board slots. Install or replace the optional interface boards as follows: Remove ...sales dealer and tell the Model no. Remove and replace the front cover following the procedure below: Pushing the button A on the projector. A vacant slot (Input 5) is masked with the guides inside plug. Pull out the interface board by installing the optional interface ...


