
Print Specs
Page 1
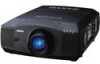
... Yes (power) 4.4 - 6.2:1 2.0 - 2.9 8:1 - 1:8 6.8 lbs. Issued 09/08 © 2008 SANYO Video Y/C & S-Video Input Board POA-LNA02 - Quick repair program under warranty Because its products are also provided...1:8 4.2 lbs. 8.2 lbs. 4.2 lbs. 7000 ANSI LUMENS z REAL 2K FULL HD MULTIMEDIA PROJECTOR PLV-HD2000 Projects high-resolution images in the 2K x 1K digital format in full resolution - HIGH PERFORMANCE BRIGHTN3ESS The PLV-HD2000 uses four high-intensity 300-watt UHP lamps to achieve 7,000 lumens of Pixels Contrast Ratio Projection Lens Image Size Aspect Ratio Throw Distance...
... Yes (power) 4.4 - 6.2:1 2.0 - 2.9 8:1 - 1:8 6.8 lbs. Issued 09/08 © 2008 SANYO Video Y/C & S-Video Input Board POA-LNA02 - Quick repair program under warranty Because its products are also provided...1:8 4.2 lbs. 8.2 lbs. 4.2 lbs. 7000 ANSI LUMENS z REAL 2K FULL HD MULTIMEDIA PROJECTOR PLV-HD2000 Projects high-resolution images in the 2K x 1K digital format in full resolution - HIGH PERFORMANCE BRIGHTN3ESS The PLV-HD2000 uses four high-intensity 300-watt UHP lamps to achieve 7,000 lumens of Pixels Contrast Ratio Projection Lens Image Size Aspect Ratio Throw Distance...
Owner's Manual
Page 1
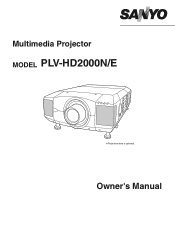
Owner's Manual Multimedia Projector MODEL PLV-HD2000N/E ✽ Projection lens is optional.
Owner's Manual Multimedia Projector MODEL PLV-HD2000N/E ✽ Projection lens is optional.
Owner's Manual
Page 2
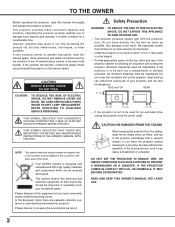
...MAINTENANCE INSTRUCTIONS IN THE OWNER'S MANUAL WITH THIS UNIT. Your SANYO product is designed and manufactured with a vacuum cleaner. If the projector is to be maintained. CAUTION ON HANGING FROM THE CEILING When hanging the projector from the power outlet. Please help us to the countries in... ! Provide appropriate space on the projector. If you leave the projector without cleaning for an extended time, unplug the projector from the ceiling, clean the air intake vents, air filters, and top of -life, should be built into the lens as much as possible. CAUTION RISK...
...MAINTENANCE INSTRUCTIONS IN THE OWNER'S MANUAL WITH THIS UNIT. Your SANYO product is designed and manufactured with a vacuum cleaner. If the projector is to be maintained. CAUTION ON HANGING FROM THE CEILING When hanging the projector from the power outlet. Please help us to the countries in... ! Provide appropriate space on the projector. If you leave the projector without cleaning for an extended time, unplug the projector from the ceiling, clean the air intake vents, air filters, and top of -life, should be built into the lens as much as possible. CAUTION RISK...
Owner's Manual
Page 5
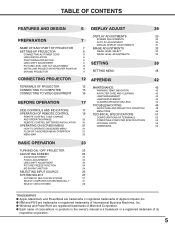
... NAME OF EACH PART OF PROJECTOR 7 IMAGE ADJUSTMENTS 33 SETTING-UP PROJECTOR 8 IMAGE LEVEL SELECT 33 CONNECTING AC POWER CORD 8 IMAGE LEVEL ADJUSTMENTS 34 LENS INSTALLATION 9 POSITIONING PROJECTOR 9 LENS SHIFT ADJUSTMENT 9 SETTING 38 PICTURE LEVEL AND TILT ADJUSTMENT 10 INSTALLING PROJECTOR IN PROPER POSITION 10 MOVING PROJECTOR 11 SETTING MENU 38 CONNECTING PROJECTOR 12 APPENDIX 42 TERMINALS OF...
... NAME OF EACH PART OF PROJECTOR 7 IMAGE ADJUSTMENTS 33 SETTING-UP PROJECTOR 8 IMAGE LEVEL SELECT 33 CONNECTING AC POWER CORD 8 IMAGE LEVEL ADJUSTMENTS 34 LENS INSTALLATION 9 POSITIONING PROJECTOR 9 LENS SHIFT ADJUSTMENT 9 SETTING 38 PICTURE LEVEL AND TILT ADJUSTMENT 10 INSTALLING PROJECTOR IN PROPER POSITION 10 MOVING PROJECTOR 11 SETTING MENU 38 CONNECTING PROJECTOR 12 APPENDIX 42 TERMINALS OF...
Owner's Manual
Page 6
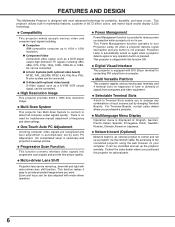
... Incoming computer video signals are recognized and best adjustment is not pressed. Projection Lamp is shipped with motor-driven lens shift function. This projector is automatically turned on your computer. N Multi Versatile Platform This projector applies various input/output terminals and 4 terminal slots for optional parts. For Terminal Boards, contact sales dealer where...
... Incoming computer video signals are recognized and best adjustment is not pressed. Projection Lamp is shipped with motor-driven lens shift function. This projector is automatically turned on your computer. N Multi Versatile Platform This projector applies various input/output terminals and 4 terminal slots for optional parts. For Terminal Boards, contact sales dealer where...
Owner's Manual
Page 7
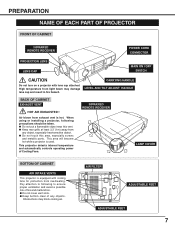
.... G Do not cover vent slots. PREPARATION NAME OF EACH PART OF PROJECTOR FRONT OF CABINET INFRARED REMOTE RECEIVER POWER CORD CONNECTOR PROJECTION LENS LENS CAP MAIN ON / OFF SWITCH CAUTION Do not turn on a projector with cooling fans for protection from overheating. G Keep rear grills at least... to ensure proper ventilation and avoid a possible risk of Cooling Fans. Obstructions may damage lens cap and result in fire hazard. This area will become hot while a projector is hot. CARRYING HANDLE LEVEL AND TILT ADJUST HANDLE BACK OF CABINET EXHAUST VENT HOT AIR ...
.... G Do not cover vent slots. PREPARATION NAME OF EACH PART OF PROJECTOR FRONT OF CABINET INFRARED REMOTE RECEIVER POWER CORD CONNECTOR PROJECTION LENS LENS CAP MAIN ON / OFF SWITCH CAUTION Do not turn on a projector with cooling fans for protection from overheating. G Keep rear grills at least... to ensure proper ventilation and avoid a possible risk of Cooling Fans. Obstructions may damage lens cap and result in fire hazard. This area will become hot while a projector is hot. CARRYING HANDLE LEVEL AND TILT ADJUST HANDLE BACK OF CABINET EXHAUST VENT HOT AIR ...

Owner's Manual
Page 9
... to provide best image. G Make sure that there are no objects under a projector may damage lens, cabinet, or mechanical parts. PREPARATION LENS INSTALLATION Before setting up a projector, install Projection Lens on a flat projection surface. For specifications of fire and malfunction. POSITIONING PROJECTOR This projector is recommended to limit ambient lighting in room has a great influence on picture...
... to provide best image. G Make sure that there are no objects under a projector may damage lens, cabinet, or mechanical parts. PREPARATION LENS INSTALLATION Before setting up a projector, install Projection Lens on a flat projection surface. For specifications of fire and malfunction. POSITIONING PROJECTOR This projector is recommended to limit ambient lighting in room has a great influence on picture...
Owner's Manual
Page 11
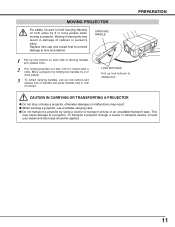
...applied. 11 PREPARATION CAUTION IN CARRYING OR TRANSPORTING A PROJECTOR G Do not drop or bump a projector, otherwise damages or malfunctions may result in an unsuitable transport case. This may cause damage to lens and cabinet. To transport a projector through a courier or transport service, consult your dealer... and best case should be sure to hold Carrying Handles on each side of cabinet or person's injury. Move a projector by holding two handles by ...
...applied. 11 PREPARATION CAUTION IN CARRYING OR TRANSPORTING A PROJECTOR G Do not drop or bump a projector, otherwise damages or malfunctions may result in an unsuitable transport case. This may cause damage to lens and cabinet. To transport a projector through a courier or transport service, consult your dealer... and best case should be sure to hold Carrying Handles on each side of cabinet or person's injury. Move a projector by holding two handles by ...

Owner's Manual
Page 17
button Operates the AUTO PC adjustment function. (P30) ZOOM FOCUS ON-OFF MENU LENS SHIFT INPUT 1/2 SELECT INPUT 3/4 AUTO PC ADJ. IMAGE LENS SHIFT button Select LENS SHIFT function. (P24) INPUT 1/2 button Select input source either INPUT 1 or INPUT 2. (P25) INPUT 3/4 button Select input source either INPUT 3... FRONT INDICATORS ZOOM buttons Adjust zoom. (P24) SIDE CONTROLS FOCUS buttons Adjust focus. (P24) SIDE CONTROLS POWER ON-OFF button Turns the projector on or off. (P23) MENU button Open or close the On-Screen Menu operation. (P21, 22) SELECT button Executes the item selected...
button Operates the AUTO PC adjustment function. (P30) ZOOM FOCUS ON-OFF MENU LENS SHIFT INPUT 1/2 SELECT INPUT 3/4 AUTO PC ADJ. IMAGE LENS SHIFT button Select LENS SHIFT function. (P24) INPUT 1/2 button Select input source either INPUT 1 or INPUT 2. (P25) INPUT 3/4 button Select input source either INPUT 3... FRONT INDICATORS ZOOM buttons Adjust zoom. (P24) SIDE CONTROLS FOCUS buttons Adjust focus. (P24) SIDE CONTROLS POWER ON-OFF button Turns the projector on or off. (P23) MENU button Open or close the On-Screen Menu operation. (P21, 22) SELECT button Executes the item selected...
Owner's Manual
Page 19
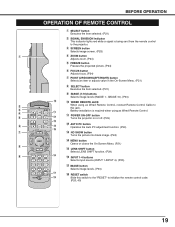
... This indicator lights red while a signal is required when using as Wired Remote Control. !1 POWER ON-OFF button Turns the projector on or off. (P23) !3 FOCUS y !4 !2 AUTO PC button Operates the Auto PC adjustment function. (P30) ...LENS SHIFT function. (P24) o !6 !6 INPUT 1-4 buttons Selects input source (INPUT 1-INPUT 4). (P25) !7 IMAGE button Selects image levels. (P33) !7 !8 RESET switch RESET !8 Slide this jack. IMAGE 10). (P33) !0 !0 WIRED REMOTE JACK w When using as Wired Remote Control, connect Remote Control Cable to this switch to the "RESET" to the projector...
... This indicator lights red while a signal is required when using as Wired Remote Control. !1 POWER ON-OFF button Turns the projector on or off. (P23) !3 FOCUS y !4 !2 AUTO PC button Operates the Auto PC adjustment function. (P30) ...LENS SHIFT function. (P24) o !6 !6 INPUT 1-4 buttons Selects input source (INPUT 1-INPUT 4). (P25) !7 IMAGE button Selects image levels. (P33) !7 !8 RESET switch RESET !8 Slide this jack. IMAGE 10). (P33) !0 !0 WIRED REMOTE JACK w When using as Wired Remote Control, connect Remote Control Cable to this switch to the "RESET" to the projector...
Owner's Manual
Page 21
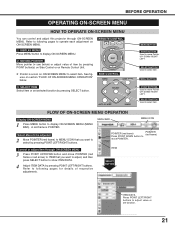
LENS SHIFT I MENU BUTTON 3 SELECT ITEM Select item or set function. 21 SELECT BUTTON Used to select item. SIDE CONTROL MENU SELECT BUTTON Used to select ... Move pointer (✽ see below . BEFORE OPERATION OPERATING ON-SCREEN MENU ON-OFF HOW TO OPERATE ON-SCREZOEOM N MENU You can control and adjust this projector through ON-SCREEN MENU 3 Press POINT UP/DOWN button and move POINTER (red frame or red arrow) to ITEM that you want to select by...
LENS SHIFT I MENU BUTTON 3 SELECT ITEM Select item or set function. 21 SELECT BUTTON Used to select item. SIDE CONTROL MENU SELECT BUTTON Used to select ... Move pointer (✽ see below . BEFORE OPERATION OPERATING ON-SCREEN MENU ON-OFF HOW TO OPERATE ON-SCREZOEOM N MENU You can control and adjust this projector through ON-SCREEN MENU 3 Press POINT UP/DOWN button and move POINTER (red frame or red arrow) to ITEM that you want to select by...

Owner's Manual
Page 45
... with the LAMP REPLACE INDICATOR lighted may fail or terminate their lifetime in use of this manual.) Continuous use , replace lens cap. 45 APPENDIX ORDER REPLACEMENT LAMP Replacement Lamp can be ordered through your projector : G Replacement Lamp Type No. : PLV-HD2000N/E POA-LMP100 (Service Parts No. 610 327 4928) LAMP HANDLING PRECAUTIONS This...
... with the LAMP REPLACE INDICATOR lighted may fail or terminate their lifetime in use of this manual.) Continuous use , replace lens cap. 45 APPENDIX ORDER REPLACEMENT LAMP Replacement Lamp can be ordered through your projector : G Replacement Lamp Type No. : PLV-HD2000N/E POA-LMP100 (Service Parts No. 610 327 4928) LAMP HANDLING PRECAUTIONS This...
Owner's Manual
Page 46
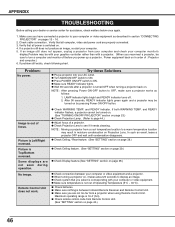
... switched on page 40.) 46 Make sure you reconnect a projector, be turned on. (See "TURNING ON/OFF PROJECTOR" section on page 23.) G Check Projection Lamp. (Refer to OFF, make sure a projector works as described in section "CONNECTING PROJECTOR" on in moisture condensation on Projection Lens. Check cable connection. If both WARNING TEMP. APPENDIX TROUBLESHOOTING Before...
... switched on page 40.) 46 Make sure you reconnect a projector, be turned on. (See "TURNING ON/OFF PROJECTOR" section on page 23.) G Check Projection Lamp. (Refer to OFF, make sure a projector works as described in section "CONNECTING PROJECTOR" on in moisture condensation on Projection Lens. Check cable connection. If both WARNING TEMP. APPENDIX TROUBLESHOOTING Before...
Owner's Manual
Page 51
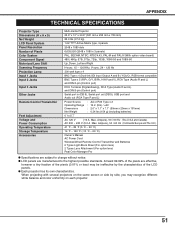
...on the same screen or side by side, you may be ineffective by the characteristics of Pixels Color System Component Signal Motorized Lens Shift Scanning Frequency Projection Lamp Input 1 Jacks Input 2 Jacks Input 3 Jacks Other Jacks Remote Control Transmitter Feet Adjustment Voltage and... Power Consumption Operating Temperature Storage Temperature Accessories Multi-media Projector 22.9" x 10" x 30.9" (581 mm x 252 mm x 783 mm) 82.0 lbs (37.2 kg) 1.64" TFT Active Matrix type, 3 ...
...on the same screen or side by side, you may be ineffective by the characteristics of Pixels Color System Component Signal Motorized Lens Shift Scanning Frequency Projection Lamp Input 1 Jacks Input 2 Jacks Input 3 Jacks Other Jacks Remote Control Transmitter Feet Adjustment Voltage and... Power Consumption Operating Temperature Storage Temperature Accessories Multi-media Projector 22.9" x 10" x 30.9" (581 mm x 252 mm x 783 mm) 82.0 lbs (37.2 kg) 1.64" TFT Active Matrix type, 3 ...

Owner's Manual
Page 56
...Motor Driven Motor Driven NOTES ON LENS INSTALLATION G Lens installation and replacement should be sure to replace the Lens Cover to protect the surface. G For details of the Projection Lens matches to the projector. LCD PROJECTOR LENS REPLACEMENT AND INSTALLATION PROCEDURES CAUTION ...When installing or replacing the Projection Lens, refer to this projector. G LIGHT-BLOCK SHEETS 6 pcs. Use the suitable lens for where the projector is used. G Be sure to install the lens following...
...Motor Driven Motor Driven NOTES ON LENS INSTALLATION G Lens installation and replacement should be sure to replace the Lens Cover to protect the surface. G For details of the Projection Lens matches to the projector. LCD PROJECTOR LENS REPLACEMENT AND INSTALLATION PROCEDURES CAUTION ...When installing or replacing the Projection Lens, refer to this projector. G LIGHT-BLOCK SHEETS 6 pcs. Use the suitable lens for where the projector is used. G Be sure to install the lens following...
Owner's Manual
Page 58
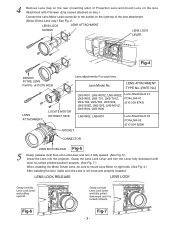
... (610 304 6228) SOCKET CONNECTOR LENS MOTOR LEAD Fig-5 5 Grasp (release lock) the Lens Lock Lever and turn the Lever fully downward until it fully upward. (See Fig. 6.) Install the Lens into the projector. Fig-6 Fig-7 - 3 - LENS LOCK RELEASE LENS LOCK Grasp (unlock) Lens Lock Lever and pulling upward. LENS LOCK LENS ATTACHMENT SCREW LENS LOCK LEVER Fig-4 DRIVER IN...
... (610 304 6228) SOCKET CONNECTOR LENS MOTOR LEAD Fig-5 5 Grasp (release lock) the Lens Lock Lever and turn the Lever fully downward until it fully upward. (See Fig. 6.) Install the Lens into the projector. Fig-6 Fig-7 - 3 - LENS LOCK RELEASE LENS LOCK Grasp (unlock) Lens Lock Lever and pulling upward. LENS LOCK LENS ATTACHMENT SCREW LENS LOCK LEVER Fig-4 DRIVER IN...
Owner's Manual
Page 59
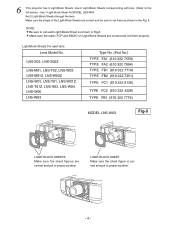
... Sheets are correct and be sure to the list below.) Use 1 Light-block Sheet for MODEL LNS-W03 Set 2 Light-Block Sheets through the lens. Lens Model No. Light-Block Sheets For each Light-Block Sheet as shown in Fig-8. LIGHT BLOCK SHEET Make sure the sheet figure is correct and... put in proper position. - 4 - Use 2 Light-Block Sheets corresponding with lens. (Refer to set each lens. G Make sure the mark (TOP and BACK) on Light-Block Sheets are correct and put in proper position. NOTE: G Be sure to set...
... Sheets are correct and be sure to the list below.) Use 1 Light-block Sheet for MODEL LNS-W03 Set 2 Light-Block Sheets through the lens. Lens Model No. Light-Block Sheets For each Light-Block Sheet as shown in Fig-8. LIGHT BLOCK SHEET Make sure the sheet figure is correct and... put in proper position. - 4 - Use 2 Light-Block Sheets corresponding with lens. (Refer to set each lens. G Make sure the mark (TOP and BACK) on Light-Block Sheets are correct and put in proper position. NOTE: G Be sure to set...
Owner's Manual
Page 60
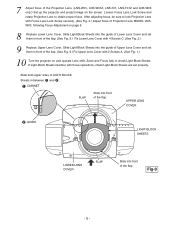
...in front of the flap. (See Fig. 9.) Fix Lower Lens Cover with 2 Screws A. (See Fig. 1.) 10 Turn the projector on and operate Lens shift, Zoom and Focus fully to check Light-Block Sheets. Slide Light-Block Sheets into the guide of Upper Lens Cover and set them in between 1 and 2 . 1 ... LNS-T01, LNS-T01Z and LNS-W03 only.) Set up the projector and project image on page 6. 8 Replace Lower Lens Cover. After adjusting focus, be sure to obtain proper focus. UPPER LENS COVER 2 GUIDE LIGHT-BLOCK SHEETS LOWER LENS COVER FLAP Slide into front of the flap. If Light-Block Sheets ...
...in front of the flap. (See Fig. 9.) Fix Lower Lens Cover with 2 Screws A. (See Fig. 1.) 10 Turn the projector on and operate Lens shift, Zoom and Focus fully to check Light-Block Sheets. Slide Light-Block Sheets into the guide of Upper Lens Cover and set them in between 1 and 2 . 1 ... LNS-T01, LNS-T01Z and LNS-W03 only.) Set up the projector and project image on page 6. 8 Replace Lower Lens Cover. After adjusting focus, be sure to obtain proper focus. UPPER LENS COVER 2 GUIDE LIGHT-BLOCK SHEETS LOWER LENS COVER FLAP Slide into front of the flap. If Light-Block Sheets ...
Owner's Manual
Page 61
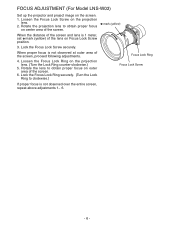
... to obtain proper focus on outer area of the screen. When proper focus is not observed at outer area of the lens on the projection lens. 2. Rotate the projection lens to clockwise.) Focus Lock Screw If proper focus is 1 meter, set G mark (yellow) of the screen, proceed ... Ring on the screen. 1. FOCUS ADJUSTMENT (For Model LNS-W03) Set up the projector and project image on the projection lens. (Turn the Lock Ring counter-clockwise.) 5. G mark (yellow) When the distance of the screen and lens is not observed over the entire screen, repeat above adjustments 1~ 6. - 6 -...
... to obtain proper focus on outer area of the screen. When proper focus is not observed at outer area of the lens on the projection lens. 2. Rotate the projection lens to clockwise.) Focus Lock Screw If proper focus is 1 meter, set G mark (yellow) of the screen, proceed ... Ring on the screen. 1. FOCUS ADJUSTMENT (For Model LNS-W03) Set up the projector and project image on the projection lens. (Turn the Lock Ring counter-clockwise.) 5. G mark (yellow) When the distance of the screen and lens is not observed over the entire screen, repeat above adjustments 1~ 6. - 6 -...
Owner's Manual
Page 62
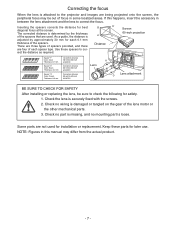
... for later use. Some parts are being projected onto the screen, the peripheral focus may differ from the actual product. - 7 - Check the lens is determined by approximately 30 mm for best diagonal focus at the screen. Clear Thickness; 0.1 mm Spacer "2" Color; Black Thickness; 0.2 mm Spacer... "3" Color; Correcting the focus When the lens is attached to the projector and images are not used . The corrected distance is securely fixed with the screws. 2. There are three types of the spacers....
... for later use. Some parts are being projected onto the screen, the peripheral focus may differ from the actual product. - 7 - Check the lens is determined by approximately 30 mm for best diagonal focus at the screen. Clear Thickness; 0.1 mm Spacer "2" Color; Black Thickness; 0.2 mm Spacer... "3" Color; Correcting the focus When the lens is attached to the projector and images are not used . The corrected distance is securely fixed with the screws. 2. There are three types of the spacers....


