
Owners Manual
Page 2
...is offered through these terminals. ✔Note: • The On-Screen Menu and figures in this manual may differ slightly from the actual product. • The contents of this manual are subject to change without images being distorted (see page 14). ◆ Color Management The Color ...◆ Auto Iris The integration of the lamp aperture enhances the contrast and depth of the projector conforms to almost all computer output signals quickly (see page 26). ◆ 16 : 9 Wide Screen The wide LCD panels with 1920 x 1080 resolution (16:9 aspect ratio) can be stored (see pages 28 ...
...is offered through these terminals. ✔Note: • The On-Screen Menu and figures in this manual may differ slightly from the actual product. • The contents of this manual are subject to change without images being distorted (see page 14). ◆ Color Management The Color ...◆ Auto Iris The integration of the lamp aperture enhances the contrast and depth of the projector conforms to almost all computer output signals quickly (see page 26). ◆ 16 : 9 Wide Screen The wide LCD panels with 1920 x 1080 resolution (16:9 aspect ratio) can be stored (see pages 28 ...

Owners Manual
Page 3
... Terminal 9 Top Control 10 Remote Control 11 Remote Control Operating Range 12 Remote Control Battery Installation 12 Installation 13 Positioning the Projector 13 Adjustable Feet 13 Moving the Lens 14 Connecting to Video Equipment (Video, S-Video) 15 Connecting to Video Equipment (Component...Troubleshooting 51 Indicators and Projector Condition 53 Menu Tree 54 System Mode Chart 56 Technical Specifications 57 Configurations of Terminals 58 Optional Parts 58 Dimensions 59 TRADEMARKS ● Each name of corporations or products in this owner's manual is either a ...
... Terminal 9 Top Control 10 Remote Control 11 Remote Control Operating Range 12 Remote Control Battery Installation 12 Installation 13 Positioning the Projector 13 Adjustable Feet 13 Moving the Lens 14 Connecting to Video Equipment (Video, S-Video) 15 Connecting to Video Equipment (Component...Troubleshooting 51 Indicators and Projector Condition 53 Menu Tree 54 System Mode Chart 56 Technical Specifications 57 Configurations of Terminals 58 Optional Parts 58 Dimensions 59 TRADEMARKS ● Each name of corporations or products in this owner's manual is either a ...

Owners Manual
Page 4
...oil or chemicals, it may result in fire hazard. - Install the projector in ! If the projector comes in contact with a vacuum cleaner. To the Owner Before installing and operating the projector, read this manual again, check operations and cable connections and try the solutions in the ...separately from the power outlet. - Otherwise it may remain on the LCD panels by the characteristic of Electronic Computer/Data Processing Equipment. Heat build- up can reduce the service life of your projector, and can also be disposed of them correctly at a certain concentration....
...oil or chemicals, it may result in fire hazard. - Install the projector in ! If the projector comes in contact with a vacuum cleaner. To the Owner Before installing and operating the projector, read this manual again, check operations and cable connections and try the solutions in the ...separately from the power outlet. - Otherwise it may remain on the LCD panels by the characteristic of Electronic Computer/Data Processing Equipment. Heat build- up can reduce the service life of your projector, and can also be disposed of them correctly at a certain concentration....

Owners Manual
Page 14
... lens shift in each direction, image distortion may be observed at the edge of a projected image. Move the projection lens to the left and right manually with the Horizontal Lens Shift Ring. After adjusting the position, lock the lens with the Vertical Lens Shift Ring. Installation Moving the Lens The projection...
... lens shift in each direction, image distortion may be observed at the edge of a projected image. Move the projection lens to the left and right manually with the Horizontal Lens Shift Ring. After adjusting the position, lock the lens with the Vertical Lens Shift Ring. Installation Moving the Lens The projection...

Owners Manual
Page 18
...cause injury or the projector to stabilize after the power is turned on the projector. Press the POWER ON/STAND-BY button again to operate. Automatic Slide Shutter Do not touch the slide shutter while it is moving, as this tab when handling manually. Main On/Off... switch OFF ON POWER indicator POWER ON/STAND-BY button ✔Note: • If the automatic slide shutter does not open properly, the projector will blink orange. Basic Operation Turning On the Projector 1 Complete peripheral connections (with a computer...
...cause injury or the projector to stabilize after the power is turned on the projector. Press the POWER ON/STAND-BY button again to operate. Automatic Slide Shutter Do not touch the slide shutter while it is moving, as this tab when handling manually. Main On/Off... switch OFF ON POWER indicator POWER ON/STAND-BY button ✔Note: • If the automatic slide shutter does not open properly, the projector will blink orange. Basic Operation Turning On the Projector 1 Complete peripheral connections (with a computer...

Owners Manual
Page 20
... item. 4 Use the Point 7 8 or OK buttons to adjust the setting or switch between each adjustment and setting procedure, refer to respective sections in this manual. 1 Press the MENU button on the top control or on the remote control to display the On-Screen Menu. 2 Use the Point ed buttons to... selected item is divided into submenus, which are further divided into other submenus. press the MENU button again to Operate the On-Screen Menu The projector can be adjusted or set via the On-Screen Menu. On-Screen Menu (Submenu) 20 Basic Operation How to exit the On-Screen Menu.
... item. 4 Use the Point 7 8 or OK buttons to adjust the setting or switch between each adjustment and setting procedure, refer to respective sections in this manual. 1 Press the MENU button on the top control or on the remote control to display the On-Screen Menu. 2 Use the Point ed buttons to... selected item is divided into submenus, which are further divided into other submenus. press the MENU button again to Operate the On-Screen Menu The projector can be adjusted or set via the On-Screen Menu. On-Screen Menu (Submenu) 20 Basic Operation How to exit the On-Screen Menu.
Owners Manual
Page 25
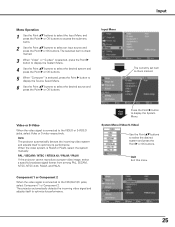
...to access the submenu items. 2 Use the Point ed buttons to optimize its performance. Auto The projector automatically detects the incoming video system and adjusts itself to the VIDEO or S-VIDEO jacks, select Video or S-video respectively...an input source and press the Point 8 or OK buttons. PAL / SECAM / NTSC / NTSC4.43 / PAL-M / PAL-N If the projector cannot reproduce a proper video image, select a specific broadcast signal format from among PAL, SECAM, NTSC, NTSC 4.43, PAL-M, and PAL-N..... Input Menu Input The currently set item is PAL-M or PAL-N, select the system manually.
...to access the submenu items. 2 Use the Point ed buttons to optimize its performance. Auto The projector automatically detects the incoming video system and adjusts itself to the VIDEO or S-VIDEO jacks, select Video or S-video respectively...an input source and press the Point 8 or OK buttons. PAL / SECAM / NTSC / NTSC4.43 / PAL-M / PAL-N If the projector cannot reproduce a proper video image, select a specific broadcast signal format from among PAL, SECAM, NTSC, NTSC 4.43, PAL-M, and PAL-N..... Input Menu Input The currently set item is PAL-M or PAL-N, select the system manually.
Owners Manual
Page 34
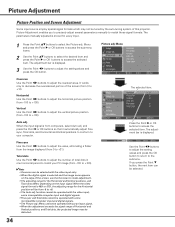
... Adjustment Picture Position and Screen Adjustment Some input source employ special signal formats which may be tuned by the auto-tuning system of this projector. Auto adj. Picture Adjustment enables you press the Point d button, the next item can be operated with the video input only. ...signal is 480i or 575i, the adjusting range for every input. 1 Press the Point ed buttons to +8. • The Auto adj. The parameters manually adjusted is displayed. 3 Use the Point 7 8 buttons to make adjustment. • The adjusting range for the Horizontal and Vertical positions, and ...
... Adjustment Picture Position and Screen Adjustment Some input source employ special signal formats which may be tuned by the auto-tuning system of this projector. Auto adj. Picture Adjustment enables you press the Point d button, the next item can be operated with the video input only. ...signal is 480i or 575i, the adjusting range for every input. 1 Press the Point ed buttons to +8. • The Auto adj. The parameters manually adjusted is displayed. 3 Use the Point 7 8 buttons to make adjustment. • The adjusting range for the Horizontal and Vertical positions, and ...

Owners Manual
Page 38
...screen for the output setting of video equipment. Press the Point 8 or OK buttons to switch between each option. Highland When using the projector in the Logo setting. HDMI 1 setup Background Press the Point 8 or OK buttons to select Normal or Enhanced according to the output signal... of video equipment is set to set this mode properly may affect the projector life. Enhanced ��� When the output of video equipment is set to equipment. For details, refer to the owner's manual of video equipment vary from equipment to "STANDARD." Press the Point 8 ...
...screen for the output setting of video equipment. Press the Point 8 or OK buttons to switch between each option. Highland When using the projector in the Logo setting. HDMI 1 setup Background Press the Point 8 or OK buttons to select Normal or Enhanced according to the output signal... of video equipment is set to set this mode properly may affect the projector life. Enhanced ��� When the output of video equipment is set to equipment. For details, refer to the owner's manual of video equipment vary from equipment to "STANDARD." Press the Point 8 ...

Owners Manual
Page 50
... to the environment or conditions in the Lamp Replacement section of this manual.) Continuous use of vibration, shock or degradation as its lifetime draws to an end. If a lamp explodes, disconnect the projector's AC plug from the cooling air circulation holes. Contact an authorized ...replacement counter. ✔Note: • Do not reset the Lamp replacement counter without implementing lamp replacement. No one IMMEDIATELY after the projector has cooled down. (Follow carefully the instructions in which must be cleaned up , replace the lamp with the LAMP REPLACE indicator ...
... to the environment or conditions in the Lamp Replacement section of this manual.) Continuous use of vibration, shock or degradation as its lifetime draws to an end. If a lamp explodes, disconnect the projector's AC plug from the cooling air circulation holes. Contact an authorized ...replacement counter. ✔Note: • Do not reset the Lamp replacement counter without implementing lamp replacement. No one IMMEDIATELY after the projector has cooled down. (Follow carefully the instructions in which must be cleaned up , replace the lamp with the LAMP REPLACE indicator ...

Owners Manual
Page 51
...display is operating, the image cannot be displayed. No image. Check the projection lamp (see page 22). - Adjust the focus of the projector into an AC outlet. - For some laptop computers, the setting for the setting. - Select a correct input source once again through Menu... air filter (see pages 25 - 26). - Check the projection lens to restart the projector. Check the connection between the projector and the projection screen (see page 40). - See your computer's instruction manual for the monitor output needs to the screen may result in "Connecting to Video Equipment" ...
...display is operating, the image cannot be displayed. No image. Check the projection lamp (see page 22). - Adjust the focus of the projector into an AC outlet. - For some laptop computers, the setting for the setting. - Select a correct input source once again through Menu... air filter (see pages 25 - 26). - Check the projection lens to restart the projector. Check the connection between the projector and the projection screen (see page 40). - See your computer's instruction manual for the monitor output needs to the screen may result in "Connecting to Video Equipment" ...

Owners Manual
Page 57
...A Max. It is Listed by the characteristics of the LCD panels. The CE Mark is a Directive conformity mark of fire, casualty and electrical hazards. Appendix Technical Specifications Projector Type Dimensions (W x H x D) Net Weight LCD Panel System Panel Resolution Number of Pixels Color System High Definition...NTSC, NTSC4.43, PAL-M, and PAL-N 480i, 480p, 575i, 575p, 720p, 1080i, and 1080p H-sync. 15 kHz - 80 kHz, V-sync. 50 Hz - 100 Hz Adjustable from 40" to 300" F 2.0 - 3.05 lens with f 22.6 - 45.3 mm with manual zoom and focus 3.9' - 60.4' (1.2 m - 18.4 m) 165 W RCA Type x ...
...A Max. It is Listed by the characteristics of the LCD panels. The CE Mark is a Directive conformity mark of fire, casualty and electrical hazards. Appendix Technical Specifications Projector Type Dimensions (W x H x D) Net Weight LCD Panel System Panel Resolution Number of Pixels Color System High Definition...NTSC, NTSC4.43, PAL-M, and PAL-N 480i, 480p, 575i, 575p, 720p, 1080i, and 1080p H-sync. 15 kHz - 80 kHz, V-sync. 50 Hz - 100 Hz Adjustable from 40" to 300" F 2.0 - 3.05 lens with f 22.6 - 45.3 mm with manual zoom and focus 3.9' - 60.4' (1.2 m - 18.4 m) 165 W RCA Type x ...


