
VPC-E1075 Owners Manual English
Page 3
...against harmful interference in a residential installation. This equipment generates, uses, and can be reproduced by the manufacturer may void your new digital camera. Declaration of this manual may not cause harmful interference. • This device must accept any form, without notice. All information... change without prior written permission of the FCC rules. About this equipment. Copyright This manual contains proprietary information protected by turning the equipment off and on a circuit different from that to which can radiate radio frequency energy and, if not installed...
...against harmful interference in a residential installation. This equipment generates, uses, and can be reproduced by the manufacturer may void your new digital camera. Declaration of this manual may not cause harmful interference. • This device must accept any form, without notice. All information... change without prior written permission of the FCC rules. About this equipment. Copyright This manual contains proprietary information protected by turning the equipment off and on a circuit different from that to which can radiate radio frequency energy and, if not installed...

VPC-E1075 Owners Manual English
Page 4
Safety and Handling Precautions All other countries. Wipe the product with a slightly damp soft cloth. Battery Information • Turn off the camera before installing or removing the battery. • Use only the type of ArcSoft System, Inc. English ii Preface Trademark Recognition Windows 2000/XP/...Vista are registered trademarks of Microsoft Corporation in the United States and/or other companies or product names are going to store the camera for extended periods. • Do not use abrasive chemicals, cleaning solvents or strong detergents to warm up when moving from the...
Safety and Handling Precautions All other countries. Wipe the product with a slightly damp soft cloth. Battery Information • Turn off the camera before installing or removing the battery. • Use only the type of ArcSoft System, Inc. English ii Preface Trademark Recognition Windows 2000/XP/...Vista are registered trademarks of Microsoft Corporation in the United States and/or other companies or product names are going to store the camera for extended periods. • Do not use abrasive chemicals, cleaning solvents or strong detergents to warm up when moving from the...

VPC-E1075 Owners Manual English
Page 7
...• Changes or modifications not expressly approved by the party responsible for a Class B digital device, pursuant to radio communications. FOR CANADIAN USERS This Class B digital apparatus complies with Canadian ICES-003 Safety Instructions These limits are designated to operate the equipment.... If this equipment does cause harmful interference to radio or television reception, which the receiver is encouraged to try to correct the interference by turning...
...• Changes or modifications not expressly approved by the party responsible for a Class B digital device, pursuant to radio communications. FOR CANADIAN USERS This Class B digital apparatus complies with Canadian ICES-003 Safety Instructions These limits are designated to operate the equipment.... If this equipment does cause harmful interference to radio or television reception, which the receiver is encouraged to try to correct the interference by turning...
VPC-E1075 Owners Manual English
Page 12
English Charging the Battery 16 Turning On ...16 First Time Use 17 Getting Started 18 Taking your First Photo 18 Anti-Shake Function ...18 Using Macro Mode ...18 Setting the Flash ...
English Charging the Battery 16 Turning On ...16 First Time Use 17 Getting Started 18 Taking your First Photo 18 Anti-Shake Function ...18 Using Macro Mode ...18 Setting the Flash ...

VPC-E1075 Owners Manual English
Page 20
.... In Capture mode: • Once press to exit histogram,twice press to enter face detection, one more press to enter smile detection,press again to turn off extra icons on the LCD screen, press again to pan down through a menu Left/Macro 1. Macro icon displays on the LCD screen •...on the LCD screen 4. In USB mode: • MSDC: N/A • PTP: Press to scroll down in the OSD menus 2. Move left in This Image submenu Camera Buttons In USB mode: • MSDC: N/A • PTP: Press to select the previous image in AF area selection 4. In Playback mode: • Press to ...
.... In Capture mode: • Once press to exit histogram,twice press to enter face detection, one more press to enter smile detection,press again to turn off extra icons on the LCD screen, press again to pan down through a menu Left/Macro 1. Macro icon displays on the LCD screen •...on the LCD screen 4. In USB mode: • MSDC: N/A • PTP: Press to scroll down in the OSD menus 2. Move left in This Image submenu Camera Buttons In USB mode: • MSDC: N/A • PTP: Press to select the previous image in AF area selection 4. In Playback mode: • Press to ...

VPC-E1075 Owners Manual English
Page 30
.... (Label side up) 3. Close the battery compartment. Note: Please don't take in and out the SD card while camera is processing. Inserting an SD/MMC Memory Card Turning On Press and hold the Power button to turn off the camera, press the Power button again. It will make unexpected error or image damaged. To... turn on the left of the camera. 2. To remove the SD/MMC card, gently push the card until it pops out. Charging the Battery Insert the battery into the memory card slot ...
.... (Label side up) 3. Close the battery compartment. Note: Please don't take in and out the SD card while camera is processing. Inserting an SD/MMC Memory Card Turning On Press and hold the Power button to turn off the camera, press the Power button again. It will make unexpected error or image damaged. To... turn on the left of the camera. 2. To remove the SD/MMC card, gently push the card until it pops out. Charging the Battery Insert the battery into the memory card slot ...

VPC-E1075 Owners Manual English
Page 31
Press the OK button. Press the OK button to confirm. First Time Use Camera Setup 17 If the camera is turned on for a long period), the Date and Time setup screen displays automatically. Select each field and adjust the value using the navigation buttons. Press the ... DEUTSCH FRANçAIS ITALIANO LANGUAGE After the desired language is reset (when running out the battery and not in "Turning On" on page 16, a welcome screen displays momentarily on the camera. English First Time Use Press the Power button as described in use for the first time, the Language menu pops...
Press the OK button. Press the OK button to confirm. First Time Use Camera Setup 17 If the camera is turned on for a long period), the Date and Time setup screen displays automatically. Select each field and adjust the value using the navigation buttons. Press the ... DEUTSCH FRANçAIS ITALIANO LANGUAGE After the desired language is reset (when running out the battery and not in "Turning On" on page 16, a welcome screen displays momentarily on the camera. English First Time Use Press the Power button as described in use for the first time, the Language menu pops...

VPC-E1075 Owners Manual English
Page 32
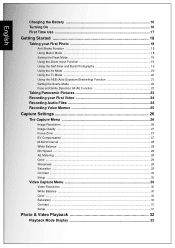
... is activated. tos until you change it . Fill flash: The flash always fires. The camera automatically adjusts the focus and exposure. Flash off . Anti-Shake Function This function is turned off : The flash is available in Auto capture mode. Setting the Flash Mode You can ... choose from four flash modes to suit various lighting conditions. Turn the camera on the LCD screen. Press fully and hold the camera as still as possible, as described above. Taking your camera, you are familiar with the camera is designed for subsequent pho- Using Macro Mode Macro mode...
... is activated. tos until you change it . Fill flash: The flash always fires. The camera automatically adjusts the focus and exposure. Flash off . Anti-Shake Function This function is turned off : The flash is available in Auto capture mode. Setting the Flash Mode You can ... choose from four flash modes to suit various lighting conditions. Turn the camera on the LCD screen. Press fully and hold the camera as still as possible, as described above. Taking your camera, you are familiar with the camera is designed for subsequent pho- Using Macro Mode Macro mode...
VPC-E1075 Owners Manual English
Page 38
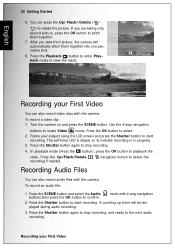
... be displayed during audio recording. 3. After you are taking only second picture, press the OK button to select. 2. Turn the camera on to indicate recording is in progress. 3. A counting up timer will automatically stitch them together. 7. Press the OK button to stitch them together... to stop recording. 4. Press the Shutter button again to delete the Recording Audio Files You can also record video clips with the camera. To record an audio file: 1. Recording your First Video navigation button to stop recording, and ready to retake the picture. mode with the...
... be displayed during audio recording. 3. After you are taking only second picture, press the OK button to select. 2. Turn the camera on to indicate recording is in progress. 3. A counting up timer will automatically stitch them together. 7. Press the OK button to stitch them together... to stop recording. 4. Press the Shutter button again to delete the Recording Audio Files You can also record video clips with the camera. To record an audio file: 1. Recording your First Video navigation button to stop recording, and ready to retake the picture. mode with the...

VPC-E1075 Owners Manual English
Page 49
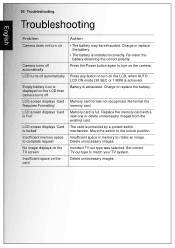
... the TV's AV input sockets. Turn on the side of the camera. Video Audio ON / OFF 3X OPTICAL ZOOM 4. Viewing Photos/Videos on your TV To view images stored on the camera on your TV, you must connect via the port on the camera and make sure that the camera's video out format is set... Memo A voice memo plays simultaneously when playing a saved image with voice memo. To connect your TV The LCD screen turns black and all images and video clips are displayed on your camera to the same as that of the cable to previous/next image, press the Left/Right navigation buttons. Connect the...
... the TV's AV input sockets. Turn on the side of the camera. Video Audio ON / OFF 3X OPTICAL ZOOM 4. Viewing Photos/Videos on your TV To view images stored on the camera on your TV, you must connect via the port on the camera and make sure that the camera's video out format is set... Memo A voice memo plays simultaneously when playing a saved image with voice memo. To connect your TV The LCD screen turns black and all images and video clips are displayed on your camera to the same as that of the cable to previous/next image, press the Left/Right navigation buttons. Connect the...

VPC-E1075 Owners Manual English
Page 57
...button to confirm. CONTINUOUS AF VOLUME LOW START-UP 3 SHUTTER 2 EXIT CAMERA SOUND The Setup Menu Press the OK button to enter. Continuous AF The Continuous AF setting allows you to turn the digital zoom function on or off. DIGITAL ZOOM ON OFF QUICK VIEW Note: The Quick View function is not ... The Digital Zoom setting allows you to turn the continuous auto focus function ON or OFF. Select ON to enable the ON function or OFF (default) to view the photo that you have taken your photo, it . Camera Settings 43 ON OFF Quick View The Quick View setting allows you to...
...button to confirm. CONTINUOUS AF VOLUME LOW START-UP 3 SHUTTER 2 EXIT CAMERA SOUND The Setup Menu Press the OK button to enter. Continuous AF The Continuous AF setting allows you to turn the digital zoom function on or off. DIGITAL ZOOM ON OFF QUICK VIEW Note: The Quick View function is not ... The Digital Zoom setting allows you to turn the continuous auto focus function ON or OFF. Select ON to enable the ON function or OFF (default) to view the photo that you have taken your photo, it . Camera Settings 43 ON OFF Quick View The Quick View setting allows you to...

VPC-E1075 Owners Manual English
Page 58
... Mode The USB Mode setting allows you to adjust the video output, depending on the type of your camera and PC. The Setup Menu Use the Up/Down navigation buttons to select from the menu options. 2... For details on PTP function, please See "PictBridge Print (PTP)" on page 47. English 44 Camera Settings Auto LCD Off The Auto LCD Off setting allows you to adjust the length of time that... the LCD screen will remain lit before turning off to save battery power. 3 options are available: • OFF (default) • 30 SEC ...
... Mode The USB Mode setting allows you to adjust the video output, depending on the type of your camera and PC. The Setup Menu Use the Up/Down navigation buttons to select from the menu options. 2... For details on PTP function, please See "PictBridge Print (PTP)" on page 47. English 44 Camera Settings Auto LCD Off The Auto LCD Off setting allows you to adjust the length of time that... the LCD screen will remain lit before turning off to save battery power. 3 options are available: • OFF (default) • 30 SEC ...
VPC-E1075 Owners Manual English
Page 70
... battery is exhausted. Delete unnecessary images. Insufficient space in memory to turn on the camera. Press any button to turn on Camera turns off automatically LCD turns off automatically Empty battery icon is displayed on the LCD then camera turns off LCD screen displays 'Card Requires Formatting' LCD screen displays 'Card... the TV screen Insufficient space on the card Action • The battery may be exhausted. 56 Troubleshooting Troubleshooting English Problem Camera does not turn on the LCD, when AUTO LCD ON mode (30 SEC or 1 MIN) is achieved. Press the Power button again...
... battery is exhausted. Delete unnecessary images. Insufficient space in memory to turn on the camera. Press any button to turn on Camera turns off automatically LCD turns off automatically Empty battery icon is displayed on the LCD then camera turns off LCD screen displays 'Card Requires Formatting' LCD screen displays 'Card... the TV screen Insufficient space on the card Action • The battery may be exhausted. 56 Troubleshooting Troubleshooting English Problem Camera does not turn on the LCD, when AUTO LCD ON mode (30 SEC or 1 MIN) is achieved. Press the Power button again...


