
Owners Manual
Page 3
... ...2 Back View ...2 Top View ...2 Bottom View ...3 Left / Right View ...3 The Mode Dial 3 Navigation Buttons 4 LED Indicators 6 LCD screen ...7 Capture/Video Mode Display 7 Camera Setup 12 Attaching the Wrist Strap 12 Inserting the Battery 12 Inserting an SD/MMC Memory Card 13 Charging the Battery 13 Turning On ...13 ...First Time Use 14 Getting Started 15 Taking your First Photo 15 Anti-Shake Function ...15 Using Quick Review ...15 Using Macro Mode ...15 Setting the Flash Mode ...16 Using the Zoom in/out Function 16 Using the Self-timer and Burst ...
... ...2 Back View ...2 Top View ...2 Bottom View ...3 Left / Right View ...3 The Mode Dial 3 Navigation Buttons 4 LED Indicators 6 LCD screen ...7 Capture/Video Mode Display 7 Camera Setup 12 Attaching the Wrist Strap 12 Inserting the Battery 12 Inserting an SD/MMC Memory Card 13 Charging the Battery 13 Turning On ...13 ...First Time Use 14 Getting Started 15 Taking your First Photo 15 Anti-Shake Function ...15 Using Quick Review ...15 Using Macro Mode ...15 Setting the Flash Mode ...16 Using the Zoom in/out Function 16 Using the Self-timer and Burst ...

Owners Manual
Page 15
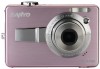
It should contain: • Digital camera • USB/AV 3-in-1 cable • Wrist strap • One Li-ion battery • Battery charger and power cord • Camera pouch • Quick start guide for all regions • Bundled AP-CD (Application Software, Driver and User's Manual for...8226; PictBridge compatibility • Slideshow feature to review your pictures and movies • A/V output to view your pictures and movies on the purchase of your new digital camera. System Requirements In order to get the most out of your camera, your computer must meet the following system ...
It should contain: • Digital camera • USB/AV 3-in-1 cable • Wrist strap • One Li-ion battery • Battery charger and power cord • Camera pouch • Quick start guide for all regions • Bundled AP-CD (Application Software, Driver and User's Manual for...8226; PictBridge compatibility • Slideshow feature to review your pictures and movies • A/V output to view your pictures and movies on the purchase of your new digital camera. System Requirements In order to get the most out of your camera, your computer must meet the following system ...

Owners Manual
Page 18
... through a menu Navigation Buttons Moves up in the OSD menus. 2. In Playback mode: • Press to pan up in magnify/crop mode • Press to review photos/videos/audio clips saved in Focus Zone submenu 3. English 4 Introduction Macro Switch to enable Audio Recording mode. Switch to select Playback mode to move...
... through a menu Navigation Buttons Moves up in the OSD menus. 2. In Playback mode: • Press to pan up in magnify/crop mode • Press to review photos/videos/audio clips saved in Focus Zone submenu 3. English 4 Introduction Macro Switch to enable Audio Recording mode. Switch to select Playback mode to move...

Owners Manual
Page 20
... to take pictures. Ready to select the previous image in AF area selection • Press to display the first frame of the last video recorded 5. Camera busy. Self-timer off. Self-timer count down , flashes during last 2 seconds. In Capture mode: • Press to fast rewind video/audio playback 6. In Video... LED Indicators LED Power/Flash LED LED Status Off Blue (steady) Blue (blinking) Off Self-timer LED/ Assist Lamp Orange (blinking) (1Hz) Orange (blinking) (4Hz) Camera Status Power Off. English 6 Introduction Icon Button Left/ Quick...
... to take pictures. Ready to select the previous image in AF area selection • Press to display the first frame of the last video recorded 5. Camera busy. Self-timer off. Self-timer count down , flashes during last 2 seconds. In Capture mode: • Press to fast rewind video/audio playback 6. In Video... LED Indicators LED Power/Flash LED LED Status Off Blue (steady) Blue (blinking) Off Self-timer LED/ Assist Lamp Orange (blinking) (1Hz) Orange (blinking) (4Hz) Camera Status Power Off. English 6 Introduction Icon Button Left/ Quick...

Owners Manual
Page 29
... to capture the image. Turn the Mode Dial to confirm your First Photo Turn the camera on the LCD screen. Press the Left/Quick Review navigation button. 2. Using Quick Review To delete a photo when using Quick Review: 1. Press fully and hold the camera as still as possible, as a longer exposure time (more detailed information. The...
... to capture the image. Turn the Mode Dial to confirm your First Photo Turn the camera on the LCD screen. Press the Left/Quick Review navigation button. 2. Using Quick Review To delete a photo when using Quick Review: 1. Press fully and hold the camera as still as possible, as a longer exposure time (more detailed information. The...

Owners Manual
Page 41
....8 Viewing Photos/Videos on the LCD Screen To view your multi-burst photos on the LCD screen: 1. mode. The most recent photo or video 2. When reviewing a multi-burst image, it will be displayed from the 1st frame to Playback clip is displayed. Turn the Mode Dial to the 16th frame at...
....8 Viewing Photos/Videos on the LCD Screen To view your multi-burst photos on the LCD screen: 1. mode. The most recent photo or video 2. When reviewing a multi-burst image, it will be displayed from the 1st frame to Playback clip is displayed. Turn the Mode Dial to the 16th frame at...

Owners Manual
Page 42
...press the Left/Right navigation buttons to fast-rewind/fast-forward during playback to the previous/next audio file. 5. See "Video Out" on the camera. 3. The most recent photo or video 2. Press the Left/Right navigation buttons at any time during playback to skip to pause. To skip...Screen" on the TV screen. Use the Left/Right navigation buttons to previous/next image, press Left/Right navigation buttons. To stop a voice memo while reviewing an image, press OK button. Video Audio 4. Turn on the side of the TV. Listening to audio files: 1. English 28 Photo, Video &...
...press the Left/Right navigation buttons to fast-rewind/fast-forward during playback to the previous/next audio file. 5. See "Video Out" on the camera. 3. The most recent photo or video 2. Press the Left/Right navigation buttons at any time during playback to skip to pause. To skip...Screen" on the TV screen. Use the Left/Right navigation buttons to previous/next image, press Left/Right navigation buttons. To stop a voice memo while reviewing an image, press OK button. Video Audio 4. Turn on the side of the TV. Listening to audio files: 1. English 28 Photo, Video &...

Owners Manual
Page 59
... Erase Protection Exposure Compensation Sharpness Color Metering Focus Flash Range Lens Thread Anti-Shake Aperture Priority Shutter Priority Drive Mode Quick Delete Quick View Quick Review Self Timer Playback Magnify White Balance Still Image: JPEG (Exif2.2) Still Image: 3072x2304, 3072x2048(3:2), 2576x1932, 2048x1536, 1600x1200, 640x480 Movie Mode: 640x480@30fps, 320x240@30fps Best...
... Erase Protection Exposure Compensation Sharpness Color Metering Focus Flash Range Lens Thread Anti-Shake Aperture Priority Shutter Priority Drive Mode Quick Delete Quick View Quick Review Self Timer Playback Magnify White Balance Still Image: JPEG (Exif2.2) Still Image: 3072x2304, 3072x2048(3:2), 2576x1932, 2048x1536, 1600x1200, 640x480 Movie Mode: 640x480@30fps, 320x240@30fps Best...
