
Owners Manual
Page 3
...Commission (FCC) Compliance i Declaration of Conformity i Trademark Recognition ...ii Safety and Handling Precautions ii Camera Information ...ii Battery Information ...ii Introduction 1 System Requirements 1 Package Contents 1 Main Features ...1 Camera Views 2 Front View ...2 Back View ...2 Top View ...2 Bottom View ...3 Left / Right ...View ...3 The Mode Dial 3 Navigation Buttons 4 LED Indicators 6 LCD screen ...7 Capture/Video Mode Display 7 Camera Setup 12 Attaching the Wrist Strap 12 Inserting the Battery 12 Inserting an SD/MMC Memory Card 13 Charging the Battery 13 ...
...Commission (FCC) Compliance i Declaration of Conformity i Trademark Recognition ...ii Safety and Handling Precautions ii Camera Information ...ii Battery Information ...ii Introduction 1 System Requirements 1 Package Contents 1 Main Features ...1 Camera Views 2 Front View ...2 Back View ...2 Top View ...2 Bottom View ...3 Left / Right ...View ...3 The Mode Dial 3 Navigation Buttons 4 LED Indicators 6 LCD screen ...7 Capture/Video Mode Display 7 Camera Setup 12 Attaching the Wrist Strap 12 Inserting the Battery 12 Inserting an SD/MMC Memory Card 13 Charging the Battery 13 ...

Owners Manual
Page 5
English Camera Settings 35 The Setup Menu 35 File Number ...35 Digital Zoom ...35 Quick View ...36 Continuous AF ...36 Camera Sound ...36 Auto LCD Off ...36 Auto Power Off ...37 Video Out ...37 USB Mode ...37 Date Stamp ...38 Date and Time ...38 Language ...38 Image Storage ...39 Format ...39 Reset ...39 Voice Memo ...39 PictBridge Print (PTP 40 Image Storage ...40 This Image ...41 Index Print ...42 DPOF Image ...42 All Images ...43 Specifications 44 Troubleshooting 47
English Camera Settings 35 The Setup Menu 35 File Number ...35 Digital Zoom ...35 Quick View ...36 Continuous AF ...36 Camera Sound ...36 Auto LCD Off ...36 Auto Power Off ...37 Video Out ...37 USB Mode ...37 Date Stamp ...38 Date and Time ...38 Language ...38 Image Storage ...39 Format ...39 Reset ...39 Voice Memo ...39 PictBridge Print (PTP 40 Image Storage ...40 This Image ...41 Index Print ...42 DPOF Image ...42 All Images ...43 Specifications 44 Troubleshooting 47

Owners Manual
Page 7
.... About this equipment. All rights are designed to provide reasonable protection against harmful interference in any interference received, including interference that may void your new digital camera. Use only shielded cable to connect I/O devices to this Manual No part of this manual may be determined by turning the equipment off and on... cause harmful interference to radio or television reception, which the receiver is connected. • Consult the dealer or an experienced radio/TV technician for a Class B digital device, pursuant to Part 15 of the FCC Rules.
.... About this equipment. All rights are designed to provide reasonable protection against harmful interference in any interference received, including interference that may void your new digital camera. Use only shielded cable to connect I/O devices to this Manual No part of this manual may be determined by turning the equipment off and on... cause harmful interference to radio or television reception, which the receiver is connected. • Consult the dealer or an experienced radio/TV technician for a Class B digital device, pursuant to Part 15 of the FCC Rules.

Owners Manual
Page 8
...and/or other companies or product names are trademarks or registered trademarks of ArcSoft System, Inc. Wipe the product with your camera. Safety and Handling Precautions Using other types of Adobe Corporation. ArcSoft is an abbreviated term referring to the Microsoft Windows Operation ...Do not use abrasive chemicals, cleaning solvents or strong detergents to direct sunlight for long periods. Battery Information • Turn off the camera before installing or removing the battery. • Use only the type of Microsoft Corporation in this product, ensure that came with a ...
...and/or other companies or product names are trademarks or registered trademarks of ArcSoft System, Inc. Wipe the product with your camera. Safety and Handling Precautions Using other types of Adobe Corporation. ArcSoft is an abbreviated term referring to the Microsoft Windows Operation ...Do not use abrasive chemicals, cleaning solvents or strong detergents to direct sunlight for long periods. Battery Information • Turn off the camera before installing or removing the battery. • Use only the type of Microsoft Corporation in this product, ensure that came with a ...

Owners Manual
Page 9
...or near water. Swallowing battery might cause you are walking, driving or riding a vehicle. WARNING If foreign objects or water have entered the camera, turn the power OFF and remove the battery and the AC power adapter. Continued use in traffic accident. Continued use in areas near the ...shore. Do not disassemble, change or repair the camera. This might cause the camera to fall or tilt over or result in this state might cause fire or electric shock. If the battery is accidentally swallowed,...
...or near water. Swallowing battery might cause you are walking, driving or riding a vehicle. WARNING If foreign objects or water have entered the camera, turn the power OFF and remove the battery and the AC power adapter. Continued use in traffic accident. Continued use in areas near the ...shore. Do not disassemble, change or repair the camera. This might cause the camera to fall or tilt over or result in this state might cause fire or electric shock. If the battery is accidentally swallowed,...

Owners Manual
Page 10
... fire or electric shock. If the internal fluid enters your eyes or comes into contact with your eyes, consult a physician to receive treatment. A camera is included in humid, steamy, smoky, or dusty places. This might cause damage to build up and deform the case, resulting in places where the... temperature may rise significantly, such as inside , resulting in fire and electric shock. Use the camera in cloth or blankets. Warning: TO PREVENT THE RISK OF FIRE OR ELECTRIC SHOCK, DO NOT EXPOSE THIS APPLIANCE TO RAIN OR MOISTURE FOR ...
... fire or electric shock. If the internal fluid enters your eyes or comes into contact with your eyes, consult a physician to receive treatment. A camera is included in humid, steamy, smoky, or dusty places. This might cause damage to build up and deform the case, resulting in places where the... temperature may rise significantly, such as inside , resulting in fire and electric shock. Use the camera in cloth or blankets. Warning: TO PREVENT THE RISK OF FIRE OR ELECTRIC SHOCK, DO NOT EXPOSE THIS APPLIANCE TO RAIN OR MOISTURE FOR ...

Owners Manual
Page 11
... are designated to radio communications. Safety Instructions This equipment generates, uses and can be disposed of the FCC Rules. Your SANYO product is no guarantee that to which can radiate radio frequency energy and, if not installed and used electrical and electronic products... v • This equipment has been tested and found to comply with the limits for a Class B digital device, pursuant to questions or problems concerning camera operation in the sections "Troubleshooting". These limits are separate collection systems for used in accordance with instructions, may...
... are designated to radio communications. Safety Instructions This equipment generates, uses and can be disposed of the FCC Rules. Your SANYO product is no guarantee that to which can radiate radio frequency energy and, if not installed and used electrical and electronic products... v • This equipment has been tested and found to comply with the limits for a Class B digital device, pursuant to questions or problems concerning camera operation in the sections "Troubleshooting". These limits are separate collection systems for used in accordance with instructions, may...

Owners Manual
Page 13
Products very often vary between retailers especially with your camera may be trademarks or registered trademarks of their market requirements, customer demographics, and geographical preferences. Contact your dealer for precise product .... registered trademarks of Microsoft Corporation. • Pentium® is a registered trademark of Intel Corporation. • Macintosh® is a trademark of your camera. • The manufacturer assumes no liability for any errors or discrepancies in this user manual. This includes primary product specifications, software, software drivers, and ...
Products very often vary between retailers especially with your camera may be trademarks or registered trademarks of their market requirements, customer demographics, and geographical preferences. Contact your dealer for precise product .... registered trademarks of Microsoft Corporation. • Pentium® is a registered trademark of Intel Corporation. • Macintosh® is a trademark of your camera. • The manufacturer assumes no liability for any errors or discrepancies in this user manual. This includes primary product specifications, software, software drivers, and ...

Owners Manual
Page 15
...; One Li-ion battery • Battery charger and power cord • Camera pouch • Quick start guide for all regions) Main Features • 7.1 mega pixels resolution • 15x zoom (Up to 3x optical zoom and 5x digital zoom) • 1/2.5 inch CCD image sensor • 2.4 inch LTPS ...• Slideshow feature to review your pictures and movies • A/V output to view your pictures and movies on the purchase of your camera package. English Introduction 1 Introduction Congratulations on your TV • USB port to transfer photos and movies to your PC System Requirements This ...
...; One Li-ion battery • Battery charger and power cord • Camera pouch • Quick start guide for all regions) Main Features • 7.1 mega pixels resolution • 15x zoom (Up to 3x optical zoom and 5x digital zoom) • 1/2.5 inch CCD image sensor • 2.4 inch LTPS ...• Slideshow feature to review your pictures and movies • A/V output to view your pictures and movies on the purchase of your camera package. English Introduction 1 Introduction Congratulations on your TV • USB port to transfer photos and movies to your PC System Requirements This ...

Owners Manual
Page 16
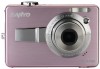
English 2 Introduction Camera Views Front View Wrist strap loop 7.1MEGA PIXELS AUTO FOCUS O 4 m m 1:2.8- 4.9 PTICAL 3X ZOOM 5.8 - 17.4 mm E Q 3 8 - 1 1 Flash Self-timer LED Zoom Lens Microphone Back View LCD screen Top View Zoom Lens Power button 7.1 MEGA PIXELS Camera Views POWER 2.5" LCD TFT/150,000 PIXELS DIGITAL CAMERA Delete/ Anti-shake button Mode dial Four-way navigation buttons MENU OK button Menu button Zoom switch Shutter button
English 2 Introduction Camera Views Front View Wrist strap loop 7.1MEGA PIXELS AUTO FOCUS O 4 m m 1:2.8- 4.9 PTICAL 3X ZOOM 5.8 - 17.4 mm E Q 3 8 - 1 1 Flash Self-timer LED Zoom Lens Microphone Back View LCD screen Top View Zoom Lens Power button 7.1 MEGA PIXELS Camera Views POWER 2.5" LCD TFT/150,000 PIXELS DIGITAL CAMERA Delete/ Anti-shake button Mode dial Four-way navigation buttons MENU OK button Menu button Zoom switch Shutter button

Owners Manual
Page 17
... View Tripod mount Introduction 3 BATTERY Battery/SD card compartment Left / Right View USB/AV port DC-in cover Wrist strap loop The Mode Dial The camera is as follows: Mode Type Auto P-Mode (Program Mode) Portrait Night Portrait Landscape Scene Video Icon Function Switch to select Auto mode. The function of...
... View Tripod mount Introduction 3 BATTERY Battery/SD card compartment Left / Right View USB/AV port DC-in cover Wrist strap loop The Mode Dial The camera is as follows: Mode Type Auto P-Mode (Program Mode) Portrait Night Portrait Landscape Scene Video Icon Function Switch to select Auto mode. The function of...

Owners Manual
Page 20
... 3. In Video mode: • Press to take pictures. In USB mode: • MSDC: N/A • PTP: Press to fast rewind video/audio playback 6. Camera busy. Self-timer count down , flashes during last 2 seconds. Self-timer count down , flashes during last 8 seconds. Self-timer off. In Capture mode: •.../Flash LED LED Status Off Blue (steady) Blue (blinking) Off Self-timer LED/ Assist Lamp Orange (blinking) (1Hz) Orange (blinking) (4Hz) Camera Status Power Off. Moves left in the OSD menus. 2. In Playback mode: • Press to pan left in magnify/crop mode • Press ...
... 3. In Video mode: • Press to take pictures. In USB mode: • MSDC: N/A • PTP: Press to fast rewind video/audio playback 6. Camera busy. Self-timer count down , flashes during last 2 seconds. Self-timer count down , flashes during last 8 seconds. Self-timer off. In Capture mode: •.../Flash LED LED Status Off Blue (steady) Blue (blinking) Off Self-timer LED/ Assist Lamp Orange (blinking) (1Hz) Orange (blinking) (4Hz) Camera Status Power Off. Moves left in the OSD menus. 2. In Playback mode: • Press to pan left in magnify/crop mode • Press ...

Owners Manual
Page 21
Press the Screen button to switch between a Full display (all important information regarding camera settings as well as the visual image for your photo or video. Use the Mode Dial to switch between screen modes. Capture/Video Mode Display ...
Press the Screen button to switch between a Full display (all important information regarding camera settings as well as the visual image for your photo or video. Use the Mode Dial to switch between screen modes. Capture/Video Mode Display ...

Owners Manual
Page 25
English 20 Saturation High Normal 21 White Balance Low Auto Sunny Tungsten Fluorescent Cloudy 22 Camera Steady Warning - 23 AE Metering Average Matrix Spot Introduction 11 LCD screen
English 20 Saturation High Normal 21 White Balance Low Auto Sunny Tungsten Fluorescent Cloudy 22 Camera Steady Warning - 23 AE Metering Average Matrix Spot Introduction 11 LCD screen

Owners Manual
Page 26
Open the battery compartment at the bottom of the strap though the short loop and pull tight to attach the strap to the camera. Insert the battery into the battery compartment. 1. Close the battery compartment. Attaching the Wrist Strap Note: The Li-ion battery should... before using for the first time. String the larger loop of the camera. 2. Inserting the Battery Follow these instructions to attach the wrist strap to your camera to facilitate easy carrying: 1. English 12 Camera Setup Camera Setup Attaching the Wrist Strap Follow these instructions to insert the Li-ion...
Open the battery compartment at the bottom of the strap though the short loop and pull tight to attach the strap to the camera. Insert the battery into the battery compartment. 1. Close the battery compartment. Attaching the Wrist Strap Note: The Li-ion battery should... before using for the first time. String the larger loop of the camera. 2. Inserting the Battery Follow these instructions to attach the wrist strap to your camera to facilitate easy carrying: 1. English 12 Camera Setup Camera Setup Attaching the Wrist Strap Follow these instructions to insert the Li-ion...

Owners Manual
Page 27
... 13 Inserting an SD/MMC Memory Card The camera features 16 MB internal flash memory but you may also use an optional SD/MMC memory...the card carefully. Charging the Battery Insert the battery into the memory card slot as shown. To turn on the camera. Connect the power supply to insert the SD/MMC card. 1. Close the battery compartment. Open the battery compartment at the... bottom of the camera. 2. To remove the SD/MMC card, gently push the card until it pops out. Inserting an SD/MMC Memory...
... 13 Inserting an SD/MMC Memory Card The camera features 16 MB internal flash memory but you may also use an optional SD/MMC memory...the card carefully. Charging the Battery Insert the battery into the memory card slot as shown. To turn on the camera. Connect the power supply to insert the SD/MMC card. 1. Close the battery compartment. Open the battery compartment at the... bottom of the camera. 2. To remove the SD/MMC card, gently push the card until it pops out. Inserting an SD/MMC Memory...

Owners Manual
Page 28
Use the Navigation Buttons to confirm. If the camera is turned on for a long period), the Date and Time setup screen displays automatically. First Time Use DATE & TIME (Year) 2007 / 01 / 01 12 : 30 ... (when running out the battery and not in "Turning On" on page 13, a welcome screen displays on the camera. Press the OK button to toggle each field and adjust the value. English 14 Camera Setup First Time Use Press the Power button as described in use for the first time, the Language...
Use the Navigation Buttons to confirm. If the camera is turned on for a long period), the Date and Time setup screen displays automatically. First Time Use DATE & TIME (Year) 2007 / 01 / 01 12 : 30 ... (when running out the battery and not in "Turning On" on page 13, a welcome screen displays on the camera. Press the OK button to toggle each field and adjust the value. English 14 Camera Setup First Time Use Press the Power button as described in use for the first time, the Language...

Owners Manual
Page 29
... Photo Taking a photo with the layout of your subject is designed for more than 1/30 second) is activated. Press fully and hold the camera as still as possible, as a longer exposure time (more detailed information. Press the Left/Quick Review navigation button. 2. Taking your selection. Frame...Shutter button halfway. Using Macro Mode Macro mode is very close -up photography and can also delete photos from the Playback menu. When a camera steady warning icon appears, hold the Shutter button to disable it . 3. Press the / button to enable the AntiShake function, and press again...
... Photo Taking a photo with the layout of your subject is designed for more than 1/30 second) is activated. Press fully and hold the camera as still as possible, as a longer exposure time (more detailed information. Press the Left/Quick Review navigation button. 2. Taking your selection. Frame...Shutter button halfway. Using Macro Mode Macro mode is very close -up photography and can also delete photos from the Playback menu. When a camera steady warning icon appears, hold the Shutter button to disable it . 3. Press the / button to enable the AntiShake function, and press again...

Owners Manual
Page 30
... consecutive VGA photos by pressing and holding the Shutter button. To set the self-timer/burst mode: 1. Using the Zoom in/out Function The camera comes equipped with a self-timer which allows you have selected an option, frame and take multiple consecutive photos by pressing the Shutter button once....: The flash fires twice so as described above. Taking your subject. 2. Using the Self-timer and Burst Photography The camera comes equipped with 3x optical zoom and 5x digital zoom that allows you to zoom in on your subject. Flash off . Slide the Zoom switch to the left to ...
... consecutive VGA photos by pressing and holding the Shutter button. To set the self-timer/burst mode: 1. Using the Zoom in/out Function The camera comes equipped with a self-timer which allows you have selected an option, frame and take multiple consecutive photos by pressing the Shutter button once....: The flash fires twice so as described above. Taking your subject. 2. Using the Self-timer and Burst Photography The camera comes equipped with 3x optical zoom and 5x digital zoom that allows you to zoom in on your subject. Flash off . Slide the Zoom switch to the left to ...

Owners Manual
Page 31
... Portrait and Night Portrait capture modes. To select scene modes: 1. Then the camera automatically adjusts the focus point and exposure to the optimized value. 1/125 F3.5 However, when the camera fails to detect your selection. mode to Scene play the Scene menu options. ...When the subject's face is activated. Press OK to confirm your subject's face, the camera will set the focus to scroll through the modes: 140 FIREWORKS • Sport • Night Landscape • Backlight • Museum &#...
... Portrait and Night Portrait capture modes. To select scene modes: 1. Then the camera automatically adjusts the focus point and exposure to the optimized value. 1/125 F3.5 However, when the camera fails to detect your selection. mode to Scene play the Scene menu options. ...When the subject's face is activated. Press OK to confirm your subject's face, the camera will set the focus to scroll through the modes: 140 FIREWORKS • Sport • Night Landscape • Backlight • Museum &#...


