
Owners Manual
Page 2
.... Products very often vary between retailers especially with your camera may be different from the actual design of your dealer for the product. Contact your camera. J The illustrations in this manual. This is a... general reference guide for precise product definition and included accessories. J Pentium® is a trademark. READ THIS FIRST Notice: J Product design and specifications are for any errors or discrepancies in this manual are subject to the fact that come with accessories such as batteries...
.... Products very often vary between retailers especially with your camera may be different from the actual design of your dealer for the product. Contact your camera. J The illustrations in this manual. This is a... general reference guide for precise product definition and included accessories. J Pentium® is a trademark. READ THIS FIRST Notice: J Product design and specifications are for any errors or discrepancies in this manual are subject to the fact that come with accessories such as batteries...

Owners Manual
Page 3
... Consult the store of purchase. Do not place the camera on the beach, or near water. For repair or internal inspection, ask the store of purchase. If the battery is accidentally swallowed, immediately consult a physician. If the camera has fallen or its case has been damaged, turn... the power OFF and remove the battery and the AC power adapter. This might cause poisoning. Safety ...
... Consult the store of purchase. Do not place the camera on the beach, or near water. For repair or internal inspection, ask the store of purchase. If the battery is accidentally swallowed, immediately consult a physician. If the camera has fallen or its case has been damaged, turn... the power OFF and remove the battery and the AC power adapter. This might cause poisoning. Safety ...

Owners Manual
Page 4
... cause damage to anyone's eyes. Do not remove the battery immediately after long period of the terminals. Use the camera in fire. This might cause heat to the person's eyesight. EN-4 Do not fire the flash close to the camera. A camera is a precision instrument. Do not drop it, strike...the case, resulting in fire. Do not use . Inserting the battery with fresh water. The battery becomes hot during use excessive force when handling the camera. Touching a hot battery might cause fire or electric shock. Do not leave the camera in humid, steamy, smoky, or dusty places. Do not ...
... cause damage to anyone's eyes. Do not remove the battery immediately after long period of the terminals. Use the camera in fire. This might cause heat to the person's eyesight. EN-4 Do not fire the flash close to the camera. A camera is a precision instrument. Do not drop it, strike...the case, resulting in fire. Do not use . Inserting the battery with fresh water. The battery becomes hot during use excessive force when handling the camera. Touching a hot battery might cause fire or electric shock. Do not leave the camera in humid, steamy, smoky, or dusty places. Do not ...

Owners Manual
Page 8
...of used for a long period of explosion if battery is stored for a long period of the camera or the flash. J We recommend the battery should be captured. EN-8 J If the battery is replaced by an incorrect type. If the battery is incorrectly replaced. CAUTION J Danger of time... type. J Avoid using the new rechargeable battery or rechargeable battery that can be charged 8 hours as low temperatures can shorten the battery life and reduce camera performance. Therefore, to the recycle instructions. J When you use the battery, carefully read and strictly observe the Safety ...
...of used for a long period of explosion if battery is stored for a long period of the camera or the flash. J We recommend the battery should be captured. EN-8 J If the battery is replaced by an incorrect type. If the battery is incorrectly replaced. CAUTION J Danger of time... type. J Avoid using the new rechargeable battery or rechargeable battery that can be charged 8 hours as low temperatures can shorten the battery life and reduce camera performance. Therefore, to the recycle instructions. J When you use the battery, carefully read and strictly observe the Safety ...

Owners Manual
Page 9
... Front View 14 Rear View 16 LCD Monitor Icons GETTING STARTED 18 Attaching the Camera Strap 18 Inserting and Removing the Battery 19 Charging the Battery 20 Inserting and Removing the SD/SDHC Memory Card (Optional Accessory) 21 Setting the Date and Time 22 Formatting the SD/SDHC Memory ...Card or Internal Memory 23 Setting Image Resolution and Quality PHOTOGRAPHY MODE 26 [ ] Capture Mode 27 Recording Voice Memos 28 Using the Digital...
... Front View 14 Rear View 16 LCD Monitor Icons GETTING STARTED 18 Attaching the Camera Strap 18 Inserting and Removing the Battery 19 Charging the Battery 20 Inserting and Removing the SD/SDHC Memory Card (Optional Accessory) 21 Setting the Date and Time 22 Formatting the SD/SDHC Memory ...Card or Internal Memory 23 Setting Image Resolution and Quality PHOTOGRAPHY MODE 26 [ ] Capture Mode 27 Recording Voice Memos 28 Using the Digital...

Owners Manual
Page 12
Package Contents Carefully unpack your camera and ensure that you have the following items. Common Product Components: J Digital camera J User's manual J Software CD-ROM J USB cable J AV cable J Camera strap J Camera pouch J AC power adapter J Adapter converter (for "DC Jack to mini USB cable") J Rechargeable lithium-ion battery Common (Optional) Accessories: J SD/SDHC memory card EN-12
Package Contents Carefully unpack your camera and ensure that you have the following items. Common Product Components: J Digital camera J User's manual J Software CD-ROM J USB cable J AV cable J Camera strap J Camera pouch J AC power adapter J Adapter converter (for "DC Jack to mini USB cable") J Rechargeable lithium-ion battery Common (Optional) Accessories: J SD/SDHC memory card EN-12

Owners Manual
Page 14
Status LED 5. Battery/SD/SDHC memory card cover 13. Tripod socket Erase button 8. DISPLAY button 4. Rear View 1 23 4 5 EN-14 13 12 1. MENU button 6 7 8 9 10 11 7. SET /Direction button 10. PC/AV terminal 11. Speaker 9. Strap holder 12. Mode switch Capture mode Video mode Playback mode 3. LCD monitor 2. Zoom in button Zoom out button 6.
Status LED 5. Battery/SD/SDHC memory card cover 13. Tripod socket Erase button 8. DISPLAY button 4. Rear View 1 23 4 5 EN-14 13 12 1. MENU button 6 7 8 9 10 11 7. SET /Direction button 10. PC/AV terminal 11. Speaker 9. Strap holder 12. Mode switch Capture mode Video mode Playback mode 3. LCD monitor 2. Zoom in button Zoom out button 6.

Owners Manual
Page 16
... off. Metering [Blank] Average [ ] Spot 16. Focus mode [Blank] Auto focus [ ] Macro [ ] Infinity 18. EN-16 Voice memo 3. Zoom status 2. Remaining battery status [ ] Full battery power [ ] Medium battery power [ ] Low battery power [ ] No battery power *[ ] AC adapter icon (if used) 4. Self-timer icon [ 10s] 10 sec. [ 2s ] 2 sec. [ 10+2s ] 10+2 sec. 13. Scene mode...
... off. Metering [Blank] Average [ ] Spot 16. Focus mode [Blank] Auto focus [ ] Macro [ ] Infinity 18. EN-16 Voice memo 3. Zoom status 2. Remaining battery status [ ] Full battery power [ ] Medium battery power [ ] Low battery power [ ] No battery power *[ ] AC adapter icon (if used) 4. Self-timer icon [ 10s] 10 sec. [ 2s ] 2 sec. [ 10+2s ] 10+2 sec. 13. Scene mode...

Owners Manual
Page 17
Zoom status 3. Quality 7. File number 3. Video status bar 2. Remaining battery status 4. Focus icon Playback mode [ ] -Still image playback 1. Elapsed time 3. Folder number 5. Playback mode 2. Voice memo 6. Protect icon 5. Protect icon 6. Video mode [ ] 1. [ ] Video mode 2. Video ...
Zoom status 3. Quality 7. File number 3. Video status bar 2. Remaining battery status 4. Focus icon Playback mode [ ] -Still image playback 1. Elapsed time 3. Folder number 5. Playback mode 2. Voice memo 6. Protect icon 5. Protect icon 6. Video mode [ ] 1. [ ] Video mode 2. Video ...
Owners Manual
Page 18
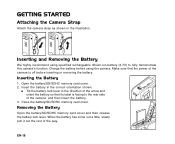
...) to the rear side of the camera, and then insert the battery. 3. GETTING STARTED Attaching the Camera Strap Attach the camera strap as shown in the direction of the arrow and orient the battery so that the power of the camera is facing to fully demonstrate this camera's function. Insert the battery in the correct orientation shown. Removing...
...) to the rear side of the camera, and then insert the battery. 3. GETTING STARTED Attaching the Camera Strap Attach the camera strap as shown in the direction of the arrow and orient the battery so that the power of the camera is facing to fully demonstrate this camera's function. Insert the battery in the correct orientation shown. Removing...

Owners Manual
Page 19
...by storing it has been charged or immediately after being used with specified AC power adapter. J Always make sure that the camera is off when charging the 2 battery. 2. This is inserted inside the quilt, under the warranty. Connect one end of the adapter converter to make sure that ...the date and time will not be used . J It is completed. J The battery may charge the battery or operate the camera as inside the camera. J If you have to be reset. The LED lights red when a charging error has occurred or no...
...by storing it has been charged or immediately after being used with specified AC power adapter. J Always make sure that the camera is off when charging the 2 battery. 2. This is inserted inside the quilt, under the warranty. Connect one end of the adapter converter to make sure that ...the date and time will not be used . J It is completed. J The battery may charge the battery or operate the camera as inside the camera. J If you have to be reset. The LED lights red when a charging error has occurred or no...

Owners Manual
Page 20
... SD/SDHC memory card) to store captured still images or video clips in the correct orientation shown. However, you must unlock the card. Close the battery/SD/SDHC memory card cover. EN-20 J To prevent valuable data from being accidentally erased from an SD/SDHC memory card you can slide the... rear side of internal memory (approx. 27 MB for image storage), allowing you can store more files. J Hold the SD/SDHC memory card with this digital camera before using an SD/SDHC memory card so that you to "LOCK". J To save, edit or erase data on the side of the SD/SDHC...
... SD/SDHC memory card) to store captured still images or video clips in the correct orientation shown. However, you must unlock the card. Close the battery/SD/SDHC memory card cover. EN-20 J To prevent valuable data from being accidentally erased from an SD/SDHC memory card you can slide the... rear side of internal memory (approx. 27 MB for image storage), allowing you can store more files. J Hold the SD/SDHC memory card with this digital camera before using an SD/SDHC memory card so that you to "LOCK". J To save, edit or erase data on the side of the SD/SDHC...

Owners Manual
Page 21
...time. 1. When the date and time information is not displayed on the LCD monitor, follow these steps to be displayed. 4. Camera is turned on after leaving the camera without the battery for the date and time with the W / X buttons and adjust the value for an extended period of time. Slide ...the mode switch to [ ] or [ ]. 2. The time is set if/when: Camera is turned on for the first time. Select the item's...
...time. 1. When the date and time information is not displayed on the LCD monitor, follow these steps to be displayed. 4. Camera is turned on after leaving the camera without the battery for the date and time with the W / X buttons and adjust the value for an extended period of time. Slide ...the mode switch to [ ] or [ ]. 2. The time is set if/when: Camera is turned on for the first time. Select the item's...

Owners Manual
Page 53
... the MENU button, and select the [Setup] menu with the S / T buttons, and press the SET button. 5. The captured images are to the camera's default settings. Select the desired [Setup] option item with the S / T buttons, and press the SET button to section in which language menus and ... folder from the menu, press the MENU button. This feature is displayed. 3. EN-53 Reset This creates a new folder. J [Setup] menu is useful to reduce battery wear. * 1 Min. / 2 Min. / 3 Min. / Off Date/Time Refer to enter its respective menu. 4. No. Capture MENU:Exit SET:Adj. Select ...
... the MENU button, and select the [Setup] menu with the S / T buttons, and press the SET button. 5. The captured images are to the camera's default settings. Select the desired [Setup] option item with the S / T buttons, and press the SET button to section in which language menus and ... folder from the menu, press the MENU button. This feature is displayed. 3. EN-53 Reset This creates a new folder. J [Setup] menu is useful to reduce battery wear. * 1 Min. / 2 Min. / 3 Min. / Off Date/Time Refer to enter its respective menu. 4. No. Capture MENU:Exit SET:Adj. Select ...

Owners Manual
Page 63
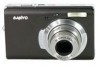
EN-63 CAMERA SPECIFICATIONS Item Image sensor Image resolution LCD monitor Recording media Compression format File format Lens Focus range Shutter speed Digital zoom Flash effective range Terminal Power supply Dimensions Weight Description 1/2.5" CCD sensor (7.0 megapixels) 3072 x 2304, 2560 x 1920, ... (Wide) 0.6m - 2.1m (Tele) USB/AV/DC-IN (3 in 1 terminal) Rechargeable Lithium-ion battery (3.7V) AC power adapter Approx. 88.5 x 55 x 19.1mm (without protruding parts) Approx. 110g (without battery and SD/SDHC memory card) *Design and specifications are subject to change without notice.
EN-63 CAMERA SPECIFICATIONS Item Image sensor Image resolution LCD monitor Recording media Compression format File format Lens Focus range Shutter speed Digital zoom Flash effective range Terminal Power supply Dimensions Weight Description 1/2.5" CCD sensor (7.0 megapixels) 3072 x 2304, 2560 x 1920, ... (Wide) 0.6m - 2.1m (Tele) USB/AV/DC-IN (3 in 1 terminal) Rechargeable Lithium-ion battery (3.7V) AC power adapter Approx. 88.5 x 55 x 19.1mm (without protruding parts) Approx. 110g (without battery and SD/SDHC memory card) *Design and specifications are subject to change without notice.
Owners Manual
Page 64
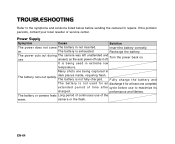
...requiring flash. Power Supply Symptom Cause Solution The power does not come The battery in extreme low temperature. Turn the power back on . The battery is exhausted. performance and lifetime. EN-64 The battery or camera feels Long period of t i m e a f t e r ... to the symptoms and solutions listed below before sending the camera for repairs. on . camera or the flash. Fully charge the battery and The batter y is being captured in The battery runs out quickly. cuts out during The camera was left unattended and unused, so the auto power off...
...requiring flash. Power Supply Symptom Cause Solution The power does not come The battery in extreme low temperature. Turn the power back on . The battery is exhausted. performance and lifetime. EN-64 The battery or camera feels Long period of t i m e a f t e r ... to the symptoms and solutions listed below before sending the camera for repairs. on . camera or the flash. Fully charge the battery and The batter y is being captured in The battery runs out quickly. cuts out during The camera was left unattended and unused, so the auto power off...

Owners Manual
Page 65
... distance to the subject is not in the menu. The image is write-protected. The camera is greater Get closer to flash off mode. The shutter button is set to something other...something other The image is captured in The image lacks natural color. not shoot. Remove the write-protection. LCD monitor is unrecognized by the camera. Set the flash to flash off mode. while set to . conditions that are hard for auto white A d d a w h...Shooting Symptom Cause Solution The battery is not on. The power is running low. Turn the power on. Recharge the...
... distance to the subject is not in the menu. The image is write-protected. The camera is greater Get closer to flash off mode. The shutter button is set to something other...something other The image is captured in The image lacks natural color. not shoot. Remove the write-protection. LCD monitor is unrecognized by the camera. Set the flash to flash off mode. while set to . conditions that are hard for auto white A d d a w h...Shooting Symptom Cause Solution The battery is not on. The power is running low. Turn the power on. Recharge the...

Owners Manual
Page 66
...playback image is write-protected. Other Problems Symptom Cause Solution Even when the camera's buttons are pressed, it The battery is running Windows, and if the drive for running low. does not operate. T h e d a t e s e t h a s The battery is write-protected. Turn the power on . You played back a memory... monitor is not set . Insert a new memory card. Adjust the brightness of memory card life. Recharge the battery. The correct date and time in the camera. Set the correct date and time. disappeared. download The free space on by this device. EN-66
...playback image is write-protected. Other Problems Symptom Cause Solution Even when the camera's buttons are pressed, it The battery is running Windows, and if the drive for running low. does not operate. T h e d a t e s e t h a s The battery is write-protected. Turn the power on . You played back a memory... monitor is not set . Insert a new memory card. Adjust the brightness of memory card life. Recharge the battery. The correct date and time in the camera. Set the correct date and time. disappeared. download The free space on by this device. EN-66


