
Instruction Manual, PLC-XF60A
Page 1
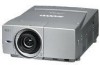
Multimedia Projector MODEL PLC-XF60A PLC-EF60A ✽ Projection lens is optional. Owner's Manual
Multimedia Projector MODEL PLC-XF60A PLC-EF60A ✽ Projection lens is optional. Owner's Manual

Instruction Manual, PLC-XF60A
Page 2
...can hide menus not in multimedia features, a palette of 16.77 million colors, and matrix liquid crystal display (LCD) technology. ◆ Compatibility The projector widely accepts various video and computer input signals including Analog and Digital Computer sources, 6 TV color systems, Component ...blackness for portability, durability, and ease of use and make your presentation with its respective corporation. Features and Design This Multimedia Projector is designed with most advanced technology for a while the projected image is either a registered trademark or a trademark of its ...
...can hide menus not in multimedia features, a palette of 16.77 million colors, and matrix liquid crystal display (LCD) technology. ◆ Compatibility The projector widely accepts various video and computer input signals including Analog and Digital Computer sources, 6 TV color systems, Component ...blackness for portability, durability, and ease of use and make your presentation with its respective corporation. Features and Design This Multimedia Projector is designed with most advanced technology for a while the projected image is either a registered trademark or a trademark of its ...

Instruction Manual, PLC-XF60A
Page 3
... Design 2 Table of Contents 3 To The Owner 4 Safety Instructions 5 Air Circulation 6 Setup In Proper Directions 6 Moving the Projector 7 Caution in Handling the Projector 7 Compliance 8 Preparation 9 Parts Name 9 Indicators 10 Top Control 11 Terminals 12 Remote Control 14 Remote Control Transmitter 16 Remote ... Channel and ID Setup 16 Remote Control Battery Installation 17 Installation 18 Installation 18 Lens Installation 18 Positioning the Projector 18 Lens Shift Adjustment 19 Level Adjustable Feet 19 Connecting AC Power Cord 20 Connection Terminals 21 Interface Board ...
... Design 2 Table of Contents 3 To The Owner 4 Safety Instructions 5 Air Circulation 6 Setup In Proper Directions 6 Moving the Projector 7 Caution in Handling the Projector 7 Compliance 8 Preparation 9 Parts Name 9 Indicators 10 Top Control 11 Terminals 12 Remote Control 14 Remote Control Transmitter 16 Remote ... Channel and ID Setup 16 Remote Control Battery Installation 17 Installation 18 Installation 18 Lens Installation 18 Positioning the Projector 18 Lens Shift Adjustment 19 Level Adjustable Feet 19 Connecting AC Power Cord 20 Connection Terminals 21 Interface Board ...
Instruction Manual, PLC-XF60A
Page 4
...electronic products. CAUTION ON HANGING FROM THE CEILING When hanging the projector from your household waste. READ AND KEEP THIS OWNER'S MANUAL FOR LATER USE. 4 NO USER-SERVICEABLE PARTS INSIDE EXCEPT LAMP REPLACEMENT. Your SANYO product is not to be built into a compartment or similarly... enclosed, the minimum distances must be maintained. Do not stare directly into the beam. - If you leave the projector without cleaning for a long time, the dust ...
...electronic products. CAUTION ON HANGING FROM THE CEILING When hanging the projector from your household waste. READ AND KEEP THIS OWNER'S MANUAL FOR LATER USE. 4 NO USER-SERVICEABLE PARTS INSIDE EXCEPT LAMP REPLACEMENT. Your SANYO product is not to be built into a compartment or similarly... enclosed, the minimum distances must be maintained. Do not stare directly into the beam. - If you leave the projector without cleaning for a long time, the dust ...
Instruction Manual, PLC-XF60A
Page 5
...in damage and will prevent damage due to dangerous voltage or other hazards. Use a damp cloth for example, in performance-this projector from overheating. Wall or shelf mounting should follow the manufacturer's instructions, and should not be covered with care. When the power...basement, near the ventilation duct of time, unplug it from AC power supply before the product is provided. Do not install the projector near a swimming pool, etc... Unauthorized substitutions may cause the appliance and cart combination to qualified service personnel under the following the ...
...in damage and will prevent damage due to dangerous voltage or other hazards. Use a damp cloth for example, in performance-this projector from overheating. Wall or shelf mounting should follow the manufacturer's instructions, and should not be covered with care. When the power...basement, near the ventilation duct of time, unplug it from AC power supply before the product is provided. Do not install the projector near a swimming pool, etc... Unauthorized substitutions may cause the appliance and cart combination to qualified service personnel under the following the ...

Instruction Manual, PLC-XF60A
Page 6
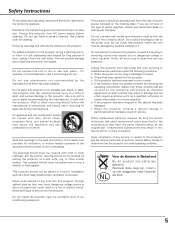
... Keep the exhaust vent at least 3.3' (1m) away from ventilation holes. - Do not put any flammable objects or spray can near the projector. Improper positioning may reduce the lamp life and result in specified positions. Safety Instructions Air Circulation Openings in any position of 360 degrees such as... or covered. Do not touch a peripheral part of the product and to protect it as below : 20˚ Do not tilt the projector more than 20 degrees from side to ensure reliable operation of the exhaust vent, especially screws and metallic part. Cooling fans are provided for ...
... Keep the exhaust vent at least 3.3' (1m) away from ventilation holes. - Do not put any flammable objects or spray can near the projector. Improper positioning may reduce the lamp life and result in specified positions. Safety Instructions Air Circulation Openings in any position of 360 degrees such as... or covered. Do not touch a peripheral part of the product and to protect it as below : 20˚ Do not tilt the projector more than 20 degrees from side to ensure reliable operation of the exhaust vent, especially screws and metallic part. Cooling fans are provided for ...
Instruction Manual, PLC-XF60A
Page 7
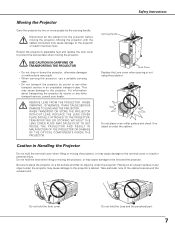
...the Lens and the peripheral part. 7 Be sure to the projector's cabinet. Placing on an uneven surface or any other transport service in personal injury. Disconnect all the cables from the projector before moving the projector. Retract the projector's adjustable feet and replace the lens cover to the terminal ...under the cabinet. OTHERWISE, IT MAY CAUSE SERIOUS DAMAGE TO LENS AND THE PROJECTOR. Do not hold the lens when lifting or moving the projector, or may cause damage to the lens and the projector. Carrying Handle Lens Cover Replace the Lens cover when carrying or not using...
...the Lens and the peripheral part. 7 Be sure to the projector's cabinet. Placing on an uneven surface or any other transport service in personal injury. Disconnect all the cables from the projector before moving the projector. Retract the projector's adjustable feet and replace the lens cover to the terminal ...under the cabinet. OTHERWISE, IT MAY CAUSE SERIOUS DAMAGE TO LENS AND THE PROJECTOR. Do not hold the lens when lifting or moving the projector, or may cause damage to the lens and the projector. Carrying Handle Lens Cover Replace the Lens cover when carrying or not using...
Instruction Manual, PLC-XF60A
Page 8
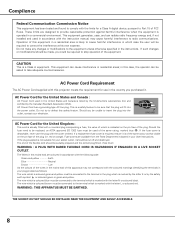
... 15 of FCC Rules. Should the fuse need to be replaced, an ASTA approved BS 1362 fuse must be connected to the terminal in this projector meets the requirement for use the plug with the cover omitted. red or orange). This equipment can radiate radio frequency energy and, if not installed...
... 15 of FCC Rules. Should the fuse need to be replaced, an ASTA approved BS 1362 fuse must be connected to the terminal in this projector meets the requirement for use the plug with the cover omitted. red or orange). This equipment can radiate radio frequency energy and, if not installed...
Instruction Manual, PLC-XF60A
Page 9
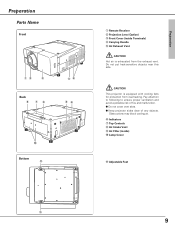
...following to ensure proper ventilation and avoid a possible risk of fire and malfunction. ● Do not cover vent slots. ● Keep projector sides clear of any objects. Preparation Preparation Parts Name Front qw e Back y uy rt io !0 Bottom !1 q Remote Receiver w ...Projection Lens (Option) e Front Cover (inside ) !0 Lamp Cover !1 Adjustable Feet !1 9 CAUTION This projector is exhausted from overheating. Do not put heat-sensitive objects near this side. Obstructions may block cooling air. y Indicators u Top Controls i Air Intake ...
...following to ensure proper ventilation and avoid a possible risk of fire and malfunction. ● Do not cover vent slots. ● Keep projector sides clear of any objects. Preparation Preparation Parts Name Front qw e Back y uy rt io !0 Bottom !1 q Remote Receiver w ...Projection Lens (Option) e Front Cover (inside ) !0 Lamp Cover !1 Adjustable Feet !1 9 CAUTION This projector is exhausted from overheating. Do not put heat-sensitive objects near this side. Obstructions may block cooling air. y Indicators u Top Controls i Air Intake ...

Instruction Manual, PLC-XF60A
Page 10
... failure. (p.65~67) y SHUTTER indicator Lights blue when the shutter is in the stand-by mode. - Turns a dim lighting when the projector is ready to an end. (p.62, 67) w WARNING TEMP indicator Blinks red when the internal temperature of the... projector is abnormally high. (p.60, 65) e WARNING FILTER indicator Lights orange when the projector's filter is clogged with dust. (p.61, 66) r LAMP indicator - Lights green when the projector is turned on and remains green lighting during operations. - Preparation Indicators...
... failure. (p.65~67) y SHUTTER indicator Lights blue when the shutter is in the stand-by mode. - Turns a dim lighting when the projector is ready to an end. (p.62, 67) w WARNING TEMP indicator Blinks red when the internal temperature of the... projector is abnormally high. (p.60, 65) e WARNING FILTER indicator Lights orange when the projector's filter is clogged with dust. (p.61, 66) r LAMP indicator - Lights green when the projector is turned on and remains green lighting during operations. - Preparation Indicators...
Instruction Manual, PLC-XF60A
Page 11
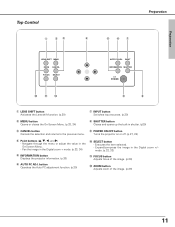
Navigate through the menu or adjust the value in the Digital zoom + mode. (p.33, 34) t INFORMATION button Displays the projector information. (p.30) y AUTO PC ADJ. Pan the image in the On-Screen Menu. - INPUT INFORMATION SHUTTER P POWER !2 !1 !0 o i q LENS... the previous menu. mode. (p.32, 33) !1 FOCUS button Adjusts focus of the image. (p.29) !2 ZOOM button Adjusts zoom of the image. (p.29) 11 Turns the projector on or off. (p.27, 28) r Point buttons (e, d, 7, and 8) - button Operates the Auto PC adjustment function. (p.30) !0 SELECT button - Preparation Top Control ...
Navigate through the menu or adjust the value in the Digital zoom + mode. (p.33, 34) t INFORMATION button Displays the projector information. (p.30) y AUTO PC ADJ. Pan the image in the On-Screen Menu. - INPUT INFORMATION SHUTTER P POWER !2 !1 !0 o i q LENS... the previous menu. mode. (p.32, 33) !1 FOCUS button Adjusts focus of the image. (p.29) !2 ZOOM button Adjusts zoom of the image. (p.29) 11 Turns the projector on or off. (p.27, 28) r Point buttons (e, d, 7, and 8) - button Operates the Auto PC adjustment function. (p.30) !0 SELECT button - Preparation Top Control ...
Instruction Manual, PLC-XF60A
Page 13
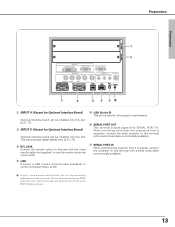
... (commercially available) to be reset. This can be installed into this slot. (p.21, 73) w INPUT 5 (Vacant for the projector maintenance. u SERIAL PORT IN When controling the projector from a computer, connect the computer to use the RESET function excessively. 13 Preparation Preparation q w u y t r e✽ ... serial cross cable (commercially available). When controling more than two projectors from SERIAL PORT IN. y SERIAL PORT OUT This terminal outputs signal from a computer, connect the other projector to this terminal with the wired remote cable (not supplied) to...
... (commercially available) to be reset. This can be installed into this slot. (p.21, 73) w INPUT 5 (Vacant for the projector maintenance. u SERIAL PORT IN When controling the projector from a computer, connect the computer to use the RESET function excessively. 13 Preparation Preparation q w u y t r e✽ ... serial cross cable (commercially available). When controling more than two projectors from SERIAL PORT IN. y SERIAL PORT OUT This terminal outputs signal from a computer, connect the other projector to this terminal with the wired remote cable (not supplied) to...
Instruction Manual, PLC-XF60A
Page 14
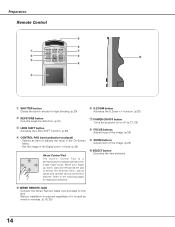
... is required regardless of the image. (p.29) r CONTROL PAD (semiconductive touchpad) - function. (p.32) w KEYSTONE button Corrects keystone distortion. (p.31) u POWER ON-OFF button Turns the projector on or off. (p.27, 28) e LENS SHIFT button Activates the LENS SHIFT function. (p.29) i FOCUS buttons Adjust focus of it is a semiconductive touchpad operated with...
... is required regardless of the image. (p.29) r CONTROL PAD (semiconductive touchpad) - function. (p.32) w KEYSTONE button Corrects keystone distortion. (p.31) u POWER ON-OFF button Turns the projector on or off. (p.27, 28) e LENS SHIFT button Activates the LENS SHIFT function. (p.29) i FOCUS buttons Adjust focus of it is a semiconductive touchpad operated with...
Instruction Manual, PLC-XF60A
Page 15
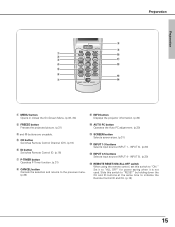
... 2 t CH REMOTE INPUT 5 INPUT 3 y ID !3 u !4 REMOTE RESET ON ALL OFF q MENU button Opens or closes the On-Screen Menu. (p.33, 34) o INFO button Displays the projector information. (p.30) w FREEZE button Freezes the projected picture. (p.31) !0 AUTO PC button Operates the Auto PC adjustment. (p.30) e and r buttons are unusable. INPUT 5). (p.30) !4 REMOTE...
... 2 t CH REMOTE INPUT 5 INPUT 3 y ID !3 u !4 REMOTE RESET ON ALL OFF q MENU button Opens or closes the On-Screen Menu. (p.33, 34) o INFO button Displays the projector information. (p.30) w FREEZE button Freezes the projected picture. (p.31) !0 AUTO PC button Operates the Auto PC adjustment. (p.30) e and r buttons are unusable. INPUT 5). (p.30) !4 REMOTE...
Instruction Manual, PLC-XF60A
Page 16
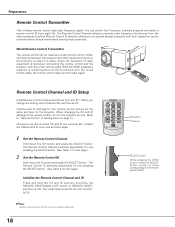
...button While pressing the CH/ID button, press the SELECT button number of radio equipment is restricted, connecting the remote control and the projector with the wired remote cable (POA-CA-RC30) separatery supplied is recommended. (p.73) Connected with their respective remote controls without mutual ... Remote Control Transmitter The remote control can switch four frequency channels prepared and select a remote control ID from the other equipment occurs or the projector is used as a wired remote control. Channel and ID settings for one pressing the SELECT button. (See Table 2 on page 51....
...button While pressing the CH/ID button, press the SELECT button number of radio equipment is restricted, connecting the remote control and the projector with the wired remote cable (POA-CA-RC30) separatery supplied is recommended. (p.73) Connected with their respective remote controls without mutual ... Remote Control Transmitter The remote control can switch four frequency channels prepared and select a remote control ID from the other equipment occurs or the projector is used as a wired remote control. Channel and ID settings for one pressing the SELECT button. (See Table 2 on page 51....
Instruction Manual, PLC-XF60A
Page 17
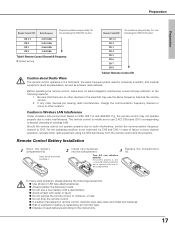
... a used battery. ● Avoid contact with pins in every channel operation, relocate other radio equipment using 2.4 GHz band away from the remote control and the projector. In case of used for industrial, scientific, and medical equipment (such as pacemaker), as well as the remote control. 2. Two AA size alkaline batteries For...
... a used battery. ● Avoid contact with pins in every channel operation, relocate other radio equipment using 2.4 GHz band away from the remote control and the projector. In case of used for industrial, scientific, and medical equipment (such as pacemaker), as well as the remote control. 2. Two AA size alkaline batteries For...

Instruction Manual, PLC-XF60A
Page 18
... lens, cabinet, or mechanical parts. Before installation, read Safety Instructions thoroughly and check the installation place. When moving or setting up the projector, install optional lens in a place with holding the lens mounted and its peripheral part. Be careful not to hold or subject a lens.... The projected image may cause serious damages to project on an unstable stand, cart, or ceiling may not be perpendicular to support the projector's weight. Installation on a flat surface. Be sure that the keystone correction may lower the image resolution. (p.31) Do not expose the...
... lens, cabinet, or mechanical parts. Before installation, read Safety Instructions thoroughly and check the installation place. When moving or setting up the projector, install optional lens in a place with holding the lens mounted and its peripheral part. Be careful not to hold or subject a lens.... The projected image may cause serious damages to project on an unstable stand, cart, or ceiling may not be perpendicular to support the projector's weight. Installation on a flat surface. Be sure that the keystone correction may lower the image resolution. (p.31) Do not expose the...
Instruction Manual, PLC-XF60A
Page 19
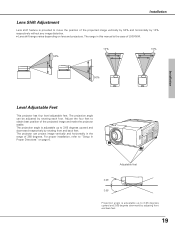
Adjust the four feet to obtain best position of LNS-W04. 50% 10% 10% 50% Installation Level Adjustable Feet This projector has four level adjustable feet. Installation Lens Shift Adjustment Lens shift feature is provided to move the position of the projected image vertically... of 360 degrees. Adjustable feet 3.65° 3.65° Projection angle is adjustable up to "Setup In Proper Directions" on lens and projectors. The projector can be adjusted by adjusting front and back feet. 19 For proper installation, refer to 3.65 degrees upward and 3.65 degrees downward by rotating...
Adjust the four feet to obtain best position of LNS-W04. 50% 10% 10% 50% Installation Level Adjustable Feet This projector has four level adjustable feet. Installation Lens Shift Adjustment Lens shift feature is provided to move the position of the projected image vertically... of 360 degrees. Adjustable feet 3.65° 3.65° Projection angle is adjustable up to "Setup In Proper Directions" on lens and projectors. The projector can be adjusted by adjusting front and back feet. 19 For proper installation, refer to 3.65 degrees upward and 3.65 degrees downward by rotating...
Instruction Manual, PLC-XF60A
Page 20
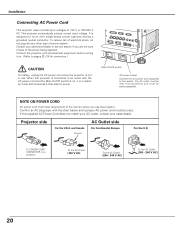
... nominal input voltages of power system. Confirm an AC plug type with all peripheral equipment before turning it is connected to this projector is in use the projector. To the AC Outlet. (120 V AC) To the AC Outlet. (200 - 240 V AC) To the AC Outlet. (200 - 240 V AC) 20 To reduce risk... of electrical shock, do not plug into any other type of 120 V or 200-240 V AC. Connect the projector with the chart below and a proper AC power cord must be used. If the supplied AC Power Cord does not match your AC outlet, contact...
... nominal input voltages of power system. Confirm an AC plug type with all peripheral equipment before turning it is connected to this projector is in use the projector. To the AC Outlet. (120 V AC) To the AC Outlet. (200 - 240 V AC) To the AC Outlet. (200 - 240 V AC) 20 To reduce risk... of electrical shock, do not plug into any other type of 120 V or 200-240 V AC. Connect the projector with the chart below and a proper AC power cord must be used. If the supplied AC Power Cord does not match your AC outlet, contact...
Instruction Manual, PLC-XF60A
Page 21
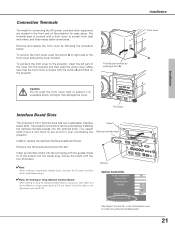
...cover forward. Remove and replace the front cover by following the procedure below: To remove the front cover, push the button A on the projector. Installation Front cover A Installation Caution Do not push the front cover hard or subject it . Screws Option Control No. ✔Notes ... board Install or replace the optional interface boards as follows: Remove two (2) screws and uncover the slot. Terminals Interface Board Slots The projector's front terminal area has two replaceable Interface board slots. Insert an interface board into the slot along with a front cover to fit ...
...cover forward. Remove and replace the front cover by following the procedure below: To remove the front cover, push the button A on the projector. Installation Front cover A Installation Caution Do not push the front cover hard or subject it . Screws Option Control No. ✔Notes ... board Install or replace the optional interface boards as follows: Remove two (2) screws and uncover the slot. Terminals Interface Board Slots The projector's front terminal area has two replaceable Interface board slots. Insert an interface board into the slot along with a front cover to fit ...


