
Instruction Manual, PLC-XP41L
Page 2
...the laser pointer function from the projection lens. q Take appropriate space on yourself or other accidents. CAUTION RISK OF ELECTRIC SHOCK DO NOT OPEN CAUTION : TO REDUCE THE RISK OF ELECTRIC SHOCK, DO NOT REMOVE COVER (OR BACK). TO THE OWNER Before operating this projector, read this manual again, check ... booklet. SIDE and TOP 50cm 50cm REAR 50cm q Do not put any flammable object or spray can reduce the service life of your projector seems to be built into Laser Light Window or shine the laser beam on the top, sides and rear of this manual thoroughly and operate...
...the laser pointer function from the projection lens. q Take appropriate space on yourself or other accidents. CAUTION RISK OF ELECTRIC SHOCK DO NOT OPEN CAUTION : TO REDUCE THE RISK OF ELECTRIC SHOCK, DO NOT REMOVE COVER (OR BACK). TO THE OWNER Before operating this projector, read this manual again, check ... booklet. SIDE and TOP 50cm 50cm REAR 50cm q Do not put any flammable object or spray can reduce the service life of your projector seems to be built into Laser Light Window or shine the laser beam on the top, sides and rear of this manual thoroughly and operate...

Instruction Manual, PLC-XP41L
Page 5
...PC ADJUSTMENT 23 NAME OF EACH PART OF PROJECTOR 7 MANUAL PC ADJUSTMENT 24 SETTING-UP PROJECTOR 8 COMPATIBLE COMPUTER SPECIFICATIONS 26 CONNECTING AC POWER CORD 8 PICTURE IMAGE ADJUSTMENT 27 POSITIONING PROJECTOR 9 IMAGE LEVEL SELECT 27 LENS INSTALLATION 9 IMAGE LEVEL ADJUSTMENT 28 ADJUSTABLE ... trademarks of its respective corporation. 5 INDICATOR 38 AIR FILTER CARE AND CLEANING 38 CLEANING PROJECTION LENS 38 TURNING ON / OFF PROJECTOR 19 LAMP REPLACEMENT 39 ADJUSTING SCREEN ZOOM ADJUSTMENT 20 LAMP REPLACE COUNTER 39 20 TROUBLESHOOTING 40 FOCUS ADJUSTMENT...
...PC ADJUSTMENT 23 NAME OF EACH PART OF PROJECTOR 7 MANUAL PC ADJUSTMENT 24 SETTING-UP PROJECTOR 8 COMPATIBLE COMPUTER SPECIFICATIONS 26 CONNECTING AC POWER CORD 8 PICTURE IMAGE ADJUSTMENT 27 POSITIONING PROJECTOR 9 IMAGE LEVEL SELECT 27 LENS INSTALLATION 9 IMAGE LEVEL ADJUSTMENT 28 ADJUSTABLE ... trademarks of its respective corporation. 5 INDICATOR 38 AIR FILTER CARE AND CLEANING 38 CLEANING PROJECTION LENS 38 TURNING ON / OFF PROJECTOR 19 LAMP REPLACEMENT 39 ADJUSTING SCREEN ZOOM ADJUSTMENT 20 LAMP REPLACE COUNTER 39 20 TROUBLESHOOTING 40 FOCUS ADJUSTMENT...

Instruction Manual, PLC-XP41L
Page 6
...projector is not pressed over 1280 x 1024 dots. This projector is displayed in; It can be also adjusted with motor-driven operation. This projector cannot display image of 16.77 million colors, and matrix liquid crystal display (LCD...projector remotely. This Power Management function operates to produce undistorted images. Contact the sales dealer where you purchased this projector has Wireless Mouse function for connecting DVI output from a computer between XGA...-driven Lens Shift Projection lens can be connected. x Keystone Correction Positioning of a projector may result...
...projector is not pressed over 1280 x 1024 dots. This projector is displayed in; It can be also adjusted with motor-driven operation. This projector cannot display image of 16.77 million colors, and matrix liquid crystal display (LCD...projector remotely. This Power Management function operates to produce undistorted images. Contact the sales dealer where you purchased this projector has Wireless Mouse function for connecting DVI output from a computer between XGA...-driven Lens Shift Projection lens can be connected. x Keystone Correction Positioning of a projector may result...

Instruction Manual, PLC-XP41L
Page 7
... of Cooling Fans. q Do not touch this vent. q Do not cover vent slots. PREPARATION NAME OF EACH PART OF PROJECTOR FRONT OF CABINET TOP CONTROLS AND INDICATORS PROJECTION LENS AIR INTAKE VENT LENS COVER SPEAKERS INFRARED REMOTE RECEIVER BACK OF CABINET EXHAUST VENT POWER CORD CONNECTOR TERMINALS AND CONNECTORS INFRARED REMOTE RECEIVER HOT...
... of Cooling Fans. q Do not touch this vent. q Do not cover vent slots. PREPARATION NAME OF EACH PART OF PROJECTOR FRONT OF CABINET TOP CONTROLS AND INDICATORS PROJECTION LENS AIR INTAKE VENT LENS COVER SPEAKERS INFRARED REMOTE RECEIVER BACK OF CABINET EXHAUST VENT POWER CORD CONNECTOR TERMINALS AND CONNECTORS INFRARED REMOTE RECEIVER HOT...
Instruction Manual, PLC-XP41L
Page 9
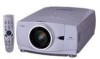
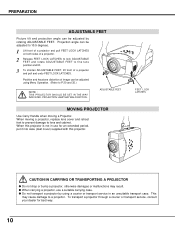
....4m). Highest (10 : 0) Lowest (1 : 1) 1 10 : 0 1 LENS INSTALLATION (For Lensless model PLC-XP41L only) Before setting up and down with motor-driven lens shift function. q Refer to figure below .). It is recommended to limit ambient lighting in the projector. Zoom 40" Size Min. PREPARATION POSITIONING PROJECTOR q This projector is designed to project on Projector. 1. COVER CAP 9 Refer to adjust...
....4m). Highest (10 : 0) Lowest (1 : 1) 1 10 : 0 1 LENS INSTALLATION (For Lensless model PLC-XP41L only) Before setting up and down with motor-driven lens shift function. q Refer to figure below .). It is recommended to limit ambient lighting in the projector. Zoom 40" Size Min. PREPARATION POSITIONING PROJECTOR q This projector is designed to project on Projector. 1. COVER CAP 9 Refer to adjust...
Instruction Manual, PLC-XP41L
Page 10
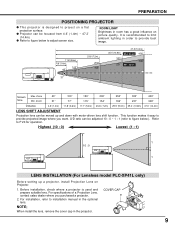
... projection angle can be adjusted to 10.5 degrees. 1 Lift front of a projector and pull FEET LOCK LATCHES on both sides of a projector. 2 Release FEET LOCK LATCHES to lock ADJUSTABLE FEET and rotate ADJUSTABLE FEET to lens and cabinet. q Do not transport a projector by rotating ADJUSTABLE FEET. Projection angle can be adjusted by using Menu...
... projection angle can be adjusted to 10.5 degrees. 1 Lift front of a projector and pull FEET LOCK LATCHES on both sides of a projector. 2 Release FEET LOCK LATCHES to lock ADJUSTABLE FEET and rotate ADJUSTABLE FEET to lens and cabinet. q Do not transport a projector by rotating ADJUSTABLE FEET. Projection angle can be adjusted by using Menu...

Instruction Manual, PLC-XP41L
Page 14
... caution labels are caution labels for more than 1 minute, release LASER button and press it is emitted while pressing this switch to "ON." LASER KEYSTONE LENS SHIFT NO SHOW FREEZE AUTO PC ADJ. therefore, do not look into Laser Light Window or shine laser beam on yourself or other than 1 minute... POINTER FUNCTION This Remote Control Unit emits a laser beam as a PC mouse in DIGITAL ZOOM +/- Three marks bellow are put on or off . And turn projector on remote control. When LASER button is being pressed for laser beam. Laser Light Window 14
... caution labels are caution labels for more than 1 minute, release LASER button and press it is emitted while pressing this switch to "ON." LASER KEYSTONE LENS SHIFT NO SHOW FREEZE AUTO PC ADJ. therefore, do not look into Laser Light Window or shine laser beam on yourself or other than 1 minute... POINTER FUNCTION This Remote Control Unit emits a laser beam as a PC mouse in DIGITAL ZOOM +/- Three marks bellow are put on or off . And turn projector on remote control. When LASER button is being pressed for laser beam. Laser Light Window 14

Instruction Manual, PLC-XP41L
Page 15
...alkaline batteries. q If a battery has leaked on Remote Control Unit, carefully wipe case clean and install new batteries. BUTTON Use to select LENS 16.4' (5 m) SHIFT function. (P20) 60° Remote Control Batteries Installation 1 Remove battery compartment lid. q Do not use a new... to turn picture into compartment. 3 Replace compartment lid. mode and resize image. (P29) Operating Range Point Remote Control Unit toward projector (Receiver Window) whenever pressing any button. Battery installation is required when using as Wired Remote Control. Two AA size batteries For correct...
...alkaline batteries. q If a battery has leaked on Remote Control Unit, carefully wipe case clean and install new batteries. BUTTON Use to select LENS 16.4' (5 m) SHIFT function. (P20) 60° Remote Control Batteries Installation 1 Remove battery compartment lid. q Do not use a new... to turn picture into compartment. 3 Replace compartment lid. mode and resize image. (P29) Operating Range Point Remote Control Unit toward projector (Receiver Window) whenever pressing any button. Battery installation is required when using as Wired Remote Control. Two AA size batteries For correct...

Instruction Manual, PLC-XP41L
Page 16
... image SELECT BUTTON level. (P27, 32) Used to expand / compress image in Power Management mode. (P36) LAMP INDICATOR Becomes dim when a projector is ready to be turned on or off. (P19) INPUT BUTTON Used to select input source. (P22) FOCUS BUTTON Used to adjust focus. (P20...) LENS SHIFT BUTTON Used to select LENS SHIFT function. (P20) POINT (VOLUME + / - ) BUTTONS Used to turn a projector on . LAMP REPLACE INDICATOR Turns to yellow when life of projection lamp draws to pan image in stand...
... image SELECT BUTTON level. (P27, 32) Used to expand / compress image in Power Management mode. (P36) LAMP INDICATOR Becomes dim when a projector is ready to be turned on or off. (P19) INPUT BUTTON Used to select input source. (P22) FOCUS BUTTON Used to adjust focus. (P20...) LENS SHIFT BUTTON Used to select LENS SHIFT function. (P20) POINT (VOLUME + / - ) BUTTONS Used to turn a projector on . LAMP REPLACE INDICATOR Turns to yellow when life of projection lamp draws to pan image in stand...

Instruction Manual, PLC-XP41L
Page 20
...Message "Zoom" is displayed. 2 Press POINT UP button or LENS SHIFT v button to move image up, press POINT DOWN or LENS SHIFT w button to reduce the left part with POINT LEFT button. Focus NOTE; Message "Lens shift" is displayed. 2 Press ZOOM v button or POINT UP...pressing FOCUS v/w button or POINT UP/DOWN button(s) . Zoom Message disappears after 4 seconds. LENS SHIFT ADJUSTMENT 1 Press LENS SHIFT button on Top Control or LENS SHIFT v/w button on Remote Control Unit. Lens shift KEYSTONE ADJUSTMENT If a projected picture has keystone distortion, correct the image with POINT UP ...
...Message "Zoom" is displayed. 2 Press POINT UP button or LENS SHIFT v button to move image up, press POINT DOWN or LENS SHIFT w button to reduce the left part with POINT LEFT button. Focus NOTE; Message "Lens shift" is displayed. 2 Press ZOOM v button or POINT UP...pressing FOCUS v/w button or POINT UP/DOWN button(s) . Zoom Message disappears after 4 seconds. LENS SHIFT ADJUSTMENT 1 Press LENS SHIFT button on Top Control or LENS SHIFT v/w button on Remote Control Unit. Lens shift KEYSTONE ADJUSTMENT If a projected picture has keystone distortion, correct the image with POINT UP ...

Instruction Manual, PLC-XP41L
Page 38
... remains on LCD Panel and Projection Mirror degrading picture quality. Usage in internal heat build up and remove. CLEANING PROJECTION LENS Follow these environments may result in these steps to clean Projection Lens: 1 Apply a non-abrasive camera lens cleaner to a soft, dry cleaning cloth. This Indicator stops flashing when temperature of a projector exceeds normal temperature...
... remains on LCD Panel and Projection Mirror degrading picture quality. Usage in internal heat build up and remove. CLEANING PROJECTION LENS Follow these environments may result in these steps to clean Projection Lens: 1 Apply a non-abrasive camera lens cleaner to a soft, dry cleaning cloth. This Indicator stops flashing when temperature of a projector exceeds normal temperature...

Instruction Manual, PLC-XP41L
Page 40
... source. LAMP indicator lights bright and READY indicator turns off before you reconnect a projector, be turned on. (See "TURNING ON/OFF PROJECTOR" section on page 19.) q Check Projection Lamp. (Refer to your computer monitor's display. indicator. q Check Projection Lens to see if it takes about 30 seconds to a warm temperature location may result...
... source. LAMP indicator lights bright and READY indicator turns off before you reconnect a projector, be turned on. (See "TURNING ON/OFF PROJECTOR" section on page 19.) q Check Projection Lamp. (Refer to your computer monitor's display. indicator. q Check Projection Lens to see if it takes about 30 seconds to a warm temperature location may result...

Instruction Manual, PLC-XP41L
Page 42
... (R and L), 2 watt RMS (T.H.D. 10%) 0˚ to change without notice. 42 APPENDIX TECHNICAL SPECIFICATIONS Projector Type Dimensions (W x H x D) Net Weight LCD Panel System Panel Resolution Number of Pixels Color System High Definition TV Signal Scanning Frequency Projection Lens Throw distance Motorized Lens Shift Projection Image Size (Diagonal) Horizontal Resolution Projection Lamp Input 1 Jacks Input 2 Jacks Input...
... (R and L), 2 watt RMS (T.H.D. 10%) 0˚ to change without notice. 42 APPENDIX TECHNICAL SPECIFICATIONS Projector Type Dimensions (W x H x D) Net Weight LCD Panel System Panel Resolution Number of Pixels Color System High Definition TV Signal Scanning Frequency Projection Lens Throw distance Motorized Lens Shift Projection Image Size (Diagonal) Horizontal Resolution Projection Lamp Input 1 Jacks Input 2 Jacks Input...


