
Instruction Manual, PLC-XT21L
Page 1
Multimedia Projector MODEL PLC-XT25/PLC-XT25L* PLC-XT21/PLC-XT21L* PLC-XT20/PLC-XT20L* PLC-XT25K/PLC-XT20K (*Models without lens.) Owner's Manual
Multimedia Projector MODEL PLC-XT25/PLC-XT25L* PLC-XT21/PLC-XT21L* PLC-XT20/PLC-XT20L* PLC-XT25K/PLC-XT20K (*Models without lens.) Owner's Manual

Instruction Manual, PLC-XT21L
Page 2
...and installed anywhere you to almost all computer output signals quickly (p.38). PIN code lock functions prevents unauthorized use . ◆ Functionally Rich This projector has many useful functions such as a PC wireless mouse. English, German, French, Italian, Spanish, Portuguese, Dutch, Swedish, Russian, Chinese,...10004;Notes: •The On-Screen Menu and figures in this manual may differ slightly from the product. •The contents of this manual are also available. ◆ Simple Computer System Setting The projector has the Multi-scan system to conform to ensure security of ...
...and installed anywhere you to almost all computer output signals quickly (p.38). PIN code lock functions prevents unauthorized use . ◆ Functionally Rich This projector has many useful functions such as a PC wireless mouse. English, German, French, Italian, Spanish, Portuguese, Dutch, Swedish, Russian, Chinese,...10004;Notes: •The On-Screen Menu and figures in this manual may differ slightly from the product. •The contents of this manual are also available. ◆ Simple Computer System Setting The projector has the Multi-scan system to conform to ensure security of ...
Instruction Manual, PLC-XT21L
Page 3
...Remote Control Battery Installation 18 Remote Control Receivers and Operating Range 18 Adjustable Feet 18 Installation 19 Lens Installation 19 Positioning the Projector 20 Moving the Lens 20 Connecting the AC Power Cord 21 Connecting to a Computer (Digital and Analog RGB) 22 Connecting ... 28 Operating with Projector Control 29 Sound Adjustment 30 Operating with Remote Control 31 Input Selection 33 Input 34 Input Source Selection 35 Video System Selection 36 Computer Adjustment 37 Computer System Selection 38 Auto PC Adjustment 39 Manual PC Adjustment 40 ...
...Remote Control Battery Installation 18 Remote Control Receivers and Operating Range 18 Adjustable Feet 18 Installation 19 Lens Installation 19 Positioning the Projector 20 Moving the Lens 20 Connecting the AC Power Cord 21 Connecting to a Computer (Digital and Analog RGB) 22 Connecting ... 28 Operating with Projector Control 29 Sound Adjustment 30 Operating with Remote Control 31 Input Selection 33 Input 34 Input Source Selection 35 Video System Selection 36 Computer Adjustment 37 Computer System Selection 38 Auto PC Adjustment 39 Manual PC Adjustment 40 ...
Instruction Manual, PLC-XT21L
Page 4
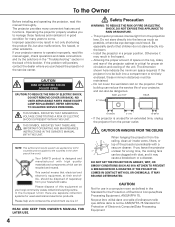
...INDICATES THAT DANGEROUS VOLTAGE CONSTITUTING A RISK OF ELECTRIC SHOCK IS PRESENT WITHIN THIS UNIT. Your SANYO product is unused for many convenient features and functions. If the projector is designed and manufactured with a vacuum cleaner. NOTE: This symbol and recycle system are ...The dimension shown here indicate the minimum space required. If you leave the projector unclean for Protection of the world. To the Owner Before installing and operating the projector, read this manual again, check operations and cable connections and try the solutions in the "...
...INDICATES THAT DANGEROUS VOLTAGE CONSTITUTING A RISK OF ELECTRIC SHOCK IS PRESENT WITHIN THIS UNIT. Your SANYO product is unused for many convenient features and functions. If the projector is designed and manufactured with a vacuum cleaner. NOTE: This symbol and recycle system are ...The dimension shown here indicate the minimum space required. If you leave the projector unclean for Protection of the world. To the Owner Before installing and operating the projector, read this manual again, check operations and cable connections and try the solutions in the "...

Instruction Manual, PLC-XT21L
Page 25
...operations are invalid. •If the correct PIN code number is not entered within three minutes after 30 seconds. Basic Operation Turning On the Projector 1 Complete peripheral connections (with a PIN code, PIN code input dialog box will appear. The POWER indicator lights green. 3 Press the ON...box. If you fixed an incorrect number, use of a four-digit number. Repeat this manual and keep it to correct, and then enter the correct number. What is set to operate the projector. PIN (Personal Identification Number) code is set as instructed below. CAUTION ON HANDLING PIN...
...operations are invalid. •If the correct PIN code number is not entered within three minutes after 30 seconds. Basic Operation Turning On the Projector 1 Complete peripheral connections (with a PIN code, PIN code input dialog box will appear. The POWER indicator lights green. 3 Press the ON...box. If you fixed an incorrect number, use of a four-digit number. Repeat this manual and keep it to correct, and then enter the correct number. What is set to operate the projector. PIN (Personal Identification Number) code is set as instructed below. CAUTION ON HANDLING PIN...

Instruction Manual, PLC-XT21L
Page 27
... Menu SELECT button Menu icon Menu bar Pointer (red frame ) Pointer (red frame ) Press the Point ed buttons to Operate the On-Screen Menu The projector can be adjusted or set via the On-Screen Menu. For each adjustment and setting procedure, refer to the respective sections in the selected menu.... 3 Press the SELECT button to show the item data. Use the Point ed buttons to select an item to select a Menu icon. Quit Exit this manual. 1 Press the MENU button on the top control or the remote control to display the On-Screen Menu. 2 Use the Point 7 8 buttons to in this...
... Menu SELECT button Menu icon Menu bar Pointer (red frame ) Pointer (red frame ) Press the Point ed buttons to Operate the On-Screen Menu The projector can be adjusted or set via the On-Screen Menu. For each adjustment and setting procedure, refer to the respective sections in the selected menu.... 3 Press the SELECT button to show the item data. Use the Point ed buttons to select an item to select a Menu icon. Quit Exit this manual. 1 Press the MENU button on the top control or the remote control to display the On-Screen Menu. 2 Use the Point 7 8 buttons to in this...

Instruction Manual, PLC-XT21L
Page 35
... When the RGB PC (digital) signal is connected. Component* When the component signal is connected. *If the projector cannot reproduce proper video image, select a system manually (see "Video System Selection" on page 36). The projector selects the connection in the following order: Video* 1. Use the Point 7 8 buttons to move the red ... to select the desired signal format and then press the SELECT button. INPUT 2 RGB When the RGB PC signal is connected. *If the projector cannot reproduce proper video image, select a system manually (see "Video System Selection" on page 36).
... When the RGB PC (digital) signal is connected. Component* When the component signal is connected. *If the projector cannot reproduce proper video image, select a system manually (see "Video System Selection" on page 36). The projector selects the connection in the following order: Video* 1. Use the Point 7 8 buttons to move the red ... to select the desired signal format and then press the SELECT button. INPUT 2 RGB When the RGB PC signal is connected. *If the projector cannot reproduce proper video image, select a system manually (see "Video System Selection" on page 36).

Instruction Manual, PLC-XT21L
Page 36
... is displayed. AV System Menu (Video or S-Video) AV System Menu icon The selected system is PAL-M or PAL-N, select the system manually. Component Auto The projector automatically detects an incoming video signal, and adjusts itself to optimize its performance. COMPONENT VIDEO SIGNAL FORMAT If the... the Point ed buttons to move the red arrow pointer to display the On-Screen Menu. PAL/SECAM/NTSC/NTSC4.43/PAL-M/PAL-N If the projector cannot reproduce proper video image, select a specific broadcast signal format from among PAL, SECAM, NTSC, NTSC 4.43, PAL-M, and PAL-N. AV System Menu...
... is displayed. AV System Menu (Video or S-Video) AV System Menu icon The selected system is PAL-M or PAL-N, select the system manually. Component Auto The projector automatically detects an incoming video signal, and adjusts itself to optimize its performance. COMPONENT VIDEO SIGNAL FORMAT If the... the Point ed buttons to move the red arrow pointer to display the On-Screen Menu. PAL/SECAM/NTSC/NTSC4.43/PAL-M/PAL-N If the projector cannot reproduce proper video image, select a specific broadcast signal format from among PAL, SECAM, NTSC, NTSC 4.43, PAL-M, and PAL-N. AV System Menu...
Instruction Manual, PLC-XT21L
Page 38
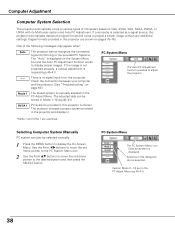
... The adjusted data can be selected manually. 1 Press the MENU button to display the On-Screen Menu. PC System Menu The Auto PC Adjustment function operates to adjust the projector. *Mode 1 and SVGA 1 are shown on pages 75-76.) One of computers based on VGA, SVGA, XGA, SXGA, WXGA, or UXGA with... its Multi-scan system and Auto PC Adjustment. Selecting Computer System Manually PC system can be selected. If the image...
... The adjusted data can be selected manually. 1 Press the MENU button to display the On-Screen Menu. PC System Menu The Auto PC Adjustment function operates to adjust the projector. *Mode 1 and SVGA 1 are shown on pages 75-76.) One of computers based on VGA, SVGA, XGA, SXGA, WXGA, or UXGA with... its Multi-scan system and Auto PC Adjustment. Selecting Computer System Manually PC system can be selected. If the image...

Instruction Manual, PLC-XT21L
Page 39
... 41. ✔Notes: •Fine sync, Total dots, Horizontal and Vertical position of some computers cannot be fully adjusted with this operation, manual adjustments are stored, the setting can be operated when 480i, 575i, 480p, 575p, 720p,1035i, or 1080i is selected in the PC System...icon Move the red frame pointer to your computer. and press the SELECT button. appears while the Auto PC adjustment is in the projector. Computer Adjustment Auto PC Adjustment Auto PC Adjustment function is provided to automatically adjust Fine sync, Total dots, Horizontal and Vertical positions ...
... 41. ✔Notes: •Fine sync, Total dots, Horizontal and Vertical position of some computers cannot be fully adjusted with this operation, manual adjustments are stored, the setting can be operated when 480i, 575i, 480p, 575p, 720p,1035i, or 1080i is selected in the PC System...icon Move the red frame pointer to your computer. and press the SELECT button. appears while the Auto PC adjustment is in the projector. Computer Adjustment Auto PC Adjustment Auto PC Adjustment function is provided to automatically adjust Fine sync, Total dots, Horizontal and Vertical positions ...
Instruction Manual, PLC-XT21L
Page 40
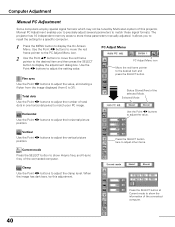
...On-Screen Menu. Selected Mode Use the Point 7 8 buttons to adjust the vertical picture position. and V-sync freq. Computer Adjustment Manual PC Adjustment Some computers employ special signal formats which may not be tuned by Multi-scan system of this adjustment. Vertical Use the ...Point 7 8 buttons to adjust the value. The projector has 10 independent memory areas to match those parameters manually adjusted. Fine sync Use the Point 7 8 buttons to adjust the value, eliminating a flicker from the image displayed...
...On-Screen Menu. Selected Mode Use the Point 7 8 buttons to adjust the vertical picture position. and V-sync freq. Computer Adjustment Manual PC Adjustment Some computers employ special signal formats which may not be tuned by Multi-scan system of this adjustment. Vertical Use the ...Point 7 8 buttons to adjust the value. The projector has 10 independent memory areas to match those parameters manually adjusted. Fine sync Use the Point 7 8 buttons to adjust the value, eliminating a flicker from the image displayed...
Instruction Manual, PLC-XT21L
Page 66
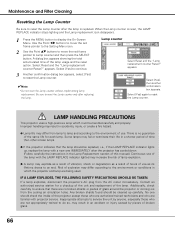
... total accumulated time of broken glass. 66 Lamp counter Select Reset and the "Lamp replacement counter Reset?" Risk of the lamp with projector service. IF A LAMP EXPLODES, THE FOLLOWING SAFETY PRECAUTIONS SHOULD BE TAKEN. Additionally, check carefully to ensure that the lamp should check...Yes] to Lamp counter and then press the SELECT button. No one IMMEDIATELY after the projector has cooled down. (Follow carefully the instructions in the Lamp Replacement section of this manual.) Continuous use of explosion may differ according to the environment or conditions in an accident or...
... total accumulated time of broken glass. 66 Lamp counter Select Reset and the "Lamp replacement counter Reset?" Risk of the lamp with projector service. IF A LAMP EXPLODES, THE FOLLOWING SAFETY PRECAUTIONS SHOULD BE TAKEN. Additionally, check carefully to ensure that the lamp should check...Yes] to Lamp counter and then press the SELECT button. No one IMMEDIATELY after the projector has cooled down. (Follow carefully the instructions in the Lamp Replacement section of this manual.) Continuous use of explosion may differ according to the environment or conditions in an accident or...
Instruction Manual, PLC-XT21L
Page 69
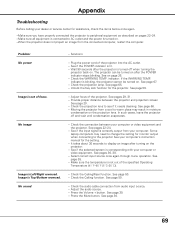
... signal is correctly output from a cool to warm place may need to change the setting for monitor output when connecting to the projector See your computer's instruction manual for the projector. See if the selected system is Left/Right reversed. See page 50. - See page 50. - indicator. See pages 29, 31. - See pages...
... signal is correctly output from a cool to warm place may need to change the setting for monitor output when connecting to the projector See your computer's instruction manual for the projector. See if the selected system is Left/Right reversed. See page 50. - See page 50. - indicator. See pages 29, 31. - See pages...

Instruction Manual, PLC-XT21L
Page 78
Appendix Accessories Owner's Manual (CD-ROM) Quick Reference Guide AC Power Cord Remote Control and Batteries VGA Cable USB Cable Lens Cap (for PLC-XT25/XT25K/XT21/XT20/XT20K) Lens Mount Cover (for PLC-XT25L/XT21LXT20L) PIN Code Label ● The specifications are subject to change without notice. ● LCD panels are effective, a tiny fraction...
Appendix Accessories Owner's Manual (CD-ROM) Quick Reference Guide AC Power Cord Remote Control and Batteries VGA Cable USB Cable Lens Cap (for PLC-XT25/XT25K/XT21/XT20/XT20K) Lens Mount Cover (for PLC-XT25L/XT21LXT20L) PIN Code Label ● The specifications are subject to change without notice. ● LCD panels are effective, a tiny fraction...

Instruction Manual, PLC-XT21L
Page 81
... Code Lock No. If you forgot or lost the number and unable to operate the projector, contact the service station. Factory default set No: 4 3 2 1* *Should the four-digit number be invalid. While the projector is locked with a PIN code. 81 PIN Code Lock No. Put the label below... and keep it is locked with the PIN code... Appendix PIN Code Number Memo Write down the PIN code number in the column below (supplied) on in a prominent place of the projector's body while it with this manual...
... Code Lock No. If you forgot or lost the number and unable to operate the projector, contact the service station. Factory default set No: 4 3 2 1* *Should the four-digit number be invalid. While the projector is locked with a PIN code. 81 PIN Code Lock No. Put the label below... and keep it is locked with the PIN code... Appendix PIN Code Number Memo Write down the PIN code number in the column below (supplied) on in a prominent place of the projector's body while it with this manual...


