
Owner's Manual
Page 2
... Latino Americano vaya a: http://www.schwinnfitness.com. Table of Contents Important Safety Instructions 3 User Setup 13 Specifications 5 Workout Programs 14 Features 6 Pausing or Stopping 16 Console 7 Console Setup Mode 16 Remote Heart Rate Monitor 9 Maintenance 17 Operations 11 Troubleshooting 19 Adjustments 11 Quick Start/Manual Program 12 Manuel du Propriétaire...
... Latino Americano vaya a: http://www.schwinnfitness.com. Table of Contents Important Safety Instructions 3 User Setup 13 Specifications 5 Workout Programs 14 Features 6 Pausing or Stopping 16 Console 7 Console Setup Mode 16 Remote Heart Rate Monitor 9 Maintenance 17 Operations 11 Troubleshooting 19 Adjustments 11 Quick Start/Manual Program 12 Manuel du Propriétaire...
Owner's Manual
Page 6
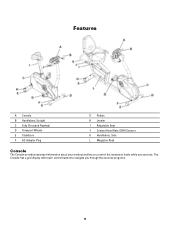
Features A Console B Handlebars, Upright C Fully Shrouded Flywheel D Transport Wheels E Stabilizers F AC Adapter Plug G Pedals H Leveler I Adjustable Seat J Contact Heart Rate (CHR) Sensors K Handlebars, Side L Magazine Rack Console The Console provides important information about your workout and lets you control the resistance levels while you through the exercise programs. 6 The Console has a grid display with touch control buttons to navigate you exercise.
Features A Console B Handlebars, Upright C Fully Shrouded Flywheel D Transport Wheels E Stabilizers F AC Adapter Plug G Pedals H Leveler I Adjustable Seat J Contact Heart Rate (CHR) Sensors K Handlebars, Side L Magazine Rack Console The Console provides important information about your workout and lets you control the resistance levels while you through the exercise programs. 6 The Console has a grid display with touch control buttons to navigate you exercise.

Owner's Manual
Page 7
... resistance level) F QUICK START button - Cycles through your workout measurements (during the workout), results, user setup data and console diagnostics. 7 Starts user data edit mode LCD The multi-function, backlit LCD shows your workout variables for manual control of the...each. Reads heart rate signal from heart rate chest strap C STOP/RESET button - Console Features A Backlit LCD Display B Telemetric Heart Rate - Starts a Program workout, confirms information , or resumes a paused workout I Schwinn Advantage™ - Increases a value (age, time, distance, calories, or workout...
... resistance level) F QUICK START button - Cycles through your workout measurements (during the workout), results, user setup data and console diagnostics. 7 Starts user data edit mode LCD The multi-function, backlit LCD shows your workout variables for manual control of the...each. Reads heart rate signal from heart rate chest strap C STOP/RESET button - Console Features A Backlit LCD Display B Telemetric Heart Rate - Starts a Program workout, confirms information , or resumes a paused workout I Schwinn Advantage™ - Increases a value (age, time, distance, calories, or workout...

Owner's Manual
Page 8
... the total time count for the workout, then the time count for that you are producing at the preset value and counts down to the "Console Setup Mode" section in the workout. The flashing column shows your current interval. Watt/Level The WATT/LEVEL display field shows the power that interval...
... the total time count for the workout, then the time count for that you are producing at the preset value and counts down to the "Console Setup Mode" section in the workout. The flashing column shows your current interval. Watt/Level The WATT/LEVEL display field shows the power that interval...
Owner's Manual
Page 9
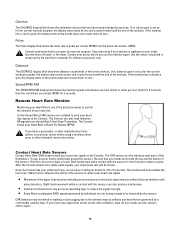
...of the upper body muscles (including arms) produces an electrical signal (muscle artifact) that can interfere with the sensors for 10 to the Console. The Console can also produce interference. • Calluses and hand lotion may be limited to walking or slow jogging due to zero. Hold firm,... chest strap or other telemetric heart rate monitor. Contact Heart Rate (CHR) sensors are the stainless steel parts of the sensors. The Console will be detected by the sensors. If no calorie goal is set up for the current workout program, the display value starts at ...
...of the upper body muscles (including arms) produces an electrical signal (muscle artifact) that can interfere with the sensors for 10 to the Console. The Console can also produce interference. • Calluses and hand lotion may be limited to walking or slow jogging due to zero. Hold firm,... chest strap or other telemetric heart rate monitor. Contact Heart Rate (CHR) sensors are the stainless steel parts of the sensors. The Console will be detected by the sensors. If no calorie goal is set up for the current workout program, the display value starts at ...

Owner's Manual
Page 11
... in your doctor before you feel faint. Stop exercising if you adjust the seat. • Upright bike-pull the adjustment knob on the recumbent bike. Try to work out even when you to , or away from the console, loosen the knob. Seat Adjustment Correct seat placement encourages exercise efficiency and comfort, while reducing the...
... in your doctor before you feel faint. Stop exercising if you adjust the seat. • Upright bike-pull the adjustment knob on the recumbent bike. Try to work out even when you to , or away from the console, loosen the knob. Seat Adjustment Correct seat placement encourages exercise efficiency and comfort, while reducing the...

Owner's Manual
Page 12
... be left in position for the other foot. Rotate the Pedals until one of pedaling the machine. Repeat for subsequent workouts. Carefully move the console tilt to start a workout without entering any button is 3. The time will automatically shut off while in Sleep Mode. Push STOP when done ...with straps provide secure footing to look at 12 Use the Increase/Decrease buttons to the exercise bike. 1. Fasten the strap over the shoe. 4. Tighten the knob. Note: The Console does not have the knob on the top or the side of each foot on the machine. 2. Adjust...
... be left in position for the other foot. Rotate the Pedals until one of pedaling the machine. Repeat for subsequent workouts. Carefully move the console tilt to start a workout without entering any button is 3. The time will automatically shut off while in Sleep Mode. Push STOP when done ...with straps provide secure footing to look at 12 Use the Increase/Decrease buttons to the exercise bike. 1. Fasten the strap over the shoe. 4. Tighten the knob. Note: The Console does not have the knob on the top or the side of each foot on the machine. 2. Adjust...
Owner's Manual
Page 13
Schwinn Advantage™ The Schwinn® 40 Series console lets you track your fitness progress and edit data. Name - Total distance 5. Total calories 6. Note: ADD USER and GUEST USER are the only options if no setup data stored. In the ADD USER option, push START/ENTER 2 times and the console display...Push START/ENTER make your workout data, refer to the Program Menu without user setup data. If you want to save your selection. The Schwinn Advantage™ feature automatically records your User profile, and lets you store and use , the ADD USER option will not be available. 2....
Schwinn Advantage™ The Schwinn® 40 Series console lets you track your fitness progress and edit data. Name - Total distance 5. Total calories 6. Note: ADD USER and GUEST USER are the only options if no setup data stored. In the ADD USER option, push START/ENTER 2 times and the console display...Push START/ENTER make your workout data, refer to the Program Menu without user setup data. If you want to save your selection. The Schwinn Advantage™ feature automatically records your User profile, and lets you store and use , the ADD USER option will not be available. 2....
Owner's Manual
Page 14
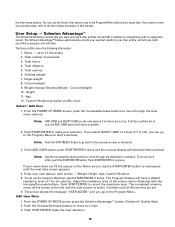
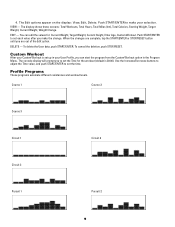
... the Program Menu. You can start the program from the Custom Workout option in your User Profile, you are out of the Edit option. The console display will prompt you make your Custom Workout is 30:00). DELETE - To delete the User data, push START/ENTER. The Edit options appear on...
... the Program Menu. You can start the program from the Custom Workout option in your User Profile, you are out of the Edit option. The console display will prompt you make your Custom Workout is 30:00). DELETE - To delete the User data, push START/ENTER. The Edit options appear on...

Owner's Manual
Page 15
...your workout: 1. Consult a physician before you to your previous scores and not other user setup information to set up your workout. The console display then gives prompts for your heart rate reaches the "Test Zone." Enter the distance with the Increase/Decrease buttons (default is 25...Fitness Scores to record your workout. Push START/ENTER. 15 Set the Time for your answers. Set the percentage of the 3 minutes, the Console measures your heart rate in a workout program. Fitness Test The Fitness Test measures the improvements of power at a given heart rate. These ...
...your workout: 1. Consult a physician before you to your previous scores and not other user setup information to set up your workout. The console display then gives prompts for your heart rate reaches the "Test Zone." Enter the distance with the Increase/Decrease buttons (default is 25...Fitness Scores to record your workout. Push START/ENTER. 15 Set the Time for your answers. Set the percentage of the 3 minutes, the Console measures your heart rate in a workout program. Fitness Test The Fitness Test measures the improvements of power at a given heart rate. These ...

Owner's Manual
Page 16
... display, and stop the workout. Push Increase/Decrease to count up from 00:00. Push START/ENTER to change between ENGLISH and METRIC units. 5. Console Setup Mode The Console Setup Mode lets you are working out. 1. Push the Increase/Decrease buttons to set . 4. "5" = maximum intensity, "1" = minimum). 7. Push Increase/...cool down the LOCK/SCAN button and Increase button together for 3 seconds while in the POWER-UP MODE to change between ELLIPTICAL and BIKE. 3. Note: Push STOP/RESET for 4 seconds: TIME, MILES (KM), CALORIES, CAL/HR, AVG/MPH (KMH), AVG PWR, AVG/HR, MAX...
... display, and stop the workout. Push Increase/Decrease to count up from 00:00. Push START/ENTER to change between ENGLISH and METRIC units. 5. Console Setup Mode The Console Setup Mode lets you are working out. 1. Push the Increase/Decrease buttons to set . 4. "5" = maximum intensity, "1" = minimum). 7. Push Increase/...cool down the LOCK/SCAN button and Increase button together for 3 seconds while in the POWER-UP MODE to change between ELLIPTICAL and BIKE. 3. Note: Push STOP/RESET for 4 seconds: TIME, MILES (KM), CALORIES, CAL/HR, AVG/MPH (KMH), AVG PWR, AVG/HR, MAX...

Owner's Manual
Page 17
...is responsible to ease operation. Daily Monthly Weekly Before each workout, use , examine the exercise machine for smooth seat slider, handlebar slider, and console tilt operation. If you would like additional information, please refer to our Web site at the first sign of wear or damage. After each ...use a damp cloth to wipe your machine and Console free of silicone lube to make sure that regular maintenance is provided in this machine. If needed, sparingly apply a thin coating of sweat. ...
...is responsible to ease operation. Daily Monthly Weekly Before each workout, use , examine the exercise machine for smooth seat slider, handlebar slider, and console tilt operation. If you would like additional information, please refer to our Web site at the first sign of wear or damage. After each ...use a damp cloth to wipe your machine and Console free of silicone lube to make sure that regular maintenance is provided in this machine. If needed, sparingly apply a thin coating of sweat. ...

Owner's Manual
Page 19
... interference is cracked or otherwise damaged. Check data cable integrity All wires in cable should be raised to each side. Console Display If Console only has partial display and all connections are visibly crimped or cut, replace cable. Unit operates but Telemetric (if equipped...or connection at medical or some larger fitness stores. Check connection at Console Insure cable is connected securely and oriented properly. Unit operates but Contact HR not displayed HR cable connection at front (recumbent) or Connection should line up and snap into a functioning wall ...
... interference is cracked or otherwise damaged. Check data cable integrity All wires in cable should be raised to each side. Console Display If Console only has partial display and all connections are visibly crimped or cut, replace cable. Unit operates but Telemetric (if equipped...or connection at medical or some larger fitness stores. Check connection at Console Insure cable is connected securely and oriented properly. Unit operates but Contact HR not displayed HR cable connection at front (recumbent) or Connection should line up and snap into a functioning wall ...

Owner's Manual
Page 20
...Insure cable is connected securely and oriented properly. Reconnect to replace flywheel). Small latch on connector should line up , press "reset". After Console powers up and snap into place. All wires in cable should be intact. If any damage to compensate for 3 minutes. Unplug unit ...cable integrity Check data cable connections/orientation Unit rocks/does not sit level Reset Machine (if equipped with magnet and connected to level bike. If any are cut or crimped, replace cable. If tests reveal no magnet is connected securely and oriented properly. RPM sensor...
...Insure cable is connected securely and oriented properly. Reconnect to replace flywheel). Small latch on connector should line up , press "reset". After Console powers up and snap into place. All wires in cable should be intact. If any damage to compensate for 3 minutes. Unplug unit ...cable integrity Check data cable connections/orientation Unit rocks/does not sit level Reset Machine (if equipped with magnet and connected to level bike. If any are cut or crimped, replace cable. If tests reveal no magnet is connected securely and oriented properly. RPM sensor...

Assembly Manual
Page 5
Included 5mm Tools Not Included Hardware ABC D E F G H Item A B C D E F G Qty Description 4 M8 x 16 Hex Screw 8 M8 x 45 Button Head Hex Screw 1 M7 x 30 Hex Bolt 17 M8 x 16 Button Head Hex Screw (9 pre-installed) 1 M8 x 85 Hex Bolt 1 M8 x 85 Carriage Bolt 1 Lock Washer I J K M N Item H I J K Qty Description 1 Narrow Washer 23 Flat Washer (9 pre-installed) 4 Arc Washer 1 M8 Lock Nut L - not used M 1 Console Adjustment Knob N 4 Cover 5
Included 5mm Tools Not Included Hardware ABC D E F G H Item A B C D E F G Qty Description 4 M8 x 16 Hex Screw 8 M8 x 45 Button Head Hex Screw 1 M7 x 30 Hex Bolt 17 M8 x 16 Button Head Hex Screw (9 pre-installed) 1 M8 x 85 Hex Bolt 1 M8 x 85 Carriage Bolt 1 Lock Washer I J K M N Item H I J K Qty Description 1 Narrow Washer 23 Flat Washer (9 pre-installed) 4 Arc Washer 1 M8 Lock Nut L - not used M 1 Console Adjustment Knob N 4 Cover 5

Assembly Manual
Page 6
not used 9 1 Handlebar Bracket 10 1 Seat Rail Bracket Item Qty Description 11 1 Seat Back 12 1 Seat Bottom 13 1 Seat Rail 14 1 Console Mast 15 1 Power Cord 16 1 Left Pedal 17 1 Right Pedal 18 1 Upright Handlebar 19 1 Side Handlebar 6 Parts 1 3 4 5 6 2 18 17 16 19 15 7 9 10 11 12 13 14 Item Qty Description 1 1 Rear Stabilizer 2 1 Front Stabilizer 3 1 Seat Frame 4 1 Main Frame 5 1 Console 6 1 Console Bracket 7 1 Water Bottle Holder 8 -
not used 9 1 Handlebar Bracket 10 1 Seat Rail Bracket Item Qty Description 11 1 Seat Back 12 1 Seat Bottom 13 1 Seat Rail 14 1 Console Mast 15 1 Power Cord 16 1 Left Pedal 17 1 Right Pedal 18 1 Upright Handlebar 19 1 Side Handlebar 6 Parts 1 3 4 5 6 2 18 17 16 19 15 7 9 10 11 12 13 14 Item Qty Description 1 1 Rear Stabilizer 2 1 Front Stabilizer 3 1 Seat Frame 4 1 Main Frame 5 1 Console 6 1 Console Bracket 7 1 Water Bottle Holder 8 -

Assembly Manual
Page 15
9. Attach Console Mast to Frame Assembly NOTICE: Do not crimp Console Cables. 14 X4 J D 15
9. Attach Console Mast to Frame Assembly NOTICE: Do not crimp Console Cables. 14 X4 J D 15

Assembly Manual
Page 16
10. Attach Upright Handlebar to Console Mast 18 H G C 9 16
10. Attach Upright Handlebar to Console Mast 18 H G C 9 16

Assembly Manual
Page 17
Attach Console Bracket to Console Mast NOTICE: Do not crimp Console Cables. 17 11.
Attach Console Bracket to Console Mast NOTICE: Do not crimp Console Cables. 17 11.

Assembly Manual
Page 18
Connect Console Cables to Console 18 12.
Connect Console Cables to Console 18 12.


