
Instructions for use
Page 1
CoDEmCT fort calls DW Pro1/Pro2 Instruction manual
CoDEmCT fort calls DW Pro1/Pro2 Instruction manual
Instructions for use
Page 2
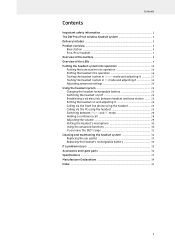
Contents Contents Important safety information 2 The DW Pro1/Pro2 wireless headset system 4 Delivery includes ...5 Product overview ...6 Base station ...6 Pro1/Pro2 headset 7 Overview of the buttons 8 Overview of the LEDs ...9 Putting the headset system into operation 10 Putting the base station into operation 10 Putting the ...
Contents Contents Important safety information 2 The DW Pro1/Pro2 wireless headset system 4 Delivery includes ...5 Product overview ...6 Base station ...6 Pro1/Pro2 headset 7 Overview of the buttons 8 Overview of the LEDs ...9 Putting the headset system into operation 10 Putting the base station into operation 10 Putting the ...
Instructions for use
Page 3
... The DW series headsets contain magnets that no metal objects (e.g. only operated within the permissible temperature range, * The DW series comprises the following products: DW Office, DW Office USB, DW Pro1/ Pro2, DW Pro1/Pro2 USB.... However, there is - Never try to completely disconnect the product from the wall socket - Keep the DW series headsets at all users at least 1.2" (3 cm) from cardiac pacemakers or implanted defibrillators! • Protect your hearing from high volume levels. • Only use the power supply units supplied by Sennheiser...
... The DW series headsets contain magnets that no metal objects (e.g. only operated within the permissible temperature range, * The DW series comprises the following products: DW Office, DW Office USB, DW Pro1/ Pro2, DW Pro1/Pro2 USB.... However, there is - Never try to completely disconnect the product from the wall socket - Keep the DW series headsets at all users at least 1.2" (3 cm) from cardiac pacemakers or implanted defibrillators! • Protect your hearing from high volume levels. • Only use the power supply units supplied by Sennheiser...

Instructions for use
Page 4
...heat hazard, • a fire hazard, • an explosion hazard, • a smoke or gas hazard. "Improper use attachments/accessories specified by Sennheiser Communications (see "Accessories" on page 2, • using the product other than as described in a cool and dry place at ambient temperatures between +5&#...176;F to +45°C/+113 °F. In extreme cases, rechargeable batteries may leak. Please understand that Sennheiser Communications does not accept liability for about one hour). Store in this instruction manual. Return defective devices or devices with an appropriate...
...heat hazard, • a fire hazard, • an explosion hazard, • a smoke or gas hazard. "Improper use attachments/accessories specified by Sennheiser Communications (see "Accessories" on page 2, • using the product other than as described in a cool and dry place at ambient temperatures between +5&#...176;F to +45°C/+113 °F. In extreme cases, rechargeable batteries may leak. Please understand that Sennheiser Communications does not accept liability for about one hour). Store in this instruction manual. Return defective devices or devices with an appropriate...
Instructions for use
Page 5
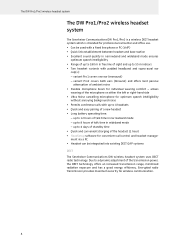
...8226; Two headset variants with padded headband and supra-aural ear cup(s): - The DW Pro1/Pro2 wireless headset system The DW Pro1/Pro2 wireless headset system The Sennheiser Communications DW Pro1/Pro2 is a wireless DECT headset system which is intended for professional call center and office ...call control and headset management via a PC • Headset can be integrated into existing DECT GAP systems DECT The Sennheiser Communications DW wireless headset system uses DECT radio technology. Encrypted radio transmission provides maximum security for individual wearing comfort - variant Pro1...
...8226; Two headset variants with padded headband and supra-aural ear cup(s): - The DW Pro1/Pro2 wireless headset system The DW Pro1/Pro2 wireless headset system The Sennheiser Communications DW Pro1/Pro2 is a wireless DECT headset system which is intended for professional call center and office ...call control and headset management via a PC • Headset can be integrated into existing DECT GAP systems DECT The Sennheiser Communications DW wireless headset system uses DECT radio technology. Encrypted radio transmission provides maximum security for individual wearing comfort - variant Pro1...
Instructions for use
Page 6
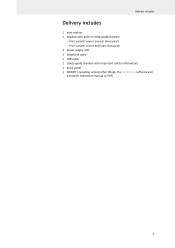
Pro2 variant: covers both ears (binaural) 1 power supply unit 1 telephone cable 1 USB cable 1 safety guide (booklet with built-in rechargeable battery: - Delivery includes Delivery includes 1 base station 1 headset with important safety information) 1 quick guide 1 CD ROM (including, among other things, the HeadSetup software and a detailed instruction manual as PDF) 5 Pro1 variant: covers one ear (monaural) -
Pro2 variant: covers both ears (binaural) 1 power supply unit 1 telephone cable 1 USB cable 1 safety guide (booklet with built-in rechargeable battery: - Delivery includes Delivery includes 1 base station 1 headset with important safety information) 1 quick guide 1 CD ROM (including, among other things, the HeadSetup software and a detailed instruction manual as PDF) 5 Pro1 variant: covers one ear (monaural) -
Instructions for use
Page 7
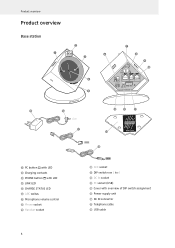
Product overview Product overview Base station ³ · ² » ¿ ´ ¶ º ¾ µ ƺ ƻ Ƹ¹ ¸ Ƽ ƹ ƽ ³ PC button with LED · Charging contacts » PHONE button with LED ¿ LINK LED ´ CHARGE STATUS LED ² ABC switch ¶ Microphone volume control º Phone socket ¾ Handset socket µ ACC socket ¸ DIP switch row 1 to 6 ¹ DC IN socket Ƹ PC socket (USB) ƹ Cover with overview of DIP switch assignment ƺ Power supply unit ƻ DC IN connector Ƽ ...
Product overview Product overview Base station ³ · ² » ¿ ´ ¶ º ¾ µ ƺ ƻ Ƹ¹ ¸ Ƽ ƹ ƽ ³ PC button with LED · Charging contacts » PHONE button with LED ¿ LINK LED ´ CHARGE STATUS LED ² ABC switch ¶ Microphone volume control º Phone socket ¾ Handset socket µ ACC socket ¸ DIP switch row 1 to 6 ¹ DC IN socket Ƹ PC socket (USB) ƹ Cover with overview of DIP switch assignment ƺ Power supply unit ƻ DC IN connector Ƽ ...
Instructions for use
Page 8
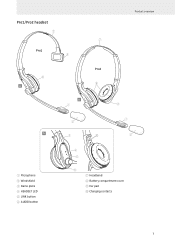
Pro1/Pro2 headset 7 7 Pro1 8 Product overview 9 A Pro2 9 A 1 8 2 A 3 0 1 2 ቢ Microphone ባ Windshield ቤ Name plate ብ HEADSET LED ቦ LINK button ቧ AUDIO button 4 5 6 ቨ Headband ቩ Battery compartment cover ቪ Ear pad ቫ Charging contacts 7
Pro1/Pro2 headset 7 7 Pro1 8 Product overview 9 A Pro2 9 A 1 8 2 A 3 0 1 2 ቢ Microphone ባ Windshield ቤ Name plate ብ HEADSET LED ቦ LINK button ቧ AUDIO button 4 5 6 ቨ Headband ቩ Battery compartment cover ቪ Ear pad ቫ Charging contacts 7
Instructions for use
Page 9
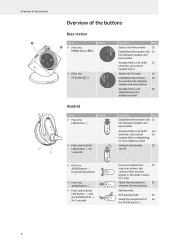
Overview of the buttons Overview of the buttons Base station ³ Action Button Functions Page » ̈ Press the Selects the Phone mode 25 PHONE button » Establishes/disconnects the 23 link between headset and base station Accepts/ends a call (with 25 electronic call control/ handset lifter) ̈ Press the PC button ³ Selects the PC mode 26 Establishes/disconnects 23 the wireless link between headset and base station Accepts/ends a call 26 (depending on the softphone used) 5 6 Headset Action ̈ Press the LINK button ቦ Button ̈ Press ...
Overview of the buttons Overview of the buttons Base station ³ Action Button Functions Page » ̈ Press the Selects the Phone mode 25 PHONE button » Establishes/disconnects the 23 link between headset and base station Accepts/ends a call (with 25 electronic call control/ handset lifter) ̈ Press the PC button ³ Selects the PC mode 26 Establishes/disconnects 23 the wireless link between headset and base station Accepts/ends a call 26 (depending on the softphone used) 5 6 Headset Action ̈ Press the LINK button ቦ Button ̈ Press ...

Instructions for use
Page 10
You have to the base station 9 Headset LED HEADSET ብ lights up red flashes red is off Meaning PC mode Incoming PC call Meaning Phone mode Incoming telephone call Meaning Active link to the headset No link to the headset Headset is muted Standby mode Base station is switched off (not powered) CHARGE STATUS LED ´ LED segment* Battery charge 1 0-25% 2 25-50% 3 50-75% 4 75-100% Required charging time approx. 10 min approx. 10 min approx. 20 min total: approx. 60 min approx. 20 min * during charging, each segment gets brighter in 5 steps When the LED segment 1 ...
You have to the base station 9 Headset LED HEADSET ብ lights up red flashes red is off Meaning PC mode Incoming PC call Meaning Phone mode Incoming telephone call Meaning Active link to the headset No link to the headset Headset is muted Standby mode Base station is switched off (not powered) CHARGE STATUS LED ´ LED segment* Battery charge 1 0-25% 2 25-50% 3 50-75% 4 75-100% Required charging time approx. 10 min approx. 10 min approx. 20 min total: approx. 60 min approx. 20 min * during charging, each segment gets brighter in 5 steps When the LED segment 1 ...
Instructions for use
Page 11
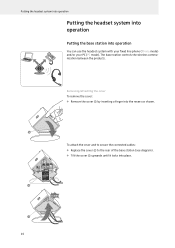
The base station controls the wireless communication between the products. ƹ ƹ ƹ 10 Removing/attaching the cover To remove the cover: ̈ Remove the cover ƹ by inserting a finger into place. To attach the cover and to secure the connected cables: ̈ Replace the cover ƹ to the rear of the base station (see diagram). ̈ Tilt the cover ƹ upwards until it locks into the recess as shown. Putting the headset system into operation Putting the headset system into operation Putting the base station into operation You can use the headset system with your ...
The base station controls the wireless communication between the products. ƹ ƹ ƹ 10 Removing/attaching the cover To remove the cover: ̈ Remove the cover ƹ by inserting a finger into place. To attach the cover and to secure the connected cables: ̈ Replace the cover ƹ to the rear of the base station (see diagram). ̈ Tilt the cover ƹ upwards until it locks into the recess as shown. Putting the headset system into operation Putting the headset system into operation Putting the base station into operation You can use the headset system with your ...
Instructions for use
Page 12
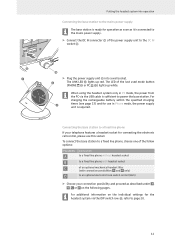
To connect the base station to a fixed line phone, choose one of the follow options: Possibility A B C D Connection to a fixed line phone without headset socket to a fixed line phone with headset socket of an optional mechanical handset lifter (with connection possibilities A and B only) to an optional electronic hook switch control (EHS) ̈ Choose your telephone features a headset socket for connecting the electronic call control, please use in PC mode, the power from the PC via the DIP switch row ¸, refer to power the base station. For additional information on...
To connect the base station to a fixed line phone, choose one of the follow options: Possibility A B C D Connection to a fixed line phone without headset socket to a fixed line phone with headset socket of an optional mechanical handset lifter (with connection possibilities A and B only) to an optional electronic hook switch control (EHS) ̈ Choose your telephone features a headset socket for connecting the electronic call control, please use in PC mode, the power from the PC via the DIP switch row ¸, refer to power the base station. For additional information on...
Instructions for use
Page 13
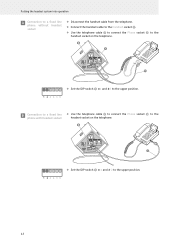
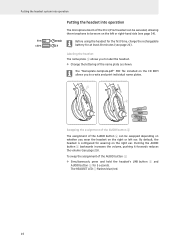
Putting the headset system into operation A Connection to a fixed line phone without headset socket ̈ Disconnect the handset cable from the telephone. ̈ Connect the handset cable to the Handset socket ¾. ̈ Use the telephone cable Ƽ to connect the Phone socket º to the handset socket on the telephone. º Ƽ ̈ Set the DIP switch ¸ # 1 and # 2 to the upper position. B Connection to a fixed line ̈ Use the telephone cable Ƽ to connect the Phone socket º to the phone with headset socket headset socket on the telephone. º...
Putting the headset system into operation A Connection to a fixed line phone without headset socket ̈ Disconnect the handset cable from the telephone. ̈ Connect the handset cable to the Handset socket ¾. ̈ Use the telephone cable Ƽ to connect the Phone socket º to the handset socket on the telephone. º Ƽ ̈ Set the DIP switch ¸ # 1 and # 2 to the upper position. B Connection to a fixed line ̈ Use the telephone cable Ƽ to connect the Phone socket º to the phone with headset socket headset socket on the telephone. º...
Instructions for use
Page 14
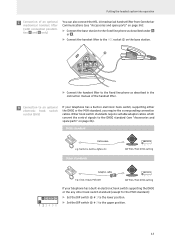
...C Connection of an optional mechanical handset lifter (with connection possibilities A and B only) You can also connect the HSL 10 mechanical handset lifter from Sennheiser Communications (see "Accessories and spare parts" on the base station. µ ̈ Connect the handset lifter to the upper position. 13 D Connection... either the DHSG or the MSH standard, you require the corresponding connection cables. DHSG standard DHSG cable e.g. Cisco, Avaya, Polycom DW Pro1/Pro2 DHSG setting If your telephone has a built-in the instruction manual of the handset lifter. Other standards...
...C Connection of an optional mechanical handset lifter (with connection possibilities A and B only) You can also connect the HSL 10 mechanical handset lifter from Sennheiser Communications (see "Accessories and spare parts" on the base station. µ ̈ Connect the handset lifter to the upper position. 13 D Connection... either the DHSG or the MSH standard, you require the corresponding connection cables. DHSG standard DHSG cable e.g. Cisco, Avaya, Polycom DW Pro1/Pro2 DHSG setting If your telephone has a built-in the instruction manual of the handset lifter. Other standards...

Instructions for use
Page 15
Alcatel DW Pro1/Pro2 MSH setting If your telephone has a built-in order to use it for Internet telephone (VoIP) with softphones or multimedia applications. ̈ Use the USB ... lower position. Setting up the base station ̈ Place the base station at www.senncom.com/headsetselector. The operating system detects the USB audio device "Sennheiser DECT" and installs the necessary drivers. ƽ Ƹ 14 Connecting the base station to a PC You can connect the headset system to a PC in electronic...
Alcatel DW Pro1/Pro2 MSH setting If your telephone has a built-in order to use it for Internet telephone (VoIP) with softphones or multimedia applications. ̈ Use the USB ... lower position. Setting up the base station ̈ Place the base station at www.senncom.com/headsetselector. The operating system detects the USB audio device "Sennheiser DECT" and installs the necessary drivers. ƽ Ƹ 14 Connecting the base station to a PC You can connect the headset system to a PC in electronic...

Instructions for use
Page 16
Specifications (version 2.2) File size approx. 20 MB Supported operating systems Microsoft Windows 2000 Microsoft Windows XP Microsoft Windows Vista Microsoft Windows 7 Supports the call control functions of the following softphones AOL Instant Messenger Avaya IP Softphone 4.0x - 5.0x - 6.0x Avaya One-X Communicator Cisco IP Communicator Version 2.0 - 2.1 IBM Lotus Sametime Connect Skype To install the HeadSetup software: ̈ Run the "HeadSetup USB version X.X.exe" file in the Help section of the software. Putting the headset system into operation Installing the HeadSetup ...
Specifications (version 2.2) File size approx. 20 MB Supported operating systems Microsoft Windows 2000 Microsoft Windows XP Microsoft Windows Vista Microsoft Windows 7 Supports the call control functions of the following softphones AOL Instant Messenger Avaya IP Softphone 4.0x - 5.0x - 6.0x Avaya One-X Communicator Cisco IP Communicator Version 2.0 - 2.1 IBM Lotus Sametime Connect Skype To install the HeadSetup software: ̈ Run the "HeadSetup USB version X.X.exe" file in the Help section of the software. Putting the headset system into operation Installing the HeadSetup ...
Instructions for use
Page 17
... reduces the volume (see page 22). Putting the headset system into operation 50% 100% Putting the headset into operation The microphone boom of the Pro1/Pro2 headset can be swiveled, allowing the microphone to create and print individual name plates. 3 3 Swapping the assignment of the AUDIO button ቧ The assignment of...
... reduces the volume (see page 22). Putting the headset system into operation 50% 100% Putting the headset into operation The microphone boom of the Pro1/Pro2 headset can be swiveled, allowing the microphone to create and print individual name plates. 3 3 Swapping the assignment of the AUDIO button ቧ The assignment of...

Instructions for use
Page 18
The system is correctly connected if you can hear you at a comfortable level. Putting the headset system into operation ̈ Push the AUDIO button ቧ in the direction in Phone mode and adjusting it Testing the telephone connection When PC mode is selected (the LED of the PHONE button » lights up white. ̈ Press either the LINK button ቦ on the headset or the PHONE button » on the base station. If the other party can hear a clear dial tone and if the other party cannot hear you well, adjust the microphone sensitivity (see page 18). The headset switches to...
The system is correctly connected if you can hear you at a comfortable level. Putting the headset system into operation ̈ Push the AUDIO button ቧ in the direction in Phone mode and adjusting it Testing the telephone connection When PC mode is selected (the LED of the PHONE button » lights up white. ̈ Press either the LINK button ቦ on the headset or the PHONE button » on the base station. If the other party can hear a clear dial tone and if the other party cannot hear you well, adjust the microphone sensitivity (see page 18). The headset switches to...
Instructions for use
Page 19
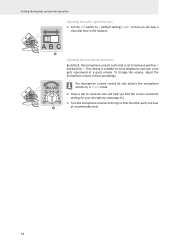
This setting is set to someone who will help you can hear a clear dial tone in Phone mode. ̈ Make a call to between position 4 and position 5. The microphone volume control ¶ only adjusts the microphone sensitivity in the headset. ² Adjusting the microphone sensitivity By default, the microphone volume control ¶ is suitable for your voice gets reproduced at a comfortable level. 18 Putting the headset system into operation Adjusting the audio signal/dial tone ̈ Set the ABC switch to A (default setting), B or C so that you find the correct sensitivity ...
This setting is set to someone who will help you can hear a clear dial tone in Phone mode. ̈ Make a call to between position 4 and position 5. The microphone volume control ¶ only adjusts the microphone sensitivity in the headset. ² Adjusting the microphone sensitivity By default, the microphone volume control ¶ is suitable for your voice gets reproduced at a comfortable level. 18 Putting the headset system into operation Adjusting the audio signal/dial tone ̈ Set the ABC switch to A (default setting), B or C so that you find the correct sensitivity ...

Instructions for use
Page 20
Adjusting the microphone sensitivity ̈ Depending on the operating system used, adjust the microphone sensitivity so that the other party can hear you at a comfortable level. The base station is established between the headset and the base station, the LINK LED ¿ lights up blue and the HEADSET LED ብ flashes blue. ³ ¿ 4 5 ̈ Use your operating system). A wireless link is set to PC mode and the LED of the PC button ³ lights up white): ̈ Press the PC button ³ on the base station. If possible, activate this function in PC mode and ...
Adjusting the microphone sensitivity ̈ Depending on the operating system used, adjust the microphone sensitivity so that the other party can hear you at a comfortable level. The base station is established between the headset and the base station, the LINK LED ¿ lights up blue and the HEADSET LED ብ flashes blue. ³ ¿ 4 5 ̈ Use your operating system). A wireless link is set to PC mode and the LED of the PC button ³ lights up white): ̈ Press the PC button ³ on the base station. If possible, activate this function in PC mode and ...