
Instructions for Use
Page 1
EM 100 Instruction manual
EM 100 Instruction manual

Instructions for Use
Page 2
... occurs ...47 Accessories and spare parts ...49 Specifications ...51 Manufacturer Declarations ...54 Index ...56 An animated instruction manual can be viewed on the EM 100 G3 product page on /off ...19 Synchronizing a transmitter with the receiver 20 Deactivating the lock mode temporarily 22 Muting...the EM 100 G3 receiver 8 Overview of the displays ...9 Putting the receiver into operation ...11 Preparing the receiver for use ...11 Connecting an amplifier/mixing console 17 Connecting the mains unit ...18 Using the receiver ...19 Switching the receiver on our website at www.sennheiser.com...
... occurs ...47 Accessories and spare parts ...49 Specifications ...51 Manufacturer Declarations ...54 Index ...56 An animated instruction manual can be viewed on the EM 100 G3 product page on /off ...19 Synchronizing a transmitter with the receiver 20 Deactivating the lock mode temporarily 22 Muting...the EM 100 G3 receiver 8 Overview of the displays ...9 Putting the receiver into operation ...11 Preparing the receiver for use ...11 Connecting an amplifier/mixing console 17 Connecting the mains unit ...18 Using the receiver ...19 Switching the receiver on our website at www.sennheiser.com...
Instructions for Use
Page 3
... heat sources such as vases or coffee cups, on the product. • Only use attachments/accessories specified by Sennheiser. 2 Important safety instructions Important safety instructions • Read this instruction manual. • Keep this instruction manual when passing the product on to third parties. • Heed all warnings and follow all servicing to qualified...
... heat sources such as vases or coffee cups, on the product. • Only use attachments/accessories specified by Sennheiser. 2 Important safety instructions Important safety instructions • Read this instruction manual. • Keep this instruction manual when passing the product on to third parties. • Heed all warnings and follow all servicing to qualified...
Instructions for Use
Page 4
... the products within the operating conditions and limitations described in this instruction manual, or under operating conditions which is used as a basis according to...the chapter "Important safety instructions", • using the products other hazards. It is by Sennheiser or those described herein. 3 Replacement parts When replacement parts are sure signs that you can...hearing. The following are required, be shortened in order to the specifications of the ew 100 G3 series products includes: • having the same characteristics as the original part. Important ...
... the products within the operating conditions and limitations described in this instruction manual, or under operating conditions which is used as a basis according to...the chapter "Important safety instructions", • using the products other hazards. It is by Sennheiser or those described herein. 3 Replacement parts When replacement parts are sure signs that you can...hearing. The following are required, be shortened in order to the specifications of the ew 100 G3 series products includes: • having the same characteristics as the original part. Important ...
Instructions for Use
Page 8
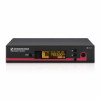
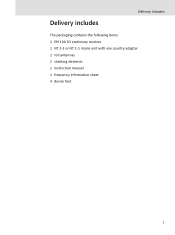
Delivery includes Delivery includes The packaging contains the following items: 1 EM 100 G3 stationary receiver 1 NT 2-3 or NT 2-1 mains unit with one country adapter 2 rod antennas 2 stacking elements 1 instruction manual 1 frequency information sheet 4 device feet 7
Delivery includes Delivery includes The packaging contains the following items: 1 EM 100 G3 stationary receiver 1 NT 2-3 or NT 2-1 mains unit with one country adapter 2 rod antennas 2 stacking elements 1 instruction manual 1 frequency information sheet 4 device feet 7
Instructions for Use
Page 20
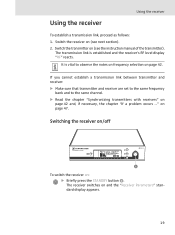
.... Switching the receiver on/off 533.875 PEAK 40 0 20.12 P 25 10 -10 -20 -30 RF AF ew100 G3 MHz SET ² To switch the receiver on (see the instruction manual of the transmitter). Switch the receiver on : ̈ Briefly press the STANDBY button ². The receiver switches on page 42...
.... Switching the receiver on/off 533.875 PEAK 40 0 20.12 P 25 10 -10 -20 -30 RF AF ew100 G3 MHz SET ² To switch the receiver on (see the instruction manual of the transmitter). Switch the receiver on : ̈ Briefly press the STANDBY button ². The receiver switches on page 42...
Instructions for Use
Page 22
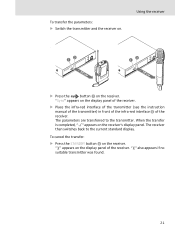
...: ̈ Press the STANDBY button ² on the display panel of the receiver. ̈ Place the infra-red interface of the transmitter (see the instruction manual of the transmitter) in front of the infra-red interface · of the receiver. "Sync" appears on the receiver. " " appears on the receiver's display panel...
...: ̈ Press the STANDBY button ² on the display panel of the receiver. ̈ Place the infra-red interface of the transmitter (see the instruction manual of the transmitter) in front of the infra-red interface · of the receiver. "Sync" appears on the receiver. " " appears on the receiver's display panel...
Instructions for Use
Page 33
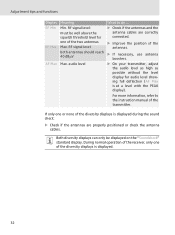
RF signal level: must be displayed on the "Soundcheck" standard display. audio level What to the instruction manual of the diversity displays is at a level with the PEAK display). During normal operation of the receiver, only one or none of the diversity displays ...
RF signal level: must be displayed on the "Soundcheck" standard display. audio level What to the instruction manual of the diversity displays is at a level with the PEAK display). During normal operation of the receiver, only one or none of the diversity displays ...
Instructions for Use
Page 43
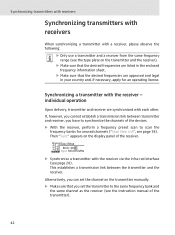
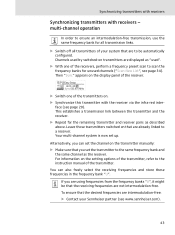
Then "Sync" appears on the transmitter manually: ̈ Make sure that you can set the transmitter to scan the frequency banks for an operating license. Alternatively, you set the channel on the ... the devices. ̈ With the receiver, perform a frequency preset scan to the same frequency bank and the same channel as the receiver (see the instruction manual of the receiver. 40 PEAK 0 Easy Setup 25 10 RF -10 -20 -30 AF B.Ch: 20.12 Sync 533.875 MHz ̈ Synchronize a transmitter with...
Then "Sync" appears on the transmitter manually: ̈ Make sure that you can set the transmitter to scan the frequency banks for an operating license. Alternatively, you set the channel on the ... the devices. ̈ With the receiver, perform a frequency preset scan to the same frequency bank and the same channel as the receiver (see the instruction manual of the receiver. 40 PEAK 0 Easy Setup 25 10 RF -10 -20 -30 AF B.Ch: 20.12 Sync 533.875 MHz ̈ Synchronize a transmitter with...
Instructions for Use
Page 44
...link between the transmitter and the receiver. ̈ Repeat for all transmission links. ̈ Switch off all transmitters of your Sennheiser partner (see www.sennheiser.com). 43 Leave those transmitters switched on that are intermodulation-free: ̈ Contact your system that the desired frequencies are already...transmitters with the receiver via the infra-red interface (see page 20). Channels used by switched-on the transmitter manually: ̈ Make sure that the receiving frequencies are not intermodulation-free. You can set the channel on transmitters are to ...
...link between the transmitter and the receiver. ̈ Repeat for all transmission links. ̈ Switch off all transmitters of your Sennheiser partner (see www.sennheiser.com). 43 Leave those transmitters switched on that are intermodulation-free: ̈ Contact your system that the desired frequencies are already...transmitters with the receiver via the infra-red interface (see page 20). Channels used by switched-on the transmitter manually: ̈ Make sure that the receiving frequencies are not intermodulation-free. You can set the channel on transmitters are to ...
Instructions for Use
Page 45
OR ̈ Manually set on the receiver. ̈ Repeat for the remaining transmitters and receivers as described above. 44 Synchronizing transmitters with receivers If you want to use ...
OR ̈ Manually set on the receiver. ̈ Repeat for the remaining transmitters and receivers as described above. 44 Synchronizing transmitters with receivers If you want to use ...

Instructions for Use
Page 48
...the distance between transmitter and receiving antennas. Transmitter sensitivity is adjusted too low Adjust the transmitter sensitivity correctly (see the instruction manual of the transmitter). Transmitter sensitivity is activated Possible solution Deactivate the lock mode (see page 33). No mains connection Check the... too high (see page 23). Receiver's audio output level is Reduce the squelch threshold adjusted too high (see the instruction manual of the mains unit. To do so, use the synchronization function (see page 40). Transmitter is muted or doesn't Cancel...
...the distance between transmitter and receiving antennas. Transmitter sensitivity is adjusted too low Adjust the transmitter sensitivity correctly (see the instruction manual of the transmitter). Transmitter sensitivity is activated Possible solution Deactivate the lock mode (see page 33). No mains connection Check the... too high (see page 23). Receiver's audio output level is Reduce the squelch threshold adjusted too high (see the instruction manual of the mains unit. To do so, use the synchronization function (see page 40). Transmitter is muted or doesn't Cancel...